ENGLISH OWNER’S MANUAL DIGITAL SIGNAGE MEDIA PLAYER Please read this manual carefully before operating your set and retain it for future reference. DIGITAL SIGNAGE MEDIA PLAYER NC1000 NC2000 www.lgsupersign.com www.LGsolutions.
CONTENTS NC1000 Specifications................................................................................................................. 4 General Specifications................................................................................................................. 4 Multi I/O Port................................................................................................................................ 4 Operational Specifications.........................................................
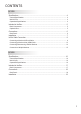
NC1000 Specifications Attention NC1000 General Specifications ● Product specifications may change without prior notice to improve performance. Dimensions 250 mm (W) x 220 mm (H) x 45 mm (D) (only Set) Weight 1.321 kg (only Set) CPU Intel ATOM Processor 330 1.
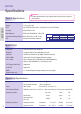
NC1000 Included in the Box Basic Components The NC1000 with the following components. Please check that these components have been included prior to installation. NC1000 NC1000 User Manual / Cards Box Guide Power Cable RS-232C Cable Rail x 2 Handle x 2 (for attachment of handle) M3, L8 x 8 M3, L12 x 4 (for attachment of Box Guide on the monitor) Attention ● These illustrations may differ from your product and are subject to change.
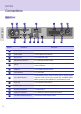
NC1000 Connections Back Panel D C B F G M E E NC1000 A H Number 6 I J K E L Connection Description A Power Cable In For the power cable. B Power Switch Provides power to the NC1000. C RS-232C Out For the RS-232C cable. D USB Wireless Modem In For a USB-type wireless modem. E USB In For USB-type devices, including memory, hard disk, CD-ROM, keyboard, and mouse. F HDMI Out For an HDMI-compatible monitor. G LAN Connector For a LAN cable.
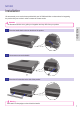
NC1000 Installation We recommend you to use the items provided with your NC1000 and follow our instructions for integrating the product with your monitor in order to ensure the correct results. Attention The illustrations shown are to guide your integration and may differ from your product. Place the handle into the slots on the side of the product. 2 Use screws to secure the handle. 3 Place the rail in the slots on the side of the product.
NC1000 As shown below, use screws to secure the Box Guide in the four slots at the back of the monitor. 5 Attach the Box Guide to the rail slots, and press it upward. 6 Use screws to secure the player and the Box Guide as shown below.
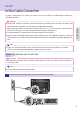
NC1000 In/Out Cable Connection In order to watch video on a monitor, you need to use a D-sub cable or an HDMI cable to connect the NC1000 to a monitor. Attention NC1000 ● D-sub, HDMI, LINE-OUT, OPTICAL, and LAN cables are not included with the NC1000. If the cables were not provided with your monitor, you may need to purchase them separately. ● After all required cables are connected, configure SET ID to 1 for the first monitor connected to the NC1000.
NC1000 In/Out Cable Connection Connect the D-sub port of NC1000 and RGB-IN port of the monitor with a D-sub cable. 3 Connect NC1000 (OUT) to the monitor (IN) with an RS-232C cable.
NC1000 In/Out Cable Connection Connect the NC1000 to the monitor with a LINE-OUT cable. 5 Connect a LAN cable to the NC1000.
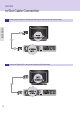
NC1000 In/Out Cable Connection Connecting a Monitor with an HDMI Cable HDMI connections allow digital video and audio signals to be transferred with one cable. HDMI cable connections do not require an additional audio in cable. NC1000 Note 12 ● In and Out signals are not differentiated when using HDMI cables. Attention ● The monitor to connect with NC1000 should have the HDMI in for the HDMI connection.
NC1000 In/Out Cable Connection Connect NC1000 (OUT) to the monitor (IN) with an RS-232C cable. 4 Connect a LAN cable to NC1000.
NC1000 Connecting/Disconnecting HDMI in Windows Connecting HDMI NC1000 Move to the desktop of the monitor connected to the NC1000. 1 Click the button in the lower left of the screen. 2 Select Start > Control Panel > Sounds and Audio Devices > Audio. 3 Select Play Sounds > NVIDIA High Definition Audio from the list and click OK. Disconnecting HDMI Move to the desktop of the monitor connected to the NC1000. 1 Click the button in the lower left of the screen.
NC1000 Connection to Multiple Monitors Each NC1000 can accommodate up to 25 monitors for video playback. (SET ID: 1 to 25) Connect the NC1000's D-sub OUT to the D-sub IN of the first monitor, which has SET ID = 1. 2 Connect other monitors with D-sub cables as shown below (IN/OUT separated). 3 Connect the NC1000's RS-232C OUT to the RS-232C IN of the first monitor, which has SET ID = 1. 4 Connect other monitors with RS-232C cables as shown below (IN/OUT separated).
NC2000 Specifications Attention NC2000 General Specifications ● Product specifications may change without prior notice to improve performance. Dimensions 99.8 mm (W) x 183.3 mm (H) x 28.4 mm (D) (only Set) Weight 0.215 kg (only Set) CPU Intel ATOM Processor 330 1.
NC2000 Included in the Box Basic Components The NC2000 consists of the following components. Please check that these components have been included prior to installation. NC2000 NC2000 User Manual / Cards screw x 2 Attention ● These illustrations may differ from your product and are subject to change.
NC2000 Connections Back Panel B D C C NC2000 A Number 18 Connection Description A HDMI Out For an HDMI-compatible monitor. B LAN Connector For a LAN cable. C USB In For USB-type devices, including memory, hard disk, CD-ROM, keyboard, and mouse. D PCI MINI EXPRESS Card Slot Provided for PCI Mini Express Cards.
NC2000 Installation We recommend you to use the items provided with your NC2000 and follow our instructions for integrating the product with your monitor in order to ensure the correct results. Attention The illustrations shown are to guide your integration and may differ from your product. Remove the screw and Metal cover. 2 Attach the Box Guide to the rail slots, and press it upward. NC2000 1 Note If card does not become fully inserted into the insertion direction.
Make sure to read the Important Precautions before using the product. Keep the User’s Guide(CD) in an accessible place for furture reference. The model and serial number of the SET is located on the back and one side of the SET. Record it below should you ever need service. MODEL SERIAL WARNING - This is a class A product. In a domestic environment this product may cause radio interference in which case the user may be required to take adequate measures.