ENGLISH OWNER’S MANUAL DIGITAL SIGNAGE MEDIA PLAYER Please read this manual carefully before operating your set and retain it for future reference. DIGITAL SIGNAGE MEDIA PLAYER NC1000 NC2000 www.lgsupersign.com www.LGsolutions.
CONTENTS NC1000 Specifications............................................4 General Specifications................................... 4 Multi I/O Port.................................................. 4 Operational Specifications............................. 4 Included in the Box....................................5 Basic Components......................................... 5 Optional Items................................................ 5 Connections..............................................
Changing Layouts........................................ 55 Changing Templates..................................... 56 Using the Library.......................................... 57 Creating Contents........................................ 60 Using Clip Art............................................... 69 Setting the Timeline . ................................... 72 Distributing Completed Content................... 74 Content Properties/Tool................................ 78 Schedule.....................
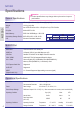
NC1000 Specifications Attention NC1000 General Specifications ● Product specifications may change without prior notice to improve performance. Dimensions 250 mm (W) x 220 mm (H) x 45 mm (D) (only Set) Weight 1.321 kg (only Set) CPU Intel ATOM Processor 330 1.
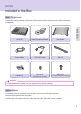
NC1000 Included in the Box Basic Components The NC1000 with the following components. Please check that these components have been included prior to installation. NC1000 NC1000 Setup Program/User Manual Box Guide Power Cable RS-232C Cable Rail x 2 Handle x 2 (for attachment of handle) M3, L8 x 8 M3, L12 x 4 (for attachment of Box Guide on the monitor) Attention ● These illustrations may differ from your product and are subject to change.
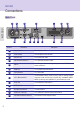
NC1000 Connections Back Panel D C B F G M E E NC1000 A H Number 6 I J K E L Connection Description A Power Cable In For the power cable. B Power Switch Provides power to the NC1000. C RS-232C Out For the RS-232C cable. D USB Wireless Modem In For a USB-type wireless modem. E USB In For USB-type devices, including memory, hard disk, CD-ROM, keyboard, and mouse. F HDMI Out For an HDMI-compatible monitor. G LAN Connector For a LAN cable.
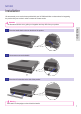
NC1000 Installation We recommend you to use the items provided with your NC1000 and follow our instructions for integrating the product with your monitor in order to ensure the correct results. Attention The illustrations shown are to guide your integration and may differ from your product. Place the handle into the slots on the side of the product. 2 Use screws to secure the handle. 3 Place the rail in the slots on the side of the product.
NC1000 As shown below, use screws to secure the Box Guide in the four slots at the back of the monitor. 5 Attach the Box Guide to the rail slots, and press it upward. 6 Use screws to secure the player and the Box Guide as shown below.
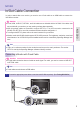
NC1000 In/Out Cable Connection In order to watch video on a monitor, you need to use a D-sub cable or an HDMI cable to connect the NC1000 to a monitor. Attention NC1000 ● D-sub, HDMI, LINE-OUT, OPTICAL, and LAN cables are not included with the NC1000. If the cables were not provided with your monitor, you may need to purchase them separately. ● After all required cables are connected, configure SET ID to 1 for the first monitor connected to the NC1000.
NC1000 In/Out Cable Connection Connect the D-sub port of NC1000 and RGB-IN port of the monitor with a D-sub cable. 3 Connect NC1000 (OUT) to the monitor (IN) with an RS-232C cable.
NC1000 In/Out Cable Connection Connect the NC1000 to the monitor with a LINE-OUT cable. 5 Connect a LAN cable to the NC1000.
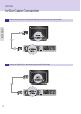
NC1000 In/Out Cable Connection Connecting a Monitor with an HDMI Cable HDMI connections allow digital video and audio signals to be transferred with one cable. HDMI cable connections do not require an additional audio in cable. NC1000 Note 12 ● In and Out signals are not differentiated when using HDMI cables. Attention ● The monitor to connect with NC1000 should have the HDMI in for the HDMI connection.
NC1000 In/Out Cable Connection Connect NC1000 (OUT) to the monitor (IN) with an RS-232C cable. 4 Connect a LAN cable to NC1000.
NC1000 Connecting/Disconnecting HDMI in Windows Connecting HDMI NC1000 Move to the desktop of the monitor connected to the NC1000. 1 Click the button in the lower left of the screen. 2 Select Start > Control Panel > Sounds and Audio Devices > Audio. 3 Select Play Sounds > NVIDIA High Definition Audio from the list and click OK. Disconnecting HDMI Move to the desktop of the monitor connected to the NC1000. 1 Click the button in the lower left of the screen.
NC1000 NC1000 Installation Confirmation Connect the NC1000 to the monitor as described on the previous pages and turn the monitor and the NC1000 on. When the monitor is on, the SuperSign Player home screen will appear as shown here. Each NC1000 can accommodate up to 25 monitors for video playback. (SET ID: 1 to 25) 1 Connect the NC1000's D-sub OUT to the D-sub IN of the first monitor, which has SET ID = 1. 2 Connect other monitors with D-sub cables as shown below (IN/OUT separated).
NC2000 Specifications Attention NC2000 General Specifications ● Product specifications may change without prior notice to improve performance. Dimensions 99.8 mm (W) x 183.3 mm (H) x 28.4 mm (D) (only Set) Weight 0.215 kg (only Set) CPU Intel ATOM Processor 330 1.
NC2000 Included in the Box Basic Components The NC2000 consists of the following components. Please check that these components have been included prior to installation. NC2000 NC2000 Setup Program/User Manual screw x 2 Attention ● These illustrations may differ from your product and are subject to change.
NC2000 Connections Back Panel B D C C NC2000 A Number 18 Connection Description A HDMI Out For an HDMI-compatible monitor. B LAN Connector For a LAN cable. C USB In For USB-type devices, including memory, hard disk, CD-ROM, keyboard, and mouse. D PCI MINI EXPRESS Card Slot Provided for PCI Mini Express Cards.
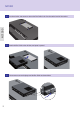
NC2000 Installation We recommend you to use the items provided with your NC2000 and follow our instructions for integrating the product with your monitor in order to ensure the correct results. Attention The illustrations shown are to guide your integration and may differ from your product. Remove the screw and Metal cover. 2 Attach the Box Guide to the rail slots, and press it upward.
SuperSign Solution What is SuperSign? SuperSign is a digital signage solution developed exclusively by LG Electronics. The comprehensive LG SuperSign solution offers displays, media player (hardware and software), and management programs. Component LG Display Media Player LG SuperSign Solution Software Note ● Digital Signage Solution is a network-based digital signage communication program.
SuperSign Solution How to Install SuperSign Solution Via LAN/Internet Network NC1000/NC2000-integrated monitors can be connected via LAN or the Internet. Note ● With SuperSign Player, each display can play different content at the same time. Via RS-232C Cable (NC1000 Only) One NC1000-integrated monitor (with SET ID = 1) can accommodate multiple monitors. Note ● Because only one SuperSign Player is attached, the connected monitors can play the same video only.
SuperSign Player What is SuperSign Player? SuperSign Player is the software portion of NC1000/NC2000, the LG Digital Signage Media Player, designed to play digital signage content. SuperSign Player can play media files such as video, images, audio, Flash files, and documents transferred from the SuperSign Manager. Attention ● The SuperSign Player is pre-installed on the NC1000/NC2000. Start the NC1000/NC2000 and check that SuperSign Player is installed.
SuperSign Player SuperSign Player Settings The SuperSign Player can be customized for multiple users. Log-in to the Setting Menu 1 To use SuperSign Player setting menu, right click on the SuperSign Player ( Windows taskbar. Its pop-up menu will appear as shown below. ) icon located on the 2 Click Setup to display the password entry screen. The SuperSign Player's default password is set to "0000".
SuperSign Player Network Settings You can set the player IP (the IP of the NC1000/NC2000 in which SuperSign Player software is installed) and the server IP (the IP of the PC on which the SuperSign Manager software is installed) in Network Settings. Player Name Setting You can change the player name you specified before. ● Enter a new name for the player in the field. ● Click the Save button the save the settings.
SuperSign Player Player IP Setting The Player IP setting is for the NC1000/NC2000 IP settings. It is set to Dynamic IP by default. ● With Dynamic IP enabled, the IP will be automatically generated. ● With Static IP, you can assign a specific IP for NC1000/ NC2000 by yourself. ● Enter the IP address of your choice and click Save. Server IP Setting In the Server IP settings, you can set the IP of the PC (server) on which SuperSign Manager is installed. It is set to Auto setting by default.
SuperSign Player Wizard Setting The SuperSign solution now provides SuperSign Wizard setting that guides you through the necessary steps to configure the network settings on your SuperSign Player and SuperSign Manager. Attention ● Before continuing with the Wizard setting, please make sure that you already have a SuperSign Manager installed on your server. If not, the wizard may not setup network connections correctly.
SuperSign Player Follow the steps below to setup network connections by using the Wizard. 1 Select the network environment that you want to use to connect to SuperSign Manager and SuperSign Player. ● Choose LAN when the SuperSign Manger and the SuperSign player are connected to the same network. ● Choose WAN when the SuperSign Manger and the SuperSign player are connected to different networks.
SuperSign Player 2 Enter a name for SuperSign Player. The SuperSign Manager will use these names to identify the connected players. 3 Select a network interface card that will be used for network connections. 4 Set SuperSign Player IP address. The Player's IP address can be assigned automatically or manually. ● Choose Dynamic IP when you want the Wizard to automatically set the IP settings. ● Choose Static IP when you want to assign the IP address yourself.
SuperSign Player 5 Set the IP address for the server on which SuperSign Manager is installed. The server's IP address can be assigned automatically or manually. ● Choose the Auto setting when you want the Wizard to automatically assign the IP address to the server. ● Choose the Manual Setting when you want to assign the IP address yourself. 6 A connection will be made if the player is connected with a network cable properly.
SuperSign Player Screen In the Screen Setting menu, you can choose the screen view type. The type is set to Landscape 0 by default. ● Select Landscape when you position the monitor horizontally. ● Select Portrait when you position the monitor vertically.
SuperSign Player Password In Password menu, you can set a password to access the SuperSign Player Menus. Password You can choose whether you want to use a password when entering the SuperSign Player Menu. ● If you select Enable, you must type in your password to use the SuperSign Player Menu. ● If you select Disable, you can use the SuperSign Player Menu without entering your password. Change You can change the password required for the SuperSign Player Menu. The password should be a four-digit number.
SuperSign Player EWF In the EWF menu, you can select whether you want to use the Enhanced Write Filter feature of Microsoft Windows Embedded Standard. ● EWF protects against viruses that can destroy the product's file system. ● With EWF Enabled, you cannot add, delete, or modify data saved on the C drive of the NC1000/NC2000. ● When you need to add a new program to the NC1000/ NC2000, Disable EWF. ● With EWF enabled, new programs cannot be installed. ● To apply the change to EWF, restart your system.
SuperSign Player Initialize S/W The Initialize S/W menu allows you to initialize the SuperSign Player settings. When you click on the menu, an alert window will be displayed as shown below. When you click Yes, the SuperSign Player settings will return to the same conditions that existed at the time of your purchase. Attention ● Even after you initialize the software, the network settings will not be reset.
SuperSign Player Info. Displays the status of the installed SuperSign Player. ● Version info.: Displays the version of the installed SuperSign Player. ● Network status: Displays the network connection status. ● Content Info.: Displays the file name of the content being played.
SuperSign Player USB AutoPlay If you connect a USB storage device to SuperSign Player, the list of the content files stored in the USB device will be automatically displayed. The selected content file can either be played or saved in SuperSign Player's hard disk for playback. If the USB playback list is not displayed automatically, press the blue button on the remote control or press the F12 on the keyboard to display the content list.
SuperSign Player Language Options and Regional Settings Language Options and Regional Settings If you want to change the language, you can use Regional and Language Options of Microsoft Windows Embedded Standard, the NC1000/NC2000's operating system. To Change the Language: 1 Disable EWF in SuperSign Player Menu. 2 In Windows, select Start > Control Panel > Regional and Language Options. 3 Choose the language you want to use as shown below. 4 Re-install the SuperSign Player with the new language.
SuperSign Player SuperSign Player Functions Signage Mode (Video Playback Mode) SuperSign Player runs automatically when booting NC1000/2000. Then SuperSign Player automatically plays its schedule. Signage mode is for playing pre-distributed videos based on the assigned schedule. The Signage mode screen is shown below. Note ● When SuperSign Player is restarted, ad content is automatically played according to the last transferred schedule. See SuperSign Manager Schedule for details.
SuperSign Player Tray Icon Description If you click the ESC key in signage mode while videos are playing, the video will pause and move to the desktop. The SuperSign Player tray icon shows the server connectivity status as shown below. SuperSign Player Tray Icon Description SuperSign Player is being installed. SuperSign Player is being uninstalled. SuperSign Player is connected to the server on which SuperSign Manager is installed.
SuperSign Player Tray Icon Menu Right-click the SuperSign Player tray icon in the lower right of the desktop to display the tray menu. Menu About the Description program The program information including SuperSign Player software version is shown here. SuperSign Mode You can play content based on the SuperSign Player's schedule. Setup Go to the SuperSign Player Setup Menu. Close Exit SuperSign Player.
SuperSign Manager What is SuperSign Manager ? Product Information SuperSign Manager is a network-based comprehensive management program that creates and manages digital media, distributes content, and supports video playback and remote control. A Index 40 Item B C Description A Content Edit You can create content for the SuperSign Player with a variety of media files.
SuperSign Manager How to Install SuperSign Manager SuperSign Manager is supplied with the NC1000/NC2000. Insert the CD included with the NC1000/NC2000 into your PC and install SuperSign Manager. System Requirements SuperSign Manager PC Recommended Specifications Accessories Requirements CPU 2.
SuperSign Manager Installing the Program When the CD provided with the NC1000/NC2000 is inserted into a PC, the installation program will run automatically as shown below. A A SuperSign Program Installation Installation is initiated by clicking SuperSign Manager. Note ● If the installation program does not run automatically, open the window manually by double clicking the file SupersignMgr_setup.exe in the CD-ROM drive: ₩SuperSign₩SuperSign_ Software₩Application₩SuperSign_Manager₩directory of the CD.
SuperSign Manager Installing SuperSign Manager When the CD provided with the set is inserted into a PC, the installation program will run automatically. Follow the steps below to install the SuperSign Manager. 1 Click Run in the Download file pop-up window. 2 Click Run in the Security Warning pop-up window. 3 Select the language and then click OK to continue. 4 After reviewing the installation instruction, click Next to continue.
SuperSign Manager 44 5 If necessary, change the installation path to the directory where you want to install SuperSign Manager. Click Next to continue. 6 Installation is initiated. Click Details to see the detailed installation process information during installation. 7 During the installation process, Adobe AIR installer will run. Click Agree to install Adobe AIR. You must install Adobe AIR to use SuperSign Manager properly. 8 Click Complete to finish the installation of Adobe AIR.
SuperSign Manager 9 Adobe Flash Player Active X installation is initiated. 10 Click DONE when the installation of Adobe Flash Player Active X ends. 11 After SuperSign Manager installation is complete, click Finish to exit the installation. Note ● When you re-install the program without uninstalling it, you can preserve the data or initialize the system. ● If you use Windows 7, you should log on as an administrator. Otherwise, you cannot install the program.
SuperSign Manager Uninstalling the Program To uninstall SuperSign Manager, Click Start > Program > SuperSign Manager > Uninstall SuperSign Manager. Follow these steps to uninstall SuperSign Manager. 46 1 Click Uninstall to start the un-installation of SuperSign Manager. 2 Click Details to see the detailed un-installation process information during un-installation.
SuperSign Manager 3 After SuperSign Manager un-installation is complete, click Finish to exit the un-installation. Note ● SuperSign Manager can be uninstalled by using Add or Remove Programs in Control Panel. 1. Windows XP, Windows 2003 Server Select SuperSign Manager in Start > Settings > Control Panel > Add or Remove Programs, click Remove. 2. Windows 7 Select SuperSign Manager in Start > Settings > Control Panel > Programs > Uninstall or change a program, click Remove.
SuperSign Manager Starting SuperSign Manager Starting SuperSign Manager Open the program by clicking Start > Programs > SuperSign Manager > SuperSign Manager. Logging In 1 When SuperSign Manager starts, a log-in window appears as shown below. 2 If you start SuperSign Manager for the first time, you need to enter a user ID and password of your choice. Click OK to log into SuperSign Manager.
SuperSign Manager Setting the Canvas When you start SuperSign Manager for the first time, the
SuperSign Manager Customizing the Canvas You can customize the properties of the canvas, such as the orientation and resolution of the canvas. The following shows the steps to set the properties of the canvas in the
SuperSign Manager SuperSign Manager Overview A B C D E Index Item Description A Menu Bar The major features of SuperSign Manager are listed here. B Main Menu With tab menus, content editing, content play schedule setting, system management are done here. C Workspace Content editing, playback schedule setting, and player management are done here. D Hide Button If you click the Hide button, the window not in use will be displayed or hidden.
SuperSign Manager Content Edit SuperSign Manager provides a media content editor. You can create content and play it in SuperSign Player with this content editor. Overview Content editing and various other features are available under Content Edit in the top menu. A B H C G F E D 52 Index Item Description A Menu Bar B Main Menu C Media Window D Quick Menu E Timeline An intuitive timeline is provided to allow for time editing and arrangement by zone.
SuperSign Manager Checking details A B C D Index Description A Canvas file name and resolution. B Buttons for creating zones and text boxes. Create a zone on the canvas. Click the Zone button and then click on the canvas to create a zone. Create a text box on the canvas. Click the Text button and then click on the canvas to create a text box. Aligns the edges of the selected zone with ones of other zones. C The scroll bar used to zoom in or out on the canvas screen.
SuperSign Manager Index D Description Quick menus that allows using popular content-editing features. You can preview your content before playing it with SuperSign Player. This allows users to preview the content being edited within the canvas prior to exporting it to SuperSign Player. You can transfer your content to SuperSign Player that is on the same network as SuperSign Manager. Attention ● Make sure that the MS Office programs are closed before previewing MS Office files.
SuperSign Manager Changing Layouts You can change layouts to suit your needs. 1 Click Template > Layout in the left part of the SuperSign Manager screen. 2 This will display the layouts registered in the media library. 3 Double-click on a new layout. 4 It will be shown on the canvas. Attention ● If you change the layout, the content you are editing will be lost. Save it before changing the layout.
SuperSign Manager Changing Templates As with layouts, you can change templates to suit your needs. 1 Click on Template in the left part of the SuperSign Manager screen. 2 This will display the templates registered in the media library under different categories. The categories include bar/restaurant, shopping, and public organizations. 3 Double-click on a new template. This example explains how to change an existing template to a shopping mall template (double-click shopping).
SuperSign Manager Using the Library The media library is used to register media files needed for media content production, and to use services, including websites, RSS feeds, and widgets. To register media files in the media library, click the Library tab on the media window in the left part of the SuperSign Manager screen. Note ● A video thumbnail is picked randomly from the middle frames of the file.
SuperSign Manager The library is divided into media and service as shown below. Add a Media File You can add photos, videos, Flash files, music, PDFs, and MS Office files in the media tab. To add media, click on the media tab. After you select the file from the Select Files window and click the Open button, the media file will be registered in the library as shown below. In addition to photos, the same process can be used to register videos, Flash files, music, PDFs, and MS Office files.
SuperSign Manager Add Service Contents You can use SuperSign Manager to add online content such as websites, RSS feeds, and widgets, as well as their date and time. Click Library > Service on the media window to launch the menu for adding content as shown below. Note ● Service contents cannot be saved together with media files in the library. ● For details on adding content, refer to the Creating Content section of this manual.
SuperSign Manager Creating Contents Follow these steps to create contents: 60 1 Select Template or Layout Select a layout or template to display various media on the screen. The example shows the layout set to None. For specific information on how to change layout, refer to Changing layouts or Changing Templates section of this manual. 2 Register Media in Library To use a media file, you first need to register it in the library.
SuperSign Manager 3 Display Media You can exhibit media such as photos, videos, music, PDFs, and MS Office files registered in the library. There are two ways to display media on the canvas. Add Media to Zone 1 Click the Zone button in the upper right of the screen. A zone is created. 2 Drag and drop a media file already registered in the library. 3 The media will be added to the zone.
SuperSign Manager Drag Media You can directly display media files. 1 To do this, drag and drop a registered media file. 2 The file will be displayed on the canvas as shown here. A new zone is also automatically created. The size and location of the new zone can be adjusted. Note Select and drag a media file from the Windows Explorer directly to the canvas to create a new zone.
SuperSign Manager 4 Display Service Content You can use SuperSign Manager to add online content such as websites, RSS feeds, and widgets, as well as their date and time. To add service content, click Library > Service on the media window. Add Websites 1 To add a website, enter the URL you want to add and click Add. The website zone will be added on the canvas. 2 Move the new website zone to the desired location. Click Preview in the quick menus. You will see the website added as shown here.
SuperSign Manager Add RSS Feeds 1 To add an RSS feed, enter the URL you want and click Add. The RSS feed zone will be added on the canvas. Note ● The service and text zones can include one item each. ● RSS (Really Simple Syndication) is used to publish frequently updated works. Using RSS reader software, users can subscribe to receive regularly updated content provided by their favorite sites in an RSScompatible format. 2 Display the RSS feed zone on the desired location on the canvas.
SuperSign Manager Add Widgets 1 To add widgets, enter a widget code and then click Add. The widget zone will be added on the canvas. Note ● Widgets are small icons linked to frequently used services that users can run without opening a web browser. 2 Display the widget zone on the desired location on the canvas. Click Preview from the quick menus to see the screen with widget content added.
SuperSign Manager Adding Streaming Media You can select and add streaming audio or video. 1 To add streaming service, enter the address (URL) of the streaming media and click Add. The specified streaming zone will be added to the canvas. 2 66 Place the streaming zone added to the desired location. Click Preview from the quick menu at the bottom of the screen. You can see that the streaming media has been added as shown below.
SuperSign Manager Add Dates 1 For date, you can either select a word type date or an image type date to add. The date zone will be added. 2 Display the date zone on the desired location on the canvas Click Preview in the quick menus to see the screen with the added date information.
SuperSign Manager Add Times 1 For time, you can either select a word type time or an image type time to add. A time zone will be added. 2 Move the new time zone to the desired location. Click Preview in the quick menus to see the screen with the added time information.
SuperSign Manager Using Clip Art You can use clip art to create more unique and creative content. Various categories of clip art (such as background, banner, and Flash) are provided by SuperSign Manager by default. Adding Clip Art 1 If you select a clip art category and drag the clip art image to the canvas, the image is added to the clip art zone of the canvas. 2 Place the clip art zone added to the desired location. Click Preview from the quick menu at the bottom of the screen.
SuperSign Manager Copy Zones A zone on the canvas can be copied and pasted to other spaces. 1 To do this, first select the zone you want to copy. 2 Click Edit > Copy in the Menu bar, or press Ctrl + C to copy the selected zone. 3 Click Edit > Paste in the Menu bar, or press Ctrl + V to paste the selected zone onto the canvas. Note ● If you copy a zone, its properties and the media in it will be copied as well.
SuperSign Manager Zone Alignment You can insert zones and align objects in the canvas. To align objects, press and hold the Ctrl key and select the zones to align. Then, select the alignment format you want in Zone alignment under Tools. Note You can use the [Auto snap] function to align the selected zone with the adjacent zones automatically. Selecting Zones The canvas allows you to select multiple zones or all zones at once. To select multiple zones, press and hold Ctrl and select the zones you want.
SuperSign Manager Setting the Timeline The timeline allows you to set the duration for each content clip so that your media can be played at the designated time. On the timeline, you can set the start time, duration, and end time of the content in the zone. You can set content to play for up to 12 hours. Timeline Setting Overview You can display or hide the boundary color and file name of the zone on the canvas. (On: , Off: ) Set the basic time unit of the timeline.
SuperSign Manager Add Media to Timeline To add media to the timeline, drag a file to the timeline of the zone to which you want to add it. Copy Media to Timeline 1 Select a media file from the timeline. 2 With the desired media file selected, press Ctrl + C. 3 Press Ctrl + V to paste the file. Note ● You cannot copy text or services, including RSS feeds, websites, and widgets.
SuperSign Manager Distributing Completed Content You can distribute content by sending it from SuperSign Manager to SuperSign Player in order to play it there. Below is the step to distribute a content file to the player. Immediate Distribution Allows you to immediately send the content you created to SuperSign Player for playback. 1 When the content edit is complete, click the Send to player button from the quick menu at the bottom right of the screen.
SuperSign Manager Scheduled Distribution You can send content to SuperSign Player at the scheduled time. The content will be sent and played at the designated time. For details on the scheduled distribution, go to the Schedule section of this document. Export SuperSign Player can save the created content to a playable file format. The saved content can be exported to a USB storage device which can be connected to SuperSign Player for direct playback.
SuperSign Manager USB AutoPlay The USB AutoPlay function allows you to save your content in a USB storage device and play it in SuperSign Player. You can enable this function in Export of the Content Edit menu or in Export schedule of the Schedule menu. To enable the USB AutoPlay function in the Content Edit menu, follow the steps below. 76 1 Click File > Export. The window will appear as shown below.
SuperSign Manager To enable the USB AutoPlay function in the Schedule menu, follow the steps below. 1 Click File > Export. The window will appear as shown below. 2 Set the playback duration. 3 Select the root folder of the USB storage device as the folder in which to save your content. (For example, F:\, G:\) 4 Select the AutoPlay checkbox. 5 Click Export. Then, a folder named AutoPlay is created in the root folder, and the content file in which it is stored.
SuperSign Manager Content Properties/Tool In SuperSign Manager, users can check and modify the properties of the selected content. Selecting a Canvas zone displays the zone properties in the upper right of the Properties window. You also can change the time, image size, play repeat, and volume of the zone in the Tool window below the properties window.
SuperSign Manager Content Properties / Tools Media File Property Description Background Properties Displays the properties of the selected background. ● Name, Resolution, File Size Background Tools ● Changes the background color. ● Adds or deletes the photo to use as the background. Fitting ● Original: Fits to the canvas as the original size. ● Fit to zone: Fits to the canvas while preserving the original aspect ratio. ● Full zone: Fits to the canvas as full screen.
SuperSign Manager Property Description Photo Properties Displays the properties of the selected photo. ● Name, Resolution, Size Time Sets the playback duration of a photo. Fitting ● Original: Displays the original size; fits to the zone if the photo is larger than the zone. ● Fit to zone: Fits to the zone while preserving the original aspect ratio. ● Full zone: Fits to the zone as full screen. Transition Effects Sets the transition effects of a photo.
SuperSign Manager Property Description Time Displays the playback properties of the selected audio. ● Duration, Starting at, Ending at Play Sets whether to repeat playing the selected audio. Volume Adjusts the volume of the audio. Property Description Flash Properties Displays the properties of the selected Flash file. ● Name, Resolution, Size, Play Time Time Sets the playback duration of the Flash file.
SuperSign Manager Property Description Document Properties Displays the type (e.g. DOC, PPT and PDF) of the selected document. ● Name, File Size Time Sets the playback duration of a document. Slide Show ● Start page: Sets the first page of the slide show. ● Setting: Sets whether to use the slide show. ● Slide time: Sets the duration of each slide. Property Description Website Properties Displays the URL of the website to be connected.
SuperSign Manager Property Description Time Sets the display time of the text. Text Format Sets the format of the text. Text Scroll ● Sets the scroll direction of the text. ● Sets the scroll speed of the text. Property Description RSS Properties Displays the address of the RSS feed to be connected. Time Sets the display time of the RSS feed. Text Format Sets the format of the text. Text Scroll ● Sets the scroll direction of the text. ● Sets the scroll speed of the text.
SuperSign Manager Property Description Time Sets the display time of the date. Text Sets the format of the text. Date Display Sets the display format of the date. Property Description Time Sets the display time of the time. Text Sets the format of the text. Time Display Sets the display format of the time.
SuperSign Manager Property Description Widget Displays the address of the widget to be connected. Time Sets the display time of the widget. Change Widget Changes the address of the widget to be connected. Property Description Streaming Properties Displays the address of the streaming service to play. Time Sets the duration of streaming media. Play Sets whether to repeat playing streaming media. Volume Sets the volume of streaming media.
SuperSign Manager Schedule A schedule is the time table for playing content in SuperSign Player. Schedules are set as daily, weekly, or repeating. Overview A B C D E F Index A B The display time can be set to 1 hour, 30, 10, or 1 minute. C Assign content and media files to the desired times. You cannot set them to a date already past. The schedule should be within 180 days after the present date. D Schedules are shown in three different modes.
SuperSign Manager Properties and Tool Windows A B C A The name, type, and resolution of the selected player. B Preview the selected content. C The properties of content or media files for which schedules are D registered. D Enter the duration directly to display content. E Set a repeat cycle. E To set repeat cycles: 1 Enter the end time for the repeat. 2 Set the days for scheduling the repeat before the end date. 3 Check the Every day box to repeat the play every day.
SuperSign Manager Setting schedules Follow these steps to make a schedule: 1 Click the Player menu in the media window and select the SuperSign Player on which to change schedules. 2 The current schedules of SuperSign Player will be displayed. 3 To change the schedule, select content or a media file from the Library on the media window. 4 Create the basic schedule by dragging and dropping the selected content or media files.
SuperSign Manager Copying Schedules Schedules can be copied in order to re-use them. 1 Select the schedule blocks you want to copy. 2 Press Ctrl + C to change the mouse pointer to the copy icon ( ). Press Esc to turn the icon back to the mouse pointer. 3 Click the point on the schedule table where you want to paste the copied schedule. 4 Click Save to apply the change.
SuperSign Manager Deleting Schedules Delete Schedules via Menu bar Select the schedule block you want to delete and then select Edit > Delete in the Menu bar. Delete Schedules via X Button Select the schedule block you want to delete and then click Delete. Delete Schedules via Delete Key Select the schedule block you want to delete and then press Delete on your keyboard. Delete Schedules via Backspace Key Select the schedule block to be deleted and press the backspace key ( ).
SuperSign Manager When the connection to the target player (or group) to distribute the schedule is lost, the following message appears. Then, the scheduled distribution is canceled. Note ● You can also cancel transferring the schedule and content while transferring them. If the transferring of the content is canceled, it cannot be resumed and must be restarted from the beginning. ● The content that has not been transferred completely will not be played.
SuperSign Manager Management The Management menu allows you to group and manage SuperSign Players connected to SuperSign Manager and the monitors connected to each player. You can group and manage the players and monitors by content distribution, playback time, playback location, etc. Overview D B C A E Item Description A Displays the list of SuperSign Players connected to SuperSign Manager. The players connected can be managed by group.
SuperSign Manager Note ● If a player is disconnected, it will automatically attempt to reconnect the SuperSign Manager. ● If the connection to the player is lost when using SuperSign Manager, you will be notified with a message window and a status guide icon. Note ● When more than one SuperSign Manager is used, you cannot use them to control the same player at the same time. You should use the Manual Setting to connect to the player to be controlled.
SuperSign Manager Controlling Players by Group Allows you to control players and displays by group. If you select a group, a list of the controls available for the group is enabled as shown below. Note You can also select a group in List view mode to control the players and displays in the group. This function controls the power of the players in the group, and the power, time, screen, audio, video of the displays in the group.
SuperSign Manager Advanced Control In the Advanced Control area, you can control various properties of the displays in the group. Item Details Video ● Input type (AV, Component, RGB, DVI, S-Video, SuperSign) ● Supported resolutions vary depending on the input type.
SuperSign Manager General Control The properties that can be controlled in the General Control area are as follows: ● Display power (On/Off) Advanced Control In the Advanced Control area, you can control various properties of the displays in the group.
SuperSign Manager Advanced Command line The Advanced Command line menu allows you to remote control LG Electronics' monitor connected to the media player. You can find this menu in the Display general tab. Enter the RS232C control command supported by the connected monitor along with the set ID (e.g. - ka 01 01). The control command does not work if the set ID is invalid. For the monitors and control commands supported by SuperSign, see Appendix. Monitor Models Supported by SuperSign.
SuperSign Manager Remote Control of the Player/Display Power You can remotely power on or off the player and/or display connected to SuperSign Manager. The following shows the steps to remotely power on the player. 1 Select the player to power on. 2 Click On as shown above. 3 The Information window appears and shows the information of the selected player. In the window, click Open to view the selected player's information. 4 You can change the IP address or MAC address of the selected player.
SuperSign Manager Adding/Removing Group Removing a group To remove a group, select the group you want, select Edit > Remove Group/Player from the menu bar, press Delete or Backspace. Releasing a Group If you release a group, only the group folder will be deleted; all players and displays in the group will be released from the group. To release a group, select the group you want. Then, select Edit > Release Group from the menu bar, or click the Release at the top of the screen.
SuperSign Manager Other Features Update Now You can remotely update the SuperSign Player software. The player settings which the user entered will not change. 1 In the Grouping & Monitoring window, select the player to be updated and select Update under Advanced Control. Click the [Open] button and select the update file downloaded from the SuperSign Support website. 2 3 100 * Support Website - Worldwide: http://www.lgsupersign.com - North America Only: http://lgsolutions.
SuperSign Manager Urgent Message This function allows you to display an urgent message on the player connected in case of an emergency situation or for notification purpose. A B C D E F A Set the properties (font, size, color, etc.) of the text. B Set the scroll direction and speed of the text. C Enter the message to send. D Set the position on the screen to display the message. E Set the display time of the message. The default display time is "10 seconds".
SuperSign Manager Creating a Log Report You can view the players' connection record, the contents playback record and the schedule distribution record. ● Log information reflects up to the previous 180 days. ● The report will be updated with the latest information. ● Using Send Email, you can send the log report files (.csv) to an assigned e-mail address. ● Change the email settings in Option > Management.
Appendix Frequently Asked Questions (FAQs) Question Answer The transfer stopped during "Send to player" task. ● Check whether the media file is an officially supported type and try again. The officially supported media types are available in the Files Supported by SuperSign list. The "Scan" shows no available players. ● Check whether the SuperSign Player is on. ● Check whether the SuperSign Player is working properly. ● Check the SuperSign Player's network cable connection status.
Appendix Frequently Asked Questions (FAQs) Question 104 Answer I cannot see photos or PDFs. ● Check the current settings of Regional and Language Options in MS Windows and change the file name to be consistent with the language, then reregister the file in the library. For example, photos with a name in Korean may not be seen when the language is set to English. After changing the time on the Windows-based machine on which SuperSign Player is installed, I found that it changed back.
Appendix SuperSign Network Connecting Instructions Connect via LAN This is used when SuperSign Manager and SuperSign Player are on the same network. ● The same network means that they use the same gateway and subnet address in the IP communication settings. ● The SuperSign Manager's search feature can be used to find SuperSign Players on the same network. ● For a single connection, use a crossover cable so that communication is possible without the use of network devices.
Appendix Connect via Internet Use this method when the manager and player are not on the same network. ● SuperSign Manager cannot search for different SuperSign Players that do not share the same network. ● SuperSign Player can be connected to SuperSign Manager on a different network through the Manual discovery mode. ● If SuperSign Manager is on a private network, the SuperSign Player will not be correctly connected.
Appendix Wireless Network Connection This is used when SuperSign Manager and SuperSign Player are connected via a wireless router. ● SuperSign Manager and SuperSign Player support both wired and wireless network connectivity. ● When both wired and wireless network types are used at the same time, SuperSign Player may not work properly. ● Unplug the LAN cable if you want to connect the player to SuperSign Manager wirelessly.
Appendix Monitor Models Supported by SuperSign ※ For NC1000, NC2000, supported displays are subject to change without notice for improvement of performance. The range of features controlled by SuperSign Manager may vary depending on the monitors used with it. The list below includes monitors that can be controlled by SuperSign Manager. Models not controlled by SuperSign Manager are marked with an X.
Appendix SuperSign Manager Menu List File Menu Main Menu File Sub Menu Option Menu Enabled Content Edit Schedule Description Management New Create a new canvas Open Open the existing content Add a file to media library Add a media file to the library Save Save the content being created Save as Save the content as Save as template Save the content as the template Export Export the content Import content Import the content Send to player Send the content to the player for playback L
Appendix View Menu Main Menu Sub Menu Zoom in/out Option Menu Enabled Content Edit Schedule Management 150% Zoom in 150% 120% Zoom in 120% 100% View in the original size 80% Zoom out 80% 60% Zoom out 60% 50% Zoom out 50% 30% Zoom out 30% Preview View Content Edit Window Plan Window Manage Window Description Preview the content being created Timeline Show or hide the timeline Template/ Library Show or hide the player/template/library Property/Tools Show or hide the properties/to
Appendix Setting Menu Main Menu Setting Sub Menu Canvas Setting Window Option Menu Enabled Content Edit Schedule Management Show Description Show or hide the Canvas setting window Server View the server information Initialize Initialize the SuperSign Manager settings Help Menu Main Menu Help Sub Menu Option Menu Enabled Content Edit Schedule Management Description Technical Support View the information for LG Electronics Technical Support About SuperSign View the information for Sup
Appendix Required Software and Codec Package Installation Required Software You should install all software below in order to take advantage of all Edit functions in the SuperSign solution. Microsoft Office To use MS Office files for media content, you need to have MS Office installed on both the Super- Sign Player and the SuperSign Manager (MS Office 2000, XP, 2003, 2007 and higher). Attention ● You should purchase and install Microsoft Office.
Appendix Codec Package Installation You need to install codecs if you want to upload or play videos. If SuperSign Manager and SuperSign Player have different codecs installed, the player may not be able to play content. Use the same type and same version of codecs on SuperSign Manager and SuperSign Player. You may need different codecs depending on the video files. You can download codec packages from the links below. ● http://www.codecguide.com ● http://shark007.net ● http://www.free-codecs.
Appendix Limitations of Microsoft Windows Embedded Standard The following are potential errors that may occur due to internal limitations of Microsoft Windows Embedded Standard, which is the OS of SuperSign Player. ● If you press Alt + Enter on the DOS window, text other than English may be shown corrupted. ● If you use Save As function in the Print window, the menu window name will be displayed in English.
Appendix Swapping Displays You can change the primary and secondary monitors in the Control Panel > Nvidia Control Panel. Attention ● The Nvidia Graphic Chipset which is the graphic card equipped in SuperSign Player (NC1000/NC2000) does not support display swap in the Windows Display Registry Information.
Appendix SMTP E-mail Settings Follow the steps below to set the SMTP e-mail. Log reports can be sent to the e-mail address you designate. 1 Select Menu bar Options > Management to use the e-mail setting menu. 2 The Options window will appear. 3 Type an e-mail address in the Administrator E-mail field to receive the report. Type the e-mail server address in the SMTP Server field. 4 If the SMTP server requires user identification, provide the user ID and password and then click OK.
Make sure to read the Important Precautions before using the product. Keep the User’s Guide(CD) in an accessible place for furture reference. The model and serial number of the SET is located on the back and one side of the SET. Record it below should you ever need service. MODEL SERIAL WARNING - This is a class A product. In a domestic environment this product may cause radio interference in which case the user may be required to take adequate measures.