PRODUCT FEATURES ■ Direct Drive System The advanced Brushless DC motor directly drives the drum without belt and pulley. ■ Tilted Drum and Large Door Opening The tilted drum and large door opening make it possible to easily load and unload clothing. ■ Time-Released Dispenser Detergent, fabric softener and bleach are dispensed separately at the right time during wash cycle. ■ Automatic Wash Load Detection Automatically detects the load and optimizes the washing time.
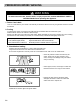
IMPORTANT SAFETY INFORMATION READ ALL INSTRUCTIONS BEFORE USE WARNING! ENGLISH ! For your safety, the information in this manual must be followed to minimize the risk of fire or explosion, electric shock, or to prevent property damage, personal injury, or loss of life. IMPORTANT SAFETY INSTRUCTIONS ! WARNING: To reduce the risk of fire, electric shock, or injury to persons when using the washer, follow basic precautions, including the following: • Read all instructions before using the washer.
SPECIFICATIONS 울 란제리 ■ Name: ■ Power supply: su ■ Size: Front-loading Washing Machine 120V~ 60Hz 68.6 cm (W) X 76.3 cm (D) X 98.3 cm (H), 129.1 cm (D, door open) 27”(W) X 301/32”(D) X 3811/16”(H), 5013/16”(D, door open) ■ Weight: ■ Wash capacity: ■ Spin speed: ■ Permissible water pressure: 173 lbs. (78.5 kg) 2.96 cu. ft. (IEC: 3.42 cu. ft.)1) 900 rpm max. 4.5 ~ 116 PSI (30 ~ 800 kPa) ✽ Specifications subject to change by manufacturer. ■ Accessories 1) Per IEC 60456, washes the equivalent of a 3.
INSTALLATION INSTRUCTIONS ENGLISH Install or store unit where it will not be exposed to temperatures below freezing or exposed to outside weather conditions. Properly ground washer to conform with all governing codes and ordinances. To reduce the risk of electric shock, do not install the washer in humid spaces. The base opening must not be obstructed by carpeting when the washing machine is installed on a carpeted floor.
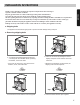
INSTALLATION INSTRUCTIONS ■ Installation clearances The location must be large enough to fully open the washer door. ■ Washer dimensions 30 1 32 76.3 [Side view] [Front view] 30 1 32 • Most installations require a minimum 4 in. (10 cm) clearance behind the washer. ■ Minimum installation spacing for recessed area installation. The following dimensions shown are for the minimum spacing allowed. Additional spacing should be considered for installation and servicing.
INSTALLATION INSTRUCTIONS ■ Electrical connection ENGLISH • Do not use an extension cord or double adapter. • If the supply cord is damaged, it must be replaced by a qualified person in order to avoid a hazard. • If the machine will not be used for an extended time, unplug it and shut off the water supply. • Connect the machine to a grounded outlet in accordance with current wiring regulations. • The appliance must be positioned so that the plug is easily accessible.
INSTALLATION INSTRUCTIONS ■ Installation of drain hose 63 41 60 • Place the end of the drain hose in the hole of the floor drain system. 78 41 40 • The drain hose should not be placed higher than 96 in. from the bottom of the washer. • Properly securing the drain hose will protect the floor from damage due to water leakage. • When installing the drain hose at a sink, secure it so it cannot break away and cause flooding and damage.
INSTALLATION INSTRUCTIONS ■ Level adjustment ENGLISH • Leveling the washing machine properly prevents excessive noise and vibration. Install the appliance on a solid and level floor surface, preferably in a corner of the room. • If the floor is uneven, adjust the adjustable feet as required. (Do not insert pieces of wood, etc. under the feet.) NOTE: Extend the feet no more than necessary to level the washer. The more the feet are extended, the more the washer will vibrate.
PREPARATION BEFORE WASHING WARNING To reduce the risk of fire, electric shock, or injury to persons, read the IMPORTANT SAFETY INSTRUCTIONS before operating this appliance. 1. Fabric Care Labels Look for a care label on your clothes. This will tell you about the fabric content of your garment and how it should be washed. 2. Sorting To get the best results, sort clothes into loads that can be washed with the same wash cycle. Different fabrics need to be washed in different ways.
USING THE DISPENSER ENGLISH The automatic dispenser consists of four compartments which hold 1) liquid chlorine bleach, 2) liquid fabric softener, 3) liquid or powdered detergent for prewash and 4) liquid or powdered detergent and color safe bleach for main wash. All laundry products can be added at once in their respective dispenser compartments. They will be dispensed at the appropriate time for most effective cleaning. After loading the laundry additives into the dispenser, close the dispenser drawer.
USING THE DISPENSER 2. Main Wash Detergent Compartment 3. Liquid Bleach Compartment • Add measured detergent to this compartment for Main wash. Detergent is flushed from the dispenser at the beginning of the cycle. Either powdered or liquid detergent can be used. • Add measured liquid chlorine bleach to this compartment. The bleach will be automatically dispensed at the proper time during the wash cycle.
CYCLES ■ Select cycles designed for different types of fabric and soil levels. ENGLISH Tap Cold/Cold Tap Cold/Cold Tap Cold/Cold Gentle Tap Cold/Cold Gentle Gentle Tap Cold/Cold 1) Automatic wash load (weight) detection: Automatically detects the load and optimizes the washing time. After detecting, the estimated time remaining in the cycle will be displayed.
HOW TO USE THE WASHER Cycle Selector 1. Power 4. Wash/Rinse Temperature • Use this button to turn the Power On/Off. • Select a water temperature based on the type of load you are washing. • Follow the fabric care label and chart below for best results. 2. Cycles • Press the Cycle selector to select cycle designed for different types of fabric and soil levels. • Each cycle has a preset Water Temperature, Spin Speed, Soil Level, and Option (See page 13).
HOW TO USE THE WASHER • To change the soil level, press the Soil Level button repeatedly until the desired setting is on. OPTION ENGLISH EST. TIME REMAINING 6. Soil Level • This display shows: a) the estimated time remaining in the cycle when operating, b) the error code when an error has been detected. 1. Prewash • Use this option for loads that need pretreatment. Adds 16 minutes prewash and drain.
MAINTENANCE Before cleaning the washer interior, unplug the electrical power cord to avoid electrical shock hazards. When disposing of the appliance, cut off the power cable, destroy the plug, and disable the door lock to prevent young children from being trapped inside. ■ The water inlet filter •" " error message will blink on the control panel when water does not enter the dispenser. • If your water is very hard or contains traces of lime deposit, the water inlet filter may become clogged.
MAINTENANCE ■ Cleaning the Dispenser • The dispenser may need to be cleaned periodically due to laundry additive build-up. 2 Press down the lock tab on the bleach insert. Remove the drawer. 3 ENGLISH 1 Pull the dispenser drawer out until it stops. Remove the softener and bleach inserts from their compartments. MAX MAX SOFTENER SOFTENER • Run warm water and use a soft brush or cloth on the drawer and inserts to remove any excess laundry additives.
MAINTENANCE ■ Cleaning your washer 1. Exterior Proper care of your washer can extend its life. The outside of the machine can be cleaned with warm water and a neutral, non-abrasive household detergent. Immediately wipe off any spills with a damp cloth. Try not to damage the surface with sharp objects. ✽ IMPORTANT: Do not use methylated spirit, solvents or similar products. 2. Interior Dry around the washer door opening, flexible gasket and door glass.
TROUBLESHOOTING GUIDE Problem Possible Cause Solution Rattling and clanking noise • Foreign objects such as coins or safety pins may be in drum or pump. Stop washer and check drum and drain filter. If noise continues after washer is restarted, call for service. Thumping sound • Heavy wash loads may produce a thumping sound. This is normal. If sound continues, washer is probably out of balance. Stop and redistribute wash load.
TROUBLESHOOTING GUIDE Problem Washer does not start 20 Possible Cause Solution • Electrical power cord may not be plugged in or connection may be loose. Make sure plug fits tightly in wall outlet. • House fuse is blown, circuit breaker tripped, or a power outage has occurred. Reset circuit breaker or replace fuse. Do not increase fuse capacity. If problem is a circuit overload, have it corrected by a qualified electrician. • Water supply tap is not turned on. Turn on water supply tap.
TROUBLESHOOTING GUIDE ENGLISH Problem Possible Cause Solution • Water supply is not adequate in area. • Water supply taps are not completely open. • Water inlet hose is bent. • The filter of the inlet hose clogged. Check another tap in the house. • Drain hose is bent or clogged. • The drain filter is clogged. Clean and straighten the drain hose. • Load is too small. • Load is out of balance. • The appliance has an imbalance detection and correction system.
WARRANTY (24 hours a day, 365 days per year) 22
CARACTERÍSTICAS DEL PRODUCTO ■ Sistema DD Invertidor. El avanzado motor de DC sin cepillo que mueve directamente el cilindro sin cinturón ni polea. ■ Cilindro Inclinado y Abertura Extra Grande. El cilindro inclinado y la abertura extra grande, hacen màs fácil la carga y descarga. 5 ■ Detección de la carga de lavado automático Automáticamente detecta la carga y optimiza el tiempo de lavado. 추가선택 예약 ■ Seguro de Niños.
INFORMACIÓN IMPORTANTE DE SEGURIDAD LEA TODAS LAS INSTRUCCIONES ANTES DE USARLA. ! ADVERTENCIA! Para su seguridad, la información en este manual debe ser seguida para minimizar el riesgo de incendio ó explosión, descarga eléctrica, ó para prevenir daños a su propiedad, a su persona ó pérdida de la vida.
ESPECIFICACIONES Perno para Transportación Clavija de Energía • Si el cable de suministro está dañado, debe ser reemplazado por el fabricante ó sus agentes de servicio, ó alguna persona calificada en orden a evitar cualquier riesgo.
INSTRUCCIONES DE INSTALACIÓN Instale ó almacene en un lugar donde no esté expuesta a temperaturas inferiores a la congelación ni expuesta a la intemperie. Conecte a tierra correctamente y cumpliendo con todos los códigos y ordenanzas gubernamentales. Para reducir los riesgos de electrocución, no instale la lavadora en lugares húmedos. La abertura de la base no debe ser obstruida por alfombra cuando esté instalada sobre un piso con alfombra.
INSTRUCCIONES DE INSTALACIÓN ■ Espacios Libres de instalación El lugar debe ser lo suficientemente grande para abrir en su totalidad la puerta de la lavadora. ■ Dimensiones de la lavadora 30 1 32 76.3 [Vista lateral] ESPAÑOL [Vista frontal] ■ Nivele el Piso • La inclinación admisible debajo de la lavadora 30 1 32 completa es de 1°. • Pare reducir ruido y vibración, la lavadora Las dimensiones mostradas a continuación son el espaciado mínimo permitido.
INSTRUCCIONES DE INSTALACIÓN ■ Conexión Eléctrica • No use un cable de extensión ni un adaptador doble. • Si el cordón proveedor de energía es dañado, debe ser repuesto por una persona calificada para evitar peligros. • Si la lavadora no va a ser usada en un periodo largo de tiempo, deconèctela de la energía y de la corriente de agua. • Conecte la lavadora a una toma de corriente correctamente conectada a tierra de acuerdo con las regulaciones de cableado locales.
INSTRUCCIONES DE INSTALACIÓN ■ Instalación de la Manguera de Desagüe Aprox. 63˝ Aprox. 41˝ Aprox. 60˝ ESPAÑOL • Ubique el extremo de la manguera de desagüe en el orificio del sistema de drenaje en el piso. Aprox. 78˝ Tina de ropa sucia Aprox. 41˝ Soporte de manguera Plástico sujetador Aprox. 40˝ max. 96" (2.4 m) max. 96" • La manguera de desagüe no debe ubicarse a mas de 96" desde la base de la lavadora.
INSTRUCCIONES DE INSTALACIÓN ■ Nivelar • Nivelar correctamente la lavadora previene el ruido y las vibraciones excesivos. Instale el aparato sobre un piso sólido y parejo y preferentemente en una esquina de la habitación. • Si el piso está disparejo, ajuste las patas ajustables según lo requiera (No inserte piezas de madera, etc. debajo de las patas). NOTA: No extienda las patas niveladoras más de lo necesario. Mientras más extendidas estén, más vibración puede haber.
PREPARACIÓN ANTES DE LAVAR ADVERTENCIA Para reducir el riesgo de incendio, descarga eléctrica ó daño a personas, lea las Instrucciones Importantes de Seguridad antes de operar este aparato. 1. Etiquetas de Cuidado Busque etiquetas de cuidado en sus prendas. Esto le dirá sobre el contenido de las telas de su ropa y como debe ser lavada. 2.
USANDO EL DISTRIBUIDOR El distribuidor automático consiste de cuatro compartimentos que retienen 1) cloro líquido blanqueador, 2) suavizante de telas líquido, 3) detergente líquido ó en polvo para el prelavado y 4) detergente en polvo ó líquido y blanqueador seguro para los colores para el lavado principal. Todos los productos de lavandería pueden ser añadidos al mismo tiempo en su compartimiento distribuidor. Estos se distribuirán a su debido tiempo para lograr la limpieza mas efectiva.
USANDO EL DISTRIBUIDOR 2. Compartimiento de Detergente del Lavado Principal • Añada el detergente con medida a este compartimiento para el lavado Principal. El detergente es drenado del distribuidor al comenzar el ciclo. Puede usarse tanto detergente líquido como en polvo. • Puede añadirse blanqueador que cuide los colores al compartimiento del Lavado Principal junto con el mismo tipo de detergente, líquido ó en polvo. • Añada cloro líquido blanqueador a este compartimiento.
CICLOS ■ Usted puede seleccionar ciclos diseñados para diferentes tipos de telas y niveles de suciedad. Ciclo Tipo de Tela Algodón/ Toallas (Cotton/ Towels) Algodón, Lino, Toallas, Camisetas Normal (Normal) Cargas mixtas, ropa de trabajo, jeans, camisas Planchado Permanente (Perm Press) Delicados (Delicates) Pantalones, camisas de vestir, ropa sin arrugas, mezclas de poly/ algodón, etc.
COMO USAR LA LAVADORA ESPAÑOL Cycle Selector Selector de Ciclo 1. Encendido (Power) • Use este botón para Encender y Apagar la lavadora. 2. Ciclos • Presione la Selector de Ciclo para seleccionar el ciclo diseñado para los diferentes tipos de telas y niveles de suciedad. • Cada ciclo tiene una temperatura, velocidad de giros, nivel de suciedad y Opciones predeterminadas (Véase página 34). • La configuración predeterminada puede ser cambiada en cualquier momento antes de comenzar el ciclo..
COMO USAR LA LAVADORA 6. Nivel de Suciedad (Soil Level) 6. Beeper • Para cambiar el nivel de suciedad, presione el botón de Nivel de Suciedad (Soil Level) repetidamente hasta que el nivel deseado se haya conseguido. • Use este botón para activar o apagar la Alarma. TIEMPO RESTANTE ESTIMADO (EST. TIME REMAINING) OPCIONES (OPTION) 1. Prelavado (Prewash) • Use esta opción para cargas que requieran tratamiento previo. Añade 16 minutos de prelavado y desagüe.
MANTENIMIENTO Antes de limpiar el interior de la lavadora, desconéctela del suministro eléctrico para evitar recibir una descarga eléctrica. Cuando deseche el aparato, corte el cable de corriente y destruya la clavija. Deshabilite el seguro de la puerta para evitar que algún niño pequeño quede atrapado dentro. ■ El Filtro de Entrada de Agua. • El mensaje de error “ ”parpadeará en el panel de control cuando no entre agua al compartimiento de detergente.
MANTENIMIENTO ■ Limpiando el Distribuidor • El distribuidor puede necesitar que lo limpie periódicamente debido a los residuos de los aditivos de lavandería. 1 Jale el cajòn dispensador fuera hasta que termine. 2 Presione abajo la lengüeta de la cerradura en el relleno del blanqueo. Quite el cajón. 3 Remueva la blanqueador y suavizante de sus compartimentos.
MANTENIMIENTO ■ Limpiando su Lavadora 1. Exterior El cuidado adecuado de su lavadora puede extender su vida. El exterior de la máquina puede ser limpiado con agua tibia y un detergente casero neutral, no-abrasivo. Limpie inmediatamente cualquier derrame. Limpie con un trapo húmedo. Trate de no golpear la superficie con objetos filosos ó puntiagudos. ✽ IMPORTANTE: No use esencia de metilo, solventes ó productos similares. 2.
GUÍA PARA LA LOCALIZACIÓN DE PROBLEMAS ✽ Esta lavadora está equipada con funciones de seguridad automáticas que detectan y diagnostican fallas tempranamente y reaccionan apropiadamente. Cuando la máquina no funcione apropiadamente ó no funcione para nada, verifique los puntos siguientes antes de llamar al Departamento de Servicio. Problema Posible Causa Ruido de golpeteo metálico • Algún objeto externo como monedas ó seguros pueden estar en el cilindro ó en la bomba de drenaje.
GUÍA PARA LA LOCALIZACIÓN DE PROBLEMAS Problema La lavadora no enciende Posible Causa Solución Asegúrese de que esté bien conectado. • El fusible de la casa puede estar fundido, ó se botó el interruptor de circuito, ó no hay luz. Reemplace el fusible ó reinicie el interruptor de circuito. No incremente la capacidad del fusible. Si el problema es una sobrecarga en el circuito, hágalo corregir por un electricista calificado. • La llave de suministro de agua no está abierta.
GUÍA PARA LA LOCALIZACIÓN DE PROBLEMAS Problema Posible Causa Solución • El suministro de agua no es adecuado en el área. • Las llaves del agua no están completamente abiertas. • Las mangueras de entrada de agua están torcidas. • El filtro de la manguera de entrada está obstruido. Verifique con otra llave de agua en la casa. • La manguera de desagüe está torcida u obstruida. • El filtro de desagüe está obstruido. Limpie y enderece la manguera. • La carga es muy pequeña.
GARANTÍA LG ELECTRONICS, INC. Grantía Limitada En Los Estados Unidos De Lavadora LG Su lavadora LG será reparada o reemplazada, a consideración de LG, si prueba ser defectuosa en material o en ejecución dentro de un uso normal, dentro del periodo de garantía ("periodo de garantía") descrito en la parte inferior, efectivo desde la fecha ("fecha de compra") de la compra del producto por el consumidor.
P/ No.