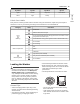
OPERATION 17 OPERATION WARNING To reduce the risk of fire, electric shock, or injury to persons, read the SAFETY INSTRUCTIONS before operating this appliance. Operation Overview 1 Sort laundry and load the washer. Sort laundry by fabric type, soil level, color and load size as needed. Open the door and load items into the washer. If using single-use detergent packs, or gel or tablet detergents, place them in the drum before loading the laundry. 2 Add cleaning products.
18 OPERATION 7 End of cycle. When the cycle is finished, a melody sounds. Immediately remove the clothing from the washer to reduce wrinkling. Check around the door seal when removing the load for small items that may be caught in the seal. NOTE The washer rotates the laundry in a way that allows it to use less water while still fully saturating the clothing. It is normal to be unable to see water during the wash cycle.
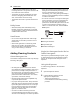
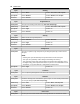
OPERATION 19 By Soil By Fabric By Lint Lights Normal Easy Care Lint Collector Darks Light Sturdy ENGLISH By Colors Fabric Care Labels Many articles of clothing include a fabric care label. Using the chart below, adjust the cycle and option selections to care for your clothing according to the manufacturers recommendations.
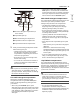
20 OPERATION Combine large and small items in the drum. Load large items first. Large items should not be more than half of the total load. The washer can be fully loaded, but the drum should not be tightly packed with items. The door of the washer must close easily. The washer will not fill or operate with the door open. Bulky Items Wash thick, bulky items individually. Heavy blankets, comforters, bedspreads, or pet beds can get tangled or cause an unbalanced load if combined with other items.
OPERATION 21 Main Wash Detergent Compartment This compartment holds laundry detergent for the main wash cycle. Either powdered or liquid detergent may be used in this compartment. The detergent is added to the load at the beginning of the cycle. Always use HE (HighEfficiency) detergent with your washer.
22 OPERATION NOTE Follow the manufacturers recommendations when adding bleach. Never add more than one cup, and do not exceed the maximum fill line or the bleach may be dispensed immediately and damage fabrics. Using too much bleach can also damage fabrics. Never pour undiluted liquid chlorine bleach directly onto the load or into the drum. Fabric damage can occur. Do not use color-safe bleach or oxygen bleach in the same cycle with liquid chlorine bleach.
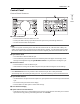
OPERATION 23 Control Panel Control Panel Features ENGLISH a Power On/Off Button Press this button to turn the washer on or off. Pressing this button during a cycle will cancel that cycle and any load settings will be lost. The door will unlock after a brief pause. NOTE If there is any water remaining in the drum after the washer shuts off, it will drain after a delay. The washer can be restarted at any time before the drain begins.
24 OPERATION Time and Status Display a Cycle Status Indicators These LEDs will blink when a cycle is selected to indicate which stages will run. When a cycle is running, the LED for the active stage will blink, and the LEDs for the remaining stages will remain steady. Once a stage is complete, the LED will turn off. If a cycle is paused, the active stage LED will stop blinking. b Estimated Time Remaining When a cycle is selected, the default time for that cycle is displayed.
OPERATION 25 Wash Cycles Cycle Guide Turn the knob or press the button to select the desired cycle. When you select a wash cycle, the light for the corresponding wash cycle will turn on. NOTE Whenever load weights are mentioned, assume 1 lb (0.45 kg) = 1 thick bath towel (dry). Temperature indicator lights up when one of Tap Cold, Cold, Warm, Hot or Extra Hot is selected. Spin indicator lights up when one of No Spin, Low, Medium, High or Extra High is selected.
26 OPERATION Cycle Bedding Wash Temp. Default: Warm Available: Hot, Warm, Cold, Tap Cold Spin Speed Default: Medium Available: Medium, Low, No Spin Soil Level Default: Normal Available: All Bright WhitesTM Cycle Description This cycle is for washing white items only. (less than 15 lb (6.8 kg)) Wash Temp.
OPERATION 27 Cycle Perm. Press Default: Warm Available: Hot, Warm, Cold, Tap Cold Spin Speed Default: Medium Available: High, Medium, Low, No Spin Soil Level Default: Normal Available: All Cycle Towels Description Use this cycle for washing towels, shirts, jeans and mixed loads. Wash Temp.
28 OPERATION Cycle Downloaded (Small Load) Wash Temp. Default: Warm Available: Hot, Warm, Cold, Tap Cold Spin Speed Default: High Available: All Soil Level Default: Normal Available: All Available Options This option is automatically included in the cycle and cannot be deselected. NOTE Delay Wash, Extra Rinse, Fresh Care and Add Item can be selected for every cycle in this table. Steam and Cold Wash cannot be selected at the same time.
OPERATION 29 Cycle Modifiers About Modifier Buttons Repeatedly press the button for the desired modifier until the indicator light for the desired setting is lit. The washer automatically adjusts the water level for the type and size of wash load for best results and maximum efficiency. This is a high-efficiency washer, and the water levels may be much lower than you expect. This is normal, and cleaning/rinsing performance will not be compromised.
30 OPERATION Always stretch these materials out immediately after drying. NOTE Permanent Press and Synthetics This function spray water periodically onto the drum while drying to reduce the drying time. Do not overload your appliance. Take out permanent press articles as soon as the appliance stops to reduce wrinkles. Baby Clothes and Night Gowns Always check the manufacturers instructions. Blankets and Duvets Check fabric care labels on blankets and duvets before using the drying programme.
OPERATION 31 4 Press the Start/Pause button. Your washer includes several additional cycle options to customize cycles to meet your individual needs. Select the desired option after selecting the desired cycle and settings. NOTE The LED for the option will light when the option is selected. To protect your garments, not every option is available with every cycle. A chime will sound twice and the LED will not light if the selected option is not allowed for the selected cycle.
32 OPERATION WARNING Do not attempt to force the door to open when locked. Doing so could result in damage to the appliance, malfunction, or personal injury. NOTE If the water level and temperature are safe, the door lock LED turns off and the door unlocks once the wash movement has stopped. Press the Extra Rinse button to add additional rinses to the cycle. Rinse+Spin Select this option to rinse and spin a load separately from a regular cycle.
SMART FUNCTIONS 33 SMART FUNCTIONS Before Using LG ThinQ Application The LG ThinQ application allows you to communicate with the appliance using a smartphone. 1 If the appliance is too far from the router, the signal strength becomes weak. It may take a long time to connect or installation may fail. LG ThinQ Application Features For the product that contains the Wireless LAN module Remote Start - Control the appliance remotely from the LG ThinQ application.
34 SMART FUNCTIONS try to correct the interference by one or more of the following measures: NOTE If the appliance cannot be registered due to problems with the wireless signal transmission, unplug the appliance and wait about a minute before trying again. If the firewall on your wireless router is enabled, disable the firewall or add an exception to it. The wireless network name (SSID) should be a combination of English letters and numbers. (Do not use special characters.
SMART FUNCTIONS 35 Using LG ThinQ to Diagnose Issues This equipment complies with IC radiation exposure limits set forth for an uncontrolled environment. If you experience a problem with your Wi-Fi equipped appliance, it can transmit troubleshooting data to a smartphone using the LG ThinQ application. This equipment should be installed and operated with a minimum distance of 20 cm (7.8 inches) between the antenna and your body.
36 MAINTENANCE MAINTENANCE WARNING To reduce the risk of fire, electric shock, or injury to persons, read this entire owners manual, including the SAFETY INSTRUCTIONS, before operating this appliance. Unplug the appliance before cleaning to avoid the risk of electric shock. Failure to follow this warning can cause serious injury, fire, electric shock, or death. Do not use volatile substances (benzene, paint thinner, alcohol, acetone, etc.
MAINTENANCE 37 Do not exceed the maximum fill line when adding bleach or powdered cleaners. Powdered cleaners may remain in the drum after cleaning. Close the door and press the Power button. 4 Select the Tub Clean cycle and press the Start/Pause button to begin the cycle. 5 After the cycle ends, open the door and allow the drum interior to dry completely. After you finish using the washer, leave the door open overnight to allow air to circulate and dry the drum. This helps prevent odors.
38 MAINTENANCE 8 Replace the drawer. CAUTION Do not use the washer without the inlet filters. Doing so will cause leaks and malfunction. If you use the washer in an area with hard water, the inlet filter may clog due to lime buildup and require more frequent cleaning. Cleaning the Door Seal Clean the door seal once a month to prevent build-up of dirt. 1 Turn off the washer, and unplug the power cord. 2 Turn off hot and cold water faucets.
MAINTENANCE 39 Cleaning the Drain Pump Filter ENGLISH The washer fails to drain if the drain pump filter is clogged. Periodically clean the drain filter to prevent clogging with foreign objects. WARNING Opening the drain filter will result in water overflowing if there is water in the drum. Use a bucket if the drum is not completely drained before you open the drain filter.
40 MAINTENANCE Care in Cold Climates Storing the Washer If the washer will not be used for an extended period of time and is in an area that could be exposed to freezing temperatures, follow these steps to protect the washer from damage. 9 Dry the drum interior with a soft cloth, and close the door. 10 Store the washer in an upright position. 11 Remove the inserts from the dispenser. Drain any water in the compartments and let them dry.
MAINTENANCE 41 When the Drain Hose is Frozen Pour hot water in the washer drum and close the door. 2 Wait for 1 - 2 hours. 3 Press the Power button. 4 Press the Spin button to operate spin only cycle for draining and spinning. 5 Press the Start/Pause button to make sure the water drains.