INSTALLATION 9 INSTALLATION Before Installing Installation Overview Please read the following installation instructions first after purchasing this washer or transporting it to another location. @ choosing the Proper Location @ Unpacking and Removing Shipping Material @ Connecting the Inlet Hoses @ Connecting the Drain Hose @ Leveling the Washer @ Final Installation Check £3 WARNING Moving or installation of the appliance requires two or more people.
10 INSTALLATION £b WARNING « Certain internal parts are intentionally not grounded and may present a risk of electric shack only during servicing. Service personnel Do not contact the following parts while the appliance is energized: pump, valve, motor, control board. Tools Needed Flat-Blade Screwdriver @ Level @ @ Pliers Choosing the Proper Location Check the following requirements for the Install location before installing the washer.
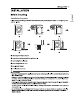
INSTALLATION 11 27" (70cm) G 1/4" (0.5 cm) Stacking or Pedestal Installation The washer can be stacked under a dryer or on top of a pedestal or pedestal washer. 4 30 1/4" (0.5 1/2" (196.8 cm) 1/4" (0.5 cm) NOTE « Refer to the instructions packaged with the optional pedestal kit before stacking appliance on pedestal. * Do not use a drain pan with a pedestal or pedestal washer installation as It can block the drawer. Using a drain pan may result in Increased vibration and nose during operation.
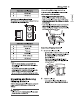
12 INSTALLATION the washer, Install the caps in the holes left by the bolt assemblies. 4) CAUTION Once removed, save the bolt assemblies for future use. To prevent damage to Internal components, do not transport the washer without reinstalling the shipping bolts. Failure to remove shipping bolts and retainers may cause severe vibration and noise, which can lead to permanent damage to the washer.
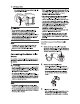
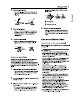
INSTALLATION 13 * Let the water drain into a bucket, and check the water temperature to make sure you've connected the hoses to the correct faucets. 4 Attach the inlet hoses to the back of the washer, « Attach the hot water inlet hose to the hot water inlet on the back of the washer. Attach the cold water inlet hose to the cold water inlet on the back of the washer, « Tighten the fittings securely. Turn on both faucets all the way and check for leaks at both ends of the hoses.
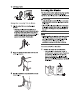
14 INSTALLATION Using the Laundry Tub to Drain 1 Clip the end of the hose into the elbow bracket, « Connect the elbow bracket @ within 4 Inches (10 cm) of the end of the drain hose. If the drain hose is extended more than 4 Inches {10 cm) beyond the end of the elbow bracket, mold or microorganisms could spread to the inside of the washer. 2 Hang the end of the drain hose over the side of the laundry tub. 3 use the provided tie strap to secure the drain hose in place.
INSTALLATION 15 2 Adjust the leveling feet, + Turn all 4 leveling feet in one direction to raise the washer or the other direction to lower it. 3 Check the level again. Push or rock the top edges of the washer gently to make sure the washer does not rock. If the washer rocks, readjust the leveling feet. 4 Tighten the lockouts @ « Turn the lockouts counterclockwise and tighten them when the washer is level.