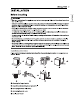
INSTALLATION 9 INSTALLATION Before Installing £ WARNING Moving or installation of the appliance requires two or more people. Failure to follow these instructions may resulting injury. Store and Install the appliance where it will not be exposed to temperatures below freezing or exposed to outdoor weather conditions. Failure to follow this warning can cause product or part failure, serious injury, fire, electric shock, or death. Properly ground the washer to conform with all governing codes and ordinances.
10 INSTALLATION @ Connecting to the Power Supply @ Final Installation Check Tools Leaded @ Pliers @ Flat-Blade Screwdriver @ Level Choosing the Proper Location Check the following requirements for the install location before installing the washer. * Allow for sufficient space between the walls and the washer for installation. Make sure that the floor is clean, dry and free of dust, dirt, water and oil so the leveling feet cannot slide easily.
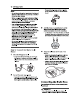
INSTALLATION 11 D 57 cm) E 26 3/4° (68 cm) F 6 32" (81.1 cm) H cm) Unpacking and Removing Shipping Material Remove all shipping materials from the washer for proper operation and inspect it for shipping damage, 4% CAUTION + Allure to remove shipping materials can cause excessive nose and vibration. Unpacking Shipping Material 1 Lift the washer off of the foam base. After removing the carton and shipping material, lift the washer off the foam base.
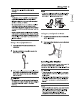
12 INSTALLATION NOTE Do not stretch the water hoses intentionally, and make sure that they are not pinched, crushed or kinked by other objects. Water supply pressure must be between 20 psi and 120 psi (138 827 kappa. If the water supply pressure is more than 120 psi, a pressure reducing valve must be installed, Your hot water heater should be set to deliver water at 120 135°F (48 57°C) to allow the washer to properly control wash temperatures.
INSTALLATION 13 hose can result in flooding and property damage. ] NOTE The drain must be installed in accordance with any applicable local codes and regulations. Make sure that the drain hose is not stretched, pinched, crushed, or kinked. Do not install the drain hose with the end lower than 29,5 Inches (75 cm) or higher than 96 Inches (244 cm) above the bottom of the washer or more than 60 inches (152 cm) away from the washer.
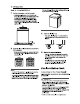
14 INSTALLATION How to Level the Washer 1 Position the washer In its final location, *+ Take special care nat to pinch, strain, or crush the water and drain hoses. If you have a carpenter’s level @, you can use it to check that the washer is level. The slope beneath the washer should not exceed 1 inch, and all 4 leveling feet must rest firmly on the floor. 2 Open the lid and look from above to see if the tub is centered. * If the tub Is not centered, readjust the front feet.