LG G5 Chassis Brace Gen 5 Camaro “THE MOST POWERFUL HEADERS ON THE PLANET” Brought to you by LG Motorsports 972-429-1963 Thank you for purchasing LG Motorsports products for your Gen 5 Camaro.
Parts Inventory: 1. Driver side rear subframe brace 2. Passenger side rear subframe brace 3. Driver side mid bar 4. Passenger side mid bar 5. Front X brace 6. two small single, nut plates 7. two double, nut plates 8. (4) 12 x 1.75mm ny-lock nuts 9. (6) 12 x 1.75 mm x 60mm long bolts 10. (7) 12 x 1.75 mm x 45mm long bolts 11. (2) 16 x 2.0 mm x 80mm long bolts 12. (12) 10 x 1.5mm x 45mm long bolts 13. (2) tube frame nut inserts 14. (2) 16mm Washers 15. (17) 12mm Washers 16.
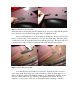
Figure 1: Center tunnel brace removal. Install: To begin the install start at the rear of the car mocking up one side of your chassis brace to familiarize yourself with the bolt locations that you will be using. We will be using all factory hole and nut locations on the car so no drilling is required into your car for this install. Figure 2: Rear subframe mockup First we will need to install the four supplied nut plates into the chassis.
Figure 3: Install of outer nut plate. Install the plate by twisting the plate through the larger open slot to align with the middle hole. The bent down tab will hold the plate while you tighten the bolts. Next we will install the two front nut plates by sliding into the open section of the factory car chassis rails. Notice that there is one open hole in the plate. This hole will go over the factory nut shown in the picture below with the green tape.
Figure 4: Rear brace to subframe connection. Figure 5: Rear bolts installed Moving forward, install the 12mm x 1.7 x 60mm bolts into both outer supports into the nut plates that we installed first into the frame. Again start this by hand, and leave loose until all bolts are installed.
Figure 6: Outer brace bolt installed Moving forward yet again we are going to start the install of the front bolt locations, see figure #7. In these holes we will be using the 10mm supplied bolts and a combination of factory nut locations as well as the installed nut plate that we installed in figure 3 above. Remember use a correct washer at each location. The factory cross brace will also be used at this time (removed for picture).
Moving onto the middle supports we must first remove two bolts from the front subframe as we will be tying the system into it as well. See this bolt in figure 8. Figure 8: Front subframe rear bolt to be removed With the front bolt removed you can now start to install the middle bracing to your car.
Using the supplied 16mm x 2.0 bolts attach the middle braces to the front subframe loosely. Install the remaining 10mm x 1.5 bolts and washers to the open holes to the Camaro factory chassis rails and through the last open bolts in the rear subframe brace. Figure 10: Front X brace installed. Slide the X brace into place at the open gap provided by the middle chassis braces. You will need to insert the two supplied tube nuts are shown in figure 11 below.
Figure 12: Rear X location mount for tube nuts. Once the nuts are dropped in line up the holes and install 2 of the supplied 12 x 1.75 x 45mm bolts and washers to hold the X in location. You will be using the remaining 12mm bolts and washers to attach the X to the front subframe through existing threaded and non threaded holes into the front subframe. Moving forward on the X you will drop in two more 12mm bolts and washers just under the oil pan and thread into the X from the top down.
I thank you for choosing LG Motorsports for all of your Corvette and Camaro needs. Lou Gigliotti President LG Motorsports LG Motorsports is not responsible for any improper install, modification to product, or any changes made by installer to product. Any welding or modification will void any product warrantee. LG Motorsports or the dealer is not liable for any loss, damage, or injury due to the direct or indirect use of this product.