OPERATION 15 OPERATION Clean the refrigerator. Clean the refrigerator thoroughly and wipe off all dust that accumulated during shipping. CAUTION ••Do not scratch the refrigerator with a sharp object or use a detergent that contains alcohol, a flammable liquid or an abrasive when removing any tape or adhesive from the refrigerator. Remove adhesive residue by wiping it off with your thumb or dish detergent.
16 OPERATION Control Panel The control panel may differ from model to model. Control Panel Features a Voice Assistant Changes voice assistant settings. This button allows the appliance to connect to a home Wi-Fi network. Refer to SMART FUNCTIONS for information on the initial setup of the LG ThinQ application. b Wi-Fi The Wi-Fi button, when used with the LG ThinQ app, allows the refrigerator to connect to a home Wi-Fi network.
OPERATION 17 CAUTION NOTE •• The displayed text may not be readable on some flooring materials, but this will not affect the performance of the automatic door opening function. •• If flooring material is highly reflective (metal, glass tile), the motion sensor may malfunction and the automatic door opening function may not work properly. •• Reflective objects placed in front of the motion sensor may cause the text to display, but the text disappears if no movement is detected.
18 OPERATION i Auto Lift When Auto Lift is enabled, pressing the bottom pullout drawer button automatically opens the drawer and raises the inner compartment for convenient access. ••When the auto door sensor a detects motion in front of the refrigerator, the bottom pullout drawer button b lights up. If the button does not light up, move closer to the refrigerator to trip the sensor. Press the bottom pullout drawer button again to automatically lower the inner compartment and close the drawer.
OPERATION 19 Setting Drawers to Freezer Mode To set the drawers to the freezer mode, press and hold the Freezer Drawer button for approximately 1 second. k Refrigerator Drawer Indicates the set temperature of the drawers in Celsius (°C) or Fahrenheit (°F). The default Refrigerator mode temperature is 37 °F (3 °C). Press the Refrigerator Drawer button repeatedly to select a new set temperature from 33 °F to 43 °F (1 °C to 7 °C).
20 OPERATION Storing Wine CAUTION ••Do not overfill or pack items too tightly onto storage racks. Doing so may cause damage to the rack or personal injury if items are removed with excessive force. NOTE •• If you are leaving home for a short period, like a short vacation, the refrigerator should be left on. •• If you are leaving the refrigerator turned off for an extended period, remove all contents and turn off the power.
OPERATION 21 NOTE Stagger the fronts and backs of the bottles on the racks for safer storage. Storing Champagne The drawer can hold up to 6 bottles. ENGLISH Storing Red Wine The top shelf can hold up to 16 bottles. The remaining shelves can hold up to 9 bottles each. Storage Racks The sliding racks help keep bottles organized and easy to reach. CAUTION Storing White Wine The shelf can hold up to 16 bottles. •• The storage racks are heavy.
22 OPERATION Removing and Assembling Red Wine Racks 1 2 To remove, raise the front of the shelf to disengage the shelf hooks, then lift the shelf from the back. Wireless Power Transfer a Specifications Frequency 350 kHz ± 20 kHz Rated voltage DC 12 V Delivered power Less than or equal to 1.2 W per shelf Transmission mode Electromagnetic induction To assemble, tilt the front of the shelf up and guide the shelf hooks into the slots at a desired height.
OPERATION 23 Removing and Assembling White Wine Rack To remove the rack, lift the rack and pull straight out. 2 To assemble the rack, insert the rack into the frame and lower it into place. Removing and Assembling Champagne Drawer 1 To remove, pull the drawer out. 2 Lift the drawer straight up and out of the frame. While keeping both levers pressed, lift the drawer support slightly and remove it from the rail system.
24 OPERATION InstaView Door The sleek tinted glass panel illuminates with two quick knocks, allowing you to see inside the wine storage compartment without ever opening the door. Storing Food Food Storage Tips Wrap or store food in the refrigerator in airtight and moisture-proof material unless otherwise noted. This prevents food odor and taste transfer throughout the refrigerator. For dated products, check date code to ensure freshness. CAUTION • Do not overfill or pack items too tightly into door bins.
OPERATION 25 Place in plastic bags or plastic container and store in crisper. Fish Freeze fresh fish and shellfish if they are not being eaten the same day purchased. Eating fresh fish and shellfish the same day purchased is recommended. Leftovers Cover leftovers with plastic wrap or aluminum foil, or store in plastic containers with tight lids.
26 OPERATION Auto-lift Device 5 Removing the Auto-lift Device Insert the fingertips of both hands under the cover at the center and pull the cover forward gently. Remove the auto-lift device in the bottom drawer to increase the storage space or for cleaning. 1 Unplug the refrigerator or disconnect power. 2 Open the bottom drawer, hold the inner compartment with both hands and pull it out. CAUTION •• Pull the cover gently to avoid damaging it.
OPERATION 27 Assembling the Auto-lift Device 1 Lift the auto-lift device with both hands. 6 Insert the hinges on the auto-lift device into the slots at the front of the drawer. 7 Lower the device into place and move it back and forth to make sure it is engaged. 8 Use both hands to assemble the inner compartment in the drawer. 9 Plug in the refrigerator or connect power. Remove the hole cover from the bottom of the drawer.
28 SMART FUNCTIONS SMART FUNCTIONS LG ThinQ Application Before Using LG ThinQ Application 1 Use a smartphone to check the strength of the wireless router (Wi-Fi network) near the appliance. ••If the distance between the appliance and the wireless router is too far, the signal strength becomes weak. It may take a long time to register or installation may fail. 2 Turn off the Mobile data or Cellular Data on your smartphone. 3 Connect your smartphone to the wireless router.
SMART FUNCTIONS 29 Installing the LG ThinQ Application Search for the LG ThinQ application from the Google Play Store or Apple App Store on a smartphone. Follow instructions to download and install the application. Connecting to Wi-Fi The Wi-Fi button, when used with the LG ThinQ application, allows the appliance to connect to a home Wi-Fi network. The Wi-Fi icon shows the status of the appliance’s network connection. The icon illuminates when the appliance is connected to the Wi-Fi network.
30 SMART FUNCTIONS FCC RF Radiation Exposure Statement Open Source Software Notice Information This equipment complies with FCC radiation exposure limits set forth for an uncontrolled environment. This transmitter must not be colocated or operating in conjunction with any other antenna or transmitter. To obtain the source code under GPL, LGPL, MPL, and other open source licenses, that is contained in this product, please visit http://opensource.lge. com.
SMART FUNCTIONS 31 NOTE Setting up the Voice Assistant You must wake the voice assistant up before it can assist you. You can select 2 different ways to do this. Mode Details This mode allows you to use either motion sensor activation or voice activation. Wake Zone + Wake Word •• Wake Zone: Stand close enough to the front of the product and the voice assistant will wake automatically without the wake word. •• Wake Word: Stand within 10 feet (3 m) of the refrigerator and clearly say, “Hi, LG”.
32 SMART FUNCTIONS NOTE Voice assistant supports English commands only, so it will not be responded to other than English language. •• To issue a new voice command, say, “Hi, LG” or move away from the refrigerator and then move close again (within 3.25 ft. or 1 m). •• If the voice command is not recognized, the voice assistant function exits the standby mode. Using Audible Diagnosis to Diagnose Issues Follow the instructions below to use the audible diagnosis method.
MAINTENANCE 33 MAINTENANCE WARNING •• Use non-flammable cleaner. Failure to do so can result in fire, explosion, or death. CAUTION •• Do not use an abrasive cloth or sponge when cleaning the interior and exterior of the refrigerator. •• Do not place your hand on the bottom surface of the refrigerator when opening and closing the doors. General Cleaning Tips •• Both the refrigerator and freezer sections defrost automatically; however, clean both sections once a month to prevent odors.
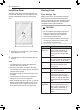
34 MAINTENANCE Air Filter Replacing the Fresh Filter Replace the air filter: •• Approximately every six months. •• When the air filter LED blinks or the replacement indcator icon is displayed. 1 Remove the cover to the air filter compartment by inserting the blunt end of a plastic pen into the groove at the base of the compartment on either side. 2 Remove the filter inside the air filter cover and replace it with a new filter. •• Make sure to insert the new filter with the “Back” label facing out.