UUGGwGXGG{ SGhGY[SGYWYXGG[aXXGwt OWNER'S MANUAL GAS RANGE Read this owner's manual thoroughly before operating the appliance and keep it handy for reference at all times. ENGLISH LSGS6338 MFL68920537 Rev.01_082421 www.lg.com Copyright © 2021 LG Electronics Inc. All Rights Reserved.
UUGGwG[GGt SGtGX\SGYWYXGG\aY[Gwt Safety for a Gas Range WARNING: If the information in these instructions is not followed exactly, a fire or explosion may result causing property damage, personal injury or death. • • Do not store or use gasoline or other flammable vapors and liquids in the vicinity of this or any other appliance. WHAT TO DO IF YOU SMELL GAS - Do not try to light any appliance. - Do not touch any electrical switch. - Do not use any phone in your building.
UUGGwGZGG{ SGhGY[SGYWYXGG[aXXGwt 3 TABLE OF CONTENTS 5 5 6 9 IMPORTANT SAFETY INSTRUCTIONS 17 Grounding 18 18 Assembling the Surface Burners READ ALL INSTRUCTIONS BEFORE USE 5 Safety Messages 5 Anti-Tip Device WARNING 6 Installation 7 Operation 8 Maintenance 8 Grounding Instructions 8 Risk of Fire and Flammable Materials 19 Checking Ignition of the Surface Burners 19 Adjusting the Surface Burner to the Low Flame (Simmer) Setting 19 Installation 9 Operatio
UUGGwG[GG{ SGhGY[SGYWYXGG[aXXGwt 4 34 Using Oven Racks 61 61 Changing the Oven Light 34 Instaview 35 Bake 35 Convection Mode 36 Recommended Baking and Roasting Guide 37 Broil 39 Recommended Broiling Guide 41 Proof 62 TROUBLESHOOTING 62 64 66 Parts & Features 68 Noises 42 Air Fry 69 Wi-Fi 43 Recommended Air Frying Guide 45 Frozen Meal 45 Remote Start 46 Meat Probe 47 Using the Sabbath Mode 48 SMART FUNCTIONS 48 LG ThinQ Application 48 LG ThinQ Application Features 48
UUGGwG\GG{ SGhGY[SGYWYXGG[aXXGwt IMPORTANT SAFETY INSTRUCTIONS 5 IMPORTANT SAFETY INSTRUCTIONS Download this owner's manual at http://www.lg.com Safety Messages Your safety and the safety of others are very important. We have provided many important safety messages in this manual and on your appliance. Always read and follow all safety messages. This is the safety alert symbol. This symbol alerts you to potential hazards that can kill or injure you and others.
UUGGwG]GG{ SGhGY[SGYWYXGG[aXXGwt 6 IMPORTANT SAFETY INSTRUCTIONS WARNING • Do not step or sit on the oven door. The range could be tipped and injury might result from spilled hot liquid, food, or the range itself. • Never remove the oven legs. The range will not be secured to the anti-tip bracket if the legs are removed.
UUGGwG^GG{ SGhGY[SGYWYXGG[aXXGwt IMPORTANT SAFETY INSTRUCTIONS 7 • This product should not be installed below ventilation type hood systems that direct air in a downward direction. • To prevent poor air circulation, place the range out of the kitchen traffic path and out of drafty locations. Operation WARNING NEVER cover any slots, holes or passages in the oven bottom or cover an entire rack with materials such as aluminum foil.
UUGGwG_GG{ SGhGY[SGYWYXGG[aXXGwt 8 IMPORTANT SAFETY INSTRUCTIONS • Do not line oven walls or bottom with aluminum foil or allow them to contact exposed heating elements in the oven. Doing so could create a fire hazard or cause damage to the range. • During oven operation, the upper surface of the drawer cavity becomes hot and may cause burns. Never allow children to remain unsupervised near the oven or cooktop.
UUGGwG`GG{ SGhGY[SGYWYXGG[aXXGwt IMPORTANT SAFETY INSTRUCTIONS 9 CAUTION Installation • After using your range for an extended period of time high floor temperatures may result. Many floor coverings will not withstand this kind of use. Never install the range over vinyl tile or linoleum that cannot withstand such type of use. Never install it directly over interior kitchen carpeting. Operation • Do not use the oven for storing food or cookware.
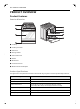
UUGGwGXWGG{ SGhGY[SGYWYXGG[aXXGwt 10 PRODUCT OVERVIEW PRODUCT OVERVIEW Product Features Exterior & Interior a Cooktop b Cooktop controller c Oven door d Storage drawer e Oven mode knob f Gasket g Broil burner h Convection burner i Model & serial number plate Product Specifications The appearance and specifications listed in this manual may vary due to constant product improvements. Oven Range Models LSGS6338 Description Gas Slide In Oven Range Electrical requirements 0.
UUGGwGXXGG{ SGhGY[SGYWYXGG[aXXGwt PRODUCT OVERVIEW 11 Accessories Included Accessories c Rear filler (1ea) d Air fry tray (1ea) e Meat probe (1ea) f Owner’s manual (1ea) g Wok grate (1ea) h Offset rack (1ea) i Spray bottle (1ea) a Anti-tip bracket (1ea) b Screws (6ea) c Anchors (6ea) j Non-scratch scouring pad (1ea) k Gliding rack (1ea) Optional Accessories d Template (1ea) LP Nozzle Conversion Kit a Grid b Broiler pan a Cooktop Nozzles (6ea) b Oven Nozzles (2ea) NOTE •
UUGGwGXYGG{ SGhGY[SGYWYXGG[aXXGwt 12 INSTALLATION INSTALLATION Before Installing Tools Needed a Phillips screwdriver b Flat-blade screwdriver c Pencil and ruler d Open-end or adjustable wrench e Pipe wrench (2) (one for support) f Level Parts Parts You May Need Unpacking and Moving the Range WARNING • You should use two or more people to move and install the range. (Excessive Weight Hazard) Failure to do so can result in back or other injury.
UUGGwGXZGG{ SGhGY[SGYWYXGG[aXXGwt INSTALLATION 13 tape or glue. These products can damage the surface of your range. Ventilation • Do not locate your range where it may be subject to strong drafts. Any openings in the floor or wall behind the range should be sealed. Make sure the openings around the base of the range that supply fresh air for combustion and ventilation are not blocked by carpeting or woodwork.
UUGGwGX[GG{ SGhGY[SGYWYXGG[aXXGwt 14 INSTALLATION Dimensions and Clearances • Provide proper clearance between the range and adjacent combustible surfaces. • These dimensions must be met for safe use of your range. • The location of the electrical outlet and pipe opening (see "Gas Pipe and Electrical Outlet Locations" below) may be adjusted to meet specific requirements. • The range may be placed with 0" clearance (flush) at the back wall.
UUGGwGX\GG{ SGhGY[SGYWYXGG[aXXGwt INSTALLATION 15 Clearances ENGLISH a Minimum b Minimum clearance to left/right wall c Maximum depth for cabinets above countertops d Front edge of the range side panel forward from cabinet e To cabinets below cooktop and at the range back Gas Pipe and Electrical Outlet Locations 30" (76.2 cm) 7 14/16" (20 cm) 11 13/16" (30 cm) 3 6/16" (8.5 cm) 3" 17 15/16" (7.6 cm) (45.
UUGGwGX]GG{ SGhGY[SGYWYXGG[aXXGwt 16 INSTALLATION Checking Adjustments 1 Place the level diagonally on the oven rack, and check each direction for level. • First check direction a. Then check direction b. Connecting the Range to Gas WARNING • Isolate the range from the gas supply system by closing its individual shut-off valve during any pressure testing of the gas supply system at test pressures equal to or less than 1/2 psi (3.5 kPa).
UUGGwGX^GG{ SGhGY[SGYWYXGG[aXXGwt INSTALLATION 17 NOTE 3 4 e Flex connector (6 ft. max.) f Gas shut-off valve g 1/2" Adapter Connect a flexible metal appliance connector to the adapter on the range. Position the range to permit connection at the shut-off valve.
UUGGwGX_GG{ SGhGY[SGYWYXGG[aXXGwt 18 INSTALLATION WARNING • Do not, under any circumstances, cut or remove the third (ground) prong from the power cord. • The customer should have the wall receptacle and circuit checked by a qualified electrician to make sure the receptacle is properly grounded.
UUGGwGX`GG{ SGhGY[SGYWYXGG[aXXGwt INSTALLATION 19 Checking Ignition of the Surface Burners 4 Insert a small, flat-blade screwdriver into the opening marked below. ENGLISH Electric Ignition Select a surface burner knob and simultaneously push in and turn to the Lite position. You will hear a clicking sound indicating proper operation of the spark module. Once the air has been purged from the supply lines the burner should ignite within 4 seconds.
UUGGwGYWGG{ SGhGY[SGYWYXGG[aXXGwt 20 INSTALLATION NOTE • If the countertop depth is less than 24 3/4 ", the control panel will not sit flush with the countertop. 1 Using a screwdriver, remove the three screws holding the rear bracket in place. • Engage the range to the anti-tip device by following the guide on the anti-tip bracket template. Ensure the anti-tip device is reengaged when the range is moved by following the guide on the anti-tip bracket template.
UUGGwGYXGG{ SGhGY[SGYWYXGG[aXXGwt INSTALLATION 21 a Anti-tip bracket 2 b Leveling leg 2 Slide the range against the wall, making sure the back leg slides into and engages the antitip bracket. 3 • Make sure the back leg slides into and engages the anti-tip bracket. NOTE Check for proper installation by grasping the front edge of the cooktop and carefully attempting to tilt the range forward.
UUGGwGYYGG{ SGhGY[SGYWYXGG[aXXGwt 22 OPERATION OPERATION Control Panel Control Panel Features a Smart DiagnosisTM Use during the Smart Diagnosis feature. b Control Lock Press and hold the button for 3 seconds to lock the control panel. c Cook Time Press the button to set the desired amount of time for food to cook. The oven shuts off when the set cooking time runs out. d Start Time Press the button to set the delayed timed cook. The oven starts at the set time. e Temp.
UUGGwGYZGG{ SGhGY[SGYWYXGG[aXXGwt OPERATION 23 l Oven Mode Knob Turn the knob to select oven operating mode. • Flashing Clock If the colon in the clock display flashes, press Clock and reset the time, or press any key to stop the flashing. • Press any button on the control panel to activate the display. • Setting the Time, Timer and Temperature If you enter one digit of a number incorrectly, enter the entire number again to correct it.
UUGGwGY[GG{ SGhGY[SGYWYXGG[aXXGwt 24 OPERATION NOTE • The time of day cannot be changed during a timed baking or self-clean cycle. • To check the time of day when the display is showing other information, press Clock. • If no other buttons are pressed within 25 seconds of pressing Clock, the display reverts to the original setting. • If the display time is blinking, there may have been a power failure. Reset the time.
UUGGwGY\GG{ SGhGY[SGYWYXGG[aXXGwt OPERATION 25 • enable/disable convection auto conversion • adjust the oven temperature • activate/deactivate the preheating alarm light • switch the temperature scale between Fahrenheit and Celsius 1 2 Setting the Hour Mode The control is set to use a 12-hour clock. To reset the clock to 24-hour mode, follow the steps below. 1 2 3 Press Settings once. Press 1 to toggle between a 12-hour and 24hour clock. Press START to accept the change.
UUGGwGY]GG{ SGhGY[SGYWYXGG[aXXGwt 26 OPERATION Selecting Fahrenheit or Celsius Setting a Delayed Timed Cook 1 1 Set the oven temperature display to show either Fahrenheit (ૢ) or Celsius () units. The oven defaults to Fahrenheit unless changed by the user. Press Settings repeatedly until Unit appears in the display. For example, to bake at 300 °F and delay the start of baking until 4:30, first set the clock for the correct time of day.
UUGGwGY^GG{ SGhGY[SGYWYXGG[aXXGwt OPERATION 27 1 Turn the oven mode knob to select Bake. 350 °F appears in the display. Min. Max. Temp. / Temp. / Time Time 12 Hr. 1:00 Hr. / min. 12:59 Hr. / min. 24 Hr. 0:00 Hr. / min. 23:59 Hr. / min. 12 Hr. 0:01 min. / sec. 11:59 Hr. / min. 24 Hr. 0:01 min. / sec. 11:59 Hr. / min. 12 Hr. 0:01 Hr. / min. 11:59 Hr. / min. 24 Hr. 0:01 Hr. / min. 11:59 Hr. / min. Changing the Cook Time during Cooking Conv.
UUGGwGY_GG{ SGhGY[SGYWYXGG[aXXGwt 28 OPERATION Feature Air Fry Air SousVide • Touching grates before they cool down may cause burns. Min. Max. Temp. / Temp. / Time Time 300 ૢ / 150 0:01 Hr. / min. 550 ૢ / 285 11:59 Hr. / min. 400 °F / 205 100 ૢ / 38 205 ૢ / 96 130 °F / 54 Default • What to do if you smell gas - Open windows. - Do not try to light any appliance.
UUGGwGY`GG{ SGhGY[SGYWYXGG[aXXGwt OPERATION 29 • Foods for frying should be as dry as possible. Frost or moisture on foods can cause hot fat to bubble up and spill over the sides of the pan. • Never try to move a pan of hot fat, especially a deep fryer. Wait until the fat is cool. • Do not place plastic items on the cooktop- they may melt if left too close to the vent. • Keep all plastics away from the surface burners.
UUGGwGZWGG{ SGhGY[SGYWYXGG[aXXGwt 30 OPERATION Using the Gas Surface Burners CAUTION • Match the size of the cooktop burner or element to the size of the cookware in use. Using a large element for a small pan wastes heating energy, and the exposed surface of the element is a burn or fire hazard. 1 2 3 Setting the Flame Size Watch the flame, not the knob, as you reduce heat. Match the flame size on a gas burner to the cookware being used for fastest heating.
UUGGwGZXGG{ SGhGY[SGYWYXGG[aXXGwt OPERATION 31 • Heatproof Glass Ceramic 1 NOTE • Match the size of the cookware to the amount of food being cooked to save energy when heating. Heating 1/2 quart of water requires more energy in a 3-quart pot than in a 1-quart pot. Using a Wok If using a wok, use a 14-inch or smaller flatbottomed of wok. Make sure that the wok bottom sits flat on the grate.
UUGGwGZYGG{ SGhGY[SGYWYXGG[aXXGwt 32 OPERATION CAUTION • Do not use stove top grills on the surface burners. Using a stove top grill on the surface burner will cause incomplete combustion and can result in exposure to carbon monoxide levels above allowable current standards. This can be a health hazard. CAUTION • Do not remove the center grate when using the griddle. • Do not remove the griddle plate until the cooktop grates, surfaces and griddle plate have completely cooled.
UUGGwGZZGG{ SGhGY[SGYWYXGG[aXXGwt OPERATION 33 In Case of Power Failure In case of a power failure, you can light the gas surface burners on your range with a match. CAUTION • Use extreme caution when lighting burners with a match. It can cause burns and other damage. 1 2 Hold a lit match to the burner, then push in the control knob. Turn the control knob to the Lo position. Oven Before Using the Oven Read all instructions before using.
UUGGwGZ[GG{ SGhGY[SGYWYXGG[aXXGwt 34 OPERATION harmless and will evaporate as the oven continues to heat up. 2 Lift up the front of the rack and pull it out. Replacing Racks 1 Place the end of the rack on the support. 2 Tilt the front end up and push the rack in. Oven Vent Instaview Areas near the vent may become hot during operation and may cause burns. Do not block the vent opening. Avoid placing plastics near the vent as heat may distort or melt the plastic.
UUGGwGZ\GG{ SGhGY[SGYWYXGG[aXXGwt OPERATION 35 Bake Bake is used to prepare foods such as pastries, breads and casseroles. The oven can be programmed to bake at any temperature from 170 ૢ (80 ) to 550 ૢ (285 ). The default temperature is 350 ૢ (175 ). Setting the Bake Function (example, 375 ૢ) Convection Mode 1 Turn the oven mode knob to select Bake. 2 The convection system uses a fan to circulate the heat evenly within the oven.
UUGGwGZ]GG{ SGhGY[SGYWYXGG[aXXGwt 36 OPERATION • When using Convection Bake, place the oven racks in positions suggested in the charts in this manual. Multiple-rack cooking saves time and energy. Whenever possible, cook foods requiring the same cooking temperature together in one oven. • Multiple oven rack cooking may slightly increase cook times for some foods. Rack and Pan Placement • Cakes, cookies and muffins have better results when using multiple racks.
UUGGwGZ^GG{ SGhGY[SGYWYXGG[aXXGwt OPERATION 37 • Always use a broiler pan and grid for excess fat and grease drainage. This will help to reduce splatter, smoke, and flare-ups. Desserts Fruit crisps and cobblers, from scratch Pies, from scratch, 2crust fruit 3 3 • When using your broiler, the temperature inside the oven will be extremely high.
UUGGwGZ_GG{ SGhGY[SGYWYXGG[aXXGwt 38 OPERATION • Always run your cooktop ventilation system or vent hood during broiling. • Keep the interior of your oven as clean as possible. Leftover debris from prior meals can burn or catch fire. • Avoid fatty marinades and sugary glazes. Both of these will increase the amount of smoke you experience. If you would like to use a glaze, apply it at the very end of cooking.
UUGGwGZ`GG{ SGhGY[SGYWYXGG[aXXGwt OPERATION 39 Recommended Broiling Guide The size, weight, thickness, starting temperature, and your preference of doneness will affect broiling times. a Grid (sold separately) b Broiler pan (sold separately) * : This feature is for the offset rack use. Hamburgers Rack Position First Side (min.) Second Side (min.) Comments 7* 6-7 4-5 Space evenly. Up to 9 patties may be broiled at once.
UUGGwG[WGG{ SGhGY[SGYWYXGG[aXXGwt 40 OPERATION Quantity and/or Thickness Food Lamb Chops Bacon Rack Position First Side (min.) Second Side (min.) 2 (1" thick) about 10 to 12 oz. Medium 5 (6*) 6 4-7 Well done 5 (6*) 10 10 2 (1 1/2" thick) about 1lb. Medium 5 (6*) 10 4-6 Well done 5 (6*) 17 12-14 4 (5*) 8 3 1/2 lb. (about 8 thin slices) Comments • This guide is only for reference. Adjust cook time according to your preference.
UUGGwG[XGG{ SGhGY[SGYWYXGG[aXXGwt OPERATION 41 Proof Setting the Proof Function 1 Use rack position 2 or 3 for proofing. Setting the Warm Function 1 Turn the oven mode knob to select Proof/ Warm until Proof appears in the display. 2 Press 2 to set Warm. 3 Press START. 4 To cancel the Warm function, turn the oven mode knob to the OFF position. NOTE 2 Turn the oven mode knob to select Proof/ Warm until Proof appears in the display. 3 Press 1 to set Proof.
UUGGwG[YGG{ SGhGY[SGYWYXGG[aXXGwt 42 OPERATION 5 To cancel the Keep Warm function, turn the oven mode knob to the OFF position. NOTE • You can also activate the Keep Warm function while operating some cook modes. a Air Fry Tray b Heavy Duty Rack • If you don't have the air fry tray, place food on a wire rack inside a foil-lined broiler pan. • The Keep Warm function will be maintained up to 3 hours unless you turn the oven mode knob to the OFF position.
UUGGwG[ZGG{ SGhGY[SGYWYXGG[aXXGwt OPERATION 43 • Turn on your exhaust hood at a high fan setting before you start Air Fry and leave it on for 15 minutes after you're done. • Open a window or sliding glass door, if possible, to make sure the kitchen is well-ventilated. • Clean the grease filters on your exhaust hood regularly. • Keep the oven free from grease buildup. Wipe down the interior of the oven before and after air frying (once the oven has cooled).
UUGGwG[[GG{ SGhGY[SGYWYXGG[aXXGwt 44 OPERATION Quantity (oz) Temp. (°F) Rack Position Time 50 425 5 25-35 Fresh Chicken Wings† 40 450 5 30-35 Fresh Chicken 40 450 5 30-40 Thighs 40 450 5 30-35 Breasts 40 450 5 30-35 Frozen Onion Rings, Breaded 20 400 5 15-25 Frozen Spring Rolls (0.7 oz each) 45 425 5 18-28 Thin Sausage (2.5 oz each, diameter 0.
UUGGwG[\GG{ SGhGY[SGYWYXGG[aXXGwt OPERATION 45 Setting Air Sous-Vide Mode 1 Place the heavy duty rack in position 3 and place the sealed food bag on it. 2 3 4 5 Turn the oven mode knob to select Air SousVide mode. Set the desired oven temperature. (Range: 100 °F ~ 205 °F) Press START. Once cooking is finished, allow the oven to cool completely. Recommended Air Sous-Vide Guide Food Beef steak Chicken breast Salmon Asparagus Time Quantity Temp.
UUGGwG[]GG{ SGhGY[SGYWYXGG[aXXGwt 46 OPERATION 2 3 4 Turn the oven mode knob to select Remote Start. When ON appears in the display, the Remote Start function is ready to use. Follow the directions in the smart phone application to set the cook mode, temperature, and run time (preheating time plus holding time). NOTE • Do not place food in the oven before or during the Remote Start run time.
UUGGwG[^GG{ SGhGY[SGYWYXGG[aXXGwt OPERATION 47 avoid breaking the probe, make sure food is completely defrosted before inserting. • Always use an oven mitt to remove the temperature probe. Do not touch the broil element. Failure to obey this caution can result in severe personal injury. • To avoid damage to the meat probe, do not use tongs to pull on the probe when removing it. • Do not store the meat probe in the oven. • Do not pull the wire to remove the probe.
UUGGwG[_GG{ SGhGY[SGYWYXGG[aXXGwt 48 SMART FUNCTIONS SMART FUNCTIONS LG ThinQ Application This feature is only available on models with Wi-Fi. The LG ThinQ application allows you to communicate with the appliance using a smartphone. LG ThinQ Application Features • Smart Diagnosis™ - This function provides useful information for diagnosing and solving issues with the appliance based on the pattern of use. NOTE • Scan to Cook cannot be used while the timer is running.
UUGGwG[`GG{ SGhGY[SGYWYXGG[aXXGwt SMART FUNCTIONS 49 • The network connection may not work properly depending on the Internet service provider. • If the appliance cannot be registered due to problems with the wireless signal transmission, unplug the appliance and wait about a minute before trying again. • If the firewall on your wireless router is enabled, disable the firewall or add an exception to it.
UUGGwG\WGG{ SGhGY[SGYWYXGG[aXXGwt 50 SMART FUNCTIONS This equipment should be installed and operated with a minimum distance of 20 cm (7.8 inches) between the antenna and your body. Users must follow the specific operating instructions for satisfying RF exposure compliance. Open Source Software Notice Information To obtain the source code under GPL, LGPL, MPL, and other open source licenses, that is contained in this product, please visit http:// opensource.lge.com.
UUGGwG\XGG{ SGhGY[SGYWYXGG[aXXGwt MAINTENANCE 51 MAINTENANCE CAUTION • Do not clean this appliance with bleach. • To prevent burns, wait until the cooktop has cooled down before touching any of its parts. • Always wear gloves when cleaning the cooktop. • To clean the knobs, make sure that they are in the OFF position and pull them straight off the stems.
UUGGwG\YGG{ SGhGY[SGYWYXGG[aXXGwt 52 MAINTENANCE Oven Door CAUTION • Both the broiler pan and grid may be cleaned with a commercial oven cleaner or in the dishwasher. • Do not use harsh cleaners or harsh abrasive cleaning materials on the outside of the oven door. Doing so can cause damage. Oven Racks • Use soapy water to thoroughly clean the oven door. Rinse well. Do not immerse the door in water. 1 • You may use a glass cleaner on the outside glass of the oven door.
UUGGwG\ZGG{ SGhGY[SGYWYXGG[aXXGwt MAINTENANCE 53 Grates and burner heads/caps can be removed for care and cleaning. • To remove burnt-on food, soak the burner heads in a solution of mild liquid detergent and hot water for 20–30 minutes. For stubborn stains, use a toothbrush or wire brush. • The burners will not operate properly if the burner ports or electrodes are clogged or dirty. • Burner caps and heads should be cleaned routinely, especially after excessive spillover.
UUGGwG\[GG{ SGhGY[SGYWYXGG[aXXGwt 54 MAINTENANCE Cleaning the Burner Grates CAUTION • Do not lift the grates out until they have cooled. • Do not put the grate in the oven during self cleaning mode. • Grates should be washed regularly and after spillovers. NOTE • EasyClean Stainless Steel Cooktop - To avoid scratching the cooktop surface, do not use abrasive or metal scouring sponges or pads. - Rub in the direction of the grain to avoid damaging the surface.
UUGGwG\\GG{ SGhGY[SGYWYXGG[aXXGwt MAINTENANCE 55 Benefits of EasyClean • Helps loosen light soils before hand-cleaning • EasyClean only uses water; no chemical cleaners - Delays the need for a Self Clean cycle - Minimizes smoke and odors - Can allow shorter Self Clean time NOTE • For models without Self Clean option - The EasyClean feature may not be effective in removing heavy, built-up soils.
UUGGwG\]GG{ SGhGY[SGYWYXGG[aXXGwt 56 MAINTENANCE should be fully covered to submerge all soils. Add water if necessary. NOTE • If cleaning multiple ovens, use an entire bottle of water to clean each oven. Do not spray water directly on the door. Doing so will result in water dripping to the floor. 6 10 11 Once the oven cavity is cleaned, wipe any excess water with a clean dry towel. Replace racks and any other accessories.
UUGGwG\^GG{ SGhGY[SGYWYXGG[aXXGwt MAINTENANCE 57 cookware, aluminum foil or any other material from the oven. • The kitchen should be well ventilated to minimize the odors from cleaning. Open a window or turn on a ventilation fan or hood before self-cleaning. • Wipe any heavy spillovers on the bottom of the oven. • Make sure that the oven light cover is in place and the oven light is off. • Clean the frame of the oven and door with hot soapy water. Rinse well.
UUGGwG\_GG{ SGhGY[SGYWYXGG[aXXGwt 58 MAINTENANCE NOTE • Once the door has been locked, the lock k indicator light stops flashing and remains on. Allow about 15 seconds for the oven door lock to activate. • If the clock is set for a 12-hour display (default) the Delayed Self Clean can never be set to start more than 12 hours in advance. • After the oven is turned off, the convection fan keeps operating until the oven has cooled down.
UUGGwG\`GG{ SGhGY[SGYWYXGG[aXXGwt MAINTENANCE 59 3 5 Set the time of day you would like the Self Clean to start by pressing numbers. 3 4 Press START. Firmly grasp both sides of the door at the top. Close the door to the removal position (approximately five degrees) which is halfway between the broil stop position and fully closed. If the position is correct, the hinge arms will move freely.
UUGGwG]WGG{ SGhGY[SGYWYXGG[aXXGwt 60 MAINTENANCE 4 Lock the hinge locks, rotating them back toward the slots in the oven frame until they lock. a Lever b Push down with finger a Hinge arm c Pull up with finger b Hinge lock 5 Close the oven door. Removing Drawers CAUTION • Disconnect the electrical power to the range at the main fuse or circuit breaker panel. Failure to do so can result in severe personal injury, death, or electrical shock.
UUGGwG]XGG{ SGhGY[SGYWYXGG[aXXGwt MAINTENANCE 61 Remove the halogen lamp from the socket. 4 Insert the new halogen lamp. 5 6 2 Lift the vent trim. Assembling the Vent Trim Assemble the vent trim in the reverse sequence of its removal. Periodic Maintenance Changing the Oven Light The oven light is a standard 40-watt appliance halogen. It turns on when the oven door is open. When the oven door is closed, press Light to turn it on or off.
UUGGwG]YGG{ SGhGY[SGYWYXGG[aXXGwt 62 TROUBLESHOOTING TROUBLESHOOTING FAQs Frequently Asked Questions Q: What types of cookware are recommended for use with the cooktop? A: • The pans must have a flat bottom and straight sides. • Only use heavy-gauge pans. • The pan size must match the amount of food to be prepared and the size of the surface element. • Use tight fitting lids. • Only use flat-bottom woks. Q: My new oven doesn’t cook like my old one.
UUGGwG]ZGG{ SGhGY[SGYWYXGG[aXXGwt TROUBLESHOOTING 63 What should I do if my racks are sticky and have become hard to slide in and out? A: Over time, the racks may become hard to slide in and out. Apply a small amount of olive oil to the sides of the racks. This will work as a lubricant for easier gliding. Q: What should I do for hard to remove stains on my cooktop? A: The cooktop should be cleaned after every use to prevent permanent staining.
UUGGwG][GG{ SGhGY[SGYWYXGG[aXXGwt 64 TROUBLESHOOTING A: Yes. It is highly recommended that 1 cup (8 oz or 240 ml) of water be sprayed or poured on the bottom and an additional ¼ cup (2 oz or 60 ml) of water be sprayed on walls and other soiled areas to fully saturate the soils for better cleaning performance. Q: I see smoke coming out of my oven range’s cooktop vents during EasyClean. Is this normal? A: This is normal. This is not smoke.
UUGGwG]\GG{ SGhGY[SGYWYXGG[aXXGwt TROUBLESHOOTING 65 Problem Possible Cause & Solution It may be due to improper installation or setting. Surface burners light but the oven does not. Shut-off vavle is not fully open. Food does not bake or roast properly Oven controls improperly set. • If the range is connected to LP gas, contact the technician who installed your range or made the conversion.
UUGGwG]]GG{ SGhGY[SGYWYXGG[aXXGwt 66 TROUBLESHOOTING Problem Oven will not work Possible Cause & Solution Plug on range is not completely inserted in the electrical outlet. • Make sure electrical plug is plugged into a live, properly grounded outlet. A fuse in your home may be blown or the circuit breaker tripped. • Replace the fuse or reset the circuit breaker. Oven controls improperly set. • See the "Oven" section in the Operation chapter. Oven too hot.
UUGGwG]^GG{ SGhGY[SGYWYXGG[aXXGwt TROUBLESHOOTING 67 Problem Oven light does not work. Possible Cause & Solution It is time to replace the lamp or the lamp is loose. The plug on the range is not completely inserted in the electrical outlet. • Make sure the electrical plug is inserted into a live, properly grounded outlet. Oven will not Self Clean. (On some models) The oven temperature is too high to set a Self Clean operation. • Allow the range to cool and reset the controls.
UUGGwG]_GG{ SGhGY[SGYWYXGG[aXXGwt 68 TROUBLESHOOTING Problem Range is not level. Possible Cause & Solution Poor installation. • Place oven rack in center of oven. Place a level on the oven rack. Adjust leveling legs at base of range until the oven rack is level. • Be sure floor is level and strong and stable enough to adequately support range. • If floor is sagging or sloping, contact a carpenter to correct the situation. Kitchen cabinet alignment may make range appear unlevel.
UUGGwG]`GG{ SGhGY[SGYWYXGG[aXXGwt TROUBLESHOOTING 69 Wi-Fi Problem The password for the Wi-Fi network was entered incorrectly. • Delete your home Wi-Fi network and begin the registration process again. Mobile data for your smartphone is turned on. • Turn off the Mobile data on your smartphone before registering the appliance. The wireless network name (SSID) is set incorrectly. • The wireless network name (SSID) should be a combination of English letters and numbers.
UUGGwG^WGG{ SGhGY[SGYWYXGG[aXXGwt 70 LIMITED WARRANTY LIMITED WARRANTY USA TERMS AND CONDITIONS ARBITRATION NOTICE: THIS LIMITED WARRANTY CONTAINS AN ARBITRATION PROVISION THAT REQUIRES YOU AND LG TO RESOLVE DISPUTES BY BINDING ARBITRATION INSTEAD OF IN COURT, UNLESS YOU CHOOSE TO OPT OUT. IN ARBITRATION, CLASS ACTIONS AND JURY TRIALS ARE NOT PERMITTED. PLEASE SEE THE SECTION TITLED “PROCEDURE FOR RESOLVING DISPUTES” BELOW.
UUGGwG^XGG{ SGhGY[SGYWYXGG[aXXGwt LIMITED WARRANTY 71 • Damage or failure resulting from misuse, abuse, improper installation, repair, or maintenance. Improper repair includes use of parts not authorized by LG. Improper installation or maintenance includes installation or maintenance contrary to the Product owner’s manual.
UUGGwG^YGG{ SGhGY[SGYWYXGG[aXXGwt 72 LIMITED WARRANTY Problem Uneven flame Possible Cause & Prevention Improper burner cap installation a Burner cap is properly seated. b Burner cap is NOT properly seated. • Check installation of burner head and cap. Burner ports clogged by food residue c Ports blocked by dirt d Flames uneven • Hardened residue should be removed using a toothbrush.
UUGGwG^ZGG{ SGhGY[SGYWYXGG[aXXGwt LIMITED WARRANTY 73 Problem Aluminum foil has melted in the oven ENGLISH Oven or racks are stained after using aluminum foil Possible Cause & Prevention • Never cover the oven bottom or cover an entire rack with materials such as aluminum foil. • If the foil has already melted onto the oven, it will not affect the performance of the oven.
UUGGwG^[GG{ SGhGY[SGYWYXGG[aXXGwt 74 LIMITED WARRANTY Problem Oven shows error code (F9, F19) but cooktop burners are working. Possible Cause & Prevention The gas pressure regulator valve is closed. a Lever’s closed position • Check that the regulator valve is in the open position. • If the regulator valve is closed, rotate the lever to open the valve.
UUGGwG^\GG{ SGhGY[SGYWYXGG[aXXGwt LIMITED WARRANTY 75 Problem Gas smell Possible Cause & Prevention a Pressure regulator b 1/2" Adapter c 1/2" Adapter d Gas Flow into Range e Flex connector (6 ft. max.) f Gas shut-off valve g 1/2" Adapter h 1/2" or 3/4" Gas pipe • Check with installer first. The cost of repair or replacement under these excluded circumstances shall be borne by the consumer.
UUGGwG^]GG{ SGhGY[SGYWYXGG[aXXGwt 76 LIMITED WARRANTY subject of the claim; and describe the nature of the claim and the relief being sought. If you and LG are unable to resolve the dispute within 30 days, either party may proceed to file a claim for arbitration. Agreement to Binding Arbitration and Class Action Waiver.
UUGGwG^^GG{ SGhGY[SGYWYXGG[aXXGwt LIMITED WARRANTY 77 ENGLISH You may only opt out of the dispute resolution procedure in the manner described above (that is, by e-mail or telephone); no other form of notice will be effective to opt out of this dispute resolution procedure. Opting out of this dispute resolution procedure will not affect the coverage of the Limited Warranty in any way, and you will continue to enjoy the full benefits of the Limited Warranty.
UUGGwG^_GG{ SGhGY[SGYWYXGG[aXXGwt 78 Memo
UUGGwG^`GG{ SGhGY[SGYWYXGG[aXXGwt Memo 79
UUGGwG_WGG{ SGhGY[SGYWYXGG[aXXGwt 80 Memo
UUGGwGXGG{ SGhGY[SGYWYXGG[aX^Gwt MANUAL DEL PROPIETARIO COCINA DE GAS Lea el manual del propietario detenidamente previo a operar el electrodoméstico y mantengalo al alcance para futuras referencias. ESPAÑOL LSGS6338 www.lg.com Copyright © 2021 LG Electronics Inc.
UUGGwG[GGt SGtGX\SGYWYXGGZa\XGwt Seguridad para una cocina de gas ADVERTENCIA: Si no sigue con exactitud la información de este manual, puede provocar un incendio o una explosión que cause daños en la propiedad, lesiones personales o la muerte. • • No guarde ni use gasolina u otros vapores o líquidos inflamables cerca de este aparato o cualquier otro. QUÉ HACER SI HUELE GAS - No intente encender ningún aparato. - No toque ningún interruptor eléctrico.
UUGGwGZGG{ SGhGY[SGYWYXGG[aX^Gwt 3 ÍNDICE 5 INSTRUCCIONES IMPORTANTES DE SEGURIDAD 5 LEA TODAS LAS INSTRUCCIONES ANTES DE UTILIZAR 6 9 5 Mensajes de Seguridad 5 Dispositivo antivuelco ADVERTENCIA 6 Instalación 7 Funcionamiento 8 Mantenimiento 8 Instrucciones de Conexión a Tierra 8 Riesgo de incendio y materiales inflamables PRECAUCIÓN 9 Instalación 9 Funcionamiento 18 Conexión de la cocina al gas 19 Ajuste de los obturadores de aire (para conversiones a
UUGGwG[GG{ SGhGY[SGYWYXGG[aX^Gwt 4 57 Software de código abierto 33 Ubicaciones de los quemadores 33 Uso de los quemadores de gas de superficie 57 57 Uso de LG ThinQ para diagnosticar problemas 34 Ajuste del tamaño de la llama 34 Uso de los utensilios de cocina adecuados 57 Uso del diagnóstico audible para diagnosticar problemas 35 Uso de un wok 35 Uso de la rejilla para wok 35 Uso de las rejillas en superficie 36 Uso de la parrilla 37 En caso de corte de energía eléctric
UUGGwG\GG{ SGhGY[SGYWYXGG[aX^Gwt INSTRUCCIONES IMPORTANTES DE SEGURIDAD 5 INSTRUCCIONES IMPORTANTES DE SEGURIDAD Descargue este manual del propietario en http://www.lg.com Mensajes de Seguridad Su seguridad y la de los demás son muy importantes. Tanto en este manual como en el equipo, hemos proporcionado muchos mensajes de seguridad importantes. Siempre debe leer y respetar todos los mensajes de seguridad. Este es el símbolo de alerta de seguridad.
UUGGwG]GG{ SGhGY[SGYWYXGG[aX^Gwt 6 INSTRUCCIONES IMPORTANTES DE SEGURIDAD ADVERTENCIA • No coloque objetos grandes y pesados, como pavos enteros, sobre la puerta del horno abierta. La cocina podría inclinarse hacia adelante y ocasionar lesiones. • No se pare ni se siente sobre la puerta del horno. La cocina podría inclinarse y usted podría sufrir lesiones con líquidos calientes derramados, alimentos calientes o la cocina misma. • Nunca retire las patas del horno.
UUGGwG^GG{ SGhGY[SGYWYXGG[aX^Gwt INSTRUCCIONES IMPORTANTES DE SEGURIDAD 7 instrucciones podría causar lesiones graves o daños a la propiedad. La agencia calificada que realice este trabajo asume la responsabilidad de la conversión. • Desconecte el suministro eléctrico antes de realizar el mantenimiento al electrodoméstico.
UUGGwG_GG{ SGhGY[SGYWYXGG[aX^Gwt 8 INSTRUCCIONES IMPORTANTES DE SEGURIDAD • Para prevenir riesgos de incendio o descarga eléctrica, no use un adaptador o cable de extensión, ni retire la punta con conexión a tierra del cable de alimentación eléctrica. Si lo hace podría causar lesiones graves, incendio o incluso la muerte a niños o adultos.
UUGGwG`GG{ SGhGY[SGYWYXGG[aX^Gwt INSTRUCCIONES IMPORTANTES DE SEGURIDAD 9 • La prueba para detectar fugas del aparato se debe realizar según las instrucciones del fabricante. • Para reducir la posibilidad de incendios provocados por grasa asegúrese de ubicar la asadera correctamente. • Siempre retire la asadera de la cocina después de usarla. La grasa que queda en la asadera podría provocar un incendio si se usa el horno sin remover la grasa.
UUGGwGXWGG{ SGhGY[SGYWYXGG[aX^Gwt 10 INSTRUCCIONES IMPORTANTES DE SEGURIDAD - Carne de res, ternera, cerdo o cordero: 145 °F - Pescado/mariscos: 145 °F Mantenimiento • No use limpiadores comerciales para horno sobre el acabado ni alrededor de ninguna pieza del horno. Dañarán el acabado del aparato. • Para prevenir manchas o decoloración, limpie el electrodoméstico después de cada uso. • Use guantes al limpiar la cocina para evitar lesiones o quemaduras.
UUGGwGXXGG{ SGhGY[SGYWYXGG[aX^Gwt DESCRIPCIÓN GENERAL DEL PRODUCTO 11 DESCRIPCIÓN GENERAL DEL PRODUCTO ESPAÑOL Características del Producto Interior y exterior a Placa de cocción b Controlador de la placa de cocción c Puerta del horno d Cajón de almacenamiento e Perilla de modo del horno f Junta g Quemador de asado h Quemador de convección i Placa con el número de serie y modelo Especificaciones del producto La apariencia y las especificaciones detalladas en este manual podr
UUGGwGXYGG{ SGhGY[SGYWYXGG[aX^Gwt 12 DESCRIPCIÓN GENERAL DEL PRODUCTO Modelos de cocinas con horno Capacidad total LSGS6338 6.
UUGGwGXZGG{ SGhGY[SGYWYXGG[aX^Gwt DESCRIPCIÓN GENERAL DEL PRODUCTO 13 NOTA • Para su seguridad y una mayor duración del producto, utilice únicamente componentes autorizados. • El fabricante no es responsable del mal funcionamiento del producto ni de accidentes causados por el uso de componentes o piezas no autorizados y comprados por separado.
UUGGwGX[GG{ SGhGY[SGYWYXGG[aX^Gwt 14 INSTALACIÓN INSTALACIÓN Antes de la Instalación Herramientas necesarias a Destornillador Phillips b Destornillador plano c Lápiz y regla d Llave de boca o ajustable Desembalaje y traslado de la cocina ADVERTENCIA • Debe haber dos o más personas para mover e instalar la cocina. (Peligro de peso excesivo) Si no se cumple con esto, se pueden producir lesiones en la espalda o de otro tipo.
UUGGwGX\GG{ SGhGY[SGYWYXGG[aX^Gwt INSTALACIÓN 15 Elección de la ubicación adecuada Ventilación • No instale la cocina donde pueda estar sujeta a corrientes de aire fuertes. Debe sellar todas las aberturas del piso o la pared que están detrás de la cocina. Asegúrese de que las aberturas alrededor de la base de la cocina que brindan aire fresco para la combustión y la ventilación no estén obstruidas por alfombras o madera.
UUGGwGX]GG{ SGhGY[SGYWYXGG[aX^Gwt 16 INSTALACIÓN Dimensiones y Espacios • Deje suficiente espacio entre la cocina y las superficies combustibles adyacentes. • Se deben cumplir estas dimensiones para usar de manera segura su cocina. • Se debe modificar la ubicación del tomacorriente y la abertura de la tubería (consulte "Ubicaciones de tubería de gas y tomacorriente eléctrico" a continuación) para cumplir los requisitos específicos.
UUGGwGX^GG{ SGhGY[SGYWYXGG[aX^Gwt INSTALACIÓN 17 Espacios libres ESPAÑOL a Mínimo b Espacio mínimo a la izquierda/derecha de la pared c Profundidad máxima para gabinetes ubicados sobre la mesada d Borde frontal del panel lateral de la cocina delante del gabinete e Para gabinetes debajo de la placa de cocción y en la parte posterior de la cocina Ubicaciones de tubería de gas y tomacorriente eléctrico 30" (76.2 cm) 7 14/16" (20 cm) 11 13/16" (30 cm) 3 6/16" (8.
UUGGwGX_GG{ SGhGY[SGYWYXGG[aX^Gwt 18 INSTALACIÓN Verificación de los ajustes 1 Ubique el nivelador en diagonal sobre el estante el horno y verifique en todas direcciones para nivelar. • Primero verifique la dirección a. Luego verifique la dirección b. deben ser conectores metálicos de pared simple de menos de 6 pies de longitud.
UUGGwGX`GG{ SGhGY[SGYWYXGG[aX^Gwt INSTALACIÓN 19 2 Montaje del conector flexible Pídale al instalador que le muestre la ubicación de la válvula de corte de gas de la cocina y cómo cerrarla si es necesario. • Compruebe que el regulador de la válvula de gas se encuentre en posición abierta. a Posición abierta de la palanca b Posición cerrada de la palanca NOTA • El regulador de presión de gas está en posición abierta desde fábrica.
UUGGwGYWGG{ SGhGY[SGYWYXGG[aX^Gwt 20 INSTALACIÓN Conexión de electricidad Z223.1/NFPA 54 o, en Canadá, con el Código de Instalación de Gas Natural y Propano, CSA B149.1. Requisitos eléctricos Circuito exclusivo conectado a tierra de forma adecuada de 120 voltios, 60 Hz protegido por un disyuntor de 15 o 20 A o fusible de fusión lenta. NOTA • Interruptores de circuito por falla a tierra - No se requieren ni se recomiendan los GFCI para receptáculos de cocina de gas.
UUGGwGYXGG{ SGhGY[SGYWYXGG[aX^Gwt INSTALACIÓN 21 3 Asegúrese de que el orificio del cabezal del quemador esté ubicado sobre el electrodo. Llamas amarillas Solicite mantenimiento. ESPAÑOL Puntas amarillas en conos externos Esto es normal para el gas LP. Llamas azul claro Esto es normal para el gas natural.
UUGGwGYYGG{ SGhGY[SGYWYXGG[aX^Gwt 22 INSTALACIÓN 5 Gire el tornillo para ajustar. • Sostenga el eje de la válvula con una mano mientras gira el tornillo para ajustar con la otra. 6 Vuelva a colocar la perilla. 7 Pruebe la estabilidad de la llama. • Prueba 1: Gire la perilla de Hi a Lo con rapidez. Si la llama se apaga, aumente el tamaño de la llama y vuelva a probar. • Prueba 2: Con el quemador en la configuración Lo abra y cierre la puerta del horno rápido.
UUGGwGYZGG{ SGhGY[SGYWYXGG[aX^Gwt INSTALACIÓN 23 • Vuelva a enganchar el dispositivo antivuelco si mueve la cocina. No opere la cocina sin el dispositivo antivuelco en su lugar y enganchado. Colocación del dispositivo antivuelco • Si no sigue estas instrucciones puede ocasionar la muerte o quemaduras graves en niños o adultos. • Se debe asegurar la cocina con un dispositivo antivuelco aprobado.
UUGGwGY[GG{ SGhGY[SGYWYXGG[aX^Gwt 24 INSTALACIÓN NOTA • El quemador podría demorar entre 30 y 90 segundos para comenzar a calentar. Verificación del funcionamiento de los quemadores para asar Para verificar el encendido del quemador para asar, siga los pasos que se indican a continuación: 1 2 Retire todos los materiales de embalaje del interior de la cavidad del horno. Gire la perilla de modo del horno para seleccionar el modo Broil. Hi aparece en la pantalla.
UUGGwGY\GG{ SGhGY[SGYWYXGG[aX^Gwt FUNCIONAMIENTO 25 FUNCIONAMIENTO Funciones del panel de control a Smart DiagnosisTM Uso durante la función Smart Diagnosis (Diagnóstico inteligente). b Control Lock Mantenga presionado el botón durante 3 segundos para bloquear el panel de control. c Cook Time Presione el botón para configurar la cantidad de tiempo que desea cocinar la comida. El horno se apaga cuando se agota el tiempo de cocción establecido.
UUGGwGY]GG{ SGhGY[SGYWYXGG[aX^Gwt 26 FUNCIONAMIENTO l Perilla de modo del horno Gire la perilla para seleccionar el modo de operación del horno. NOTA • Reloj intermitente Si el signo de dos puntos parpadea en la pantalla del reloj, presione Clock y restablezca la hora, o presione cualquier tecla para detener el parpadeo. • Presione cualquier botón del panel de control para activar la pantalla.
UUGGwGY^GG{ SGhGY[SGYWYXGG[aX^Gwt FUNCIONAMIENTO 27 3 Presione START. 3 NOTA • Para comprobar la hora mientras se muestra otra información en pantalla, presione Clock (Reloj). • Si no se presionan los botones numéricos dentro de los 25 segundos después de presionar el botón Clock la pantalla vuelve a la configuración original. • Si puede verse una hora parpadeando en la pantalla, se ha experimentado un corte de energía. Reconfigure el reloj.
UUGGwGY_GG{ SGhGY[SGYWYXGG[aX^Gwt 28 FUNCIONAMIENTO NOTA • Consulte la sección de Funciones Inteligentes en el manual del usuario para obtener más detalles. Configuración (Modo de horas, Conversión automática a convección, Temperatura del horno, Luz de alarma de precalentado, Volumen del indicador sonoro, Fahrenheit o Celsius) Presione el botón Settings (Ajustes) varias veces para alternar entre las diferentes configuraciones del horno y modificarlas.
UUGGwGY`GG{ SGhGY[SGYWYXGG[aX^Gwt FUNCIONAMIENTO 29 funcionando pero la perilla del modo de horno no funciona. temperatura ajustada hasta que la misma se vuelva a ajustar. Cuando el horno alcanza la temperatura programada, la luz de alarma de precalentamiento titila 5 veces o hasta que se abra la puerta del horno. Puede activar o desactivar la luz de alarma de precalentamiento. 1 Presione 1 para encender o apagar la luz. 3 Presione START para aceptar el cambio.
UUGGwGZWGG{ SGhGY[SGYWYXGG[aX^Gwt 30 FUNCIONAMIENTO 3 4 5 6 Presione Cook Time (Tiempo de cocción) y configure el tiempo de horneado con los botones numéricos. 1 Presione Start Time. 2 Configure la hora de inicio: presione 4, 3 y 0 para 4:30. 3 Presione START. Suena un tono corto y Timed Delay y la hora de inicio aparecen en la pantalla. El horno comienza a funcionar a la hora de inicio configurada.
UUGGwGZXGG{ SGhGY[SGYWYXGG[aX^Gwt FUNCIONAMIENTO 31 Máx. Temp. / Temp. / Hora Hora Hora 1:00 Horas/ min. 12:59 Horas/ min. Air Fry 0:00 Horas/ min. 23:59 Horas/ min. 550 °F/ 285 °C 11:59 Horas/ min. 400 °F/ 205 °C 24 hor as 300 °F/ 150 °C 0:01 Horas/ min. 12 hor as 0:01 min./ seg. 11:59 Horas/ min. Air SousVide 100 °F/ 38 °C 205 °F/ 96 °C 130 °F/ 54 °C 24 hor as 0:01 min./ seg. 11:59 Horas/ min. 12 hor as 0:01 Horas/ min. 11:59 Horas/ min.
UUGGwGZYGG{ SGhGY[SGYWYXGG[aX^Gwt 32 FUNCIONAMIENTO PRECAUCIÓN • Para evitar que se decolore con el uso, siga los consejos en la sección de Mantenimiento. • No haga funcionar el quemador durante mucho tiempo sin colocar utensilios de cocina en la rejilla. • El acabado de la rejilla puede saltarse si no hay utensilios de cocina que absorban el calor. • Tocar las rejillas antes de que se enfríen puede causar quemaduras. • Qué hacer si huele gas - Abra las ventanas.
UUGGwGZZGG{ SGhGY[SGYWYXGG[aX^Gwt FUNCIONAMIENTO 33 sobre los quemadores de superficie y encenderse. el modelo. Estos se pueden ensamblar y separar. Siga la guía a continuación. ESPAÑOL • Limpie la placa de cocción con cuidado. Los extremos de metal puntiagudos de los electrodos de chispa pueden producir lesiones. • Asegúrese de que todos los quemadores estén colocados en las posiciones adecuadas.
UUGGwGZ[GG{ SGhGY[SGYWYXGG[aX^Gwt 34 FUNCIONAMIENTO 2 3 Coloque el utensilio de cocina sobre la rejilla. Empuje la perilla de control y gire hacia la posición Lite para encender el quemador. NOTA • Las llamas de los quemadores de superficie pueden volverse amarillas si hay un alto grado de humedad; por ejemplo, si el día es lluvioso o si hay un humidificador cerca.
UUGGwGZ\GG{ SGhGY[SGYWYXGG[aX^Gwt FUNCIONAMIENTO 35 quemador pueden propagarse de forma excesiva y dañar la superficie de cocción. NOTA 1 2 Uso de un wok Si utiliza un wok, use uno de 14 pulgadas o menos con fondo plano. Asegúrese de que la base del wok quede nivelada sobre la rejilla. PRECAUCIÓN • No utilice un anillo de soporte para el wok.
UUGGwGZ]GG{ SGhGY[SGYWYXGG[aX^Gwt 36 FUNCIONAMIENTO PRECAUCIÓN • No use rejillas sobre los quemadores de superficie. Si usa una rejilla sobre el quemador de superficie, la combustión sería incompleta, lo que generaría niveles de monóxido de carbono superiores a los estándares permitidos. Esto puede ser riesgoso para su salud. PRECAUCIÓN • No retire la rejilla central cuando use la parrilla.
UUGGwGZ^GG{ SGhGY[SGYWYXGG[aX^Gwt FUNCIONAMIENTO 37 NOTA En caso de corte de energía eléctrica En caso de corte de energía eléctrica, puede encender los quemadores de gas de superficie de su cocina con un cerillo. Los quemadores de superficie que estaban en uso al producirse el apagón seguirán funcionando normalmente. PRECAUCIÓN • Tenga mucho cuidado al encender los quemadores con un cerillo. Esto puede causar quemaduras u otros daños.
UUGGwGZ_GG{ SGhGY[SGYWYXGG[aX^Gwt 38 FUNCIONAMIENTO cercanas durante cualquier operación de cocina. PRECAUCIÓN • Los bordes de la ventilación de la cocina son filosos. Para evitar sufrir lesiones, use guantes cuando limpie la cocina. Uso de los estantes del horno • No cubra las rejillas ni el fondo del horno con papel de aluminio. Los estantes tienen un borde posterior hacia arriba que evita que salgan de la cavidad del horno.
UUGGwGZ`GG{ SGhGY[SGYWYXGG[aX^Gwt FUNCIONAMIENTO 39 InstaView 1 2 3 Gire la perilla de modo del horno para seleccionar Bake. Ajuste la temperatura del horno: presione los botones 3, 7 y 5. Presione START. El horno comienza a precalentar. NOTA PRECAUCIÓN • No golpee el panel de la puerta de vidrio con una fuerza desmedida. No se debe golpear el panel de la puerta de vidrio con objetos duros, como utensilios de cocina o botellas de vidrio.
UUGGwG[WGG{ SGhGY[SGYWYXGG[aX^Gwt 40 FUNCIONAMIENTO Esto es particularmente importante cuando se hornea un pastel de frutas u otros alimentos con un alto contenido de ácido. Los rellenos de frutas calientes u otros alimentos que son muy ácidos pueden causar salpicaduras y dañar la superficie de esmalte de porcelana, y deben limpiarse de inmediato. Modo de convección El sistema de convección usa un ventilador para hacer circular el calor de manera uniforme dentro del horno.
UUGGwG[XGG{ SGhGY[SGYWYXGG[aX^Gwt FUNCIONAMIENTO 41 • Coloque los alimentos (con la grasa hacia arriba) en la rejilla. Guía para horneado en estantes Guía de recomendaciones para hornear y rostizar Los resultados del horneado serán mejores si las bandejas para hornear están centradas en el horno todo lo posible. Si cocina en varios estantes, coloque los estantes del horno en las posiciones que se muestran. La cocción con varios estantes ahorra tiempo y energía.
UUGGwG[YGG{ SGhGY[SGYWYXGG[aX^Gwt 42 FUNCIONAMIENTO Comida Cerdo Aves durante el proceso de asar, el quemador se apaga luego de cinco segundos. El quemador para asar se vuelve a encender automáticamente una vez cerrada la puerta. Posición del estante Costilla 2 Con hueso, solomillo 2 Configuración del horno para asar Jamón, cocido 2 Pollo entero 3 1 Presas de pollo 3 Pavo 3 • Presione 1 para ajustar en Hi (Alto) o presione 2 para ajustar en Lo (Bajo).
UUGGwG[ZGG{ SGhGY[SGYWYXGG[aX^Gwt FUNCIONAMIENTO 43 - Bajar la posición del estante para cocinar los alimentos más lejos del asador. • Como regla general, los cortes de carne y pescado más grasos producirán más humo que los más magros. • Siga las indicaciones de la sección Guía recomendada para asar siempre que sea posible.
UUGGwG[[GG{ SGhGY[SGYWYXGG[aX^Gwt 44 FUNCIONAMIENTO Guía de recomendaciones para asar El tamaño, peso, espesor, la temperatura inicial y su preferencia de cocción afectarán el tiempo de asado. Esta guía se basa en carnes a temperatura de refrigerador. Para obtener mejores resultados al asar, use una bandeja especial para asar. a Rejilla (se vende por separado) b Asadera (se vende por separado) *: esta función es para usar con el estante de desplazamiento.
UUGGwG[\GG{ SGhGY[SGYWYXGG[aX^Gwt FUNCIONAMIENTO 45 Primer lado (min.) Segundo lado (min.) Fetas de jamón (precocidas) 1" de espesor 3 (4*) 10 5 1 4 (5*) 7 4 Chuletas de cerdo Bien cocidas 2 (1/2" de espesor) 4 (5*) 10 8 2 (1" de espesor) de alrededor de 1 lb. 4 (5*) 13 8-9 Chuletas de cordero Tocino Cantidad y/o espesor /2" de espesor 2 (1" de espesor) de alrededor de 10 a 12 oz.
UUGGwG[]GG{ SGhGY[SGYWYXGG[aX^Gwt 46 FUNCIONAMIENTO • Mariscos - Al asar pescado con piel, utilice siempre la configuración de Asar en Lo y ase siempre por último el lado de la piel. - Es mejor consumir mariscos inmediatamente después de cocinarlos. Dejar reposar los mariscos después de cocinarlos puede hacer que los alimentos se sequen.
UUGGwG[^GG{ SGhGY[SGYWYXGG[aX^Gwt FUNCIONAMIENTO 47 Warm (Calentar) Esta función mantiene el horno caliente para leudar los productos con levadura antes de hornear. (Configure la temperatura a 92 °F) Esta función mantendrá una temperatura del horno de 170 °F y conservará caliente la comida cocida para que pueda servirla hasta 3 horas después de realizada la cocción.
UUGGwG[_GG{ SGhGY[SGYWYXGG[aX^Gwt 48 FUNCIONAMIENTO Configuración de la función Mantener caliente después de una cocción programada 1 2 3 4 5 Seleccione el modo de cocción Bake (Horneado), Conv. Bake (Horneado por convección), Conv. Roast (Rostizado por convección), Air Fry (Freír con aire), Slow Cook (Cocción lenta) o FrozenMeal (Comida congelada). Ajuste la temperatura.
UUGGwG[`GG{ SGhGY[SGYWYXGG[aX^Gwt FUNCIONAMIENTO 49 • Controle los alimentos con frecuencia y agítelos o gírelos para obtener resultados más crujientes. PRECAUCIÓN • Nunca cubra ranuras, orificios o pasajes en la base del horno ni cubra todos los estantes con materiales como papel de aluminio. Si lo hace, bloqueará el flujo de aire a través del horno y puede provocar una intoxicación por monóxido de carbono.
UUGGwG\WGG{ SGhGY[SGYWYXGG[aX^Gwt 50 FUNCIONAMIENTO Cantidad (onzas) Temp.
UUGGwG\XGG{ SGhGY[SGYWYXGG[aX^Gwt FUNCIONAMIENTO 51 Temp. (°F) Posición del estante Hora Guía Ostiones frescos en su media concha (35,3 onzas) 35 425 5 20-30 Derrita 4 cucharadas de manteca y pinte los ostiones. Mezcle 1/2 taza de pan rallado, 1 cucharada de ajo picado, 1/4 de tasa de queso parmesano rallado y condimente a gusto. Esparza la mezcla sobre los ostiones.
UUGGwG\YGG{ SGhGY[SGYWYXGG[aX^Gwt 52 FUNCIONAMIENTO Guía de cocción al vacío por flujo de aire recomendada Comida Carne de res filete Pechuga de pollo Salmón Espárragos Hora Cantidad Temp. (onzas) (°F) Min. Objetivo Máx. 1" de espesor 14,1-17,6 onzas 135 - 2 horas 2.5 horas 4,2-5,3 onzas 145 - 2.5 horas 3 horas 1" de espesor 7 onzas 130 - 2 horas 2.5 horas 2,8 onzas (6 c/u) 5,6 onzas (12 c/u) 185 20 min. 30 min. 45 min.
UUGGwG\ZGG{ SGhGY[SGYWYXGG[aX^Gwt FUNCIONAMIENTO 53 • La función Inicio remoto se encuentra desconectada en las siguientes situaciones: - El estado de Inicio remoto es OFF (APAGADO) o door (puerta). - Inicio remoto experimenta un problema durante el funcionamiento. - La función Inicio remoto no puede iniciarse cuando la puerta del horno está abierta. Sonará un pitido de alerta para que cierre la puerta.
UUGGwG\[GG{ SGhGY[SGYWYXGG[aX^Gwt 54 FUNCIONAMIENTO PRECAUCIÓN • Utilice siempre un guante para horno al retirar la sonda de temperatura. No toque el asador. Si no se cumple con esta advertencia, se pueden producir lesiones personales graves. • Para evitar daños en la sonda para carne, no use pinzas para tirar de la sonda al retirarla. • No guarde la sonda para carne dentro del horno. • No tire del cable para quitar la sonda.
UUGGwG\\GG{ SGhGY[SGYWYXGG[aX^Gwt FUNCIONES INTELIGENTES 55 FUNCIONES INTELIGENTES Esta característica solo está disponible en modelos con Wi-Fi. La aplicación LG ThinQ le permite comunicarse con el electrodoméstico usando un teléfono inteligente. Funciones de la aplicación LG ThinQ • Smart Diagnosis™ - Esta función brinda información útil para diagnosticar y resolver problemas con el producto conforme a su patrón de uso.
UUGGwG\]GG{ SGhGY[SGYWYXGG[aX^Gwt 56 FUNCIONES INTELIGENTES NOTA • El entorno inalámbrico circundante puede hacer que el servicio de red inalámbrica funcione lentamente. • Si el aparato tiene problemas para conectarse a la red Wi-Fi, es posible que se encuentre demasiado lejos del router. Adquiera un repetidor Wi-Fi (extensor de alcance) para mejorar la intensidad de la señal Wi-Fi.
UUGGwG\^GG{ SGhGY[SGYWYXGG[aX^Gwt FUNCIONES INTELIGENTES 57 (2) Este dispositivo debe aceptar cualquier interferencia que reciba, incluida la interferencia que pueda causar un funcionamiento no deseado. Declaración sobre exposición a la radiación de RF de la FCC Este equipo cumple con los límites de exposición a la radiación de la FCC establecidos para entornos no controlados. Este transmisor no se debe ubicar ni operar junto con ninguna otra antena ni transmisor.
UUGGwG\_GG{ SGhGY[SGYWYXGG[aX^Gwt 58 FUNCIONES INTELIGENTES y los tonos se hayan detenido, aparecerá el diagnóstico en la aplicación. NOTA • Para obtener resultados óptimos, no mueva el teléfono mientras se transmitan los tonos.
UUGGwG\`GG{ SGhGY[SGYWYXGG[aX^Gwt MANTENIMIENTO 59 MANTENIMIENTO PRECAUCIÓN • No limpie este aparato con lejía. • Para evitar quemaduras, deje enfriar la parte superior de la cocina antes de tocar cualquiera de sus piezas. • Use guantes para limpiar la parte superior. Consejos Generales de Limpieza • Se puede usar una espátula plástica como raspador para quitar los restos o residuos antes de la limpieza del horno o durante el proceso.
UUGGwG]WGG{ SGhGY[SGYWYXGG[aX^Gwt 60 MANTENIMIENTO NOTA • Los limpiadores o pulidores para electrodomésticos de acero inoxidable pueden comprarse por Internet o en la mayoría de los comercios minoristas de electrodomésticos o artículos para el hogar. Puerta del horno PRECAUCIÓN • No use limpiadores para horno, polvos limpiadores ni materiales abrasivos de limpieza en el exterior de la puerta del horno. Si lo hace, podría causar daños.
UUGGwG]XGG{ SGhGY[SGYWYXGG[aX^Gwt MANTENIMIENTO 61 Use una aspiradora con un accesorio de cepillo o boquilla para limpiar la celosía de ventilación a. No quite el panel que cubre la cocina. • La tapa del quemador está bien colocada. Limpieza de tapas/cabezales del quemador Quemadores de superficie de gas Retiro y colocación de los quemadores de superficie de gas La ubicación y el tamaño de los quemadores pueden variar según el modelo.
UUGGwG]YGG{ SGhGY[SGYWYXGG[aX^Gwt 62 MANTENIMIENTO Después de la limpieza de tapas/ cabezales del quemador Sacuda los restos de agua y deje que se sequen bien. Si coloca el quemador ovalado al revés permitirá que el agua drene con más facilidad. Vuelva a colocar las tapas y los cabezales de los quemadores sobre los electrodos en la placa de cocción en el lugar correcto de acuerdo con su tamaño.
UUGGwG]ZGG{ SGhGY[SGYWYXGG[aX^Gwt MANTENIMIENTO 63 - Frote siguiendo la dirección del grano para no dañar la superficie.
UUGGwG][GG{ SGhGY[SGYWYXGG[aX^Gwt 64 MANTENIMIENTO NOTA • Permita que el horno se enfríe a temperatura ambiente antes de usar el ciclo EasyClean. Si la cavidad del horno alcanza una temperatura superior a 150 °F (65 °C), aparecerá "Hot" en la pantalla y el ciclo EasyClean no se activará hasta que la cavidad del horno se enfríe.
UUGGwG]\GG{ SGhGY[SGYWYXGG[aX^Gwt MANTENIMIENTO 65 frente al horno para absorber el agua que pueda derramarse durante la limpieza manual. Limpie la cavidad del horno inmediatamente después del ciclo EasyClean fregando con una esponja o un paño de limpieza húmedos que no rayen. (El lado para refregar no rayará el acabado).
UUGGwG]]GG{ SGhGY[SGYWYXGG[aX^Gwt 66 MANTENIMIENTO ADVERTENCIA • En caso de un incendio en el horno durante la autolimpieza, apáguelo y espere a que se apague el fuego. No fuerce la puerta para abrirla. El ingreso de aire fresco a las temperaturas de autolimpieza puede producir un estallido de llamas en el horno. Si no sigue estas instrucciones podría sufrir quemaduras graves. PRECAUCIÓN • No use limpiadores para horno.
UUGGwG]^GG{ SGhGY[SGYWYXGG[aX^Gwt MANTENIMIENTO 67 Clean atrasada nunca se podrá iniciar con más de 12 horas de anticipación.
UUGGwG]_GG{ SGhGY[SGYWYXGG[aX^Gwt 68 MANTENIMIENTO recomendada para un horno moderadamente sucio. Presione los botones de la siguiente manera para seleccionar el tiempo de autolimpieza de 3 a 5 horas. • 1 : 3 horas • 2 : 4 horas • 3 : 5 horas 3 4 5 a Ranura Presione Start Time. b Traba de la bisagra Presione los números para establecer la hora del día en la que quisiera iniciar Self Clean. Presione START.
UUGGwG]`GG{ SGhGY[SGYWYXGG[aX^Gwt MANTENIMIENTO 69 limpieza adicional. Use agua caliente para limpiar a fondo. 2 Abra el cajón totalmente. Desenrosque el tornillo a de la parte posterior del cajón. a Brazo de la bisagra b Borde inferior de la ranura c Hendidura 3 4 3 Abra totalmente la puerta. Si la puerta no se abre por completo, la hendidura no está bien apoyada en el borde inferior de las ranuras. Localice las palancas de deslizamiento a ambos lados del cajón.
UUGGwG^WGG{ SGhGY[SGYWYXGG[aX^Gwt 70 MANTENIMIENTO 5 Tire nuevamente del cajón para abrirlo y encajar las correderas de apoyo en su lugar. Extracción/montaje de la moldura de ventilación Extracción de la moldura de ventilación 1 Con un destornillador, retire los 3 tornillos que sujetan la moldura de ventilación en su lugar. ADVERTENCIA • Asegúrese de que el horno y la bombilla estén fríos.
UUGGwG^XGG{ SGhGY[SGYWYXGG[aX^Gwt SOLUCIÓN DE PROBLEMAS 71 SOLUCIÓN DE PROBLEMAS Preguntas frecuentes P: ¿Qué tipo de utensilios cocina se recomienda usar con la placa de cocción? R: • Las bandejas deben tener fondo plano y laterales rectos. • Use solamente bandejas gruesas. • El tamaño de la bandeja debe coincidir con la cantidad de comida que se preparará y el tamaño de la hornalla. • Use tapas herméticas. • Use solamente woks de fondo plano.
UUGGwG^YGG{ SGhGY[SGYWYXGG[aX^Gwt 72 SOLUCIÓN DE PROBLEMAS PRECAUCIÓN • Se puede utilizar papel de aluminio para envolver los alimentos dentro del horno o el cajón de calentamiento, pero no permita que el papel de aluminio entre en contacto con los elementos calentadores o asaderas del horno expuestos. El papel de aluminio podría derretirse o prenderse fuego, lo que ocasionaría humo, incendio o lesiones.
UUGGwG^ZGG{ SGhGY[SGYWYXGG[aX^Gwt SOLUCIÓN DE PROBLEMAS 73 R: Depende del tipo de suciedad. Las manchas de azúcar y algunas de grasa son particularmente difíciles de limpiar. Además, si las manchas no están muy empapadas en agua, esto puede tener un efecto negativo en el desempeño de la limpieza. Si todavía quedan manchas rebeldes o acumulación, use la función Self Clean. Consulte la sección Self Clean (Autolimpieza) del manual del propietario.
UUGGwG^[GG{ SGhGY[SGYWYXGG[aX^Gwt 74 SOLUCIÓN DE PROBLEMAS P: ¿Por qué no está funcionando Instaview? (En algunos modelos) R: Nivele la cocina ajustando las patas de nivelación con una llave. Antes de llamar al servicio técnico Revise esta sección antes de llamar para servicio; hacerlo le ahorrará tiempo y dinero. Cocción Problemas Los quemadores superiores no encienden o no queman de forma pareja. Causas posibles y solución El enchufe no está insertado completamente.
UUGGwG^\GG{ SGhGY[SGYWYXGG[aX^Gwt SOLUCIÓN DE PROBLEMAS 75 Problemas Los controles del horno no se configuraron correctamente. • Asegúrese de seleccionar el modo Broil correctamente. Se está usando una posición de estante inadecuada. • Consulte la Guía de asado. Los utensilios de cocina no son los adecuados para asar. • Use la asadera y la rejilla. La puerta del horno no está cerrada. • Consulte "Asar" en el capítulo FUNCIONAMIENTO.
UUGGwG^]GG{ SGhGY[SGYWYXGG[aX^Gwt 76 SOLUCIÓN DE PROBLEMAS Problemas El horno hace demasiado humo durante el asado. Causas posibles y solución El control no está configurado correctamente. • Siga las instrucciones de Configuración de los controles del horno. La carne se encuentra muy cerca del elemento. • Cambie la posición del estante para dejar un espacio adecuado entre la carne y el elemento. Precaliente el elemento de asado para sellar los jugos.
UUGGwG^^GG{ SGhGY[SGYWYXGG[aX^Gwt SOLUCIÓN DE PROBLEMAS 77 Problemas Causas posibles y solución • Deje enfriar el horno durante aproximadamente una hora después de completar un ciclo Self Clean. Puede abrir la puerta cuando desaparezca el candado k. El horno no está limpio después de un ciclo Self Clean (En algunos modelos) Los controles del horno no se configuraron correctamente. • Consulte la sección Self Clean (Autolimpieza). El horno está muy sucio.
UUGGwG^_GG{ SGhGY[SGYWYXGG[aX^Gwt 78 SOLUCIÓN DE PROBLEMAS Problemas No se puede mover el aparato con facilidad. El aparato debe estar accesible para el mantenimiento. Causas posibles y solución Los gabinetes no son cuadrados o están instalados muy justos. • Comuníquese con el fabricante o instalador para hacer que el aparato sea accesible. La alfombra interfiere con la cocina. • Deje espacio suficiente para elevar la cocina sobre la alfombra. Dispositivo antivuelco conectado.
UUGGwG^`GG{ SGhGY[SGYWYXGG[aX^Gwt SOLUCIÓN DE PROBLEMAS 79 Wi-Fi Problemas La contraseña para la red Wi-Fi se introdujo de forma incorrecta. • Elimine su red Wi-Fi doméstica y comience el proceso de registro nuevamente. Los Datos Móviles para su teléfono inteligente están activados. • Desactive los Datos Móviles en su teléfono inteligente antes de registrar el electrodoméstico. El nombre de la red inalámbrica (SSID) se ha configurado incorrectamente.
UUGGwG_WGG{ SGhGY[SGYWYXGG[aX^Gwt 80 GARANTÍA LIMITADA GARANTÍA LIMITADA EE. UU. TÉRMINOS Y CONDICIONES AVISO DE ARBITRAJE: ESTA GARANTÍA LIMITADA CONTIENE UNA CLÁUSULA DE ARBITRAJE QUE LE DEMANDA A USTED Y A LG RESOLVER CONFLICTOS A TRAVÉS DE UN ARBITRAJE VINCULANTE EN LUGAR DE HACERLO EN EL TRIBUNAL, A MENOS QUE USTED DECIDA NO PARTICIPAR. EN EL ARBITRAJE NO ESTÁN PERMITIDAS LAS ACCIONES COLECTIVAS NI LOS JUICIOS CON JURADO.
UUGGwG_XGG{ SGhGY[SGYWYXGG[aX^Gwt GARANTÍA LIMITADA 81 • Daños o fallos causados por modificaciones o alteraciones no autorizadas, o si se usa para otro fin que no sea el previsto. • Daños o fallos causados por corriente o voltaje eléctrico incorrecto, o códigos de ventilación / fontanería.
UUGGwG_YGG{ SGhGY[SGYWYXGG[aX^Gwt 82 GARANTÍA LIMITADA Problema Llama desigual Posible causa y prevención Instalación incorrecta de la tapa del quemador a La cabeza del quemador está asentada adecuadamente. b La cabeza del quemador NO está asentada adecuadamente. • Revise la instalación de la cabeza y la tapa del quemador.
UUGGwG_ZGG{ SGhGY[SGYWYXGG[aX^Gwt GARANTÍA LIMITADA 83 Problema El papel de aluminio se derritió dentro del horno ESPAÑOL El horno o los estantes están manchados después de usar papel de aluminio Posible causa y prevención • Nunca cubra la base del horno ni un estante completo con materiales como papel de aluminio. • Si ya se ha derretido papel de aluminio en el horno, esto no afectará su rendimiento.
UUGGwG_[GG{ SGhGY[SGYWYXGG[aX^Gwt 84 GARANTÍA LIMITADA Problema El horno muestra un código de error (F9, F19), pero los quemadores de la placa de cocción están funcionando. Posible causa y prevención La válvula reguladora está cerrada. a Posición cerrada de la palanca • Compruebe que el regulador de la válvula esté en posición abierta. • Si el regulador se encuentra en posición cerrada, rote la palanca a la posición abierta.
UUGGwG_\GG{ SGhGY[SGYWYXGG[aX^Gwt GARANTÍA LIMITADA 85 Problema Olor a gas Posible causa y prevención a Regulador de presión b Adaptador de 1/2" c Adaptador de 1/2" d Flujo de gas a la cocina e Conector flexible (6 pies máx.) f Válvula de corte de gas g Adaptador de 1/2" h Tubería de gas de 1/2" o 3/4" • Primero consulte con el instalador. El costo de la reparación o el reemplazo en estas circunstancias excluidas estará a cargo del consumidor.
UUGGwG_]GG{ SGhGY[SGYWYXGG[aX^Gwt 86 GARANTÍA LIMITADA de manera amistosa. En la carta debe proporcionar su nombre, dirección y número de teléfono; identificar el producto que es objeto de la reclamación; y describir la naturaleza del reclamo y el remedio que busca. Si usted y LG no pueden resolver la disputa dentro de 30 días, cualquiera de las partes puede proceder a presentar una demanda de arbitraje. Acuerdo de arbitraje vinculante y renuncia de demanda colectiva.
UUGGwG_^GG{ SGhGY[SGYWYXGG[aX^Gwt GARANTÍA LIMITADA 87 Sólo puede excluirse del procedimiento de resolución de conflictos en la forma descrita anteriormente (es decir, por correo electrónico o por teléfono); ninguna otra forma de notificación será efectiva para hacerlo. Excluirse de este procedimiento de resolución de controversias no afectará de ninguna manera la cobertura de la Garantía Limitada, por lo que usted continuará disfrutando de todos sus beneficios.
UUGGwG__GG{ SGhGY[SGYWYXGG[aX^Gwt 88 Memorándum
UUGGwG_`GG{ SGhGY[SGYWYXGG[aX^Gwt Memorándum 89
UUGGwG`WGG{ SGhGY[SGYWYXGG[aX^Gwt 90 Memorándum
UUGGwG`XGG{ SGhGY[SGYWYXGG[aX^Gwt Memorándum 91
UUGGwG__GG{ SGhGY[SGYWYXGG[aX^Gwt LG Customer Information Center For inquiries or comments, visit www.lg.com or call: 1-800-243-0000 1-888-542-2623 U.S.A. CANADA Register your product Online! www.lg.