| ® 'sustain book. book Page 10 Tuesday, September §, 2022 9:13 AM 10 INSTALLATION INSTALLATION Before Installing Installation Overview Please read the following installation instructions first after purchasing this product or transporting it to anther location. The images in this guide may be different from the actual components and accessories, which are subject to change by the manufacturer without prior notice for product Improvement purposes.
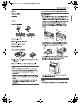
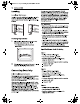
| ® Page 11 Tuesday, September §, 2022 9:13 AM | ® INSTALLATION 11 ® Drill @ Safety Glasses ®@ Gloves Parts Parts Provided © Template (1 ea) @ Anti-tip Bracket Kit {1 ea) @ Anchor Sleeves (6 ea) @ Lag Bolts (6 ea) Parts Not Provided © 4-Wire Cord or 3-Wire Cord {UL approved 40 or 50 AMP} @ Strain Relief {for conduit installations only} NOTE Observe all governing codes and ordinances. Have the Installer show you the location of the circuit breaker or fuse. Mark it for easy reference.
[o— | ® 'sustain book. book Page 12 Tuesday, September §, 2022 9:13 AM 12 INSTALLATION A NOTE « Your range is heavy and can be installed on soft floor coverings such as cushioned vinyl or carpeting. Use care when moving the range on this type of flooring. Use a belt when moving the range to prevent damaging the floor. Or slide the range onto cardboard or plywood to avoid damaging the floor covering. Remove packing material, tape and any temporary labels from your range before using.
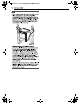
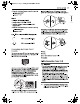
| ® sustain book book Page 13 Tuesday, September 6, 2022 9:13 AM wy] ® INSTALLATION 13 ¢ Choosing the Proper Location | Dimensions and Clearances HEIDI | Dimensions LsIsa338 A Width 29 7/8" (758.8 mm) B Height 37 1/4" (946 mm) C Depth (Includes Door Handle) 29 3/8" (745.2 mm) D Height (Excludes Vent Trim) 36" (913.0 mm) E Depth rides nye oc that Is loaded into the cabinet. 24 34 (629.4 mm) F Depth (Excludes Door Handle} 26 7/8" (683 mm) G Depth when drawer Is fully opened 36 1/16" (916.
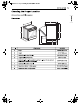
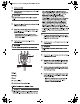
'sustain book. book Page 14 Tuesday, September §, 2022 9:13 AM 14 INSTALLATION el] Minimum Dimensions 3 | @ Minimum distance from top of range to combustible surface overhead 30" (76.2 cm) @ Minimum distance from counter top to overhead cabinets at side 15" (38.1 cm) ® Minimum opening in overhead cabinets 30" (76.2 cm) © Height of counter top 36" (31.3 cm) NOTE » @ 30" (76.2 cm) minimum clearance between the top of the cooking surface and the bottom of an unprotected wood or metal cabinet; or 24” {60.
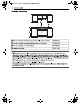
| oo ® sustain book book Page 15 Tuesday, September 6, 2022 9:13 AM wy] ® INSTALLATION 15 ¢ Clearances | HEIDI | 2a Te {78.8 omy @ Acceptable Electrical Outlet Area @® Normal Counter top Depth © Counter Top Height @ Cabinet S wall @ Center @ Cabinet Opening 0" (76.2 cm) For US.A (76.2 cm) ~ 31" {78.7 cm) For CANADA Electricity The range should always be plugged into its own Individual properly grounded electrical outlet.
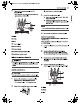
ov | ® 'sustain book. book Page 16 Tuesday, September §, 2022 9:13 AM 16 INSTALLATION | ® Leveling Leveling the Range Level the range by adjusting the leveling legs with a wrench. Extending the legs slightly may also make it leaser to Insert the rear leg Into the natl-tip bracket, Checking Adjustments 1 Place the level diagonally on the oven rack, and check each direction for level, * First check direction @. Then check direction @.
| ® 'sustain book.
'sustain book. book Page 18 Tuesday, September §, 2022 9:13 AM 18 INSTALLATION el] 2 Insert the power cord through the strain relief and tighten it. £3 CAUTION » Do not install the power cord without a strain relief. 3 Remove the lower 3 screws from the terminal block and retain them, 4 Insert the 3 screws through each power card terminal ring and into the lower terminals of the terminal black. * Make sure that the white center wire is connected to the center lower position of the terminal block.
| ® sustain book book Page 19 Tuesday, September 6, 2022 9:13 AM wy] ® INSTALLATION 18 ¢ 7 Tighten the 3 screws securely Into the © Cord/Conduit connection plate terminal block, + The center screw now attaches the bent up 3 ground strap to the block. Install the conduit strain relief. Em 1) Insert the strain relief in the 1 1/8 in. (2.8 cm) conduit hole. 2} Install the conduit through the body of the strain relief and fasten the strain relief... with its ring.
'sustain book. book Page 20 Tuesday, September §, 2022 9:13 AM 20 INSTALLATION el] @ Terminal Block © Wire Ends @ Conduit Connection Plate 4-Wire Connection: Conduit £4 WARNING » The white middle (neutral) wire of the power cord or 4-wire conduit has to be connected to the middle post of the main terminal block. The other two wires of the power cord or conduit have to be connected to the outside posts of the main terminal connection block.
| ® 'sustain book. book Page 21 Tuesday, September §, 2022 9:13 AM | ® INSTALLATION 21 Tighten the 3 screws securely Into the terminal block. (approximately 35 50 IN-LB) © Black @ White © Red @ Terminal Block © Wire Ends @® Ground Strap @ Conduit Connection Plate @ Ground Screw @ Ground Wire @® Bend strap up and attach, Optional Rear Filler Installing the Rear Filler If the counter does not bridge the opening at the rear wall, the rear filler kit which is provided with the slide-in range will be needed.
'sustain book. book Page 22 Tuesday, September §, 2022 9:13 AM 22 INSTALLATION £1 WARNING Engage the range to the natl-tip device by following the guide on the anti-tip bracket template. Ensure the anti-tip device is reengaged when the range Is moved by following the guide on the anti-tip bracket template. Re-engage the anti-tip device if the range is moved. Do not operate the range without the anti-tip device in place and engaged. See installation instructions for details.
| ® sustain book book Page 23 Tuesday, September 6, 2022 9:13 AM wy] ® INSTALLATION 23 ¢ 5 Now check the oven's operation. Turn the oven mode knob to select the Bake mode, 350 °F appears in the display. Press START. | 6 The oven should finish preheating in 15 minutes, and the convection fan should operate while the oven is preheating.