ENGLISH OWNER’S MANUAL ELECTRIC CONVECTION BUILT-IN OVEN Please read this guide thoroughly before operating and keep it handy for reference at all times. LSWS300BD LSWS307ST www.lg.com MFL51224526_01 Copyright © 2018 LG Electronics Inc. All Rights Reserved.
table of contents TABLE OF CONTENTS 3 IMPORTANT SAFETY INSTRUCTIONS 8 27 SMART FUNCTIONS 27 LG SmartThinQ Application PRODUCT OVERVIEW 8 Accessories 9 Oven Overview 10 Control Panel Overview 11 features 11 Clock 12 Timer On/Off 12 Convection Auto Conversion 13 Oven Temperature Adjustment 13 Language 13 Preheating Alarm Light 14 Beeper Volume 14 Fahrenheit or Celsius 14 Oven Light 14 Lockout 15 Start Time(Delayed Timed Cook) 16 Cook Time(Timed Cook) 17
IMPORTANT SAFETY INSTRUCTIONS 3 Read and follow all instructions before using your oven to prevent the risk of fire, electric shock, personal injury, or damage when using the oven. This guide does not cover all possible conditions that may occur. Always contact your service agent or manufacturer about problems that you do not understand. Download this owner's manual at: www.lg.com This is the safety alert symbol.
IMPORTANT SAFETY INSTRUCTIONS SAFETY PRECAUTIONS (cont.) yy Keep oven vent ducts unobstructed. The oven vent could become hot during oven use. Never block this vent and never place plastic or heat-sensitive items on or near the vent. Metal bottom trim (Vent) NOTE: For proper operation vent trim must be installed. warning yy NEVER use your appliance for warming or heating the room. yy DO NOT use water on grease fires. Should an oven fire occur, leave the oven door closed and turn the oven off.
IMPORTANT SAFETY INSTRUCTIONS 5 yy Protective Liners. Do not use aluminum foil or any other material to line the oven bottoms. Improper installation of these liners may result in a risk of electric shock or fire. yy Do Not allow aluminum foil or the meat probe to contact heating elements. WARNING No Aluminum foil • DO NOT place aluminum foil directly on the oven bottom. yy DO NOT line the oven walls, racks, bottom, or any other part of the oven with aluminum foil or any other material.
IMPORTANT SAFETY INSTRUCTIONS child safety warning yy Children should be kept away from the oven. yy Accessory parts will become hot when the broiler is in use. caution yy Children should not be left alone or unattended in an area where the appliance is in use. Children should never be allowed to sit or stand on any part of the appliance. yy DO NOT leave small children unattended near the appliance. During the selfcleaning cycle, the outside of the oven can become very hot to the touch.
IMPORTANT SAFETY INSTRUCTIONS 7 To protect against food-borne illnesses, cook meat and poultry thoroughly.
PRODUCT OVERVIEW PRODUCT OVERVIEW Accessories Make sure that all parts are included after purchasing this product.
PRODUCT OVERVIEW ENGLISH OVEN OVERVIEW Make sure to understand the name and function of each part. * Throughout this manual, the features and appearance may vary depending on your model. Door switch Door latch Control panel Rating label model and serial number plate Spacer (2 ea) - One on each side Broiler pan & Grid Standard racks (2 ea) Gasket Oven door Metal bottom trim (vent) NOTE yy The model and serial number can be verified at the rating label.
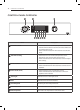
PRODUCT OVERVIEW Control Panel Overview 8 7 9 1 Name 2 3 4 5 6 Description 1 Cook Time / Clock −− Touch button and turn the Time/Temp knob to set the desired amount of time for food to cook. The oven shuts off when the set cooking time runs out. −− Touch and hold the button for three seconds to set the time of day. 2 Start Time / Setting −− Touch button and turn the Time/Temp knob to set the delayed start time. The oven starts at the set time.
features 11 ENGLISH FEATURES Clock The clock must be set to the correct time of day in order for the automatic oven timing functions to work properly. 1. Set Oven Mode knobs to the OFF position. 2. Touch and hold COOK TIME for 3 seconds. 3. Turn the Time/Temp knob to select the desired time. Turn the knob clockwise to increase the time and counterclockwise to decrease the time. 4. Touch START to enter the time and start the clock.
features Timer On/Off Convection Auto Conversion The TIMER ON/OFF serves as an extra timer in the kitchen that beeps when the set time has run out. It does not start or stop cooking. The TIMER ON/OFF feature can be used during any of the other oven control functions. The timers can be operated independently of each other. When cooking using the convection mode (Conv. Bake, Conv. Roast, and Crisp Conv.), the oven temperature is automatically reduced by 25°F(14°C).
features Language This oven may cook differently than the one it replaced. Use the oven for a few weeks to become more familiar with it before changing the thermostat settings. If the oven consistently undercooks or overcooks follow these instructions to adjust the thermostat. The default language of the display is English. It can be changed to Spanish or French. note Don't use thermometers, such as those found in grocery stores, to check the temperature setting of the oven.
features Beeper Volume Oven Light The beeper volume can be adjusted to three possible volume levels, Hi, Low and Off. The interior oven light automatically turns ON when the door is opened. The oven light can also be manually turned ON or OFF by touching OVEN LIGHT. 1. Set Oven Mode knobs to the OFF position. 2. Touch and hold START TIME for 3 seconds. Then touch START TIME repeatedly until BEEP appears in the display. note The oven light cannot be turned on if the Self Clean function is active.
features The automatic timer of the DELAYED TIMED COOK function turns the oven ON and OFF at the time you select. This feature can only be used with the BAKE, ROAST, CONV. BAKE, CONV. ROAST, CRISP CONV. and SELF CLEAN modes. Setting the Oven to Delayed Start The following example is to Bake at 300°F and start baking at 4:30. Make sure the clock is set for the correct time of day. 1. Turn the Oven Mode knob to select the BAKE mode. 350°F appears in the display. 2.
features COOK TIME (TIMED COOK) The oven turns on immediately and cooks for a selected length of time. At the end of the cooking time, the oven turns off automatically. Setting the Timed Cook Function The following example is to Bake at 300°F for 30 minutes. When the cooking time has elapsed: 1. END OF CYCLE and the time of day show in the display. The oven shuts off automatically. 2. The control continues to sound the cook end melody every minute until the Oven Mode knob is moved to any position.
using the oven BEFORE USING THE OVEN note • The temperature registered by an oven thermometer may differ from the actual set oven temperature. • It is normal for the convection fan to run while preheating during a regular bake cycle. • The convection fan motor may run periodically during a regular bake cycle. Removing and Replacing the Oven Racks ENGLISH using the oven Rack and Pan Placement E D C B A If cooking on two racks: Place standard oven racks in positions B and D.
using the oven Oven Vent yy Areas near the vent may become hot during operation and may cause burns. yy Do not block the vent opening at the bottom of the oven. yy Avoid placing plastics near the vent as heat may distort or melt the plastic. yy It is normal for steam to be visible when cooking foods with high moisture. Changing the Temperature while Baking 1. Turn the Time/Temp knob to reset the oven temperature. For example, turn the knob clockwise to reset the temperature from 375°F to 425°F. 2.
using the oven Benefits of Convection Bake yy Some foods cook up to 25 to 30% faster, saving time and energy. yy Even cooking results during multiple rack baking. yy No special pans or bakeware needed. Setting the CONVECTION BAKE Mode 1. Turn the Oven Mode knob to select the CONV. BAKE mode. 350°F (175°C) appears in the display. 2. Set the oven temperature. For example, turn the Time/Temp knob clockwise to set the temperature to 375°F. 3. Touch START.
using the oven ROAST Use the ROAST mode to cook large cuts of meat. Setting the ROAST Mode 1. Turn the Oven Mode knob to select the ROAST mode. 350°F (175°C) appears in the display. 2. Set the oven temperature in the display. For example, turn the Time/Temp knob clockwise to set the temperature to 375°F. 3. Touch START. note It is normal for cooling fans to run after any cooking cycle is complete, to protect the control panel. Setting the Convection Roast Mode 1.
using the oven Benefits of Crisp Convection: The crisp convection mode is best for light colored and delicate baked goods like cakes, tarts, cookies, puff pastries, scones, muffins, biscuits, yeast-free breads, etc. The hot air circulated by the fan continually distributes heat more evenly than the natural movement of air in a standard thermal oven. This movement of hot air cooks foods more evenly, crisping surfaces while sealing in moisture and yielding crustier breads.
using the oven BROIL Smoking Broiling uses an intense, radiant heat to cook food. Both the inner and outer broil elements heat during full broiling. Only the inner broil element heats during center broiling. The element(s) cycle on and off at intervals to maintain the oven temperature. The meat probe cannot be used with this mode. Due to the intense heat associated with broiling, it is normal to experience smoke during the cooking process.
using the oven The size, weight, thickness, starting temperature, and your preference of doneness will affect broiling times. The following guide is based on meats at refrigerator temperature. note Always use a broiler pan and grid when broiling.
using the oven Broiling Chart Food Rack Position First Side Time (min.) Second Side Time (min.) 1 lb. (4 patties) 1/2 to 3/4” thick E 4–6 3–4 1” thick 1 to 1-1/2 lbs. D D D 6 7 8 2–3 2–3 3–4 Rare Medium Well Done 1-1/2” thick 2 to 2-1/2 lbs. D D D 10 12 14 4–6 4–8 8–10 Chicken 1 whole cut up 2 to 2-1/2 lbs., split lengthwise 2 Breasts C 20 6–8 C 20 6–10 Lobster Tails 2–4 10 to 12 oz. each C 12-14 Do not turn over. Cut through back of shell. Spread open.
using the oven proof The WARM mode maintains an oven temperature of 200°F (93°C) or less. Use the Warm mode to keep cooked food at serving temperature for up to three hours after the end of the cooking cycle. Do not use the Warm mode to try to cook food or reheat cold food. The Proof feature maintains a warm environment for rising yeast-leavened products before baking. Setting the WARM Mode 1. Turn the Oven Mode knob to select the WARM mode.
using the oven MEAT PROBE The meat probe accurately measures the internal temperature of meat, poultry and casseroles. It should not be used during the broiling, self cleaning, warming or proofing mode. Always unplug and remove the meat probe from the oven before removing food. Before using, insert the probe into the center of the thickest part of meat or into the inner thigh or breast of poultry, away from fat or bone. Place food in the oven and connect the meat probe to the jack.
SMART FUNCTIONS NOTE LG SmartThinQ Application •• If the appliance is having trouble connecting to the Wi-Fi network, it may be too far from the router. Purchase a Wi-Fi repeater (range extender) to improve the Wi-Fi signal strength. The LG SmartThinQ application allows you to communicate with the appliance using a smartphone. •• The network connection may not work properly depending on the Internet service provider.
SMART FUNCTIONS LG SmartThinQ Application Features •• For appliances with the or logo Cleaning This function helps you to check the energy efficiency, usage and guide of EasyClean®. Smart Diagnosis™ Function Should you experience any problems with the appliance, it has the capability of transmitting data via your telephone to the LG Customer Information Center. NFC or Wi-Fi equipped models can also transmit data to a smartphone using the LG SmartThinQ application.
SMART FUNCTIONS 29 Open Source Software Notice Information •• For appliances with the 2. In the application, select the appliance from your list of connected appliances and then press the dots at the upper right of the screen. To obtain the source code under GPL, LGPL, MPL, and other open source licenses, that is contained in this product, please visit http://opensource.lge.com.
SMART FUNCTIONS FCC Notice (For transmitter module contained in this product) This equipment has been tested and found to comply with the limits for a Class B digital device, pursuant to Part 15 of the FCC Rules. These limits are designed to provide reasonable protection against harmful interference in a residential installation.
MAINTENANCE SELF-CLEAN The self clean cycle uses extremely hot temperatures to clean the oven cavity. While running the Self Clean cycle, you may notice smoking or an odor. This is normal; especially if the oven is heavily soiled. During Self Clean, the kitchen should be well-ventilated to minimize the odors from cleaning. CAUTION •• DO NOT leave small children unattended near the appliance. During the Self Clean cycle, the outside of the oven can become very hot to touch.
MAINTENANCE Setting Self Clean with a Delayed Start 1. Remove all racks and accessories from the oven. 2. Turn the Oven Mode knob to select the SELF CLEAN mode. The oven defaults to the recommended fourhour self clean for a moderately soiled oven. Turn the Time/Temp knob to select the self clean time from 3 to 5 hours. 3. Press START TIME. 4. Turn the Time/Temp knob to enter the time of day you would like the Self Clean to start. 5. Press START.
MAINTENANCE 33 LG's new oven with EasyClean® enamel technology provides two cleaning options for the oven interior. The EasyClean® feature takes advantage of LG's new enamel to help lift soils without harsh chemicals, and it runs using ONLY WATER for just 10 minutes in low temperatures to help loosen LIGHT soils before hand-cleaning. While EasyClean® is quick and effective for small and LIGHT soils, the Self Clean feature can be used to remove HEAVY built up soils.
MAINTENANCE EasyClean® INSTRUCTION GUIDE 1. Remove oven racks and accessories from the oven. 2. Scrape off and remove any burnt-on debris with a plastic scraper. Suggested plastic scrapers: •• Hard plastic spatula •• Plastic pan scraper •• Plastic paint scraper •• Old credit card 3. Fill a spray bottle (10 oz or 300 ml) with water and use the spray bottle to thoroughly spray the inside surfaces of the oven. 7. A tone will sound at the end of the 10-minute cycle.
MAINTENANCE The oven light is a standard 10-watt halogen bulb for ovens. Replacing Lamp on Side Wall • Make sure oven and bulb are cool. 8. Plug in oven or reconnect power. Glass Light Cover Clip Flat Blade Screwdriver 1. Unplug oven or disconnect power. 2. Remove oven racks. 3. Slide a flat blade screwdriver between the housing and the glass light cover. Flat Blade screwdriver 4. Support the glass light cover with two fingers to prevent the cover from falling to the bottom of the oven. 5.
MAINTENANCE 3. Dry and buff with a clean, dry paper towel or soft cloth. 4. Repeat as necessary. NOTE If a mineral oil-based stainless steel appliance cleaner has been used before to clean the appliance, wash the surface with a mild soap and water prior to using the Stainless Steel Appliance Cleaner or polish. Oven Cavity DO NOT use oven cleaners. NEVER wipe a warm or hot porcelain surface with a damp sponge; it may cause chipping or crazing (tiny hairlike cracks).
MAINTENANCE CAUTION •• Be careful when removing and lifting the door. •• DO NOT lift the door by the handle. −− The door is very heavy. Replacing the Door 1. Firmly grasp both sides of the door at the top. 2. With the door at the same angle as the removal position, seat the indentation of the hinge arm into the bottom edge of the hinge slot. The notch in the hinge arm must be fully seated into the bottom of the slot. Removing the Door 1. Open the door fully. 2.
TROUBLESHOOTING TROUBLESHOOTING FAQs My new oven doesn’t cook like my old one. Is there something wrong with the temperature settings? No, Your oven has been factory tested and calibrated. For the first few uses, follow your recipe times and temperatures carefully. If you still think your new oven is too hot or too cold, you can adjust the oven temperature yourself to meet your specific cooking needs.
TROUBLESHOOTING Make sure that the oven is not in Lockout mode. The lock symbol will show in the display if Lockout is activated. To deactivate Lockout, touch and hold the PROBE button for three seconds. The unlock melody will sound and UNLOCKING will appear in the display until the controls are unlocked. My oven is still dirty after running the EasyClean® cycle. What else should I do? The EasyClean® cycle only helps to loosen light soils in your oven to assist in hand-cleaning of your oven.
TROUBLESHOOTING BEFORE CALLING FOR SERVICE Before you call for service, review this list. It may save you time and expense. The list includes common occurrences that are not the result of defective workmanship or materials in this appliance. Problem Oven control beeps and displays any F error code. Oven will not work Possible Causes / Solutions yy Electronic control has detected a fault condition. Touch any button and turn any knob once to clear the display and stop the beeping. Reprogram oven.
TROUBLESHOOTING 41 Possible Causes / Solutions Food does not bake or roast properly yy Oven controls improperly set. - See the instructions for setting Bake, Convection Bake, Roast, and Convection Roast modes, pages 18-21. yy Rack position is incorrect or the rack is not level. - See Rack and Pan Placement, page 17. yy Incorrect cookware or cookware of improper size being used. - the tips on pages 17, 19 and 21. yy Oven sensor needs to be adjusted. - See Oven Temperature Adjustment, page 13.
TROUBLESHOOTING Problem Possible Causes / Solutions Oven not clean after a self clean cycle yy Oven controls not properly set. - See the self-clean section, page 31-33. yy Oven was heavily soiled. - Clean up heavy spillovers before starting the clean cycle. Heavily soiled ovens may need to self-clean again or for a longer period of time.
LIMITED WARRANTY 43 ARBITRATION NOTICE: THIS LIMITED WARRANTY CONTAINS AN ARBITRATION PROVISION THAT REQUIRES YOU AND LG TO RESOLVE DISPUTES BY BINDING ARBITRATION INSTEAD OF IN COURT, UNLESS YOU CHOOSE TO OPT OUT. IN ARBITRATION, CLASS ACTIONS AND JURY TRIALS ARE NOT PERMITTED. PLEASE SEE THE SECTION TITLED “PROCEDURE FOR RESOLVING DISPUTES” BELOW.
LIMITED WARRANTY •• Increases in utility costs and additional utility expenses. •• Any noises associated with normal operation. •• Use of accessories, components, or consumable cleaning products that are not authorized by LG. •• Replacement of light bulbs, filters, or any consumable parts. •• When Product is used for other than normal and proper household use (e.g. commercial or industrial use, offices, and recreational facilities or vehicles) or contrary to the Product’s owner’s manual.
LIMITED WARRANTY 45 Governing Law. The law of the state of your residence shall govern this Limited Warranty and any disputes between us except to the extent that such law is preempted by or inconsistent with applicable federal law. Fees/Costs. You do not need to pay any fee to begin an arbitration.
LG Customer Information Center 1-800-243-0000 USA 1-888-542-2623 CANADA Register your product Online! www.lg.