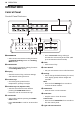
0 OPERATION OPERATION Control Panel Control Panel Features a MICROWAVE • Select various microwave cooking functions. See Manual Cooking section and Cooking Mode section. b CONVECTION • Select various convection cooking functions. See Cooking Mode section. c Display • Shows the time of day, cook time settings, and selected cooking functions. d Number Keys • Set cooking time, power level or temperature, quantity or weight.
OPERATION 11 • Set the light. press Hi, Low, or Off to adjust the cooktop light. • Set the ventilation. - Press 5 Speed to set the vent fan speed. - Press Auto Timeset to set ventilation time. (1, 3, 5, 10, and 30 minutes) Control Panel Light On/Off The LEDs on the control panel turn off after a few minutes to save energy. Press any key to activate the control panel. If the controls are idle for a few minutes, the LEDs will turn off again automatically.
12 OPERATION Turning the Vent Fan On or Off 1 Press On/Off once to turn the vent fan on. 2 Press On/Off again to turn the vent fan off. Item 4 Defrost Weight Option • 1 Lbs • 2 Kg 5 Turntable • Turntable On • Turntable Off Setting the Vent Fan Speed When the fan is on, press 5 Speed to change the vent fan speed. Setting the Defrost Weight from Lbs to Kg • The fan speed will change in sequence from Level 4 to Level 5, Level 1, Level 2, Level 3 and back to Level 4. 1 Press Settings.
OPERATION 13 Power Level 2 (20%) 1 (10%) • Cooking less tender cuts of meat. • To stop the oven during a cycle, open the door or Press STOP/Clear once. • Cooking pork chops and roasts. • To restart cooking, close the door and press START/Enter. • Taking the chill out of fruit. • To clear the oven during a cycle, press STOP/ Clear twice. • Softening butter. • Keeping casseroles and main dishes warm. • Softening butter and cream cheese.
14 OPERATION Using the Sensor Functions The sensor features offer convenient cooking or reheating of popular food items automatically using preprogrammed settings. The Sensor system works by detecting built up steam so there is no need to set cook times or power levels. - Food temperature: Refrigerated - Instructions: Add water (1 - 2 cups: 2 tbsp water, 3 - 4 cups: 4 tbsp water). Cover with vented plastic wrap. After cooking, let stand for 3 minutes.
OPERATION 15 • 9 Shrimp (4 - 16 oz) • 1 Dinner Plate (1 - 2 servings) - Cookware: Microwave-safe plate - Food temperature: Refrigerated - Food temperature: Refrigerated - Instructions: Cover with vented plastic wrap. After cooking, let stand for 2 minutes. - Instructions: Cover with lid or vented plastic wrap. After cooking, let stand for 3 minutes.
16 OPERATION CAUTION • Only pop popcorn in a microwavable container or in commercial packages designed for microwave ovens. • Do not reuse popcorn bags. long). Pour 10 oz (300 ml) tap water into the steam water bowl. Place the steam plate on the steam water bowl. Place prepared food on the steam plate in a single layer. Cover with the steam cover. • 2 Broccoli (1 - 3 cups) • Do not leave microwave unattended while popping corn. - Cookware: Steam bowl • Follow directions on bag.
OPERATION 17 Auto Defrost Mode • 1 Meat (0.1 - 6.0 lbs) The oven has 4 preset defrost cycles. The Defrost Menu shows the suggested defrost cycle for various foods. 1 Press Auto Defrost. 2 Use the number keys to enter the desired menu code from the Auto Defrost Menu. 3 Use the number keys to enter the desired amounts. 4 - Lamb: Chops (1 inch thick), rolled roast - Pork: Chops (0.5 inch thick), hot dogs, spareribs, country-style ribs, rolled roast, sausage - Veal: Cutlets (1 lb, 0.
18 OPERATION 4 5 Use the number keys to enter the desired amounts from the Soften Menu. Press START/Enter. • When the cook time ends, a melody sounds and COOK END appears in the display. Soften Menu 5 Press START/Enter. • When the cook time ends, a melody sounds and COOK END appears in the display. Melt Menu Refer to the information below to set the desired menu item and see the recommended amounts.
OPERATION 19 5 Press START/Enter. Simmer Menu • When the cook time ends, a melody sounds and COOK END appears in the display. Refer to the information below to set the desired menu item and see the recommended amounts. • 1. Rice (1, 2, 3 servings) - Cookware: Microwave-safe bowl† This function has preset cook settings for popular foods for kids.
20 OPERATION • 3 Fusilli (1, 2 ,3, 4 servings) - Cookware: Microwave-safe bowl† - Food temperature: Room - Instructions: Follow instructions for cooking Farfalle. Stir twice in the middle of cooking. • 7 Spaghetti (1, 2, 3 servings) - Cookware: Microwave-safe bowl† - 1 serving (water 4-1/4 cups/1 L, fusilli 3 oz/85 g) - Food temperature: Room 2 servings (water 4-1/4 cups/1 L, fusilli 6 oz/170 g) - 1 serving (water 4-1/4 cups/1 L, spaghetti 3 oz/ 85 g) 3 servings (water 6-1/3 cups/1.
OPERATION 21 the oven temperature. (Do not enter the time.) When the melody sounds, place the food in the oven. 5 Set the cook time: Press 4, 5, 0 and 0. 6 Press START/Enter. Set the cook time: Press 3, 0, 0 and 0. 4 Press START/Enter. • When the cook time ends, a melody sounds and COOK END appears in the display. NOTE • When the cook time ends, a melody sounds and COOK END appears in the display. Example: 30 minutes at 375 ℉ without preheating 1 Press Conv. Bake. 350 ℉ appears in the display.
22 OPERATION Food Vegetables, Other desserts Baked Potatoes Acorn Squash Halves Meringue Shells Temp Time (min) Comments 425 ℉ 375 ℉ 250 ℉ 55 to 65 60 to 70 70 to 85 Potatoes: Pierce skin with fork before baking. Squash: Pierce skin several places. Add ½ cup water to dish. Tum squash halves cut side up after 30 minutes of cook time and cover. Meringues: When done, turn oven off and let shells stand in oven for 1 hour to dry.
OPERATION 23 4 Press START/Enter. - 1 serving: 6 ea, 2 servings: 12 ea • When the oven beeps, turn the food over. - Alternative: Conv. Bake at 450 ℉ for 19 - 20 min. • 7 Mozzarella Sticks (1 - 2 servings) - Cookware: Metal tray on the rack Air Fry Menu - Food temperature: Frozen cooked Refer to the information below to set the desired menu item and see the recommended amounts. Adjust cook time according to the size, thickness, and your preference of doneness.
24 OPERATION 3 4 Set the cook time: Press 3, 0, 0 and 0. Press START/Enter. • When the cook time ends, a melody sounds and COOK END appears in the display. Combination Bake Menu Food Temp Time Comments (min) Pie, Pastries Quiche 400 ℉ 40 to 50 Let stand 1 hour before cutting. Convenience Foods Frozen Pizza Frozen Bread 425 ℉ 400 ℉ 20 to 30 15 to 30 Follow package directions for preparation. Vegetable Baked Potatoes 400 ℉ 25 to 35 Pierce skin with fork before baking.
OPERATION 25 Temp Poultry Whole Chicken (2 to 4 lbs) Chicken Pieces (1 to 2 lbs) 375 ℉ 375 ℉ Seafood Fish (1 to 3 lbs, fillets) Shrimp (0.5 to 1.5 lbs) 350 ℉ 350 ℉ Time Comments (min/lb) 20 to 25 35 to 45 12 to 18 7 to 12 (/ 0.5 lbs) Turn over halfway through the cooking time. Turn over halfway through the cooking time. NOTE • The roasting time in the chart above is only a guideline for your reference. Adjust the time according to the food condition or your preference.
26 OPERATION • Medium: 165 ℉ (74 ℃) • Low: 140 ℉ (60 ℃) 3 Press START/Enter to start warming. 4 Press STOP/Clear at any time to cancel. NOTE • This function is intended to keep food warm. Do not use it to cool food down. • It is normal for the fan to operate during the Warm mode. Proof Mode This function maintains a warm oven for rising yeast-leavened products before baking. Setting the Proof Function Example: Proofing for 2 hours 1 Press Proof. 2 Set the cook time: Press 2, 0 and 0.
OPERATION 27 • Kiwi - Preparation: Peel and cut into 3/8" (8 - 12 mm) slices. - Use: Snacks • Mangos - Preparation: Remove skin and cut into 3/8" (6 10 mm) slices. - Set temp / Time: 160 ℉ / 6 - 9 hrs - Use: Snacks, cereals, baked goods • Pineapple - Preparation: Peel, core and cut into 3/8" (8 - 12 mm) slices. - Set temp / Time: 160 ℉ / 6 - 9 hrs - Use: Snacks, baked goods, baked granola • Tomatoes - Preparation: Wash and slice into 1/4" (6 mm) thick circles.
28 OPERATION - Do not put plates with painted decoration in the oven, as the paint may contain metal and cause arcing. Microwave-Unsafe Cookware • Metal Containers/Metal Decoration - Never use metal or metal-rimmed cookware in the microwave oven. - Microwaves cannot penetrate metal. They will bounce off any metal object in the oven and cause arcing, an alarming phenomenon that resembles lightning. - Metal shields the food from microwave energy and produces uneven cooking.
OPERATION 29 Cooking Guide Cooking Tips Carefully monitor the food in the microwave oven while it is cooking. Directions given in recipes to elevate, stir, etc., are the minimum steps recommended. If food is overcooked (dry), undercooked, or unevenly cooked, make adjustments before or during cooking to correct the problem. • Overcooked or Dry Food - Sprinkling: Sprinkle low-moisture foods such as roasts and vegetables with water before cooking, or cover them to retain moisture.
30 OPERATION food is still frozen solid in the center, return it to the microwave oven for more defrosting. dense foods such as meats, casseroles, and poultry without preheating. - Depending on the shape of the food, some areas may defrost more quickly than others. • All heatproof cookware or metal accessories can be used in convection cooking. - The shape of the package affects how quickly food will defrost. Shallow packages will defrost more quickly than a deep block.
OPERATION 31 occurs when microwaves come in contact with metal. - For best results, use the metal tray supplied with your oven. - If arcing occurs with other baking cookware, do not use it for combination cooking. ENGLISH - If arcing occurs, immediately stop the cooking cycle and place a heat resistant dish between the pan and the metal rack.
32 SMART FUNCTIONS SMART FUNCTIONS LG ThinQ Application Before Using LG ThinQ Application This feature is only available on models with Wi-Fi. 1 The LG ThinQ application allows you to communicate with the appliance using a smartphone. • If the appliance is too far from the wireless router, the signal becomes weak. It may take a long time to connect or fail to install the application. LG ThinQ Application Features • Settings - Allows you to set various options on the oven and in the application.
SMART FUNCTIONS 33 • Increase the separation between the equipment and the receiver. • If the firewall on your wireless router is enabled, disable the firewall or add an exception to it. • Connect the equipment into an outlet on a circuit different from that to which the receiver is connected. • The wireless network name (SSID) should be a combination of English letters and numbers. (Do not use special characters.) • Consult the dealer or an experienced radio/TV technician for help.
34 SMART FUNCTIONS Smart DiagnosisTM Feature This feature is only available on models with the c or d logo. 3 Keep the phone in place until the tone transmission has finished. The display will count down the time. Once the countdown is over and the tones have stopped, the diagnosis will be displayed in the application. Use this feature to help you diagnose and solve problems with your appliance. NOTE NOTE • For best results, do not move the phone while the tones are being transmitted.
MAINTENANCE 35 MAINTENANCE Cleaning the Interior 1 2 Use a damp cloth to clean the surfaces of the door and wipe out crumbs between the door and the frame. Cleaning the Accessories Wash the glass tray and rotating ring in mild, sudsy water. For heavily soiled areas, use a mild cleanser and scouring sponge. Dry completely before use. • The glass tray and rotating ring are dishwasher safe. Remove greasy spatters with a soapy cloth then rinse and dry. • Hand wash the steam bowl.
36 MAINTENANCE 3 Rinse well and shake to dry. • Do not use ammonia or place in a dishwasher. The aluminum will darken. 4 To reinstall, slide the filter in on the back side and push it upward to secure it. NOTE • Do not operate the hood without the filters in place. 5 Slide the bottom of the vent cover into place. Push the top until it snaps into place. Tighten the vent grille screw in place. Replacing Parts 6 Close the oven door, plug in the power cord.