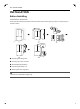
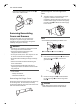
UUGGwGXWGG{ SGhGY[SGYWYXGG_aX[Ght 10 INSTALLATION INSTALLATION Before Installing Installation Overview Please read the following installation instructions first after purchasing this product or transporting it to another location. a Unpacking the Refrigerator b Choosing the Proper Location c Disassembling/Assembling d Connecting the Water Line e Leveling and Door Alignment WARNING • Connect to potable water supply only.
UUGGwGXXGG{ SGhGY[SGYWYXGG_aX[Ght INSTALLATION 11 Unpacking the Refrigerator install a booster pump to compensate for the low pressure. WARNING • The refrigerator is heavy. Protect the floor when moving the refrigerator for cleaning or service. Always pull the refrigerator straight out when moving it. Do not wiggle or walk the refrigerator when trying to move it, as floor damage could occur. • Keep flammable materials and vapors, such as gasoline, away from the refrigerator.
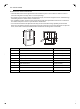
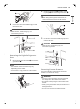
UUGGwGXYGG{ SGhGY[SGYWYXGG_aX[Ght 12 INSTALLATION Dimensions and Clearances • Check the dimensions of the appliance and the installation path to ensure there is sufficient room to move the refrigerator through doors or narrow openings. • If an opening is too narrow to fit the refrigerator through, remove the refrigerator doors. See Removing/ Assembling the Doors and Drawers in this manual.
UUGGwGXZGG{ SGhGY[SGYWYXGG_aX[Ght INSTALLATION 13 Removing/Assembling Handles The appearance of the handles may vary from what is shown. 1 2 CAUTION If needed, reassemble the mounting fasteners a on the door with a 1/4 in. Allen wrench. Place the handle on the door by fitting the handle footprints over the mounting fasteners and tightening the set screws b with a 3/32 in. Allen wrench.
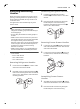
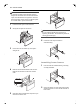
UUGGwGX[GG{ SGhGY[SGYWYXGG_aX[Ght 14 INSTALLATION fasteners and tightening the set screws b with a 1/8 in. Allen wrench. Removing the Left Refrigerator Door 1 Removing/Assembling Doors and Drawers If the entrance door is too narrow for the refrigerator to pass through, remove the refrigerator doors and move the refrigerator sideways through the doorway. The water supply is connected to the upper right part of the rear surface of the refrigerator.
UUGGwGX\GG{ SGhGY[SGYWYXGG_aX[Ght INSTALLATION 15 2 Rotate the hinge lever c clockwise. Lift the top hinge d free of the hinge lever latch e. • When lifting the hinge free of the latch, be careful that the door does not fall forward. 4 Lift the door from the middle hinge pin and remove the door. CAUTION • Place the door, inside facing up, on a nonscratching surface. 3 Lift the door from the middle hinge pin and remove the door.
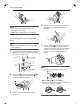
UUGGwGX]GG{ SGhGY[SGYWYXGG_aX[Ght 16 INSTALLATION WARNING • To prevent accidents, keep children and pets away from the drawer. Do not leave the drawer open. If the Durabase® storage bin is removed from the freezer drawer, there is sufficient space for a small child or pet to crawl inside. 1 Pull the drawer open to full extension. 2 Gently lift and pull out the ice bin. CAUTION • Do not hold the handle when removing or replacing the drawer.
UUGGwGX^GG{ SGhGY[SGYWYXGG_aX[Ght INSTALLATION 17 ENGLISH CAUTION • Do not hold the handle when removing or replacing the drawer. The handle may come off, causing personal injury. 3 4 Assembling the Right Refrigerator Door CAUTION • Install the right-side door first. 1 Lower the door into its final position and insert the screws in the rails on both sides. Insert the drawer into the frame, and push the drawer back until it clicks into place.
UUGGwGX_GG{ SGhGY[SGYWYXGG_aX[Ght 18 INSTALLATION NOTE 4 • The number of wire harnesses may vary depending on the model. Push the water supply lines into the hole on the top case and pull them through the backplate. • Ground wire is only present on some models. Assembling the Left Refrigerator Door CAUTION • Install the left refrigerator door after the right door is installed. 1 Make sure that the plastic sleeve is inserted in the bottom of the door.
UUGGwGX`GG{ SGhGY[SGYWYXGG_aX[Ght INSTALLATION 19 Assembling the Hinge Cover Position the hinge cover in its place. Insert and tighten the cover screws. • Where reverse osmosis water filtration system is connected to a cold water supply: If the water pressure from the reverse osmosis system is less than 20 psi or 138 kPa or 1.
UUGGwGYWGG{ SGhGY[SGYWYXGG_aX[Ght 20 INSTALLATION fitting with a tube cutter and use a compression fitting. • Shutoff valve to connect to the cold water line. The shutoff valve should have a water inlet with a minimum inside diameter of 5/32 in. at the point of connection to the COLD WATER LINE. Saddle-type shutoff valves are included in many water supply kits. Before purchasing, make sure a saddle-type valve complies with your local plumbing codes.
UUGGwGYXGG{ SGhGY[SGYWYXGG_aX[Ght INSTALLATION 21 5 Tighten the pipe clamp. • Tighten the clamp screws until the sealing washer begins to swell. ENGLISH NOTE • Do not over tighten the clamp or you may crush the tubing. a Saddle-Type Shutoff Valve b Compression Nut c Packing Nut d Outlet Valve e Ferrule (sleeve) a Pipe Clamp b Inlet End 8 • Turn the main water supply on and flush out the tubing until the water is clear.
UUGGwGYYGG{ SGhGY[SGYWYXGG_aX[Ght 22 INSTALLATION NOTE • Insert the end of the copper tubing into the connection as far as possible. While holding the tubing, tighten the fitting. doors do not close easily, adjust the refrigerator’s tilt using the instructions below: 1 Turn the leveling leg to the left to raise that side of the refrigerator or to the right to lower it. It may take several turns of the leveling leg to adjust the tilt of the refrigerator.
UUGGwGYZGG{ SGhGY[SGYWYXGG_aX[Ght INSTALLATION 23 the height. Turn the nut to the right to raise the door or to the left to lower it. • Have a certified electrician check the wall outlet and wiring for proper grounding. Position the Refrigerator • Arrange the coil of tubing so that it does not vibrate against the back of the refrigerator or against the wall. Push the refrigerator back to the wall.