
Owner's Manual
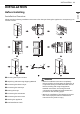
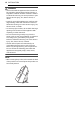
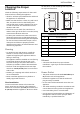
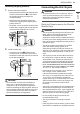
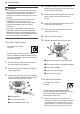
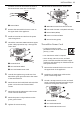


Table Of Contents
- IMPORTANT SAFETY INSTRUCTIONS
- PRODUCT OVERVIEW
- INSTALLATION
- APPENDIX

19INSTALLATION
ENGLISH
b Neutral wire (white)
c External ground wire (if required by local
codes)
d Wire from the appliance harness
e Ground screw (green)
Installing the Dryer Side
Vent Kit
The appliance is configured to vent to the rear. It
can also vent to the side.
WARNING
• Use long-sleeved gloves and safety glasses.
• Use a heavy metal vent.
• Do not use plastic or thin foil ducts.
• Clean old ducts before installing the appliance.
NOTE
• An adapter kit, part number 383EEL9001B, may
be purchased from your LG retailer. This kit
contains duct components necessary to change
the appliance vent location.
• Right-side venting is not available on gas
models.
• Bottom venting is not available on stacked or
integrated stacked models.
Side Venting
1 Remove the rear exhust duct retaining screw
a and pull out the exhaust duct b.
2 Press the tabs on the knockout c and
carefully remove the knockout for the desired
vent opening. (Right-side venting is not
available on gas models.) Press the adapter
duct
d onto the blower housing and secure
to the base of the dryer as shown.
3 Preassemble a 4" (10 cm) elbow e to the next
4" (10 cm) duct section, and secure all joints
with duct tape. Be sure that the male end of
the elbow faces AWAY from the dryer. Insert
the elbow/duct assembly through the side
opening and press it onto the adapter duct.
Secure it in place with duct tape. Be sure that
the male end of the duct protrudes 1 1/2" (3.8
cm) to connect the remaining ductwork.
Attach the cover plate
f to the back of the
dryer with the included screw.
Venting the Dryer
WARNING
• Gas dryers MUST exhaust to the outdoors.
• DO NOT use sheet metal screws or other
fasteners which extend into the duct that could
catch lint and reduce the efficiency of the
exhaust system. Secure all joints with duct tape.
• To reduce the risk of fire, combustion, or
accumulation of combustible gases, DO NOT
exhaust dryer air into an enclosed and
unventilated area, such as an attic, wall, ceiling,
crawl space, chimney, gas vent, or concealed
space of a building.
• To reduce the risk of fire, DO NOT exhaust the
dryer with plastic or thin foil ducting.
• Do not exceed the recommended duct length
limitations noted in the chart. Failure to follow
these instructions may result in extended drying
times, fire or death.
• Do not crush or collapse ductwork.
• Do not allow ductwork to rest on or contact
sharp objects.
• If connecting to existing ductwork, make sure it
is suitable and clean before installing the dryer.
a
b
c
d
f
e