Colour Television OWNER'S MANUAL Please read this manual carefully before operating your set. Retain it for future reference. Record model number and serial number of the set. See the label attached on the back cover and quote this information to your dealer when you require service.
Installation Power This set operates on an AC mains supply, the voltage is as indicated on the label on the back cover. Never apply DC power to the set. In the event of thunderstorms or powercuts, please pull out the aerial and mains plugs. Warning To prevent fire or shock hazard, do not expose the set to rain or moisture. Service Never remove the back cover of the set as this can expose you to very high voltage and other hazards. If the set does not operate properly, unplug it and call your dealer.
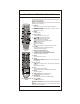
Location and function of controls All the functions can be controlled with the remote control handset. Some functions can also be adjusted with the buttons on the front panel of the set. Remote control handset Before you use the remote control handset, please install the batteries. See the next page. 1. POWER switches the set from on to standby or standby to on. 2. NUMBER BUTTONS switches the set on from standby or directly select a Programme number. 3. MENU selects a menu. 4.
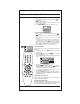
Location and function of controls Shown below is a simplified representation of front or side panel, here shown may be somewhat different from your set. Front panel VIDEO VIDEO 6 (L) I AUDIO (R) AUDIO ON/OFF 1 MENU OK 2 3 4 VIDEO (L)-AUDIO-(R) PR VOL 5 6 P-TURBO-S 7 7 ON/OFF 7 (L) I AUDIO (R) 6 AUDIO (Side Panel) SOUND PICTURE ON/OFF 2 3 4 5 MENU VOL 6 7 8 TURBO PR VOL PR OK SOUND PICTURE 5 2 3 4 9 8 9 1. MAIN POWER (ON/OFF) switches the set on or off. 2.
Basic operation On and off 1. Press the main power button to switch the set on. 2. If the set is in standby mode, press the POWER, , TV/AV or NUMBER buttons on the remote control handset to switch it on fully. 3. Press the POWER button on the remote control handset. The set reverts to standby mode. 4. Press the main power button again to switch the set off.
On screen menus The dialogue between you and your set takes place on screen with an operator menu. The buttons required for the operating steps are also displayed. Menu selection PSM SSM ME NU 1. Repeatedly press the MENU button to display each menu. 2. Press the button and then button to select a menu item. 3. Press the button to display the sub menu or the pulldown menu. 4. Change the setting of an item in the sub or pull-down menu with or .
Setting up TV stations Up to 200 stations can be stored by programme numbers (0 to199). Once you have preset the stations you will be able to use the or NUMBER buttons to scan the stations you programmed. Stations can be tuned using automatic or manual modes. Note : In some models up to 100 TV stations can be stored. SSM PSM ME NU Auto programme tuning All stations that can be received are stored by this method. It is recommended that you use auto programme during installation of this set. 1 .
Setting up TV stations Auto programme scan (option) To automatically scan the pictures of stored programmes, press the ( ) or ( ) button for about 3 seconds. The picture of stored programmes appears on the screen one by one. To stop auto programme scanning, press any button. Manual programme tuning Manual programme lets you manually tune and arrange the stations in whatever order you desire. Also you can assign a station name with five characters to each programme number.
Setting up TV stations Fine tuning Normally fine tuning is only necessary if reception is poor. 1. Repeat the 'Manual programme tuning' steps 1 to 3. 2. Press the button to select Fine. 3. Press the button to fine tune for the best picture and sound on the Fine pull-down menu. 4. Repeat the 'Manual programme tuning' steps 7 to 8. 5. Press the TV/AV button to return to normal TV viewing. The finely tuned programme will be indicated by red number during programme selection. 6.
Setting up TV stations Moving a programme 1 . Select a programme to be moved with the button. 2. Press the YELLOW button. or 3. Move the programme to the desired programme number with the or button. 4. Press the YELLOW button again to release this function. Skipping a programme number 1. Select a programme number to be skipped with the or button. 2. Press the BLUE button. The skipped programme turns to blue. 3. Press the BLUE button again to release the skipped programme.
Setting up TV stations Note : a. You may find some blue programmes. They have been set up to be skipped by auto programming or in the programme edit mode. b. Some programmes with the channel number shown in the programme table indicate there is no station name assigned. Selecting a programme in the programme table Select a programme with the or button. Then press the OK button. The set switches to the chosen programme number.
Picture adjustment 4. Press the button to make appropriate adjustments on each sub menu. You can also select other User items directly with but and adjust them with button. 5. Press the OK button to store it for the picture User. 6. Press the TV/AV button to return to normal TV viewing. Eye (option) On some models, the set will automatically adjust the picture according to the surrounding conditions. This will enable you to enjoy the most suitable picture according to the surroundings.
Sound adjustment (option) SSM (Sound Status Memory) You can select your preferred sound setting; Flat, Music, Movie or Speech and you can also adjust the sound frequency of equalizer. 1. Repeatedly press the MENU button to select the Sound menu. 2. Press the button and then button to select SSM. 3. Press the button to select a sound setting on the SSM pull-down Menu. SSM PSM POWER ME N U E UT M Sound Frequency Adjustment a. Press the button in User to display the User sub menu. b.
Sound adjustment (option) /Turbo Bass System Turbo sound selection (option) When this function is on, sound will be more emphasized and amplified sound than normal sound. You can enjoy the Turbo Sound so much better than normal Sound. Repeatedly press the TURBO SOUND button to switch on or off. (Turbo Sound off) (Turbo Sound on) CBC (Calibrated Bass Control) (Option) By using this function you can adjust the desired bass level.
Other functions Auto AV switching (option) If your VCR outputs switching voltage when it is switched to playback with the VCR connected to the Euro scart socket. The set is automatically switched to AV mode when an AV signal is input. But if you want to keep on watching TV mode, press the or NUMBER buttons. Press the TV/AV button to return to AV modes. Child lock The TV can be set so that the remote control handset is needed to control it. This feature can be used to prevent unauthorized viewing. 1.
Other functions 3. Press the button to select On or Off on the AVL. Pull-down menu. 4. Press the TV/AV button to return to normal TV viewing. CSM ( Colour Status Memory) You can select the picture colour status; standard, reddish, greenish or bluish, as you prefer. 1. Repeatedly press the MENU button to select the Special menu. 2. Press the button and then button to select CSM. 3. Press the button to select Standard, Reddish, Greenish or Bluish on the CSM pull-down menu. 4.
Other functions LG CLIMB (option) As on throwing a dice you get a random number in between 1 & 6, similarly there are six blocks in the game. After selecting a block (by pressing buttons) when you press OK it will display the random number contained in the blocks and your current position will be incremented by that number. (The block selection will reset by itself and go to first block.
Other functions Remote control for game (option) This remote control is optional supply. if it’s supplied to you, use it when playing the game. POWER : switches the set on from standby or off to standby. MUTE : switches the sound on off. TV/AV : exit game mode. MUTE : display game menu and exit game mode. PR /VOL OK : controls the game in the same way as main remote do. Note: a. Press the TV/AV or MENU button to return to the normal TV viewing. b.
Other functions Note : a. If the same time is set for the on time and the off time then off time operates. b. The set must be put in to standby mode with the POWER button on the remote control to operate the on time functions. c. Two hrs after the set in switched ON by ON TIME function it will automatically switch back to stand by mode unless a button the has been pressed. d. Once the on or off time in set, these functions operate daily at preset time, if time is set.
Connection of external equipment Component in sockets (option) 1. Connect the COMPONENT video output sockets (Y Cb Cr, Y Pb Pr or Y B-YR-Y) of the COMPONENT (480) to the COMPONENT INPUT sockets ( Y PB PR ) on the set. 2. Connect the audio cable from the COMPONENT to AUDIO sockets of COMPONENT INPUT. 3. Press the TV/AV button to select COMPONENT. 4. Press the PLAY button on the COMPONENT. THE COMPONENT playback picture appears on the screen.