
Owner's Manual

29
ENGLISH
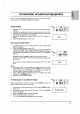
Connection
of
PC
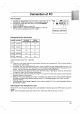
PC
in
socket
1.
Connect
the
signal
cable
from
the
monitor
output
socket
of
the
PERSONAL
COMPUTER
to
the
PC
input
socket
of
the
set.
2.
Connect
the
audio
cable
from
the
PC
to
the
PC
SOUND
sockets
of
the
set.
3.
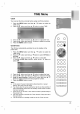
Press
the
INPUT
button
to
select
PC.
4.
Switch
on
the
PC,
and
the
PC
screen
appears
on
the
set.
The
set
can
be
operated
as
the
PC
monitor.
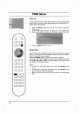
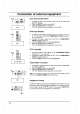
S-VIDEO
H/P
AV2
PC
INPUT
PC
SOUND
ANTIN(
75
)
PERSONAL
COMPUTER
Displayable
Monitor
Specification
(Synchronization
input
form
:
separate)
Note
:
a.
If
the
set
is
cold,
there
may
be
a
small
"flicker"
when
the
set
is
switched
on.
This
is
normal,
there
is
nothing
wrong
with
the
set.
b.
If
possible,
use
the
1360x768@60Hz
video
mode
to
obtain
the
best
image
quality
for
your
LCD
monitor.
If
used
under
the
other
resolutions,
some
scaled
or
processed
pictures
may
appear
on
the
screen.
The
set
has
been
pre-adjusted
to
the
mode
VESA
1360x768@60Hz.
c.
Some
dot
defects
may
appear
on
the
screen,
like
Red,
Green
or
Blue
spots.
However,
this
will
have
no
impact
or
effect
on
the
monitor
performance.
d.
Do
not
press
the
LCD
screen
with
your
finger
for
a
long
time
as
this
may
produce
some
temporary
distortion
effects
on
the
screen.
e.
When
the
PC
screen
appears
on
the
set,
a
message
may
appear
on
the
screen,
and
the
message
will
differ
according
to
the
Window
system
version.
If
a
message
appears
click
"Next"
until
the
message
finishes.
f. If
the
message
"out
of
range"
appears
on
the
screen,
adjust
the
PC
as
in
the
'Displayable
Monitor
Specification'
section.
DPM
(Display
Power
Management)
mode
When
the
PC
is
in
the
power
saving
mode,
automatically
the
monitor
goes
into
DPM
mode
to
save
the
energy.
Note
:
Use
the
supplied
signal
cable
with
the
set.
Otherwise,
DPM
mode
may
not
work.
MODE
Resolution
Horizontal
Frequency(kHz)
Vertical
Frequency(Hz)
VGA
SVGA
XGA
WXGA
WXGA
640x480
800x600
1024x768
1280x768
1360x768
31.4
37.8
48.3
47.7
47.6
60
60
60
60
60