LCD TV OWNER'S MANUAL MODEL: 26LZ5RV Please read Information Manual included together before reading this manual and operating your set. Retain it for future reference. Record model number and serial number of the set. See the label attached and quote this information to your dealer when you require service.
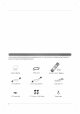
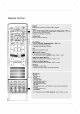
Accessories Ensure that the dealer from following accessories are included where you purchased the product. with your TV. If any accessory is missing, please contact the TV/AV MULTIMEDIA POWER PSM STOP LIST OPEN/CLOSE PLAY SSM PAUSE SKIP MENU /STEP SCAN TEXT AUDIO I/II REPEAT ARC SCAN SKIP OK EXIT DISCMENU T ITLE VOL DI S PLAY MUTE 4 SLEEP PR 2 78 0 RETURN Q.VIEW 1 5 3 6 9 CLEAR 1.5V 1.
Contents Contents Accessories 2 Introduction Installation 5 Controls 6 Connection 7 Remote Control 10 Basic Connection 12 External Options Equipment Connections 12 Antenna Connection 13 External AV Source 14 VCR Setup 19 Setup DVD Setup DVD Output Setup PC Setup Set-top box Setup 19 Power Cord Connection 16 17 18 TV Basic operation 20 Turning 20 Volume 20 20 21 22 23 Setting up TV stations 24 25 26 Picture Operation adjustment adjustment Time Setup PC menu men
Contents Contents 38 Switch on/off 38 SIMPLE text 38 TOP text 39 FASTEXT 39 Special (option) teletext functions DVD 40 Notes 42 Language Menu 42 Disc Audio / Disc Subtitle / Disc Menu 43 44 44 Display Scan Progressive Audio 45 45 Vocal 46 Lock 46 Rating 47 Password 47 Area Code 48 (Security Code) OTHERS 48 PBC 48 AUTO PLAY 49 DivX(R) 50 Playing VOD DVD a or Video CD 50 Basic 50 Still 51 Slow Motion 51 51 Moving to another Repeat Playback 52 Disc Menu /
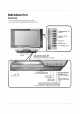
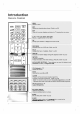
Introduction Controls Controls - - This is a simplified representation of front panel. Here shown may be somewhat different from your TV. Programme (D Buttons PR Volume / (F VOL Buttons OK OK Button / E) G) MENU Button MENU TV TV ? AV/PC Button AV/PC SKIP/ OPEN/ CLOSE PLAY STOP SCAN SKIP/ SCAN ON/OFF Button DVD / CD PLAYER Remote Control Sensor Power/Standby Indicator ( ) ? illuminates red in ? illuminates green when the set is switched standby mode. on.
Introduction Connection Connection Options Options S-Video COMPNET2 480i/576i Component2 Input (Y,PB,PR) Audio RS-232C RL AUDIO (MONO) VIDEO Input Y PB Input PR (480i/480p/576i/576p/720p/1080i) AV AC Input AV DVI Input (Auido/Video) (PC) Input COMPONENT L R AUDIO ( ) 1(DVD/DTV IN) Component 1 Input (DVD/DTV) Remote Control Port PC Sound RS-232C port VIDEO DIGITAL SOUND OUT DVD Output (Video) DVD Output (Audio) 6 OPTICAL (Digital Sound Output) Input Antenna Input
Remote Control Control POWER Switches the set On from OPEN/CLOSE POWER TV/AV LIST MULTIMEDIA TEXT AUDIO SSM PSM I/II PLAY PAUSE/STEP STOP SCAN SKIP REPEAT SCAN ? Clears the ? Switches the set On from Clears the ? Switches the set On from 1 VOL DISPLAY MUTE PC mode. screen. standby. DVD, Component 1-2, menu or tray. ? from the or PC mode. screen. standby. the programme table. Displays TITLE standby.
Introduction Remote Control Control MENU Selects a menu. OPEN/CLOSE POWER TV/AV ARC Selects your desired LIST MULTIMEDIA TEXT AUDIO SSM PSM I/II PLAY PAUSE/STEP STOP picture format. to (Refer p.28) EXIT Clears all on-screen displays and returns to TV viewing from any menu. REPEAT D/E/F/G(up/down/left/right) Selects or adjusts an item in the menu. SCAN SKIP SCAN SKIP ARC MENU OK Accepts EXIT your selection DISC MENU Accesses menu OK on a or displays DVD disc.
123 A-B Repeat 456 78 SLEEP RANDOM 9 Plays chapters ANGLE Selects a DVD CLEAR 0 sequence. or tracks in random order. camera angle if available. (Refer to p.54) SUB_T (SUBTITLE) A-B RANDOM ANGLE MARKER SEARCH PROGRAM MIX TIME Selects ZOOM MARKER Marks any REVEAL MODE ? UPDATE SUB_T SIZE subtitle language. (Refer INDEX i to p.55) point during playback. (Refer SEARCH Displays MARKER SEARCH M HOLD a PROGRAM Places a track on menu. the program list. to p.
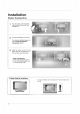
Installation Basic Connection Connection 1 Pull the while back cover backside the two tabs and pushing then lift it up. 2 Connect the cables To connect necessary. additional an the External see as equipment, equipment Connections section. 3 Align panel the - the holes with the rear Cable back the TV back on protuberances and insert. cover Arranagement Pull the cables through the hole the set and bundle the cables the Desktop on supplied on using twister holder.
How to - - join the product assembly to the wall to protect the set tumbling Set it up close to the wall so the product doesn't fall over when it is pushed backwards. The instructions shown below is a safer way to set up the product, which is to fix it on the wall uct doesn't fall ward and over when it is hurting people. that children don't climb pulled It will also on or hang in the forward direction.
Installation External To Connections Equipment Connections prevent the equipment damage, never plug in any power cords until you have finished equipment. Antenna Connection - - For optimum picture quality, adjust An antenna cable and converter antenna direction. are not supplied. Multi-family Dwellings/Apartments (Connect to wall antenna socket) Wall Antenna Socket RF Coaxial Wire (75 ohm) VHF Antenna Turn clockwise to tighten.
External AV Source TV side panel 1 COMPNET2 480i/576i Setup 1 Connect the equipment to picture quality 2 2 3 AUDIO RL VIDEO the S-VIDEO is input on the set. The improved. Connect the AUDIO Select S-video button S-VIDEO output of the external jacks between TV and external equipment. Camcorder Video Game Set S-VIDEO 4 Refer to source with using the TV/AV the remote control. on Operate input the corresponding external equipment. external equipment operating guide.
Connections Equipment Connections External VCR - - To avoid picture Typically a screen When noise frozen still (interference), from picture leave an adequate VCR. If the 4:3 a may remain visible on the with an antenna cable connecting Setup distance between the VCR and TV. picture format is used; the fixed images Connect the ANT OUT socket of the VCR to the ANT IN socket 2 2 ANT OUT on the set. Connect the antenna cable to the ANT IN socket of the VCR.
When connecting TV side with an S-Video cable panel 1 1 COMPNET2 Connect the S-VIDEO to the S- VIDEO input on the set. The picture quality is improved; compared to connecting a regular VCR to the Video input. 480i/576i 2 Connect the AUDIO 3 Insert 2 on 4 ANT IN a video the VCR. on jacks between TV and VCR. tape into the VCR and press PLAY (Refer Select S-video button ANT OUT output of the VCR to the VCR owner's input source with using manual.
External Connections Equipment Connections DVD When connecting with Setup component cable a 1 TV back panel Connect the video to outputs (Y, PB, PR) of the DVD the COMPONENT1 DVD/DTV IN (Y, PB, PR) jacks 2 RL AUDIO (MONO) VIDEO Y PB PR L COMPONENT Connect the audio AUDIO input jacks 3 Turn the DVD 4 Select on outputs of the DVD on 1(DVD/DTV IN) the set. player, insert Component1 input TV/AV button - If on DVD.
DVD The TV has 1 a Connect the second TV DVD OUT 2 special signal output capability See the (VIDEO) or which allows you to hook up monitor to the TV's and DVD OUT Operating Output Setup regarding Connect the second TV OUT (VIDEO) OUT jacks. (AUDIO) jacks. Manual of the second TV monitor for further details 1 second TV a or or monitor.
External Connections Equipment Connections PC 1 Connect the TV to the PC with the PC cable. 2 Connect the PC audio 3 Turn 4 Use the TV/AV button on output Setup to the TV's PC SOUND input. the PC. on the remote control to select PC. NOTE Connect the signal cable (DVI-D cable, Not DVI to D-Sub cable) from the DVI output socket of the PC to the DVI input socket of the set when using a PC with DVI output. In some video cards, DVI-Analog output may not be supported.
Set-top When connecting with TV back a box Setup component cable panel 1 Connect the video outputs (Y, PB, PR) of the set- top box to the COMPONENT1 DVD/DTV IN (Y, PB, PR) jacks on the set. RL AUDIO (MONO) VIDEO Y PB PR L COMPONENT () AUDIO (480i/480p/576i/576p/720p/1080i) AV R 2 1(DVD/DTV IN) outputs of the set-top box the AUDIO input jacks 3 Turn set-top box.
Operation Operation Basic Operation Operation Turning On/Off 1 TV/AV First, make all equipment connections. Connect the AC power cord into the TV, then plug the power cord into a wall outlet. Press the POWER button located POWER ? MULTIMEDIA SSM the TV In the or on the TV to turn standby mode, number buttons on on the TV. The power indicator will press the POWER, PR D the remote control to turn / light. E, TV/AV, MULTIMEDIA on the TV.
How to 1 23 the OSD adjust Press the MENU button and then D / E button to display Press the G button and then D / E button to select the Change You setting can move of to the an item in the sub higher level menu each a menu pull-down menu by pressing the OK or menu. item. with F / G button. or MENU button.
TV stations stations up up Setting Up to 100 TV stations be able to Stations use can can the D / E be tuned or be stored by programme numbers NUMBER buttons to using automatic or to (0 Once you have 99). the stations you have manual modes. scan Auto programme Auto programme Manual programme Programme edit programmed.
Manual programme Manual programme Channel Auto programme Manual programme Programme edit Favourite programme DEFG - tuning OK MENU Manual programme 29 Storage Storage System System Channel Channel Search Search Name Name DEFG OK MENU Manual programme lets you manually tune and arrange the stations in DEFG 1 whatever order you desire. GGG OK MENU Press the MENU button and then D / E button to select the Channel menu.
Setting TV stations up up Assigning Channel a station name Manual programme Auto programme Storage System Manual programme Programme edit Channel Favourite programme Search C01 Name DEFG OK MENU DEFG - You can assign a station name to OK MENU 1 Press the MENU button and then D / E button to select the Channel 2 Press the G button and then D / E button to select Manual programme. menu. each programme number. 34 Press the G button and then D / E button to select Name.
edit Programme Channel Auto programme 0C035S Manual programme 1BLN03 6S17 Programme edit 2C1 2 7----- Favourite programme 3S6 6 8----- 4S6 7 9----- DEFG - OK Delete Copy Move Skip 69 MENU 1 Press the MENU button and then D / E button to select the Channel Also you can move some stations to other programme numbers or 2 Press the G button and then D / E button to select Programme edit. insert 3 Press the G button to menu.
Setting TV stations stations up up Favourite programme Channel Favourite programme Auto programme On Manual programme Programme edit Favourite programme DEFG OK Repeatedly press - the Q.VIEW but- ton to select stored favourite pro- grammes. DISC MENU VOL TITLE RETURN DISPLAY Q.
Picture adjustment PSM Picture You can Memory) Picture PSM PSM Dynamic Contrast Contrast Standard Brightness Brightness Mild Colour Colour Game Sharpness Sharpness User DEFG - Status (Picture OK MENU also recall DEFG a desired picture (Dynamic, Standard, Mild, Game or User) with PSM button on the remote control. The picture Dynamic, Standard, Mild and Game are programmed for optimum picture reproduction at the factory and cannot be changed.
Picture adjustment Picture format - You can watch TV in various Repeatedly OPEN/CLOSE (ARC) picture formats; 16:9, 14:9, Zoom, Auto, 4:3. button to select your desired picture format. press the ARC POWER TV/AV 16:9 LIST MULTIMEDIA SSM PSM You AUDIO through I/II PLAY PAUSE/STEP STOP TEXT The REPEAT right can the cinema enjoy (the picture format of 16:9) TV programme general or the 16:9 mode.
Sound Sound adjustment If you enter the SSM button after User automatically appears even Movie making appropriate adjustment on the User sub menu, the display though you have already set a factory preset setting; Flat, Music, Speech. or SSM Sound (Sound Status Memory) Sound SSM SSM Flat AVL AVL Music Balance Balance Movie Speech G User DEFG - You can OK DEFG MENU also recall a desired sound setting (Flat, Music, Movie, Speech or User) with SSM button on the remote control.
Sound Sound adjustment (Auto Volume Leveler) AVL Sound SSM SoundSSM AVL AVL On Balance Balance Off DEFG - OK MENU AVL (Auto Volume Leveler) maintains an equal volume level automatically even if the programme is changed. DEFG OK MENU 1 Press the MENU button and then D / E button to select the Sound 2 Press the G button and then D / E button to select AVL. 3 Press the G button and then 4 Press the EXIT button to return to normal TV use the D button to select On / E or menu.
I/II A Stereo/Dual When reception programme is selected, the sound information for the station appears after the programme number and station name disappear. a OPEN/CLOSE POWER TV/AV LIST MULTIMEDIA SSM PSM I/II PLAY PAUS STOP ? SCAN SKIP SCAN SKIP ARC MENU VOL DISPLAY MUTE RETURN PR Q.VIEW Mono MONO Stereo STEREO Dual DUAL I Display Mono sound selection reception if the stereo signal is pressing the I/II button twice.
T ime menu Time Time Time Time Time Off time Off time On time On time Auto off DEFG OK Auto off MENU DEFG You must set the time - using -i-i:i-i- correctly before on/off time function. OK MENU Press the MENU button and then D 12345 / E button to select the TIME Press the G button and then D / E button to select TIME. Press the G button and then D / E button to adjust the hour. Press the G button and then D / E button to adjust the minute.
Auto off Time Time Time Time Off time Off time On time On time Auto off On Auto off Off DEFG - OK MENU If you select On DEFG on the Auto off OK MENU 1 Press the MENU button and then D 2 Press the G button and then D / E button to select Auto off. Press the G button and then D / E button to select On / E button to select the TIME menu. menu, the set will automatically switch standby mode approximately itself to ten minutes after a TV station - broadcasting.
Setup menu Input Setup source Setup Language Language Input Input TV Component1 Child lock Child lock AV Component2 Set ID Set ID S-video PC DVD DEFG - - OK DEFG MENU MENU Alternatively you can select the TV or AV mode by pressing the TV/AV but- 1 Press the MENU button and then D ton. 2 Press the G button and then D 3 Press the G In AV , Component, or PC mode, to return to TV mode, press the PR D / E or NUMBER buttons.
Child lock Setup Setup Language Language Input Input Child lock Child lock On Set ID Set ID Off DEFG - OK DEFG MENU The TV can be set so that the remote OK MENU 1 Press the MENU button and then D / E button to select the 2 Press the G button and then D / E button to select Child lock. 3 Press the G button and then D / E button to select On 4 Press the EXIT button to return to normal TV Setup menu. control handset is needed to control it.
PC After setup, be menu sure to select PC source to see the PC Auto PC the on TV screen. Configure PC H-Position H-Position V-Position V-Position Clock Clock Phase Phase Auto Auto Configure DEFG OK Configure To Set Reset Reset MENU Automatically adjusts the screen position, clock, and phase. (The displayed image will disappear for a few seconds while Auto-configuration is in progress.
Clock / Phase PC PC H-Position H-Position V-Position V-Position Clock Clock Phase Phase Auto Auto Configure Configure Reset Reset DEFG 85 OK MENU DEFG OK MENU 1 Press the MENU button and then This function is to minimize any vertical bars or stripes visible on the screen back- 2 Press the G button and then ground. And the horizontal screen will also change.
eletext Teletext T Teletext (or TOP text) is an optional function, therefore only a set with the teletext system can receive the teletext broad- cast. Teletext is a free service broadcast sion programmes, share prices The teletext decoder of this TV sists of a are more most TV stations which by and many other can gives up-to-the-minute information on news, weather, televi- topics. support the SIMPLE, TOP and FASTEXT systems.
The teletext pages are colour coded corresponding coloured button. A along the bottom of the selection i button to select the index 1. Press the page. 2. You can select the pages which are colour coded 3. screen and are selected by pressing the Page Corresponding to the SIMPLE teletext mode, you along can the bottom line with the select a page by entering same coloured buttons. its three digit page number with the NUMBER buttons in FASTEXT mode. 4.
DVD Notes VCD Discs on on Used in this Manual Symbol DVD-V operation operation On ? DVD and finalized DVD±R/RW Do not store discs in heat Video CDs ? CD Audio CDs MP3 MP3 Discs WMA WMA Discs JPEG JPEG Discs DivX DivX Discs may appear your TV display during operation indicates that the function manual is not available on explained that sunlight or near sources. places subject to bathroom humidifier.
of Types Playable Discs ?DVD(8cm/12cmdisc) ?VideoCD(VCD)(8cm/12cmdisc) ?AudioCD(8cm/12cmdisc) In addition, this unit plays DivX file, DVD -R, DVD +R, DVD -RW, DVD +RW, Kodak Picture CDs, SVCD, and CD-R / CD-RW that contains audio titles, MP3, WMA, and/or JPEG files. Note ? Depending CD-R/RW itself, +RW) on (or some the conditions of the DVD -R, DVD CD-R/RW discs cannot be Regional recording equipment or the +R, DVD -RW, DVD +RW) disc (or DVD -R, DVD +R, played on the unit.
DVD operation DVD Menu options options - LANGUAGE By using the DVD menu, you can make various adjustments to items such set a language for the subtitles and the DVD menu, among other things. Menu as picture and sound. You can also Language LANGUAGE Menu Language Chinese G Disc Audio English Disc Subtitle Disc Menu F Prev. Select your preferred language for the DVD menus and on screen dis- - plays 1 messages.
DVD Menu options options - DISPLAY DISPLAY Progressive Scan DISPLAY Progressive Scan On G Off F Prev. - Progressive Scan Video provides the highest quality pictures with less flickering. Set Progressive Scan to On. D E Move G Select Press the MENU button twice and then 123 Press the G button to select Press the G button and then use the D / E button to select DISPLAY. Progressive Scan. use 4 Press the OK button.
DVD operation operation DVD Menu Each DVD disc has Set the options options - AUDIO variety of audio output options. player's AUDIO options according to the type a of audio Dolby Digital system you use. / DTS / MPEG DivX DVD-V AUDIO Dolby Digital Bitstream G PCM DTS MPEG Sample Freq. DRC Vocal F Prev.
DRC (Dynamic Range Control) DivX DVD-V AUDIO Dolby Digital DTS MPEG Sample Freq. DRC G Vocal F Prev. - With the DVD format, you can hear a program's soundtrack in the most accurate and realistic thanks to presentation digital audio tech- possible, nology. However, you may wish to compress the dynamic range of the audio output (the difference between the loudest sounds and the quietest ones).
DVD operation operation DVD Menu options options - LOCK Rating LOCK DVD-V LOCK Rating Unlock G 8 Password Rating (Adult) 8 (Ad Password 7 Area Code Unlock G lt) Password Area Code 6 OK 5 4 4 3 3 2 1 D E F Prev. - Some movies contain 2 (Kids) Move scenes G Select that may not be suitable for children to view. Many of these discs contain parental control information that applies to the complete disc or to tain scenes on on more the disc.
Password (Security Code) LOCK LOCK Rating Rating Password G Password Change Area Code Area Code F Prev. - You can enter or Password D E Move 1 change password. Clear CLEAR G Select OK F Delete Press the MENU button twice and then 0-9 use Input the D / E button to select LOCK. 23 Press the G button and then D / E button to select Password. use Press the G and OK button. In case of "New" Input a 4-digit password and press OK button.
DVD operation operation DVD Menu options options - OTHERS OTHERS PBC VCD OTHERS PBC G Off Play Auto On DivX(R) VOD D E F Prev. - Set Playback Control (PBC) to On or according played 12 Press the G button and then use D / E button to select PBC. played 3 Press the G button and then use D / E button to select On 4 Press the OK button. 5 Press the EXIT button to exit the to the PBC.
DivX(R) VOD Div-X OTHERS PBC Auto DivX(R) Play DivX(R) VOD G Your Select Video registration on demand code is To learn more : XXXXXXXX visit www.divx.com.vod (Done) F Prev. - You D E Move G Select show the DivX DRM (Digital Right Management) Registration code for your unit only. The Registration code is used for VOD (Video-On-Demand) service agent. You can purchase or rental an can encrypt movie file.
DVD operation operation Playing a a DVD or or V ideo CD Video CD Basic OPEN/CLOSE POWER Playback Press the POWER button to turn the unit 12 Press OPEN/CLOSE button to close the VCD DivX on. Press OPEN/CLOSE button to open the disc tray, with the playback side down. 3 DVD-V tray and load your chosen disc in the tray. Playback starts automatically. If play- back does not start, press G PLAY button.
Slow Motion 1 OPEN/CLOSE 2 POWER DVD-V Press II PAUSE/STEP button The DVD player will Use the FF SCAN STOP SKIP SCAN SCAN during playback. go into PAUSE mode. now or GG SCAN button to select the F I required speed: 1/16, F I 1/8,FI1/4,orFI1/2(backward),orIG1/16,IG1/8,IG1/4,orIG1/2(forward). With a DivX Disc and Video or I G 1/2 (forward).
DVD Playing operation operation a a DVD or or V ideo CD Video CD Disc Menu 12 Press the DISC MENU button Use the D / E / F / G button DVD-V during playback. or OK button to select the desired menu Title Menu 12 Press the TITLE button Use the D a. 52 TITLE DISPLAY DVD-V during playback. button or OK button to select the desired item. Note OK DISC MENU / E / F / G option. The unit may not be able to select the disc ing on a sort of DVD disc.
On-Screen 12 3 Press DISPLAY button Use D / E Press F DISC MENU TITLE an item. change the setting. You can also use the number buttons if appropriate (e.g. inputting the title number). For some functions, press OK to execute the setting. Some discs may not provide all of the features shown below. DVD-V OK during playback.
DVD operation Playing a a DVD or or V ideo CD Video CD A-B - A-B Repeat Playback DVD-V repeat playback allows you to DivX VCD repeat material between two selected points. 1 2 3 " * " Press the A-B button to select the start point during playback. A is displayed on the TV screen and the starting point of your selected segment is set up. " Press the A-B button again to select the end point. the TV screen and the ending point is set up. Playback starts at the point that you selected.
Subtitles 1 Press SUB_T button guages. If a subtitle er a new to repeatedly during playback is language you start DVD-V DivX the different subtitle lan- see selected, the selected subtitle language is played whenev- disc playback. (The disc must contain the selected language) Note The subtitle file of the DivX file is a. b. If there is DivX information no " file, " 1 etc or srt and sub. displayed only smi, there is a code that can not read in the displayed.
DVD operation operation Playing - The DVD Audio CD CD an an player A Audio CD can play MP3/WMA formatted recordings audio CD an or CD-ROM, CD-R, a menu appears OK button. a G starts. MP3 see PLAY WMA the folder contents. OK button. or folder, and press OK a a track then press Playback starts. MUSIC AUDIO CD A CD-RW discs. 2. Press D / E button to select track then press Playback or 1. Press D / E button to select on button to 2.
You - 12 1 A-B during playback. to segment is To exit the sequence and return to normal By pressing A " is follows. playback cancels. points. displayed on the TV screen and the " play, during playback. is displayed on the TV screen and the ending point is set up. at the end point, returns to Point A automatically, then starts press A-B button The unit again. The Repeat icon disappears from the automatically begins random playback menu screen. and RANDOM button to normal.
DVD operation operation Programmed Playback - The program function enables you to store your favorite tracks from any disc in the 30 tracks. 12 Insert a memory. A program player can contain disc. Press PROGRAM button. The ? E mark will appear to the Press PROGRAM button right of the word then the again, Program E mark will on the disappear to exit the 0:52:07 A 1/12 List 0:00:00 Program Edit mode.
V V iewing - Using 1 this DVD Insert JPEG JPEG Disc a a Player view Kodak PICTURE CDs and discs with JPEG files. can you disc and close the a tray. The PHOTO menu on appears the TV screen. PHOTO List Preview JPEG Folder 1 JPEG Folder 2 JPEG Folder 3 JPEG Folder 4 JPEG Folder 5 JPEG Folder 6 JPEG Folder 7 JPEG Folder 8 E 2 Press D / E button to select folder, and press OK button. A list of files in the folder appears.
DVD operation operation V V iewing JPEG JPEG Disc a a A To listen to MP3/WMA music You watching picture 1. listening to MP3/WMA music files recorded Insert the disc containing the two types of file in the player. Press TITLE button to display PHOTO menu. Press D / E button to select a photo file. 2. 3. can files while display the same disc. 4. Use G button to select Playback ? To listen to only the desired proceed as above. then A JPEG disc ? icon then press OK button. starts.
Playing - Using 1 this DVD Insert a DivX Movie Disc a a Player can you disc and close the play DivX (Digital tray. The MOVIE Internet Video menu eXpress) the TV on appears disc. screen. MOVIE A 0:00:00 List Data Duration Movie Folder 1 Movie Folder 2 Movie Folder 3 Movie Folder 4 Movie Folder 5 Movie Folder 6 Movie Folder 7 Movie Folder 8 E 2 34 Press D / E button to select and want to return to folder, and press OK button. A list of files in the folder appears.
Reference Checklist T roubleshooting Checklist Troubleshooting The doesn't work Power is suddenly normally. ? if there is any control causing obstruction. ? Are batteries installed with correct ? Correct remote ? Install new ? Is the sleep ? Check the power control settings. Power interrupted No broadcast on station tuned with Auto off activated.
The audio function does not work. ? Press the VOL Picture OK & ? Sound muted? Press MUTE button. No sound ? Try ? Are the audio cables ? Adjust ? A No output of the from one VOLUME button. or another channel. The Balance in menu with the broadcast. option. speakers Unusual sound from inside the change in ambient noise when the product the humidity or temperature may result in an unusual product is turned on or off and does not indicate a fault with product.
Reference Language Use this list to input Codes Codes your desired language for the following initial settings: Disc Audio, Disc Subtitle, Disc Menu.
IR codes codes G Connect your wired remote control to the Remote Control port on the TV. G Output waveform Single pulse, modulated with 37.917KHz at 455KHz signal TC Carrier frequency FCAR 1/TC Duty T1 = ratio = fOSC/12 T1/TC = 1/3 = G Configuration of frame ? 1st frame Lead Low High code custom code custom code Data code Data code C0 C1C2C3C4C5C6C7C0C1C2C3C4C5C6C7D0D1D2D3D4D5D6D7D0D1D2D3D4D5D6D7 ? Repeat frame Repeat code Tf G Lead code 9ms 4.5 ms 0.
Reference IR codes codes 66 0BH TV/AV Remote Control Button 08H POWER Remote Control Button 98H MULTIMEDIA Remote Control Button 53H LIST Remote Control Button 20H TEXT Remote Control Button 4DH PSM Remote Control Button 52H SSM Remote Control Button 0AH I/II Remote Control Button 43H MENU Remote Control Button 79H ARC Remote Control Button 5BH EXIT Remote Control Button 07H F Remote Control Button 06H G Remote Control Button 40H D Remote Control Button 41H E Re
External Control Control Device - Connect the RS-232C and control the TV's - - Setup Setup Connect the serial input jack to an external functions externally. port of the control device RS-232C connection cable is not RS-232C RS-232C supplied ; RS-232C control device to the RS-232C (such jack computer as a on the TV back or an A/V control system) panel. with the TV. Setup Setup PC Type Type of of Connector; 9-Pin Male Connector; D-Sub 9-Pin 1 No.
Reference External Control Control Device Setup Setup ; RS-232C Set Set ID Use this function to - Refer to 'Real Data - specify a monitor ID number. Mapping 1'. See page 69. 1. Press the MENU button and then Setup use button to select the D / E Setup menu. Language 2. Press the G button and then use D / E 3. Press the G button and then use Input button to select Set ID. F / G button to choose the desired monitor ID number.
01. Power On 05. Volume Mute (Command:a) G To control volume G To control Power On/Off of the TV. You Transmission 0 adjust mute 1 :PowerOn Data [a][ ][Set ID][ ][OK][Data][x] 0 : Volume mute off 1 : Volume mute (Volume on) (Volume off) on G To show Power On/Off. Acknowledgement Transmission [e][ ][Set ID][ ][OK][Data][x] [k][a][ ][Set ID][ ][FF][Cr] 06. Volume Control Acknowledgement Power Off : (Command:f) G To adjust volume.
Reference External Control Control Device 09. Colour (Command:i) G To adjust the You can Setup Setup also 15. Tune Command colour. screen G Tune channel colour in the Picture adjust ; RS-232C to menu. (Command:m a) Transmission Transmission [k][i][ ][Set ID][ ][Data][Cr] [m][a][ ][Set ID][ ][Data0][ ][Cr] Data Data0: Min:0~Max:64 ? Refer to 'Real data mapping Min 1'. See page 69. : 0 number.