Owner's Manual IPS LED MONITOR (LED MONITOR*) *LG LED Monitors are LCD Monitors with LED Backlighting. Please read this manual carefully before operating your set and retain it for future reference. IPS LED MONITOR MODEL 24MP77HM 27MP77HM 24MP77SM 27MP77SM www.lg.
TABLE OF CONTENTS ENGLISH CONTENTS 3 LICENSE 4 ASSEMBLING AND PREPARING 4 Unpacking 6 Parts and buttons 7 - How to Use the Joystick Button 8 Moving and Lifting the Monitor 9 Setting up the Monitor set 9 - Attaching the Stand Base 10 - Detaching the Stand Base 11 - Mounting on a table 11 - Using the cable holder 13 - Mounting on a wall 21 CUSTOMIZING SETTINGS 22 Customizing settings 22 - Menu Settings 22 - -Quick Settings 24 - -Picture 26 - -General 27 - -Auto Config
LICENSE Each model has different licenses. Visit www.lg.com for more information on the license. The terms HDMI and HDMI High-Definition Multimedia Interface, and the HDMI logo are trademarks or registered trademarks of HDMI Licensing LLC in the United States and other countries.
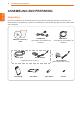
ASSEMBLING AND PREPARING ASSEMBLING AND PREPARING ENGLISH ENG Unpacking Check your product box for the following items. If there are any missing accessories, contact the local dealer where you purchased your product. The illustrations in this manual may differ from the actual product and accessories. CD(Owner's Manual) / Card D-SUB Cable ( This cable is not included in all countries. ) HDMI Cable ( This cable is not included in all countries.
ASSEMBLING AND PREPARING 5 CAUTION NOTE yy The accessories supplied with your product may vary depending on the model. yy Product specifications or contents in this manual may be changed without prior notice due to upgrade of product functions. ENG ENGLISH yy Do not use any unapproved accessories to ensure the safety and product life span. yy Any damages or injuries by using unapproved accessories are not covered by the warranty.
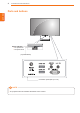
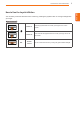
ASSEMBLING AND PREPARING Parts and buttons ENGLISH ENG Power Indicator yy On: power is on yy Off: power is off (Joystick Button) Connection panel (See p.14~16) NOTE yy The joystick button is located at the bottom of the monitor.
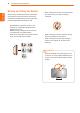
ASSEMBLING AND PREPARING 7 You can easily control the functions of the monitor by pressing the joystick button or moving it left/right with your finger. Basic Functions ◄/► Power on Press the joystick button once with your finger to turn on the monitor. Power off Press and hold the joystick button once with your finger to turn off the monitor. Volume Control You can control the volume by moving the joystick button left/right.
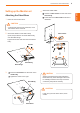
ASSEMBLING AND PREPARING Moving and Lifting the Monitor ENGLISH ENG When moving or lifting the monitor, follow these instructions to prevent the monitor from being scratched or damaged and to ensure safe transportation regardless of its shape or size. yy It is advisable to place the monitor in the original box or packing material before attempting to move it. yy Before moving or lifting the monitor, disconnect the power cord and all cables. yy Hold the top and bottom of the monitor frame firmly.
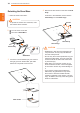
ASSEMBLING AND PREPARING Setting up the Monitor set 4 Attach the Cable holder. 1 Insert the cable holder into the hook of the stand body. 2 Press down the cable holder as shown in illustration. 1 Place the screen face down. CAUTION yy To protect the screen from scratches, cover the surface with a soft cloth. Cable holder 2 Check the direction of the stand body (front, back) and then mount the stand body onto the stand hinge. Tighten two screws into the back of the stand body .
ASSEMBLING AND PREPARING Detaching the Stand Base ENGLISH ENG 1 Place the screen face down. 4 Remove the two screws on the back of stand body. As shown in the illustration, disconnect the stand body from the stand hinge. CAUTION Screws yy To protect the screen from scratches, cover the surface with a soft cloth. 2 1 Turn the screw to the left. 2 Pull out the Stand Base.
ASSEMBLING AND PREPARING Mounting on a table 3 Press the joystick button on the bottom of the position on a table. Leave a 10 cm (minimum) space from the wall for proper ventilation. CAUTION Unplug the power cord before moving the Monitor to another location. Otherwise electric shock may occur. 10 cm 10 cm 10 cm Using the cable holder 2 Connect the AC-DC Adapter and Power Cord to a wall outlet. (19 V ) Cable holder or (19 V ) ENG ENGLISH monitor to turn on the monitor.
ASSEMBLING AND PREPARING WARNING Using the Kensington security system ENGLISH ENG When you adjust the angle, do not hold the bottom of the Monitor set frame as shown on the following illustration, as may injure your fingers. The Kensington security system connector is located at the back of the Monitor set. For more information of installation and using, refer to the manual supplied with the Kensington security system or visit http://www.kensington.com .
ASSEMBLING AND PREPARING Mounting on a wall yy Wall Mount (A x B) 10 cm 10 cm 10 cm 10 cm If you intend to mount the Monitor set to a wall, attach Wall mounting interface (optional parts) to the back of the set. When you install the Monitor set using a wall mounting interface (optional parts), attach it carefully so it will not drop. 1 If you use screw longer than standard, the monitor might be damaged internally. 2 If you use improper screw, the product might be damaged and drop from mounted position.
USING THE MONITOR SET USING THE MONITOR SET ENGLISH Connecting to a PC yy Your Monitor set supports Plug & Play*. *Plug & Play: A PC recognizes a connected device that users connect to a PC and turn on, without device configuration or user intervention. HDMI connection Transmits the digital video and audio signals from your PC to the Monitor set. Connect the PC and the Monitor set with the HDMI cable as shown in the following illustrations.
USING THE MONITOR SET CAUTION Connecting to AV Devices HDMI connection Transmits the digital video and audio signals from your AV devices to the monitor. Connect your AV device to the monitor with the HDMI cable as illustrated below. NOTE yy When you want to use two PC in our Monitor, please connect the signal cable(D-SUB/ HDMI) respectively in Monitor set. yy If you turn the Monitor set on while it is cold, the screen may flicker. This is normal.
USING THE MONITOR SET Connecting to External Devices ENGLISH Peripheral device connection Connect peripheral devices to the monitor. NOTE yy Peripheral devices are sold separately. yy Cables with angled plugs may have clearance issues, use straight plugs when possible. Angle Type Straight Type NOTE yy Headphones or speakers may not work normally, depending on the server PC settings.
INSTALLING LG MONITOR SOFTWARE 17 INSTALLING THE LG MONITOR SOFTWARE Insert the the owner's manual CD included in the product package into your PC's CD driver and install the Screen Split. 1 Set the default Web browser to Internet Explorer. 2 Click the "Screen Split" on the CD's main screen. When the file download window appears, click the Run button. (The file download window may vary depending on the operating system and the Internet Explorer version, but the installation procedures are same.
INSTALLING LG MONITOR SOFTWARE 5 The Screen Split installation starts as shown ENGLISH ENG below. NOTE yy Screen Split: This program automatically splits the program window as desired. Monitor Selection only supported in extend display. This program supported Windows 7 & Windows 8. 6 When the installation is complete, restart your system. NOTE If you run Screen Split, the Screen Split icon [ ] appears in the system tray at the right bottom of the PC screen.
INSTALLING LG MONITOR SOFTWARE 19 Installing The LG Color Cloning 1 Set the default Web browser to Internet Explorer. 3 Follow the instructions to proceed with the installation. 2 Click the "LG Color Cloning" on the CD's main screen. When the file download window appears, click the Run button. (The file download window may vary depending on the operating system and the Internet Explorer version, but the installation procedures are same.
INSTALLING LG MONITOR SOFTWARE 6 The LG Color Cloning starts the installation as ENGLISH ENG shown below. NOTE yy LG Color Cloning: This program matches the color quality and brightness of two monitors using your Smartphone. NOTE yy Double-click the LG Color Cloning icon on des-ktop to run LG Color Cloning Application. 7 Click the complete button. 8 When the installation is complete, restart your system.
CUSTOMIZING SETTINGS 21 CUSTOMIZING SETTINGS 1 Press the joystick button on the bottom of the monitor. 2 Move the joystick up/down (▲/▼) and left/right(◄/►) to set the options. 3 Press the joystick button once more to exit the main menu. Power Indicator Joystick Button Button Menu Status Description Main menu disabled Enables the main menu. Main menu enabled Exits the main menu.
CUSTOMIZING SETTINGS Customizing settings ENGLISH ENG Menu Settings -Quick Settings 1 To view the OSD menu, press the joystick button at the bottom of the monitor and then enter the Menu. 2 Go to Quick Settings > Brightness by moving the joystick. 3 Configure the options following the instructions that appear in the bottom right corner. 4 To return to the upper menu or set other menu items, move the joystick to ◄ or pressing ( / OK) it.
CUSTOMIZING SETTINGS 23 NOTE ENG ENGLISH yy Saving Data depends on the Panel. So,those values should be different from each panel and panel vendor.If option of SMART ENERGY SAVING is High or Low, monitor luminance become higher or lower depend on source. yy If option of SMART ENERGY SAVING is High or Low, Picture Mode will automatically be Custom and Color Wizard will automatically be Off.
CUSTOMIZING SETTINGS -Picture ENGLISH ENG 1 To view the OSD menu, press the joystick button at the bottom of the monitor and then enter the Menu. 2 Go to Picture by moving the joystick. 3 Configure the options following the instructions that appear in the bottom right corner. 4 To return to the upper menu or set other menu items, move the joystick to ◄ or pressing ( / OK) it. 5 If you want to exit the OSD menu, move the joystick to ◄ until you exit. Each option is described below.
CUSTOMIZING SETTINGS P i c t u r e Picture Adjust SUPER RESOLUTION+ Optimized picture quality is displayed when a user wants crystal clear images. It is effective forhigh quality video or game. Middle The optimized picture quality is displayed when a user wants images between low and highmodes for comfortable viewing. It is effective for UCC or SD video. Low The optimized picture quality is displayed when a user wants smooth and natural images. It iseffective for slowmoving pictures or still images.
CUSTOMIZING SETTINGS -General ENGLISH ENG 1 To view the OSD menu, press the joystick button at the bottom of the monitor and then enter the Menu. 2 Go to General by moving the joystick. 3 Configure the options following the instructions that appear in the bottom right corner. 4 To return to the upper menu or set other menu items, move the joystick to ◄ or pressing ( / OK) it. 5 If you want to exit the OSD menu, move the joystick to ◄ until you exit. Each option is described below.
CUSTOMIZING SETTINGS 27 -Auto Configuration 2 Go to Auto Configuration by moving the joystick. 3 Configure the options following the instructions that appear in the bottom right corner. 4 To return to the upper menu or set other menu items, move the joystick to ◄ or pressing ( / OK) it. 5 If you want to exit the OSD menu, move the joystick to ◄ until you exit. Each option is described below.
CUSTOMIZING SETTINGS -Reset ENGLISH ENG 1 To view the OSD menu, press the joystick button at the bottom of the monitor and then enter the Menu. 2 Go to Reset by moving the joystick. 3 Configure the options following the instructions that appear in the bottom right corner. 4 To return to the upper menu or set other menu items, move the joystick to ◄ or pressing ( / OK) it. 5 If you want to exit the OSD menu, move the joystick to ◄ until you exit. Each option is described below.
CUSTOMIZING SETTINGS 29 -Picture mode 2 Go to Picture mode by moving the joystick button to ▲. 3 Configure the options following the instructions that appear in the bottom. Each option is described below. Joystick Button > Picture Mode Picture Mode Description Custom Allows the user to adjust each element. The color mode of the main menu can be adjusted. Reader 1 It is a mode that the screen is adjusted to the best for the newspaper.
TROUBLESHOOTING ENGLISH ENG TROUBLESHOOTING Check the following before calling for service. No image appears Is the power cord of the display connected? Is the power indicator light on? Is the power indicator flickering? Do you see an "OUT OF RANGE" message on the screen? Do you see a "NO SIGNAL" message on the screen? yy Check and see if the power cord is connected properly to the power outlet. yy Press the Power button.
TROUBLESHOOTING 31 CAUTION Display image is incorrect The screen color is mono or abnormal. yy Check if the signal cable is properly connected and use a screwdriver to fasten if necessary. yy Make sure the video card is properly inserted in the slot. yy Set the color setting higher than 24 bits (true color) at Control Panel ► Settings. The screen blinks. yy Check if the screen is set to interlace mode and if yes, change it to the recommend resolution.
SPECIFICATIONS ENGLISH ENG SPECIFICATIONS 24MP77HM 24MP77SM Display Resolution Power Consumption Power Input AC-DC Adapter Screen Type Pixel Pitch Flat Panel Active matrix-TFT LCD Anti-Glare coating 0.2745 mm x 0.2745 mm (Pixel Pitch) Max 1920 x 1080 @ 60 Hz Recommend VESA 1920 x 1080 @ 60 Hz On Mode : 21 W (ENERGY STAR® standard)* Sleep Mode ≤ 0.3 W Off Mode ≤ 0.3 W 19 V 1.
SPECIFICATIONS Horizontal Frequency 30 kHz to 83 kHz (Automatic) Vertical Frequency 56 Hz to 75 Hz (D-SUB) ● 56 Hz to 61 Hz (HDMI) Separate Sync. Digital 15 pin D-SUB Connector ● HDMI Connector RGB Analog (0.
SPECIFICATIONS SPECIFICATIONS ENGLISH ENG 27MP77HM 27MP77SM Display Resolution Power Consumption Power Input AC-DC Adapter Screen Type Pixel Pitch Flat Panel Active matrix-TFT LCD Anti-Glare coating 0.3114 mm x 0.3114 mm (Pixel Pitch) Max 1920 x 1080 @ 60 Hz Recommend VESA 1920 x 1080 @ 60 Hz On Mode : 25 W (ENERGY STAR® standard)* Sleep Mode ≤ 0.3 W Off Mode ≤ 0.3 W 19 V 1.
SPECIFICATIONS Horizontal Frequency 30 kHz to 83 kHz (Automatic) Vertical Frequency 56 Hz to 75 Hz (D-SUB) ● 56 Hz to 61 Hz (HDMI) Separate Sync. Digital 15 pin D-SUB Connector ● HDMI Connector RGB Analog (0.
SPECIFICATIONS Preset Modes (Resolution) ENGLISH ENG D-SUB Timing Display Modes (Resolution) Horizontal Frequency(kHz) Vertical Frequency(Hz) Polarity(H/V) 720 x 400 31.468 70 -/+ 640 x 480 31.469 60 -/- 640 x 480 37.500 75 -/- 800 x 600 37.879 60 +/+ 800 x 600 46.875 75 +/+ 1024 x 768 48.363 60 -/- 1024 x 768 60.023 75 +/+ 1152 x 864 67.500 75 +/+ 1280 x 1024 63.981 60 +/+ 1280 x 1024 79.976 75 +/+ 1680 x 1050 65.290 60 -/+ 1920 x 1080 67.
PROPER POSTURE 37 ENG ENGLISH PROPER POSTURE Proper posture for using the Monitor set. Adjust the Monitor set and your posture to allow you to view images at the optimal viewing angle. Place your hands gently on the keyboard, keeping your arms bent at the elbows and horizontally outright. Adjust the location of the Monitor set to avoid it reflecting light.
Color Universal Design CUD ( COLOR UNIVERSAL DESIGN) CERTIFICATION ENGLISH Color Universal Design is a user-oriented optimum design of coloring patterns or character shapes , to allow information to be accurately conveyed to all the people. The colors of OSD Menu and User’s Manual have been designed in consideration of the colorblind people for convenient operation.
Declaration of Conformity Trade Name: LG Model : 24MP77HM,27MP77HM, 24MP77SM, 27MP77SM Responsible Party: LG Electronics Inc. Address : 1000 Sylvan Ave. Englewood Cliffs NJ 07632 U.S.A TEL: 201-266-2534 *above information is only for USA FCC Regulatory Make sure to read the Safety Precautions before using the product. Keep the Owner’s Manual (CD) in an accessible place for future reference. The model and serial number of the SET is located on the back and one side of the SET.