
Owner's Manual


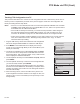


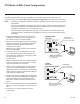
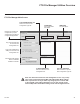
Table Of Contents
- COVER
- WARNING / CAUTION
- SAFETY INSTRUCTIONS
- CONTENTS
- FEATURES OF THIS TV
- PREPERATION
- ACCESSORIES
- FRONT PANEL INFORMATION
- BACK PANEL INFORMATION
- STAND INSTRUCTIONS
- CABLE MANAGEMENT
- DESKTOP PEDESTAL INSTALLATION
- SWIVEL STAND
- ATTACHING THE TV TO A DESK
- VESA WALL MOUNTING
- SECURING THE TV TO THE WALL TO PREVENT FALLING WHEN THE TV IS USED ON A STAND
- ANTENNA OR CABLE CONNECTION
- MPI CARD SLOT / PPV CARD INSTALLATION
- EXTERNAL EQUIPMENT SETUP
- WATCHING TV / CHANNEL CONTROL
- USB
- PICTURE CONTROL
- SOUND & LANGUAGE CONTROL
- TIME SETTING
- PARENTAL CONTROL / RATINGS
- APPENDIX
- COMMERCIAL MODE SETUP GUIDE
- Safety Warnings
- IMPORTANT SAFETY INSTRUCTIONS
- Table of Contents
- Commercial Mode Overview
- Pro:Centric Operation
- Installer Remote Control Typical Key Functions
- Master TV Setup
- Installer Menu
- Channel Icons / Custom Text Labels (2-5-4 + MENU Mode)
- Cloning Overview
- USB Cloning Procedures
- Clone Programmer Cloning Procedures
- FTG Mode of Operation Overview
- FTG Mode via CPU
- FTG Mode via EBL (Local Configuration)
- FTG File Manager Utilities Overview
- IP Environment Setup
- Remote Jack Pack / TV Connections & Setup
- Reference
- Upgrading TV/PTC Software using a USB Memory Device
- Downloading a Splash Screen Image
- Power Consumption Settings
- TV Camport Auto Sense Operation
- TV Aux Input Configuration
- b-LAN Setup & Overview
- RJP Model List and Input Auto-sensing Hierarchy
- Resetting Factory Defaults on the TV(s)
- TV Zone Restrictions
- LD660H/LD665H Rear Jack Panel
- LV555H Rear Jack Panel
- Side Connections Panel
- RF Antenna Connection
- Troubleshooting
- Glossary of Terms
- Document Revision History / Notes
- BACK COVER

36
206-4200
FTG Mode via CPU (Cont.)
(Continued from previous page)
4. To add an FTG Channel Map, click >> under FTG Channel Map to copy the current Mapped RF
Channels and Mapped IP Channels to the FTG Configuration List.
Note: If you make any change(s) in the FTG Channel Map Configuration Utility to the current data to
be included in the FTG Configuration List, you will need to recopy the FTG Channel Map to the FTG
Configuration List.
5. (Optional) Load default FTG Installer Menu settings for the TV:
• Click the down arrow at the right of the Chassis eld under Installer Menu Templates, and select the
appropriate option (depending on the TV type) from the drop-down list of available models.
• Click the Load button.
• Use the FTG Installer Menu Conguration Utility to modify settings, if necessary. Then, return to the
FTG File Manager main screen.
6. To add FTG Installer Menu settings, click >> under FTG Installer Menu Settings to copy the current set-
tings to the FTG Conguration List.
Note: If you make any change(s) in the FTG Installer Menu Configuration Utility to the current data to
be included in the FTG Configuration List, you will need to recopy the FTG Installer Menu settings to
the FTG Configuration List.
7. Click the Save button above the FTG Configuration List to save its contents (including TV setup menu
settings, if present) to an FTG Configuration (.tlx) file on the PC’s hard drive for later use (default
folder path is C:\Program Files\Zenith\FTG\TLX).
8. Transfer the FTG Configuration file to a USB memory device, and proceed to “Teaching FTG
Configuration to a TV” below to transfer the FTG Configuration file to an LD660H/LD665H or LV555H TV.