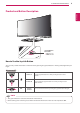
OWNER'S MANUAL IPS LED COMPUTER MONITOR (LED COMPUTER MONITOR*) * Disclaimer : LG LED Monitor applies LCD screen with LED backlights. This product is a computer monitor and not for television purpose. Please read the safety information carefully before using the product. 34UC87 34UC87M www.lg.
Table of Contents ENGLISH TABLE OF CONTENTS 3 LICENSE 4 ASSEMBLING AND PREPARING 18 INSTALLING THE LG MONITOR SOFTWARE 4 Product Composition 20 USER SETTINGS 5 Product and Button Description 20 Activating the Main Menu 5 - How to Use the Joystick Button 20 - Main Menu Features 6 - Input Connector 21 User Settings 7 Moving and Lifting the Monitor 21 - Menu Settings 8 Installing the Monitor 22 - Ratio 8 - Assembling the Stand 23 - Function 9 - Installing on a Table 25 -
License 3 LICENSE The terms HDMI and HDMI High-Definition Multimedia Interface, and the HDMI logo are trademarks or registered trademarks of HDMI Licensing LLC in the United States and other countries. VESA, VESA logo, DisplayPort compliance logo and DisplayPort compliance logo for dual-mode source devices are all registered trademarks of the Video Electronics Standards Association. MaxxAudio and additional MAXX trademarks are trademarks and/or registered trademarks of Waves Audio Ltd.
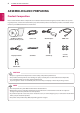
ASSEMBLING AND PREPARING ENGLISH ASSEMBLING AND PREPARING Product Composition Please check whether all the components are included in the box before using the product. If there are any missing components, contact the retailer where you purchased the product. Note that the product and related components may look different from those shown here.
ASSEMBLING AND PREPARING 5 Product and Button Description ENGLISH Joystick Button / Power LED yy On Power on yy Off Power off How to Use the Joystick Button You can easily control the functions of the monitor by pressing the joystick button or moving it left/right with your finger. Basic Functions ◄/► Power on Press the joystick button once with your finger to turn on the monitor. Power off Press and hold the joystick button once with your finger to turn off the monitor.
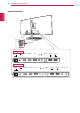
ASSEMBLING AND PREPARING ENGLISH Input Connector ON DC switch 34UC87 DC-IN (19 V ) H/P HDMI IN 1 HDMI IN 2 DP IN USB UP USB IN 1 5V 1.1 A USB IN 2 5V 1.1 A 34UC87M DC-IN (19 V ) H/P HDMI IN 1 HDMI IN 2 DP IN USB UP USB IN 1 5V 1.1 A USB IN 2 5V 1.
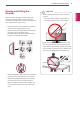
ASSEMBLING AND PREPARING When moving or lifting the monitor, follow these instructions to prevent the monitor from being scratched or damaged and to ensure safe transportation, regardless of its shape or size. CAUTION yy Avoid touching the monitor screen as much as possible. -- This may result in damage to the screen or some of the pixels used to create images. yy Place the monitor in the original box or packing material before attempting to move it.
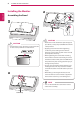
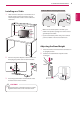
ASSEMBLING AND PREPARING ENGLISH Installing the Monitor 3 Assembling the Stand 1 Stand Base CAUTION CAUTION yy To protect the screen, place the screen face down on the screen pad which is inside the box. 2 yy Illustrations in this document represent typical procedures, so they may look different from the actual product. yy Applying excessive force when tightening screws may cause damage to the monitor. Damage caused in this way will not be covered by the product warranty.
ASSEMBLING AND PREPARING Installing on a Table 9 Cautions When Connecting Power Cord ENGLISH 1 Lift the monitor and place it on the table in an upright position. Place the monitor at least 10 cm away from the wall to ensure sufficient ventilation. 220 V 10 cm 10 cm 10 cm 10 cm 110 V yy Make sure to use the power cord that is provided in the product package and connect it to a grounded power outlet. yy If you need another power cord, please contact your local dealer or the nearest retail store.
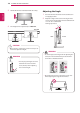
ASSEMBLING AND PREPARING 3 Handle the monitor with both hands for safety. Adjusting the Angle ENGLISH 1 Place the monitor mounted on the stand base in 2 an upright position. Adjust the angle of the screen. The angle of the screen can be adjusted forward or backward from -5° to 15° for a comfortable viewing experience. 4 The height can be adjusted up to 140.0 mm. 15 -5 140.0 mm Rear Front CAUTION yy Once the pin is removed, it is not necessary to reinsert it to adjust the height.
ASSEMBLING AND PREPARING 11 Using the Kensington Lock Arrange the cables using the cable holder as shown in the illustration. The connector for the Kensington security system is located at the bottom of the monitor. For more information on installation and usage, refer to the Kensington lock owner's manual or visit the website at http://www.kensington.com. Connect the monitor to a table using the Kensington security system cable. NOTE yy The Kensington security system is optional.
ASSEMBLING AND PREPARING ENGLISH Installing on the Wall yy Wall Mount (A x B) Install the monitor at least 10 cm away from the wall and leave about 10 cm of space at each side of the monitor to ensure sufficient ventilation. Detailed installation instructions can be obtained from your local retail store. Alternatively, refer to the manual for how to install and set up a tilting wall mounting bracket.
ASSEMBLING AND PREPARING 13 CAUTION Wall Mount Plate Back of the Monitor Wall Mount Plate Back of the Monitor Screw Dimensions : M4 x L10 Max 8 mm ENGLISH yy Unplug the power cord before moving or installing the monitor to avoid electric shock. yy Installing the monitor on the ceiling or on a slanted wall may result in the monitor falling off, which could lead to injury. Use an authorized LG wall mount and contact the local dealer or qualified personnel.
ENGLISH 14 Using the Monitor USING THE MONITOR Connecting to a PC Press the joystick button, go to Menu → Easy control → Input, and then select the input option. yy This monitor supports the *Plug and Play feature. * Plug and Play: A feature that allows you to add a device to your computer without having to reconfigure anything or install any manual drivers. H/P CAUTION yy Do not press the screen for a prolonged time. This may cause image distortion.
Using the Monitor 15 Thunderbolt ( ) Connection Transmits digital video and audio signals from your PC to the monitor. Connect the monitor to your PC using the display port cable as shown in the illustration below: You can connect your high-resolution display or high-performance data device to the monitor via a Thunderbolt port. Connect your external device to the monitor using the Thunderbolt cable as illustrated below.
Using the Monitor ENGLISH Connecting Peripherals USB Cable connection - PC The USB port on the product functions as a USB hub. HDMI/DP (DisplayPort) connection To use USB 3.0, connect the A-B type USB 3.0 cable of the product to the PC. Peripheral devices connected to the USB IN port can be controlled from the PC. NOTE USB UP USB IN 1 5V USB IN 2 1.1 A 5V 1.1 A yy Make sure to install the most recent Windows OS service pack before using the product. yy Peripheral devices are sold separately.
Using the Monitor 17 IR Connection Connect peripherals to the monitor via the headphones port. Connect as illustrated. Connect the IR sensor and stereo cable to the monitor (34UC87M) via the IR Port. Connect as illustrated. H/P 34UC87M IR IN (sold separately) NOTE IR OUT (sold separately) (sold separately) HDMI IN 1 HDMI IN 2 yy Peripheral devices are sold separately. yy If you use angled earphones, it may cause a problem with connecting another external device to the monitor.
Installing the LG Monitor Software ENGLISH INSTALLING THE LG MONITOR SOFTWARE Insert the software CD included in the product packaging into your PC's CD drive and install the Screen Split. The installation screen images are for reference only. The actual installation screen images may vary depending on the model. 1 Set up Internet Explorer as the default web browser. 2 Click Screen Split on the CD's main screen. When the file download window appears, click Run.
Installing the LG Monitor Software 19 6 When the installation is complete, restart your system. ENGLISH NOTE yy Screen Split This program automatically splits the program window as desired. yy When you run Screen Split, the Screen Split icon [ ] appears in the system tray at the bottom right of the PC screen. yy Right-click the Screen Split icon and select the desired layout.
User Settings ENGLISH USER SETTINGS Activating the Main Menu 1 Press the joystick button on the bottom of the monitor. 2 Move the joystick up/down (▲/▼) and left/right(◄/►) to set the options. 3 Press the joystick button once more to exit the main menu. Joystick Button Button Menu Status Description Main menu disabled Enables the main menu. Main menu enabled Exits the main menu. (Hold the button down to turn off the monitor.
User Settings 21 User Settings 1 2 3 4 To view the OSD menu, press the joystick button at the bottom of the monitor and then enter the Menu. Configure the options by moving the joystick up/down/left/right. To return to the upper menu or set other menu items, move the joystick to ◄ or pressing ( / OK) it. If you want to exit the OSD menu, move the joystick to ◄ until you exit. yy When you enter the menu, instructions on how to use the button will appear in the bottom right corner of the screen.
User Settings Ratio Easy control 100 > Contrast 70 > Volume 30 > Input HDMI1 > Ratio Wide > ENGLISH Brightness 1 To view the OSD menu, press the joystick button at the bottom of the monitor and then enter the Menu. Go to Easy control > Ratio by moving the joystick. 2 3 Configure the options following the instructions that appear in the bottom right corner. To return to the upper menu or set other menu items, move the joystick to ◄ or pressing ( / OK) it.
User Settings Function Function > MaxxAudio Easy control 2 3 Configure the options following the instructions that appear in 4 5 the bottom right corner. To return to the upper menu or set other menu items, move the joystick to ◄ or pressing ( / OK) it. If you want to exit the OSD menu, move the joystick to ◄ until you exit.
User Settings Menu > Function ENGLISH Picture Mode SMART ENERGY SAVING Description Custom Allows the user to adjust settings. You can adjust the color mode of the main menu. Photo Optimizes the screen for photos. Cinema Optimizes the screen for videos. Game Optimizes the screen for games. High Saves energy using the high-efficiency SMART ENERGY SAVING feature. Low Saves energy using the low-efficiency SMART ENERGY SAVING feature. Off Disables the SMART ENERGY SAVING feature.
User Settings PBP PBP PBP Easy control 5 Function > > Input Audio 2 3 Configure the options following the instructions that appear in 4 Off HDMI1 > Swap Sub Full the bottom right corner. To return to the upper menu or set other menu items, move the joystick to ◄ or pressing ( / OK) it. If you want to exit the OSD menu, move the joystick to ◄ until you exit. PBP > Ratio Screen Settings PBP Preview Reset HDMI1 ▲/▼: Move / ►: OK ◄: Back Each option is described below.
User Settings Picture Picture 5 > High > Middle > ENGLISH Sharpness 1 To view the OSD menu, press the joystick button at the bottom of the monitor and then enter the Menu. Go to Screen > Picture by moving the joystick. Easy control 2 3 Configure the options following the instructions that appear in 4 5 the bottom right corner. To return to the upper menu or set other menu items, move the joystick to ◄ or pressing ( / OK) it.
User Settings Color Color Gamma Easy control 2 3 Configure the options following the instructions that appear in 4 5 the bottom right corner. To return to the upper menu or set other menu items, move the joystick to ◄ or pressing ( / OK) it. If you want to exit the OSD menu, move the joystick to ◄ until you exit.
User Settings Settings Settings English > Power LED On > Automatic Standby Off > Disable > Off > 1 > ENGLISH Language 1 To view the OSD menu, press the joystick button at the bottom of the monitor and then enter the Menu. Go to Settings by moving the joystick. Easy control 2 3 Configure the options following the instructions that appear in 4 5 the bottom right corner. To return to the upper menu or set other menu items, move the joystick to ◄ or pressing ( / OK) it.
User Settings Reset 29 Reset Do you want to reset your settings? Easy control bottom of the monitor and then enter the Menu. Go to Reset by moving the joystick. 2 3 Configure the options following the instructions that appear in 4 5 the bottom right corner. To return to the upper menu or set other menu items, move the joystick to ◄ or pressing ( / OK) it. If you want to exit the OSD menu, move the joystick to ◄ until you exit.
Troubleshooting ENGLISH TROUBLESHOOTING Nothing is displayed on the screen. Is the monitor's power cord plugged in? yy Check if the power cord is correctly plugged into the power outlet. Is the power LED on? yy Check the power cable connection and press the power button. Is the power on and the power LED displaying white? yy Check that the connected input is enabled (Menu - Input).
Troubleshooting 31 NOTE The display color is abnormal. Does the display appear discolored (16 colors)? yy Set the color to 24 bit (true color) or higher. In Windows, go to Control Panel > Display > Settings > Color Quality. Does the display color appear unstable or monochrome? yy Check if the signal cable is connected properly. Reconnect the cable or reinsert the PC's video card.
Product Specification ENGLISH PRODUCT SPECIFICATION LCD Screen Resolution Video Signal Input Connector Power Sources Type TFT (Thin Film Transistor) LCD (Liquid Crystal Display) Screen Color Depth HDMI 8-bit color is supported. DP (DisplayPort) 10-bit color is supported. Thunderbolt ( ) 8-bit color is supported. Pixel Pitch 0.2325 mm x 0.
Product Specification Preset Mode Horizontal Frequency (kHz) Vertical Frequency (Hz) Polarity (H/V) 640 x 480 31.469 59.94 -/- 800 x 600 37.879 60.317 +/+ 1024 x 768 48.363 60 -/- 1152 x 864 54.347 60.05 +/+ 1280 x 720 45 60 +/+ 1280 x 1024 63.981 60.02 +/+ 1600 x 900 60 60 +/+ 1680 x 1050 65.29 59.954 -/+ 1920 x 1080 67.5 60 +/- 2560 x 1080 66.7 60 -/+ 3440 x 1440 43.82 29.99 +/+ 3440 x 1440 73.68 49.99 +/+ 3440 x 1440 88.82 59.
PROPER POSTURE ENGLISH PROPER POSTURE Proper Posture for Using the Monitor Adjust the screen so that you can comfortably look at it at a slight downward angle from your natural eye level. yy Take a break for approximately 10 minutes every hour to reduce any fatigue caused by prolonged usage. yy Adjust the stand angle from -5° to 15° to obtain the best view of the screen. You should be looking slightly down at the screen.
This device meets the EMC requirements for home appliances (Class B) and is intended for home usage. This device can be used in all regions. Read the owner's manual (CD) carefully and keep it at hand. Please note that the label attached to the product provides information for technical support. Model Serial No. ENERGY STAR is a set of power-saving guidelines issued by the U.S.Environmental Protection Agency (EPA). As an ENERGY STAR Partner LGE U. S. A., Inc.