Owner's Manual IPS LED MONITOR (LED MONITOR) Please read the safety information carefully before using the product. IPS LED Monitor (LED Monitor) Model List 34UM95-PD 34UM95-PE 34UM94-PD www.lg.
Table of Contents ENGLISH TABLE OF CONTENTS 19 INSTALLING THE LG MONITOR SOFTWARE PREPARING 22 USER SETTINGS 4 Product Composition 22 Activating the Main Menu 5 Product and Button Description 22 - Main Menu Features 5 - How to Use the Joystick Button 23 User Settings 6 - Input Connector 23 - Menu Settings 7 Moving and Lifting the 24 - Ratio Monitor 25 - Function Installing the Monitor 26 - PBP 8 - Assembling the Stand 27 - Picture 9 - Detaching the Stand 28 - Color
License 3 LICENSE The terms HDMI and HDMI High-Definition Multimedia Interface, and the HDMI logo are trademarks or registered trademarks of HDMI Licensing LLC in the United States and other countries. VESA, VESA logo, DisplayPort compliance logo and DisplayPort compliance logo for dual-mode source devices are all registered trademarks of the Video Electronics Standards Association. ENGLISH Each model has different licenses. Visit www.lg.com for more information on the license.
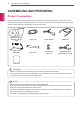
ASSEMBLING AND PREPARING ENGLISH ASSEMBLING AND PREPARING Product Composition Please check whether all the components are included in the box before using the product. If there are any missing components, contact the retailer where you purchased the product. Note that the product and related components may look different from those shown here.
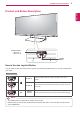
ASSEMBLING AND PREPARING 5 Product and Button Description ENGLISH Power indicator y y On Power on y y Off Power off Joystick Button How to Use the Joystick Button You can easily control the functions of the monitor by pressing the joystick button or moving it left/right with your finger. Basic Functions ◄/► Power on Press the joystick button once with your finger to turn on the monitor. Power off Press and hold the joystick button once with your finger to turn off the monitor.
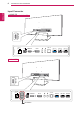
ASSEMBLING AND PREPARING 34UM95-PD HDMI IN 2 34UM94-PD HDMI IN 2 DC-IN (19 V ) H/P HDMI IN 1 DP IN USB UP USB IN 1 5V 1.1 A USB IN 2 5V 0.5 A USB IN 3 5V 0.5 A HDMI IN 2 34UM95-PE HDMI IN 2 ENGLISH Input Connector DC-IN (19 V ) ON H/P HDMI IN 1 OFF DC Switch DP IN USB UP USB IN 1 5V 1.1 A USB IN 2 5V 0.5 A USB IN 3 5V 0.
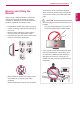
ASSEMBLING AND PREPARING When moving or lifting the monitor, follow these instructions to prevent the monitor from being scratched or damaged and to ensure safe transportation, regardless of its shape or size. y y It is advisable to place the monitor in the original box or packing material before attempting to move it. y y Before moving or lifting the monitor, disconnect the power cord and all other cables. y y Hold the bottom and side of the monitor frame firmly. Do not hold the panel itself.
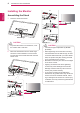
ASSEMBLING AND PREPARING ENGLISH Installing the Monitor or Assembling the Stand 1 Place the screen face down. 100 mm (3.9 inch) Screw Cover Stand Hinge CAUTION y y To protect the screen from scratches, cover the surface with a soft cloth. 2 Mount the stand base onto the stand hinge as shown in the illustration. Fix two screws into the back of the stand base and close the screw cover. Stand Base 120 mm (4.7 inch) CAUTION y y The stand height is adjustable by 20 mm (0.7 inch).
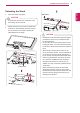
ASSEMBLING AND PREPARING 9 Detaching the Stand Place the screen face down. Stand Base CAUTION y y To protect the screen from scratches, cover the surface with a soft cloth. 2 Detach the screw cover from the stand base as shown in the illustration and then remove the two screws on the back to detach the stand base from the hinge. CAUTION Screw Cover y y Illustrations in this document represent typical procedures, so they may look different from the actual product.
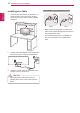
ASSEMBLING AND PREPARING ENGLISH Installing on a Table 1 Cautions When Connecting Power Cord Lift the monitor and place it on the table in an upright position. Place the monitor at least 10 cm away from the wall to ensure sufficient ventilation. 10 cm (3.9 inch) 10 cm 10 cm 10 cm 2 Connect the power adapter to the monitor and then plug the power cord into the wall outlet. 3 Press the joystick button on the bottom of the monitor to turn on the monitor.
ASSEMBLING AND PREPARING 11 Tidying up Cables 1 Tidy up cables using the cable holder on the stand base as shown in the illustration. 2 Place the monitor mounted on the stand base in an upright position. Adjust the angle of the screen. The angle of the screen can be adjusted forward or backward from -5° to 15° for a comfortable viewing experience. 15 Rear -5 Front NOTE WARNING y y When you adjust the angle, do not hold the stand as shown on the following illustration. You may injure your fingers.
ENGLISH 12 ASSEMBLING AND PREPARING Installing the Wall Mount Plate Installing on the Wall This monitor meets the specifications for the wall mount plate or other compatible devices. 1 Place the screen face down. To protect the screen from scratches, cover the surface with a soft cloth. 2 Attach the clear sheet to the back of the monitor and align it with the screw holes. Install the monitor at least 10 cm (3.9 inch) away from the wall and leave about 10 cm (3.
ASSEMBLING AND PREPARING 100 x 100 M4 x 10 mm 4 RW120 yy Wall Mount (A x B) A B NOTE yy Use the screws specified by VESA standards. yy The wall mount kit includes the installation guide and all necessary parts. yy The wall mounting bracket is optional. You can obtain optional accessories from your local dealer. yy The length of the screw may differ for each wall mounting bracket. Be sure to use the proper length. yy For more information, please refer to the user manual for the wall mounting bracket.
ASSEMBLING AND PREPARING ENGLISH Using the Kensington Lock The connector for the Kensington security system is located at the back of the monitor. For more information on installation and usage, refer to the Kensington lock owner's manual or visit the website at http://www.kensington.com. Connect the monitor to a table using the Kensington security system cable. NOTE y y The Kensington security system is optional. You can obtain optional accessories from most electronics stores.
Using the Monitor USING THE MONITOR 15 Connecting to a PC ENGLISH y y This monitor supports the *Plug and Play feature. * Plug and Play: A feature that allows you to add a device to your computer without having to reconfigure anything or install any manual drivers. y y The following instructions are based on the 34UM95-PD model. Illustrations in this manual may differ from the actual product. Press the joystick button, go to Menu → Easy control → Input, and then select the input option.
Thunderbolt ( ) Connection Transmits digital video and audio signals from your PC to the monitor. Connect the monitor to your PC using the display port cable as shown in the illustration below: You can connect your high-resolution display or high-performance data device to the monitor via a Thunderbolt port. Connect your external device to the monitor using the Thunderbolt cable as illustrated below. DC-IN (19 V ) H/P USB IN 2 5V 0.5 A USB IN 3 5V 0.
Connecting Peripherals HDMI Connection USB Cable connection - PC HDMI transmits digital video and audio signals from your AV device to the monitor. Connect your AV device to the monitor using the HDMI cable as shown in the illustration below. The USB port on the product functions as a USB hub. HDMI IN 2 Connecting AV Devices DC-IN (19 V ) H/P HDMI IN 1 NOTE DP IN y y Make sure to install the most recent Windows OS service before using the USB product. USB pack UP USB IN 1 USB IN 2 IN 3 5V 1.
Using the Monitor Connecting Headphones HDMI/DP (DisplayPort) connection SB IN 3 V 0.5 A DP OUT AUDIO IN (PC) (sold separately) HDMI 2 DP IN HDMI 1/ MHL DVI-D IN USB UP DP IN N1 5V USB IN 1 5V 1.1 A USB IN 2 5V 0.5 A USB IN 3 5V 0.5 A USB UP USB IN 1 H/P 0.9 A Connect peripherals to the monitor via the headphones port. Connect as illustrated. DC-IN ) (19 V H/P USB UP DP IN HDMI IN 1 USB IN 2 5V 0.9 A USB IN 3 5V 0.5 A HDMI IN 2 ENGLISH To use USB 3.
Installing the LG Monitor Software 19 INSTALLING THE LG MONITOR SOFTWARE 1 2 Set up Internet Explorer as the default web browser. 3 Follow the instructions to proceed with the installation. 4 Check the I accept the terms of the agreement checkbox on the License Agreement screen and then click the Next button. 5 Select the program that you want to install. Click LG Monitor Software on the CD's main screen. When the file download window appears, click Run.
Installing the LG Monitor Software NOTE ENGLISH y y Screen Split This program automatically splits the program window as desired. y y True Color Finder This program calibrates the precise color output of the monitor to suit your needs. 6 The LG Monitor Software starts the installation as shown below: 9 The program you selected on the Select Features page will install automatically. 1 0 When the installation is complete, restart your system.
Installing the LG Monitor Software NOTE y y Right-click the True Color Finder icon and select Start Program to start the program. NOTE y y To use the True Color Finder function, you must purchase the supported calibrator. y y For details on supported calibrators and graphic cards, see the True Color Finder user guide. y y If you have changed the input port, it is recommend that you calibrate the monitor's picture quality again.
User Settings ENGLISH USER SETTINGS Activating the Main Menu 1 2 3 Press the joystick button on the bottom of the monitor. Move the joystick up/down (▲/▼) and left/right(◄/►) to set the options. Press the joystick button once more to exit the main menu. Joystick Button Button Menu Status Description Main menu disabled Enables the main menu. Main menu enabled Exits the main menu.
User Settings 23 User Settings 1 2 3 4 To view the OSD menu, press the joystick button at the bottom of the monitor and then enter the Menu. Configure the options by moving the joystick up/down/left/right. To return to the upper menu or set other menu items, move the joystick to ◄ or pressing ( / OK) it. If you want to exit the OSD menu, move the joystick to ◄ until you exit. y y When you enter the menu, instructions on how to use the button will appear in the bottom right corner of the screen.
User Settings ENGLISH Ratio 1 Easy control To view the OSD menu, press the joystick button at the bottom of the monitor and then enter the Menu. Go to Easy control > Ratio by moving the joystick. 2 3 Configure the options following the instructions that appear in the bottom right corner. To return to the upper menu or set other menu items, move the joystick to ◄ or pressing ( / OK) it. If you want to exit the OSD menu, move the joystick to ◄ until you exit.
User Settings Function 2 3 4 5 To view the OSD menu, press the joystick button at the bottom of the monitor and then enter the Menu. Go to Function by moving the joystick. Easy control Low > Off > Custom > Configure the options following the instructions that appear in the bottom right corner. To return to the upper menu or set other menu items, move the joystick to ◄ or pressing ( / OK) it. If you want to exit the OSD menu, move the joystick to ◄ until you exit.
User Settings ENGLISH PBP 1 2 3 4 5 PBP PBP To view the OSD menu, press the joystick button at the bottom of the monitor and then enter the Menu. Go to PBP by movingthe joystick. Easy control Off > > Input Audio HDMI1 Function > Swap Configure the options following the instructions that appear in the bottom right corner. To return to the upper menu or set other menu items, move the joystick to ◄ or pressing ( / OK) it. If you want to exit the OSD menu, move the joystick to ◄ until you exit.
User Settings Picture 2 3 4 5 Screen To view the OSD menu, press the joystick button at the bottom of the monitor and then enter the Menu. Go to Screen > Picture by moving the joystick. Easy control Picture > Color > Function Configure the options following the instructions that appear in the bottom right corner. To return to the upper menu or set other menu items, move the joystick to ◄ or pressing ( / OK) it. If you want to exit the OSD menu, move the joystick to ◄ until you exit.
User Settings ENGLISH Color 1 2 3 4 5 Screen To view the OSD menu, press the joystick button at the bottom of the monitor and then enter the Menu. Go to Screen > Color by moving the joystick. Easy control Picture > Color > Function Configure the options following the instructions that appear in the bottom right corner. To return to the upper menu or set other menu items, move the joystick to ◄ or pressing ( / OK) it. If you want to exit the OSD menu, move the joystick to ◄ until you exit.
User Settings Settings 2 3 4 5 To view the OSD menu, press the joystick button at the bottom of the monitor and then enter the Menu. Go to Settings by moving the joystick. Configure the options following the instructions that appear in the bottom right corner. To return to the upper menu or set other menu items, move the joystick to ◄ or pressing ( / OK) it. If you want to exit the OSD menu, move the joystick to ◄ until you exit.
User Settings ENGLISH Reset 1 2 3 4 5 Reset Do you want to reset your settings? To view the OSD menu, press the joystick button at the bottom of the monitor and then enter the Menu. Go to Reset by moving the joystick. Easy control Configure the options following the instructions that appear in the bottom right corner. To return to the upper menu or set other menu items, move the joystick to ◄ or pressing ( / OK) it. If you want to exit the OSD menu, move the joystick to ◄ until you exit.
User Settings Reader Reader Mode Press the joystick button on the bottom of the monitor. Go to Reader by moving the joystick button to ▲. Reader 1 Reader 2 ◄ / ► : Change Mode Reader Off : OK Configure the options following the instructions that appear in the bottom right corner. Each option is described below. Reader Mode Description Reader 1 Optimizes the screen for browsing newspapers. You can brighten the screen in the OSD menu. Reader 2 Optimizes the screen for looking at cartoons.
ENGLISH 32 Troubleshooting TROUBLESHOOTING Nothing is displayed on the screen. Is the monitor's power cord y y Check if the power cord is correctly plugged into the power outlet. plugged in? Is the power indicator on? y y Check the power cable connection and press the power button.
Troubleshooting 33 NOTE The display color is abnormal. Does the display appear discol- y y Set the color to 24 bit (true color) or higher. In Windows, go to Conored (16 colors)? trol Panel > Display > Settings > Color Quality. Does the display color appear y y Check if the signal cable is connected properly. Reconnect the cable unstable or monochrome? or reinsert the PC's video card.
ENGLISH 34 Product Specification PRODUCT SPECIFICATION LCD Screen Type Color Depth Pixel Pitch Resolution Video Signal Input Connector Power Sources AC/DC Adapter Stand Angle 86.7 cm TFT (Thin Film Transistor) LCD (Liquid Crystal Display) Screen Diagonal length of the screen: 86.7 cm 34" class (34.1" / 86.7 cm diagonal) HDMI IN 1 / HDMI IN 2 / 8-bit color is supported. Thunderbolt ( ) DP (DisplayPort) 10-bit color is supported. 0.2325 mm x 0.
Product Specification 35 Preset Mode Horizontal Frequency (kHz) Vertical Frequency (Hz) Polarity (H/V) 640 x 480 31.469 59.94 -/- 800 x 600 37.879 60.317 +/+ 1024 x 768 48.363 60 -/- 1152 x 864 54.347 60.05 +/+ 1280 x 720 45 60 +/+ 1280 x 1024 63.981 60.02 +/+ 1600 x 900 60 60 +/+ 1680 x 1050 65.29 59.954 -/+ 1920 x 1080 67.5 60 +/- 2560 x 1080 66.7 60 -/+ 3440 x 1440 43.82 29.99 +/+ 3440 x 1440 73.68 49.99 +/+ 3440 x 1440 88.82 59.
ENGLISH 36 PROPER POSTURE PROPER POSTURE Proper Posture for Using the Monitor Adjust the screen so that you can comfortably look at it at a slight downward angle from your natural eye level. y y Take a break for approximately 10 minutes every hour to reduce any fatigue caused by prolonged usage. y y The stand of the touch monitor allows the product to be used in the optimum position. y y Adjust the stand angle from -5° to 15° to obtain the best view of the screen.
Declaration of Conformity Trade Name: LG Model: 34UM95 Responsible Party: LG Electronics Inc. Address: 1000 Sylvan Ave. Englewood Cliffs NJ 07632 U.S.A TEL: 201-266-2534 This device meets the EMC requirements for home appliances (Class B) and is intended for home usage. This device can be used in all regions. Read the owner's manual (CD) carefully and keep it at hand. Please note that the label attached to the product provides information for technical support. Model Serial No.