PLASMA MONITOR OWNER'S MANUAL Please read this manual carefully before operating your set. Retain it for future reference. Record model number and serial number of the set. See the label attached on the back mation to your dealer when you Model number : Serial number : P/NO : 3828VA0556A (RF052B) b cover and quote this infor- require service.
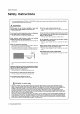
Safety Warnings Instructions Safety Safety It is recommended that 50PX4MH / 42/50PX5MH model ? only be used at an altitude of less than 6561 feet (2000m) get the best quality picture and sound. to W WARNING Do not place the sources such This may - Do not or any registers, sunlight or stove and near heat so on. damp place such as likely to get wet.
Safety Warnings * Safety instructions have two kinds of WARNING NOTES information, and each meaning of it is as below. The violation of this instruction may cause serious The violation of this instruction may cause light injuries product. Take care of under danger that may happen injuries or and even damage death. of the specific condition. NOTES Never touch the power - This may cause an plug with wet hand. a Ensure the power cord doesn't trail like a heater. electric shock.
Contents Contents Contents Special Safety Warnings ISM Options Method (Image Sticking Minimization) . . . . . .16 LowPower..............................16 Introduction LocationandFunctionofControls Menu ChildLock..............................16 SafetyInstructions.......................2~3 . . . . . . . . . . Demo.............................16 .6~7 Screen Menu Options AutoConfigure..........................17 ManualConfigure........................17 SelectingWideVGA/XGAmode..
Introduction Introduction What is a Plasma Display ? If voltage is inputted to gas in glass panels, ultraviolet rays is outputted and fused with a fluorescent substance. light is emitted. A Plasma Display is a next generation flat Display using this phenomenon. 160° Wide - A Plasma angle range Display provides At this moment, of vision than 160° more angle range of vision so that you can get without distortion from any picture a direction.
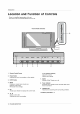
Introduction Location and Function of of Controls Controls - - Shown is a simplified representation of the set. Here shown may be somewhat different from your set. 10 7 8 9 2. MENU 3 4 2 1 1. INPUT OK VOL 5 6 Remote Control Sensor F / G Power Button Adjusts Adjusts Switches the set on from standby or off to INPUT Button 4. MENU on screen menus one Exits the current Memorizes by one. menu your selection or displays D / E Selects a menu item.
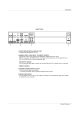
Introduction AUDIO 123 1. RS-232C INPUT(CONTROL/SERVICE) Connect to the RS-232C 2. 4 HDMI(DVI VIDEO) port on a PORT PC. / AUDIO INPUT / RGB INPUT SOCKETS Connect the monitor output socket of the PERSONAL COMPUTER to this socket. Note: If you want to use RGB/DVI audio, we strongly recommend that you core, or the EMI Filter core along with separate cable.
Installation External Connecting - - - - - Equipment V V iewing Setups Setups PC To enjoy vivid picture and sound, connect a PC to the set. Avoid keeping a fixed image on the set's screen for a long period of time. The fixed image may become permanently imprinted on the screen; use a screen saver when possible. Connect PC to the RGB INPUT(PC INPUT) or HDMI INPUT(DIGITAL RGB INPUT) port of the set; change the resolution output of PC accordingly.
Installation - HDMI TM the HDMI High-Definition Multimedia Interface are trademarks or registered trademarks of HDMI Licensing LLC. High-Definition Multimedia Interface (HDMI) or Input of Digital Visual Interface(DVI). This set supports HDCP (High-bandwidth Digital Contents Protection) Protocol for the set (480p, 720p, 1080i) modes.
Installation Reference Cable sample HDMI Cable (not supplied with the Analog product) (not supplied How to with the (RCA type) with the product) Analog Audio Cable (Stereo to RCA type) (not supplied with the product) HDMI to DVI Cable (not supplied Audio Cable product) use 1. Connect the HDMI/DVI Source Devices(DVD Player or Set Top Box or PC) and the set. display by pressing the POWER button on the set and HDMI/DVI Source Devices remote control.
Operation T urning Turning on the set after installation just 1. Connect power cord correctly, 2.Pressther/I,INPUTor Turning If the set ? on the set was the Set Set on on the set is switched to / E button D (power cord turned off with the Press the r / I, INPUT is still r On-Screen On-Screen Menu - The menus can be shown on the screen 1. Press the MENU button and then mode. the set and then the set will switch on.
Operation Picture Menu PSM - - - Status (Picture Options Options Memory) This function adjusts the set to the best picture appearance. When adjusting picture options (contrast, brightness, colour, sharpness and tint (NTSC input only)) manually, PSM is automatically changed to User. When the Intelligent eye function is on, the most suitable picture is automatically adjusted according to the surrounding conditions. 1. Press the MENU button and then use 2.
Operation sRGB - When the set is connected to external equal image - This function works in the mode use 2. Press the G with the sRGB : button to select the PICTURE button and then use D/E button to select sRGB. use D/E button to select On Repeatedly (Active Adjust press the MENU button to return to normal Colour or menu. Off. viewing. Management) the ACM to select the desired skin colour This function is not available for -I t 's not available to use use in option.
Operation Sound Sound Menu SSM - - (Sound Status Options Options Memory) This function lets you enjoy the best sound without any special adjustment because the set automatically selects the appropriate sound option based on the program content. When adjusting sound options (treble and bass) manually, SSM is automatically changed to User. 1. Press the MENU button and then use D / E button to select the SOUND 2. Press the G button and then use D/E button to select SSM. 3.
Operation T ime Menu Setting - Options Options the Clock If current time setting is erased by a power failure 1. Press the MENU button and then - / E button to select Clock. 3. Press the G button and then use D / E button to adjust the hour. 4. Press the G button and then use D button to adjust the minute.
Operation Special Special Menu Options Options Child Lock - The set can be set up so that it can't be used with the button on the set. 1. Press the MENU button and then D / E button to select the SPECIAL menu. 2. Press the G button and then D / E button to select Child lock. 3. Press the G button and then D / E button to select On 4.
Operation Screen Screen Menu Auto - - Options Options Configure Automatically adjusts picture position and minimizes image shaking. This function works in the following mode : RGB[PC]. 1. Press the MENU button and then 2. Press the G button and then / E use D use D button to select the SCREEN button to select Auto / E 3. Press the G button to start Auto config.. ? When Auto config. has finished, OK will be shown ? If the position of the image is still not correct, 4.
Operation Screen Screen Menu the Picture Format Setting - You Options Options can watch the screen in various picture formats; Spectacle, Full (option), Original, 4:3, 16:9 (Wide), Zoom. 1. Press the MENU button and then 2. Press the G button and then 3. Press the G button and then 14:9 Original, 4:3, 16:9, ? or use D use D use / E / E button to select the SCREEN button to select D/E Spectacle, Full adjust the picture adjust fully.
Operation Screen Position - This function is available after adjusting Zoom +/-. 1. Press the MENU button and then D / E button to select the SCREEN menu. 2. Press the G button and then D / E button to select Position. 3. Press the G button and then D / E 4. - the adjust position. viewing. (option) When you watch the movie, this function adjusts the 1. Press the MENU button and then use D/E set to the best picture use D / E button to select Cinema. 3.
Operation PIP (Picture-in-Picture) (Picture-in-Picture) Feature PIP lets you view 2 different - Watching inputs (sources) on your set screen at the same time. PIP RGB HDMI RGB HDMI 10:30 10:30 RGB RGB HDMI 10:30 10:30 Note : a. When the sub b. The motion of the sub picture source picture size is 1/2 of the main picture, the picture quality may decrease.
Operation - You the JPEG and MP3 file can use Notes When removing or to Memory card in mode. Card Card Memory on on by memorizing handling the memory card, damaged. use only your hands. Do not other devices use or the memory card may be Memory Card This is a camera, device Precaution for - - - - - - - Do not After - - the equipment. It's used in a digital PDA.
Operation Notes on on Available Memory Memory Card Card Card Slot 2 * Check the direction of the (refer Memory - - - Use the Card Memory card. pictures below) to the Slot 1 type specified card based on the slot location. types of Memory Card can be used for this NTFS file system is not supported. 8 set.
Operation The JPEG Preview Decoding/The Image Supplied Spec Method Compression Baseline JPEG Preview Image Display If How to insert and W W when an error occurs Inserting eject Image invalid format invalid format Ejecting on OO Image Image Display when there is thumbnail. the no JPEG, "Corrupted file" is displayed thumbnail. no thumbnail. on screen. the card button again softly and slowly. mode. to exit the mode. card a on the remote control.
Operation Notes * on on Memory In this manual, the OSD (On Screen Display) may example to help you with the set operation. Select the Photo - Card Card When you plug a or be different from your set's because it is Music Media memory card or press the button, the below Please select where to Memory Memory screens move 1 MS/Pro Photo Music 2 CF/MD Photo Music Exit 1. Press D/E/ F / G button to select 2. Press the OK button to enter the 3.
Operation JPEG V iewing JPEG File V - * Options Options When you select Photo in entry menu, you will In this manual, the OSD (On Screen Display) may help you with the set operation. Screen now see a screen filled with thumbnail be different from your set's because it is photo just an media.
Operation JPEG V iewing JPEG File V Options Options Mark/Unmark for JPEG file - - You can mark/unmark the file to view the desired file The selected file When pressing or use slide show for desired file conveniently. orange in colour. displays the OK button after marking a file, the marked file displays green in colour. W W Mark/Unmark for all files 1. In photo media, repeatedly press F button to enter the 2. Press the D/E button to select Mark All or menu on the left. Unmark All.
Operation The - Image Adjustment You can display the selected image on the entire screen and do the various adjustments for the JPEG file. View Slide Show Delete Cancel 1. Press the D / E / F / G 2. Press the D / E 3. Adjust button to select JPEG file and then press the OK button. button to select View and then press the OK button The selected image will display on entire screen. the JPEG file. 1/15 FG Prev.
Operation JPEG V iewing JPEG File V Options Options Slide Show 1. Press the D / E button to select JPEG file and then / F / G press the OK button. 2. Press the D/E button to select Slide Show Marked and then press the OK button. with MARK using screen.) View Slide Show (If or Show you mark the file button, Show Marked is displayed on Delete Cancel 3. You choose the slide show can Press the D delayed Delay No Effect 5sec Sliding Fading / G time and effect.
Operation JPEG file Deletion and Cancel View Slide show Delete Cancel 1. Use the D/E/ F 2. To delete the button to select JPEG file and then press the OK button. file, press the file?" message is up / G displayed, D/E button to select Delete and then press the OK button. When "Do you want to delete the select YES (YES or NO) with F / G button. The file is deleted, all the following files are shifted position.
Operation MP3 File - Playing Operation Operation Purchased MP3/music files may contain this model. copyright restrictions.
Operation * In this manual, the OSD (On Screen Display) may example to help you with the set operation. be different from your set's because it is just an Stop/Pause Playback W W Stop Playback To stop playback, press the To press the stop playback, A button OK, PR on the remote control. / E ) button (D the set.
Operation MP3 File Jump - Playing Operation Operation Media Use this funcion to to other media jump during using music media. Please select where to Memory 1 MS/Pro Photo Memory move Music 2 CF/MD Photo Music Cancel 1. In music media, press the F button. 2. Press the D/E button to select Jump media and then press the OK button. 3. Press the D/E/ F / G button to select desired media and then press the OK button. The screen displays each media list.
Operation MP3 file deletion and Cancel -I t 's to delete the music impossible during playback. Play Delete Cancel 1. Use the D button to select MP3 file and then press the OK button. / E 2. To delete the file, press the D / E button to select Delete and then press the OK button. When "Do you want to delete the file?" message is displayed, select YES (YES or NO) with F / G button. The file is deleted, all the following files are shifted up one position.
Miscellaneous External Control Control Device Setup Connect the RS-232C - input jack to an external externally. control device (such as a computer or an A/V control system) and control the set's functions How to connect external control ? Connect the serial ? RS-232C connection cables ? The set remote control and front computer Type or No. Pin 1 No connection to the RS-232C jack on the supplied with the set. panel controls (except main power) will back panel.
Miscellaneous Set ID - - Use this function to specify a set ID number. Mapping 1'. See page 39. Refer to 'Real Data 1. Press the MENU button and then use the D/E button to select the SPECIAL 2. Press the G button and then use D/E 3. Press the G button and then use F / G button to menu. button to select Set ID. adjust Set ID to choose the desired monitor ID number. ? 4. The adjustment range of Set ID is 1 99. ~ press the MENU button to return to normal Repeatedly viewing.
Miscellaneous 01. Power 2 (Command : a) G To control Power On/Off of the set. Transmission 0 G To select mute on/off. screen 2 d) : [k][d][ ][Set ID][ ][Data][Cr] Power Off : (Command Transmission [k][a][ ][Set ID][ ][Data][Cr] Data 04. Screen Mute 1:PowerOn Data 0 : Screen mute off 1 : Screen mute (Picture on) (Picture off) on Ack Ack [a][ ][Set ID][ ][OK][Data][x] [d][ ][Set ID][ ][OK][Data][x] G To show Power On/Off.
Miscellaneous 09. Colour (Command G To adjust the You can also screen adjust 2 i) : 14.PIP/DW(Command2:n) G To control the PIP (Picture In picture)/DW. colour. colour in the PICTURE You menu. [k][i][ ][Set ID][ ][Data][Cr] Data menu. [k][n][ ][Set ID][ ][Data][Cr] Min:0~Max:64 * also control the PIP/DW in the PIP/DW can Transmission Transmission Data 0: PIP/DW off Refer to 'Real data mapping 1'. See page 39.
Miscellaneous 18. Balance (Command 2 : 23. PIP t) G To adjust balance. You can also adjust balance in the SOUND (Command source for sub Refer to 'Real data mapping 1'. See page 39. Data :RGB 0 Ack [t][ ][Set ID][ ][OK][Data][x] [y][ ][Set ID][ ][OK][Data][x] Temperature (Command 2 : u) G To adjust colour temperature. can also adjust CSM in the PICTURE menu. picture G To recognize an (Command :HDMI 2 : z) abnormal state.
Miscellaneous 26. Low Power (Command 30. Auto 1 : j, Command 2 : G To reduce the power consumption of the also adjust Low Power in SPECIAL Configure (Command 1 : j, q) set. You 1 :On : u) only in RGB (PC) mode. Transmission [j][u][ ][Set ID][ ][Data][Cr] [j][q][ ][Set ID][ ][Data][ ][Cr] :Off It works automatically. menu.
Miscellaneous IR Code Code (NEC (NEC Format) How to connect G Connect your wired remote control to the Remote Control Remote Control IR Code port on the set. (NEC Format) G Output waveform Single pulse, modulated with 37.
Miscellaneous Code Function (Hexa) Note PR D R/C Button 01 PR E R/C Button 02 VOL D R/C Button 03 VOL E R/C Button 40 D R/C Button 41 E R/C Button 06 G R/C Button 07 F R/C Button 08 POWER R/C Button C4 POWER ON Discrete IR Code C5 POWER OFF Discrete IR 09 MUTE R/C Button 10 Number 11 Number 12 Number 13 Number 14 Number 15 Number 16 Number 17 Number 18 Number 19 Number 0B INPUT R/C Button 98 MULTIMEDIA R/C Button C6 HDMI Discrete IR Code D
Miscellaneous T roubleshooting Checklist Checklist No picture & ? Check whether the set is turned ? Power cord inserted into wall outlet? on. No sound ? Picture OK & Plug another cord was product's plugged in. power cord into the wall outlet where the set's power ? Press the VOLUME ? Sound muted? Press MUTE button. ? Check whether the ? This is normal (G) button.
Miscellaneous Product Specifications MODEL Width 50PX4M 50PX4MH 50PX4M-TB 50PX4M-ZB 50PX4MH-TB (inches / mm) 57.6 / 1461 Height (inches / mm) 32.9 / 835 Depth (inches / mm) 13.1 / 331.3 / 121.7 / 55.2 Weight (pounds Power kg) AC100-240V, 50/60Hz requirement 32 Operating Temperature Range Width 40°C) ~ 42PX5M 42PX5MH 50PX5M 50PX5MH 42PX5M-TB 42PX5M-ZB 42PX5MH-TB 50PX5M-TB 50PX5M-ZB 50PX5MH-TB / mm) 49.3 / 1252 57.6 / 1461 Height (inches / mm) 27.8 / 705.5 32.