ENG ENGLISH OWNER’S MANUAL MONITOR SIGNAGE Please read this manual carefully before operating the your set and retain it for future reference. MONITOR SIGNAGE MODELS 42WS50MS 42WS50BS 47WS50MS 47WS50BS www.lg.
TABLE OF CONTENTS ENGLISH ENG CONTENTS 4 24 ENTERTAINMENT 24 - Connecting to a wired network ASSEMBLING AND PREPARING 25 - Network Status 26 - Connecting USB storage devices 5 Accessories 27 - Browsing files 6 Optional Accessories 28 - Viewing movies 7 Parts and buttons 32 - Viewing photos 8 Using the Mounting Cable Tie 35 - Listening to music 8 Connecting the Speakers 37 - Viewing the Contents List 9 Connecting the stand 38 - DivX® VOD Guide 9 Using the IR Receiver
TABLE OF CONTENTS TROUBLESHOOTING 62 SPECIFICATIONS 68 IR CODES 69 CONTROLLING THE MULTIPLE PRODUCT 69 Connecting the cable 69 RS-232C Configurations 69 Communication Parameter 70 Command reference list 72 Transmission / Receiving protocol ENG ENGLISH 59 3
LICENSES ENGLISH LICENSES Supported licenses may differ by model. For more information of the licenses, visit www.lg.com. HDMI, the HDMI logo and High-Definition Multimedia Interface are trademarks or registered trademarks of HDMI Licensing LLC. ABOUT DIVX VIDEO: DivX is a digital video format created by DivX, LLC, a subsidiary of Rovi Corporation. This is an official DivX Certified device that plays DivX video. Visit divx.
ASSEMBLING AND PREPARING 5 Accessories Check your product box for the following items. If there are any missing accessories, contact the local dealer where you purchased your product. The illustrations in this manual may differ from the actual product and accessories.
ASSEMBLING AND PREPARING Optional Accessories ENGLISH ENG Without prior notice, optional accessories are subject to change to improve the performance of the product, and new accessories may be added. The illustrations in this manual may differ from the actual product and accessories. ST-200T Stand SP-2000 Speaker Cable holder/ Cable Tie Screws Screws : Diameter 4.0 mm x Pitch 0.7 mm x Length 10 mm(Included Spring Washer) Diameter 4.0 mm x Pitch 0.
ASSEMBLING AND PREPARING 7 Parts and buttons ENG ENGLISH Screen Buttons/ Screen Marks Connection panel Screen Marks Description INPUT Changes the input source. MENU Accesses the main menus, or saves your input and exits the menus. Adjust the up and down. Adjusts the volume level. AUTO/SET /I Displays the current signal and mode. Press this button to adjust the screen automatically (available only in RGB mode) Turns the power on or off.
ASSEMBLING AND PREPARING ENGLISH ENG Using the Mounting Cable Tie Connecting the Speakers First, connect the input signal cable to be used. Insert the cable tie into the bottom hole on the back as shown in the figure to organize cables. 1 Connect an input signal cable to use before - Only on some models. installing the speakers. 2 Mount the speaker by using a screw as shown in the following. Then connect the speaker cable.
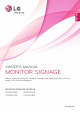
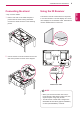
ASSEMBLING AND PREPARING Connecting the stand 9 Using the IR Receiver 1 Place a soft cloth on the table and put the product with the screen facing downward. Connect the stand as shown in the following picture. This allows a remote control sensor to be placed in a custom location. Then that display can control other displays via an RS-232C cable. Install the IR receiver towards the front of the set. 2 Use the screws to secure the stand on the rear side of the product as shown in the diagram.
ASSEMBLING AND PREPARING ENGLISH ENG Using the Kensington security system The Kensington security system connector is located at the back of the Monitor. For more information of installation and using, refer to the manual supplied with the Kensington security system or visit http://www.kensington.com . Connect the Kensington security system cable between the Monitor and a table. NOTE The Kensington security system is optional. yy You can obtain additional accessories from most electronics stores.
ASSEMBLING AND PREPARING 11 - Only on some models. 1 Place a soft cloth on the table and put the 2 Attach the Media Player on the product using the four screws provided. product with the screen facing downward. Push the Media Player into the compartment to mount it. NOTE Use the screws provided with the product. yy (Diameter 3.0 mm x Pitch 0.5 mm x Length 6.
ASSEMBLING AND PREPARING Mounting on a wall CAUTION ENGLISH ENG For proper ventilation, allow a clearance of 10 cm on each side and from the wall. Detailed installation instructions are available from your dealer, see the optional Tilt Wall Mounting Bracket Installation and Setup Guide. 10 cm 10 cm 10 cm 10 cm Disconnect the power before installing or yy moving the monitor. Otherwise electric shock may occur.
REMOTE CONTROL 13 The descriptions in this manual are based on the buttons of the remote control. Please read this manual carefully and use the Monitor correctly. To replace batteries, open the battery cover, replace batteries (1.5 V AAA) matching and ends to the label inside the compartment, and close the battery cover. To remove the batteries, perform the installation actions in reverse. CAUTION Do not mix old and new batteries, as this yy may damage the remote control.
REMOTE CONTROL ENGLISH ENG MENU (See p.41) Accesses the main menus or saves your input and exit menus. Navigation buttons Scrolls through menus or options. AUTO Automatically adjusts picture position and minimizes image instability.(RGB input only) OK Selects menus or options and confirms your input. S.MENU (SuperSign Menu Key) Selects the SuperSign OSD Menu.(SuperSign input only) BACK Allows the user to move back one step.
USING THE MONITOR SET 15 Connecting to a PC Your Monitor supports the Plug & Play* feature. * Plug & Play: This is the function that allows a PC to use the monitor without installing a driver. ENG ENGLISH USING THE MONITOR CAUTION Connect the yy signal input cable and tighten it by turning the screws clockwise. Do not press the screen with your finger for yy a long time as this may result in temporary distortion on the screen.
USING THE MONITOR SET ENGLISH ENG RGB connection DVI-D connection Transmits the analog video signal from your PC to the Monitor. Connect the PC and the Monitor set with the 15 pin signal cable as shown the following illustrations. Select RGB input source on the monitor. Transmits the digital video signal from your PC to the Monitor. Connect the PC and the Monitor set with the DVI cable as shown the following illustrations. Select DVI-D input source on the monitor.
USING THE MONITOR SET 17 Display Port connection Transmits the digital video and audio signals from your PC to the Monitor. Connect the PC and the Monitor with the HDMI cable as shown in the following illustrations. Select HDMI input source. Transmits the digital video and audio signals from your PC to the Monitor. Connect the PC and the Monitor with the Display Port cable as shown in the following illustrations. Select Display Port input source.
USING THE MONITOR SET IR Receiver connection ENGLISH ENG Allows the use of a wired remote or IR receiver extension. NOTE Make sure the power cable is disconnected.
USING THE MONITOR SET Customizing image options Selecting an image mode Customize basic and advanced options of each image mode for the best screen performance. Display images in its optimized settings by selecting one of the preset image modes. 1 Press MENU to access the main menus. 1 Press MENU to access the main menus. 2 Press the Navigation buttons to scroll to PICTURE and press OK. 3 Press the Navigation buttons to scroll to Picture Mode and press OK.
USING THE MONITOR SET ENGLISH ENG Customizing PC display options Adjusting the sound Customize options of each image mode for the best image quality. This function works in the following mode: yy RGB[PC] mode. Selecting an sound mode 1 Press MENU to access the main menus. 1 Press MENU to access the main menus.
USING THE MONITOR SET 21 Using additional options You may customize options of each sound mode for the best sound quality. Adjusting aspect ratio 1 Press MENU to access the main menus. Resize the image to view the image at its optimal size by pressing ARC while you are watching content. 2 Press the Navigation buttons to scroll to AUDIO and press OK. 3 Press the Navigation buttons to scroll to Sound Mode and press OK. 4 Press the Navigation buttons to scroll to a sound mode you want and press OK.
USING THE MONITOR SET ENGLISH ENG - 16:9 : This selection will allow you to adjust the picture horizontally, in linear proportion, to fill the entire screen(useful for viewing 4:3 formatted DVDs). - 4:3 : This selection will allow you to view a picture with an original 4:3 aspect ratio, black bars will appear on both the left and right of the screen. - Just Scan : This Selection will allow you view the picture of best quality without loss of original picture in high resolution image.
USING THE MONITOR SET 23 Using the input list 1 Press INPUT to access the input source list. - The connected device displays on each input source. 2 Press the Navigation buttons to scroll to one of the input sources and press OK. Input source Description AV(CVBS) Watch video from a VCR or other external devices. Component Watch content from a DVD or other external devices, or through a digital set-top box RGB Views the connected PC display on the screen.
ENTERTAINMENT ENGLISH ENG ENTERTAINMENT Connecting to a wired network (Depending on model) Connect the display to a local area network (LAN) via the LAN port as shown on the following illustration and set up the network settings. This monitor only supports a wired network connection. After making a physical connection, a small number of home networks may require the display network settings to be adjusted. For most home networks, the display will connect to automatically without any adjustments.
ENTERTAINMENT NOTE Tips for Network setting yy Use a standard LAN cable with this display. Cat5 or better with a RJ45 connector. yy Many network connection problems during set up can often be fixed by re-setting the router or modem. After connecting the display to the home network, quickly power off and/or disconnect the power cable of the home network router or cable modem. Then power on and/or connect the power cable again.
ENTERTAINMENT Connecting USB storage devices ENGLISH ENG You can connect USB storage devices such as a USB flash memory, external hard drive to the display and use multimedia features . Connect a USB flash memory or USB memory card reader to the Display as shown on the following illustration. The My media screen appears.
ENTERTAINMENT yy It is recommended to use a certified USB storage device and cable. Otherwise, a USB storage device may not be detected or a playback error may occur. yy Only a USB memory stick can be used to play back the files distributed and stored by SuperSign Manager. A USB hard disk or multi-card reader will not work. yy Only an FAT 32 file formatted storage device can play back the files distributed and stored by SuperSign manager. yy A USB 3.0 storage device may not work.
ENTERTAINMENT Supported File Formats ENGLISH ENG File Extensions Photo JPEG Type Movie Supported file format DAT,MPG,MPEG,VOB,AVI,DIVX,MP4,MKV,TS,T RP,TP,ASF,WMV,FLV) JPG Video format : DivX3.11, DivX4.12, DivX5.x, DivX6, Xvid1.00, Xvid1.01, Xvid1.02, Xvid1.03, Xvid1.10 beta-1/beta-2, Profile supported file format yy SOF0: baseline yy SOF1: Extend Sequential yy SOF2: Progressive Photo size yy Min: 64 x 64 yy Max Type: 1366 x 768 Bit rate 32 kbps to 320 kbps 32 kHz, 44.
ENTERTAINMENT Drive1 001 002 005 006 Page 1/1 003 Move Change Numbers ENG ENGLISH USB1 USB Drive To Photo list 6 Control playback by using the following buttons. Page 1/1 Movie List 29 004 Play Page Change Mark 01:02:30 / 02:30:25 Option Exit Mark Mode Hide Exit Page 1/1 Movie List Mark Mode Drive1 USB1 USB Drive 001 002 005 Page 1/1 003 004 Button 051. Apple_ ......
ENTERTAINMENT Tips for using playing video files ENGLISH ENG yy Some user-created subtitles may not work properly. yy Some special characters are not supported in subtitles. yy HTML tags are not supported in subtitles. yy Subtitles in languages other than the supported languages are not available. yy The screen may suffer temporary interruptions (image stoppage, faster playback, etc.) when the audio language is changed.
ENTERTAINMENT When you select the Set Video Play,, the Picture Size, Audio Language, Subtitle Language or Repeat. 2 Press the Navigation buttons to scroll to make appropriate adjustments. Latin2 Latin4 Cyrillic Menu Picture Size Audio Language Subtitle Language Language Code Page Sync Position Size Repeat Description Selects your desired picture format during movie play. Changes the Language Group of the audio during movie play. Files with a single audio track cannot be selected.
ENTERTAINMENT When you select the Set Video,, ENGLISH ENG 1 Press the Navigation buttons to scroll to make appropriate adjustments. Page 1/1 Photo List USB1 USB Drive 001 Drive1 002 010 011 Page 1/1 003 004 005 006 012 013 014 015 When you select the Set Audio,, Move View Change Numbers To Music List 008 009 Page Change Mark Exit Mark Mode 1 Press the Navigation buttons to scroll to show the Sound Mode, Clear Voice II or Balance.
ENTERTAINMENT Using photo options ENER- Press the ENERGY SAVING button GY SAVING repeatedly to change the brightness of your screen. Option yy Slide Speed: Selects a slideshow speed (Fast, Medium, Slow). yy TransitionEffect: Set the view mode of the slideshow. yy BGM: Selects a music folder for the background music. NOTE yyYou cannot change the music folder while the background music is playing. yyYou can only select the MP3 folder saved on the device that currently displays the photo.
ENTERTAINMENT When you select the Set Photo View, ENGLISH ENG 1 Press the Navigation buttons to scroll to select Slide Speed,Transition Effect or BGM. 2 Press the Navigation buttons to scroll to make appropriate adjustments. Transition Effect Option Option Description Sliding Pushes the current slide out of view as it plays to the next slide. Stairs Pushes the current slide in a staircase shape as it plays to the next slide.
ENTERTAINMENT When you select the Set Video, 35 Listening to music appropriate adjustments. 1 Press the Navigation buttons to scroll to My Media and press OK. 2 Press the Navigation buttons to scroll to Music When you select the Set Audio, 1 Press the Navigation buttons to scroll to show the Sound Mode, Clear Voice II or Balance. 2 Press the Navigation buttons to scroll to make appropriate adjustments. List and press OK. 3 Press the Navigation buttons to scroll to a folder you want and press OK.
ENTERTAINMENT 6 Control playback by using the following buttons. ENGLISH ENG 3 file(s) Marked 004. - B04.mp3 00:00 Drive1 005. - B05.mp3 00:00 Page 1/1 006. - B06.mp3 00:00 007. - B07.mp3 00:00 005. - B05.mp3 NOTE 008. - B08.mp3 00:00 02:30 / 03:25 Option Play with Photo Button This unit doesn't support the ID3 Tag yy embedded MP3 files.
ENTERTAINMENT Music options 2 Press the Navigation buttons to scroll to Set Audio Play. or Set Audio. and press OK. NOTE yy Option values changed in Movie List does not affect Photo List and Music List. yy Option value changed in Photo List and Music List are changed likewise in Photo List and Music List excluding Movie List. When you select the Set Audio Play., Viewing the Contents List Plays back the stored files using the Export option in SuperSign Manager.
ENTERTAINMENT DivX® VOD Guide ENGLISH ENG DivX® VOD Registration In order to play purchased or rented DivX® VOD contents, you should register your device with 10 digit DivX registration code from your device at www.divx.com/vod. 1 Press MENU to access the main menus. 2 Press the Navigation buttons to scroll to MY MEDIA and press OK. 3 Press the Blue button. 4 Press the Navigation buttons to scroll to DivX Reg. Code and press OK. 5 View the registration code of your display.
ENTERTAINMENT DivX® VOD Deregistration 1 Press MENU to access the main menus. Using PIP/PBP Videos or pictures stored on the USB device can be displayed on a single monitor by dividing them into the main and subscreens. (See p.51) 2 Press the Navigation buttons to scroll to MY MEDIA and press OK. 1 Press the MENU button to move to OPTION 3 Press the Blue button. 4 Press the Navigation buttons to scroll to Deactivation and press OK. 5 Press the Navigation buttons to select Yes to and press OK.
ENTERTAINMENT 4 Select a file you want and then press OK. 6 For sound select either Main or Sub. You must ENGLISH ENG to select the output sound before running the PIP or PBP function. Page 1/1 Movie List Drive1 USB1 USB Drive 001 002 005 006 Page 1/1 003 004 051. Apple_ ... 02:30:25 Select the sound path. Main Move Change Numbers To Photo list Play Page Change Sub Mark Exit Mark Mode 7 The sub screen is displayed on the main screen.
CUSTOMIZING SETTINGS Accessing Main Menus A A P 1 Press MENU to access the main menus. 2 E E A E Press the Navigation buttons to scroll to one of the following menus and press OK. A E E 3 Press the Navigation buttons to scroll to the setting or option you want and press OK. 4 When you are finished, press EXIT. When you return to the previous menu, press BACK. PICTURE (See p.42) Adjusts the image size, quality, or effect. PICTURE OPTION (See p.47) Customizes the general settings.
CUSTOMIZING SETTINGS PICTURE settings PICTURE Move ENGLISH ENG 1 Press MENU to access the main menus. Aspect Ratio 2 Smart Energy Saving : Off Energy Saving Press the Navigation buttons to scroll to PICTURE and press OK. Picture Mode : 16:9 : Off : Standard Backlight 3 Press the Navigation buttons to scroll to the setting or OK 70 Contrast 100 option you want and press OK. Brightness 50 Sharpness 50 - To return to the previous level, press BACK.
CUSTOMIZING SETTINGS Setting Description Customizes the PC display options in RGB mode. Option Resolution Selects a proper resolution. See “Customizing PC display options”. Auto Config. Adjusts the screen position, clock, and phase automatically. The displayed image may be unstable for a few seconds while the configuration is in progress. Position/Size/ Phase Adjusts the options when the picture is not clear, especially when characters are shaky. Run Auto Config. before adjusting these.
CUSTOMIZING SETTINGS Advanced Control ENGLISH ENG Setting Description Dynamic Contrast (Off/High/Medium/Low) Adjusts the contrast to keep it at the best level according to the brightness of the screen. The picture is improved by making bright parts brighter and dark parts darker. (Function works in the following mode - AV(CVBS), Component, HDMI-DTV, Display Port-DTV ) Dynamic Color (Off/High/Low) Adjusts screen Colors so that they look livelier, richer and clearer.
CUSTOMIZING SETTINGS AUDIO settings AUDIO Clear Voice II 2 Press the Navigation buttons to scroll to AUDIO and press Sound Mode : Off Balance OK. OK 0 L R : Standard Infinite Sound : Off Treble 50 3 Press the Navigation buttons to scroll to the setting or Bass option you want and press OK. 50 Reset - To return to the previous level, press BACK. 4 When you are finished, press EXIT. Digital Audio Input : Audio In Speaker : On When you return to the previous menu, press BACK.
CUSTOMIZING SETTINGS TIME settings TIME Move ENGLISH ENG 1 Press MENU to access the main menus. Clock 2 Press the Navigation buttons to scroll to TIME and press Off Time : Off On Time : Off Sleep Timer : Off Power On Delay : Off Auto Off : 15 min. Automatic Standby : Off OK. 3 Press the Navigation buttons to scroll to the setting or option you want and press OK. OK - To return to the previous level, press BACK. 4 When you are finished, press EXIT.
CUSTOMIZING SETTINGS OPTION settings OPTION Move Language 2 Press the Navigation buttons to scroll to OPTION and press ISM Method : Normal DPM Select : On Fail Over : Off OK. Factory Reset 3 Press the Navigation buttons to scroll to the setting or option :1 Set ID you want and press OK. Tile Mode - To return to the previous level, press BACK. PIP/PBP 4 When you are finished, press EXIT. When you return to the previous menu, press BACK.
CUSTOMIZING SETTINGS Setting ENGLISH ENG Tile Mode Description Tile Mode To use this function - Must be displayed with various other products. - Must be in a function that can be connected to RGB Cable by distributor and RS-232C. Tile mode and choose Tile alignment and set the ID of the current product to set location. * Only after pressing the SET button the adjustments made to the settings will be saved. - Tile mode : column x row ( c = 1 to 15 r = 1 to 15) - 15 x 15 available.
CUSTOMIZING SETTINGS Setting 49 Description Key input does not work. This prevents invalid key input. Interface Select Sets communication with Media Player and the connected PC. Option RS232C Communicates with the connected PC in serial mode. SuperSign Communicates with Media Player. PC Power Control Controls the power of the monitor with Media Player turned on. On: Turns on or off the monitor with Media Player on. Off: Turns on or off the whole system.
CUSTOMIZING SETTINGS Tile Mode Tile Mode - Natural mode ENGLISH ENG This monitor can be tiled with additional monitors to create a large tiled display. Off When the Tile Mode option is disabled When active, the part of the image that would normally be displayed in the gap between the monitors is omitted.
CUSTOMIZING SETTINGS PIP/PBP NOTE yyThe subscreen is only supported when using the USB device. Sub Mode USB *PIP(Picture In Picture): Displays the Sub screen in the main screen. *PBP(Picture By Picture): Displays the Sub screen next to the main screen. Sub screen Main screen PBP PIP Position Adjusts the position of the subscreen (top left, bottom left, top right, bottom right) top left top right bottom left bottom right Size Adjusts the size of the subscreen (Size 0-10).
CUSTOMIZING SETTINGS Picture ID ENGLISH ENG Picture ID is used to change the settings of a specific display using a single IR receiver for multivision. Communication is possible between a set with an IR receiver and other sets using audio cables. Each set is identified by a set ID. If you assign the Picture ID using the remote control, only displays with the same Picture ID and Set ID can be controlled remotely.
CUSTOMIZING SETTINGS NETWORK settings NETWORK Move Player Name Setting 2 Press the Navigation buttons to scroll to NETWORK and Network Setting : None Network Status : Not connected press OK. 3 Press the Navigation buttons to scroll to the setting or option Server IP Setting Server IP Status : Not connected you want and press OK. - To return to the previous level, press BACK. 4 When you are finished, press EXIT. When you return to the previous menu, press BACK.
MAKING CONNECTIONS MAKING CONNECTIONS ENGLISH ENG Connect various external devices to the ports on the Monitor’s back panel. 1 Find an external device you want to connect to your Monitor shown on the following illustration. 2 Check the connection type of the external device. 3 Go to the appropriate illustration and check the connection details. HD Receiver HDMI - See p.55 Component - See p.55 AV(CVBS) - See p.56 DVD HDMI - See p.55 Component - See p.55 AV(CVBS) - See p.
MAKING CONNECTIONS Connect a HD receiver, DVD, or VCR player to the Monitor and select an appropriate input mode. Component connection Transmits the analog video and audio signals from an external device to the Monitor. Connect the external device and the Monitor with the 15 pin signal to RCA cable as shown on the following illustration. To display images by using progressive scan, make sure to use the component cable.
MAKING CONNECTIONS Connecting to a USB Transmits the analog video and audio signals from an external device to the Monitor. Connect the external device and the Monitor with the 15 pin signal to RCA cable as shown on the following illustration. Connect a USB storage device such as s USB flash memory, external hard drive, MP3 player or a USB memory card reader to the Monitor and access the USB menu to use various multimedia files.
MAKING CONNECTIONS 57 Connecting to the LAN ENG ENGLISH LAN connection A Connect PC to Monitor directly. LAN Monitor PC B Using a router(Switch) LAN Monitor Switch Network PC C Using the Internet.Network LAN Network Monitor PC NOTE Using LAN establishes communication yy between your PC and the monitor and enables to use the OSD menus on the PC as well as on the monitor.
MAKING CONNECTIONS Daisy Chain Monitors ENGLISH ENG Use this function to share the RGB video signal with other monitors without having to use a separate signal splitter box.
TROUBLESHOOTING 59 No image is displayed Problem Resolution Is the product power cord connected? yy See if the power cord is properly connected to the outlet. oes the 'Out of range' D message appear? yy The signal from the PC (video card) is out of the vertical or horizontal frequency range of the product. Adjust the frequency range by referring to the Specifications in this manual.
TROUBLESHOOTING 'Key Lock On' message appears. ENGLISH ENG Problem The 'Key Lock On' message appears when pressing the Menu button. Resolution The Lock function prevents the OSD settings from being changed inadvertently. To release the lock, go to Menu and Option and disable the Key Lock option. The screen image looks abnormal.
TROUBLESHOOTING 61 The audio function does not work. No sound? Resolution Sound is too dull. yy See if the audio cable is connected properly. yy Adjust the volume. yy See if the sound is set properly. yy Adjust the Clear Voice ll, Treble and Bass appropriately. Sound is too low. yy Adjust the volume. Screen color is abnormal. Problem Resolution Screen has poor color resolution yy Set the number of colors to more than 24 bits (true color) Select (16 colors).
SPECIFICATIONS ENGLISH ENG SPECIFICATIONS 42WS50MS 42WS50BS LCD Panel Screen Type Video Signal Pixel Pitch Max. Resolution 42" class (42.0" diagonal) TFT (Thin Film Transistor) LCD (Liquid Crystal Display) Panel. Visible diagonal size : 1067.31 mm 0.4845 mm (H) x 0.4845 mm (V) RGB : 1920 X 1080 @60 Hz HDMI,DVI-D, Display Port : 1920 X 1080 @60 Hz - It may not be supported depending on the OS or video card type.
SPECIFICATIONS ENG ENGLISH Dimensions (Width x Height x Depth) / Weight 961.6 mm x 554.5 mm x 31.9 mm / 13.7 kg 961.6 mm x 628.9 mm x 298.3 mm / 15.1 kg 961.6 mm x 554.5 mm x 81.5 mm / 14.5 kg 961.6 mm x 628.9 mm x 298.3 mm / 15.9 kg * Applicable only for models that support the speakers Audio 63 RMS Audio Output Input Sensitivity Speaker Impedance 10 W + 10 W (R + L) 0.7 Vrms 8Ω Product specifications shown above may be changed without prior notice due to upgrade of product functions.
SPECIFICATIONS ENGLISH ENG 47WS50MS 47WS50BS LCD Panel Screen Type Video Signal Pixel Pitch Max. Resolution 47" class (46.9" diagonal) TFT (Thin Film Transistor) LCD (Liquid Crystal Display) Panel. Visible diagonal size : 1192.87 mm 0.5415 mm (H) x 0.5415 mm (V) RGB : 1920 X 1080 @60 Hz HDMI,DVI-D, Display Port : 1920 X 1080 @60 Hz - It may not be supported depending on the OS or video card type.
SPECIFICATIONS ENG ENGLISH Dimensions (Width x Height x Depth) / Weight 1071.8 mm x 616 mm x 31 mm / 15.7 kg 1071.8 mm x 690.4 mm x 298.3 mm / 17 kg 1071.8 mm x 616 mm x 80.6 mm / 16.6 kg 1071.8 mm x 690.4 mm x 298.3 mm / 17.9 kg * Applicable only for models that support the speakers Audio 65 RMS Audio Output Input Sensitivity Speaker Impedance 10 W + 10 W (R + L) 0.7 Vrms 8Ω Product specifications shown above may be changed without prior notice due to upgrade of product functions.
SPECIFICATIONS Dimensions ENGLISH ENG The illustrations in this manual may differ from the actual product and accessories. Please see the "Mounting on a wall" section for sizes of screws. ( See p.12 ) (Unit : mm) 42WS50MS 42WS50BS 47WS50MS 47WS50BS A 961.6 1071.8 B 11.5 11.5 C 11.5 11.5 D 554.5 616 E 628.9 690.4 F 11.5 11.5 G 85.9 85.9 H 706 804 I 280.8 335.9 J 77.3 108 K 400 400 L 400 400 M 81.5 80.6 N 52.6 52.6 O 31.9 31.0 P 134.7 135.6 Q 298.
SPECIFICATIONS 67 DTV Mode RGB (PC) supported mode Horizontal Vertical Frequency(kHz) Frequency(Hz) 640 x 350 31.469 Resolution Component HDMI,Display Port (DTV) 70.8 480i o x 576i o x 720 x 400 31.468 70.8 640 x 480 31.469 59.94 480p o o 640 x 480 37.5 75 576p o o 800 x 600 37.879 60.317 800 x 600 46.875 75 832 x 624 49.725 74.55 1024 x 768 48.363 60 1024 x 768 60.123 75.029 1280 x 720 44.772 59.855 1366 x 768 47.7 60 1280 x 1024 63.981 60.
IR CODES IR CODES ENGLISH ENG Code (Hexa) Function Note R/C BUTTON 95 08 R/C BUTTON ON/OFF 0B R/C BUTTON C4 R/C BUTTON (Discrete IR Code) C5 R/C BUTTON (Discrete IR Code) 43 R/C BUTTON 40 Up R/C BUTTON 41 Down R/C BUTTON 07 Left R/C BUTTON 06 Right R/C BUTTON 44 R/C BUTTON 28 R/C BUTTON 5B R/C BUTTON 3F R/C BUTTON 4D R/C BUTTON 02 Volume R/C BUTTON 03 Volume R/C BUTTON 09 R/C BUTTON E0 ( UP) E1 ( Down) R/C BUTTON to R/C BUTTON R/C BUTTON 10 to 19 Nu
CONTROLLING THE MULTIPLE PRODUCT Use this method to connect several products to a single PC. You can control several products at a yy time by connecting them to a single PC. In the Option menu, Set ID must be between 1 and 255 without being duplicated. yy Connecting the cable Connect the RS-232C cable as shown in the picture. The RS-232C protocol is used for communication between the PC and product. You can turn the yy product on/off, select an input source or adjust the OSD menu from your PC.
CONTROLLING THE MULTIPLE PRODUCT Command reference list ENGLISH ENG COMMAND 1 Power k DATA a 00H to 01H 2 Aspect Ratio k c 01H to 1FH 3 Screen Mute k d 00H to 01H 4 Volume Mute k e 00H to 01H 5 Volume Control k f 00H to 64H 6 Contrast k g 00H to 64H 7 Brightness k h 00H to 64H 8 Color k i 00H to 64H 9 Tint k j 00H to 64H 10 Sharpness k k 00H to 64H 11 OSD Select k l 00H to 01H 12 Remote Lock/ key Lock k m 00H to 01H 13 Treble k r 00H to 64H
CONTROLLING THE MULTIPLE PRODUCT COMMAND 71 DATA f g 00H to 01H 44 Power On Delay f h 00H to 64H 45 Language f i 00H to 12H 46 DPM Select f j 00H to 01H 47 Reset f k 00H to 03H 48 Serial no.
CONTROLLING THE MULTIPLE PRODUCT Transmission / Receiving protocol ENGLISH ENG Transmission [Command1][Command2][ ][Set ID][ ][Data][Cr] * [Command 1]: First command. (k, j, m, d, f, x) * [Command 2]: Second command.(a to u) * [Set ID]: Set up the Set ID number of product. range : 01H to 63H. by setting '0', server can control all products. * In case of operating with more than 2 sets using set ID as '0' at the same time, it should not be checked the ack message.
CONTROLLING THE MULTIPLE PRODUCT * Real data mapping Decimal Num. (Real Value) 0 0 A 10 F 15 10 16 20 32 64 100 FE 254 FF 255 01. Power (Command: k a) To control Power On/Off of the set. Transmission [k][a][ ][Set ID][ ][Data][Cr] Data 00 : Power Off 01 : Power On Acknowledgement [a][ ][Set ID][ ][OK][Data][x] To show the status of Power On/Off. Transmission [k][a][ ][Set ID][ ][FF][Cr] 03. Screen Mute (Command: k d) To select screen mute on / off.
CONTROLLING THE MULTIPLE PRODUCT ENGLISH ENG 06. Contrast (Command: k g) To adjust screen contrast. You can also adjust the contrast in the Picture menu. Transmission [k][g][ ][Set ID][ ][Data][Cr] Data Min : 00H to Max : 64H : 0 to 100 Acknowledgement [g][ ][Set ID][ ][OK][Data][x] Data Min : 00H to Max : 64H * Refer to 'Real data mapping ’. 07. Brightness (Command: k h) To adjust screen brightness. You can also adjust the brightness in the Picture menu.
CONTROLLING THE MULTIPLE PRODUCT Transmission [k][m][ ][Set ID][ ][Data][Cr] Data 00: Off 01: On Acknowledgement [m][ ][Set ID][ ][OK][Data][x] Data 00: Off 01: On 15. Balance (Command: k t) To adjust the sound balance. Transmission [k][t][ ][Set ID][ ][Data][Cr] Data Min : 00H to Max : 64H (Hexadecimal code) 00H : Step L50 64H : Step R50 Acknowledgement [t][ ][Set ID][ ][OK][Data][x] Data Min : 00H to Max : 64H (Hexadecimal code) 00H : Step 0 to L50 64H : Step 100 to R50 * Balance : L50 to R50 13.
CONTROLLING THE MULTIPLE PRODUCT 17. White Balance Red Gain (Command: j m) To adjust white balance red gain. ENGLISH ENG Transmission [j][m][ ][Set ID][ ][Data][Cr] Data 00~FE: Red gain 0~254 Acknowledgement [z][ ][Set ID][ ][OK/NG][Data][x] 20. ISM mode (Command: j p) Used to select the afterimage preventing function. Transmission [j][p][ ][Set ID][ ][Data][Cr] Data 01 : Inversion 02 : Orbiter 04 : White Wash 08 : Normal Acknowledgement [p][ ][Set ID][ ][OK][Data][x] 18.
CONTROLLING THE MULTIPLE PRODUCT 26. Automatic Standby (Command: m n) To set the Automatic Standby function. Transmission [m][n][ ][Set ID][ ][Data][Cr] Data Key code : Refer to ‘IR CODES’. Acknowledgement [c][ ][Set ID][ ][OK][Data][x] Data 00: Off(Not using the Automatic Standby function) 01: 4 Hours(The monitor will be off in 4 hours.) Acknowledgement [n][ ][Set ID][ ][OK/NG][Data][x] 24. Fail Over Select (Command: m i) To select Fail Over mode.
CONTROLLING THE MULTIPLE PRODUCT ENGLISH ENG 28. Tile Mode (Command: d d) Change a Tile Mode. Transmission [d][d][ ][Set ID][ ][Data][Cr] 31. Tile H Size (Command: d g) To set the Horizontal size. Transmission [d][g][ ][Set ID][ ][Data][Cr] Data 00~FE: First bit - Column Second bit - Row * OSD is marked with row by column. Data Min : 00H to Max : 64H : 0 to 100 * Refer to 'Real data mapping ’. Acknowledgement [g][ ][Set ID][ ][OK/NG][Data][x] Data Description 00, 01, 10, 11 Tile mode is off.
CONTROLLING THE MULTIPLE PRODUCT 37. Fan Fault check (Command: d w) To check the Fan fault of the Set. Transmission [d][w][ ][Set ID][ ][Data][Cr] Data 00 : Natural Off 01 : Natural On ff : Read Status Acknowledgement [j][ ][Set ID][ ][OK/NG][Data][x] * The data is always FF (in Hex). Data ff : Read Status Acknowledgement [w][ ][Set ID][ ][OK/NG][Data][x] 35. Picture Mode (Command: d x) To adjust the picture mode. Transmission [d][x][ ][Set ID][ ][Data][Cr] Data Structure 38.
CONTROLLING THE MULTIPLE PRODUCT ENGLISH ENG 40. Lamp fault Check (Command: d p) To check lamp fault. Transmission [d][p][ ][Set ID][ ][Data][Cr] 43. Auto Sleep (Command: f g) Set Auto Sleep. Transmission [f][g][ ][Set ID][ ][Data][Cr] * The data is always FF(in Hex). Acknowledgement [p][ ][Set ID][ ][OK/NG][Data][x] Data 00 : Off(Not using the Auto off function) 01 : 15 Minutes(Set turned off when no signal is entered for 15 min.
CONTROLLING THE MULTIPLE PRODUCT Data 00 : Czech 01 : Danish 02 : German 03 : English 04 : Spanish (EU) 05 : Greek 06 : French 07 : Italian 08 : Dutch 09 : Norwegian 0a : Portuguese(EU) 0b : Portuguese(Brazil) 0c : Russian 0d : Finnish 0e : Swedish 0f : Korean 10 : Simplified Chinese 11 : Japanese 12 : Traditional Chinese Acknowledgement [i][ ][Set ID][ ][OK/NG][Data][x] 47. Reset (Command: f k) Execute the Picture, Screen and Factory Reset functions.
CONTROLLING THE MULTIPLE PRODUCT ENGLISH ENG 50. Time 1(Year/ Month/ Day) (Command: f a) To set the Time 1(Year/ Month/ Day) values. Transmission [f][a][ ][Set ID][ ][Data1][ ][Data2][ ][Data3][Cr] 52. Off Time(Repeat Mode/ Time) (Command: f e) 1) To set the Off Time(Repeat mode/ Time) function.
CONTROLLING THE MULTIPLE PRODUCT 83 54. On Time Input (Command: f u) 1) To set the On Time Input function. Transmission [f][u][ ][Set ID][ ][Data][Cr] Data1 00: Repeat Off 01: Repeat Once 02. Repeat Daily 03: Repeat from Monday to Friday 04: Repeat from Monday to Saturday 05: Repeat from Saturday to Sunday 06.
CONTROLLING THE MULTIPLE PRODUCT ENGLISH ENG 56. V Position (Command: f r) To set the Vertical position. * Only available for Tile Off mode. Transmission [f][r][ ][Set ID][ ][Data][Cr] Data 23~41: Bottom -15 ~ Top 15 Acknowledgement [r][ ][Set ID][ ][OK/NG][Data][x] 59. Color Temperature (Command: x u) To adjust the screen color temperature. Transmission [x][u][ ][Set ID][ ][Data][Cr] Data 00~64: Warm 50~Cool 50 Acknowledgement [u][ ][Set ID][ ][OK][Data][x] 57.
Make sure to read the Safety Precautions before using the product. Keep the Owner's Manual(CD) in an accessible place for future reference. The model and serial number of the SET is located on the back and one side of the SET. Record it below should you ever need service. MODEL SERIAL Important WARRANTY VOID IF REMOVED 3850TAZ209Y Warranty void if removed. WARNING -This is a class A product.