Owner's Manual IPS LED MONITOR (LED MONITOR*) *LG LED Monitors are LCD Monitors with LED Backlighting. Please read the safety information carefully before using the product. IPS LED Monitor (LED Monitor) Model List 43UN700/43UN700P 43BN70U/43BN70UP 43UN700T www.lg.
Contents CONTENTS ENGLISH ENG 3 LICENSE 24 TROUBLESHOOTING 4 ASSEMBLING AND PREPARING 26 SPECIFICATIONS 4 5 5 6 7 7 8 9 10 10 Supported Drivers and Software Component and Button Description - How to Use the Joystick Button Moving and Lifting the Monitor - Using the cable holder - Installing onto a table - Adjusting the angle - Using the Kensington lock - Installing the wall mount plate - Installing to a wall 28 28 28 29 29 12 REMOTE CONTROL 13 USING THE MONITOR 13 13 13 14 14 14 15 15 16 16
LICENSE 3 LICENSE The terms HDMI, HDMI High-Definition Multimedia Interface, HDMI trade dress and the HDMI Logos are trademarks or registered trademarks of HDMI Licensing Administrator, Inc. VESA, VESA logo, DisplayPort compliance logo and DisplayPort compliance logo for dual-mode source devices are all registered trademarks of the Video Electronics Standards Association. The SuperSpeed USB Trident logo is a registered trademark of USB Implementers Forum, Inc.
ASSEMBLING AND PREPARING ASSEMBLING AND PREPARING ENGLISH ENG CAUTION Always use genuine LG components to ensure safety and product performance. yy The product warranty will not cover damage or injury caused by the use of unauthorized components. yy It is recommended that use the supplied components. yy If you use generic cables not certified by LG, the screen may not display or there may be image noises.
ASSEMBLING AND PREPARING 5 Component and Button Description ENG ENGLISH yyIR Receiver Joystick Button Power LED yyOn: power is on yyOff: power is off How to Use the Joystick Button You can easily control the functions of the monitor by pressing the joystick button or moving it left/right with your finger. Basic Functions ◄/► Power on Press the joystick button once with your finger to turn on the monitor. Power off Press and hold the joystick button once with your finger to turn off the monitor.
ASSEMBLING AND PREPARING Moving and Lifting the Monitor ENGLISH ENG When moving or lifting the monitor, follow these instructions to prevent the monitor from being scratched or damaged and to ensure safe transportation regardless of its shape or size. CAUTION As far as possible, avoid touching the monitor yy screen. This may result in damage to the screen or some of the pixels used to create images.
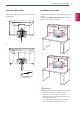
ASSEMBLING AND PREPARING Installing onto a table Arrange the cables using the cable holder as shown in the illustration. Lift the monitor and place it on the table in an upright position. Place at least 100 mm (3.94 inches) away from the wall to ensure sufficient ventilation. 100 mm (3.94 inches) 100 mm (3.94 inches) 100 mm (3.94 inches) 100 mm (3.94 inches) Or Or 100 mm (3.94 inches) 100 mm (3.94 inches) 100 mm (3.94 inches) 100 mm (3.
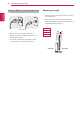
ASSEMBLING AND PREPARING Cautions When Connecting Power Cord Adjusting the angle ENGLISH ENG 1 Place the monitor in an upright position, mounted on the stand base. 2 Adjust the angle of the screen. The angle of the screen can be adjusted forwards or backwards for a comfortable viewing experience. 100-240 V ~ Make sure to use the power cord that is proyy vided in the product package and connect it to a grounded power outlet.
ASSEMBLING AND PREPARING WARNING 43UN700 43UN700P 43BN70U 43BN70UP Using the Kensington lock The Kensington security system connector is located at the back of the Monitor set. For more information on installation and usage, refer to the Kensington lock user manual or visit the website at http://www.kensington.com. Connect the Kensington security system cable between the Monitor set and a table. Be careful not to touch or press the screen area yy when adjusting the angle of the monitor.
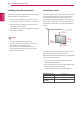
ASSEMBLING AND PREPARING ENGLISH ENG Installing the wall mount plate Installing to a wall This monitor supports the specification of the standard wall mount plate or compatible device. Install the monitor at least 100 mm (3.94 inches) away from the wall and leave about 100 mm (3.94 inches) of space at each side of the monitor to ensure sufficient ventilation. Detailed installation instructions can be obtained from your local retail store.
ASSEMBLING AND PREPARING Wall Mount (A x B) yy 11 NOTE B CAUTION Unplug the power cord before moving or installing yy the monitor to avoid electric shocks. Installing the monitor on the ceiling or on a yy slanted wall may result in the monitor falling off, which could lead to injury. Please use the genuine LG wall mounting bracket. For more information, contact your local retail store or a qualified installer. Applying excessive force when fastening screws yy may cause damage to the monitor.
REMOTE CONTROL REMOTE CONTROL ENGLISH ENG The descriptions in this manual are based on the buttons on the remote control. Please read this manual carefully to use the monitor correctly. To install batteries, open the battery cover, place batteries (1.5 V AAA) matching and terminals to the labels inside the compartment, and close the battery cover. To remove the batteries, perform the installation actions in reverse. The illustrations may differ from the actual accessories.
USING THE MONITOR USING THE MONITOR This monitor supports the *Plug and Play feature. yy *Plug and Play: A feature that allows you to add a device to your computer without having to reconfigure anything or install any manual drivers. DisplayPort connection Transmits the digital video and audio signals from your PC to the monitor. Connect your PC to the monitor using the DisplayPort cable as illustrated below. Press the menu button and then select the input option from the input menu.
USING THE MONITOR ENGLISH ENG USB-C connection Connecting to AV Devices Transmits digital video and audio signals from your PC to the monitor. Connect the monitor to your PC using the USB C-C cable as shown in the illustration below. Press the menu button and then select the input option from the input menu. HDMI connection Transmits the digital video and audio signals from your PC and A/V devices to the monitor. Connect your PC and AV device to the monitor with the HDMI cable as illustrated below.
USING THE MONITOR Connecting Peripherals The USB port on the product functions as a USB hub. Please connect the USB C-C cable to the PC. NOTE Make sure to install the most recent Windows OS yy service pack before using the product. Peripheral devices are sold separately. yy A keyboard, mouse, or USB device can be yy connected to the USB port. The charging speed may vary depending on the yy device.
USING THE MONITOR Connecting to External Devices ENGLISH ENG Connecting Headphones Connect peripherals to the monitor via the headphones port. Connect as illustrated. (sold separately) NOTE yy Peripheral devices are sold separately. yy If you use angled earphones, it may cause a problem with connecting another external device to the monitor. Therefore, it is recommended to use straight earphones.
User Settings 17 USER SETTINGS Your monitor’s OSD (On Screen Display) may differ slightly from that shown in this manual. yy When Beep Guide is activated, pressing the joystick button will take you to Settings right away. yy Activating the Main Menu 1 Press the joystick button on the bottom of the monitor. 2 Move the joystick up/down (▲/▼) and left/right(◄/►) to set the options. 3 Press the joystick button once more to exit the main menu.
User Settings User Settings ENGLISH ENG Menu Settings 1 2 3 4 To view the OSD menu, press the joystick button at the bottom of the monitor and then enter the Settings. Configure the options by moving the joystick up/down/left/right. To return to the upper menu or set other menu items, move the joystick to◄ or pressing ( / Ok) it. If you want to exit the OSD menu, move the joystick to ◄ until you exit.
User Settings 19 [PBP/PIP ON] Description Input List Displays the screens of main input and sub input. Aspect Ratio Adjusts the aspect ratio of the screen. Main input Sub input Full Wide Displays the video to fit the PBP/PIP screen, regardless of the video signal input. Original Displays the video in the aspect ratio of the video signal input on the PBP/PIP screen. Full Wide Displays the video to fit the PBP/PIP screen, regardless of the video signal input.
User Settings [Picture Mode on HDR signal] ENGLISH ENG Settings > Picture Picture Mode Description Custom Allows the user to adjust each element. Vivid Optimized the screen for HDR vivid colors. Standard Optimized the screen for HDR standard. Cinema Optimized the screen for HDR video. FPS This mode is optimized for FPS games.It is suitable for very dark FPS games. RTS This mode is optimized for RTS Game.
User Settings Picture Adjust 21 Adjusts the brightness of the screen. Contrast Adjusts the contrast of the screen. Sharpness Adjusts the sharpness of the screen. SUPER RESOLUTION+ High Optimized picture quality is displayed when a user wants crystal clear images. It is effective for high quality video or game. Middle The optimized picture quality is displayed when a user wants images between low and high modes for comfortable viewing. It is effective for UCC or SD video.
User Settings Color Adjust Gamma ENGLISH ENG Color Temp Red Mode 1, Mode 2, Mode 3 The higher the gamma value, the darker the image becomes. Likewise, the lower the gamma value, the lighter the image becomes. Mode 4 If you do not need to adjust the gamma settings, select Mode 4. Custom The user can adjust it to red, green, or blue by customization. Warm Sets the screen color to a reddish tone. Medium Sets the screen color between a red and blue tone.
User Settings Settings > General Description Sets the menu screen to the desired language. Sound Optimizer Allows optimized sound for individual Monitor installation. ENG ENGLISH Language SMART ENERGY SAVING 23 Stand Type Optimized sound for a stand-mounted Monitor. Wall Mount Type Optimized sound for a wall-mounted Monitor. High Saves energy using the high-efficiency SMART ENERGY SAVING feature. Low Saves energy using the low-efficiency SMART ENERGY SAVING feature.
TROUBLESHOOTING TROUBLESHOOTING ENGLISH ENG Nothing is displayed on the screen. Is the monitor's power cord plugged in? Check if the power cord is correctly plugged into the power outlet. yy Is the power LED on? Check the power cable connection and press the power button. yy Check that the connected input is enabled (Settings > Input > Input list).
TROUBLESHOOTING 25 NOTE The display color is abnormal. Does the display appear discolored (16 colors)? Set the color to 24 bit (true color) or higher. In Windows, go to Control yy Panel > Display > Settings > Color Quality. Does the display color appear unstable or monochrome? Check if the signal cable is connected properly. Reconnect the cable or yy reinsert the PC's graphics card.
SPECIFICATIONS SPECIFICATIONS ENGLISH ENG 43UN700 43UN700P 43BN70U 43BN70UP LCD Screen Type TFT (Thin Film Transistor) LCD (Liquid Crystal Display) Screen Resolution Maximum Resolution HDMI IN 1/2 : 3840 x 2160 @ 30 Hz HDMI IN 3/4 : 3840 x 2160 @ 60 Hz DP IN (USB-C IN) : 3840 x 2160 @ 60 Hz Recommended Resolution HDMI IN 1/2 : 3840 x 2160 @ 30 Hz HDMI IN 3/4 : 3840 x 2160 @ 60 Hz DP IN (USB-C IN) : 3840 x 2160 @ 60 Hz Power input 100-240 V~ 50 / 60 Hz, 2.3 A Power On mode: 95 W Typ.
SPECIFICATIONS 27 SPECIFICATIONS LCD Screen Type TFT (Thin Film Transistor) LCD (Liquid Crystal Display) Screen Resolution Maximum Resolution HDMI IN 1/2 : 3840 x 2160 @ 30 Hz HDMI IN 3/4 : 3840 x 2160 @ 60 Hz DP IN (USB-C IN) : 3840 x 2160 @ 60 Hz Recommended Resolution HDMI IN 1/2 : 3840 x 2160 @ 30 Hz HDMI IN 3/4 : 3840 x 2160 @ 60 Hz DP IN (USB-C IN) : 3840 x 2160 @ 60 Hz Power input 100-240 V~ 50 / 60 Hz, 2.3 A Power On mode: 95 W Typ. (Outgoing condition)* consumption (Typ.
SPECIFICATIONS Factory Support Mode (Preset Mode, PC) ENGLISH ENG HDMI Display Modes (Resolution) Horizontal Frequency(kHz) Vertical Frequency(Hz) Polarity(H/V) 640 x 480 31.469 59.94 -/- 800 x 600 37.879 60.317 +/+ 1024 x 768 48.363 60 -/- 1152 x 864 54.347 60.05 +/+ 1280 x 720 45 60 +/+ 1280 x 1024 63.981 60.02 +/+ 1600 x 900 60 60 +/+ 1920 x 1080 67.5 60 +/- 1920 x 2160 133.32 60 +/- 2560 x 1440 88.79 59.95 +/- 3840 x 1080 70.2 60 +/+ 3840 x 2160 67.
SPECIFICATIONS 29 HDMI Timing (Video) Horizontal Frequency(kHz) Vertical Frequency(Hz) 480p 31.5 60 720p 45.0 60 1080p 67.5 60 2160p 135 60 Power LED Mode LED Color On Mode White (For a few seconds) Sleep Mode (Standby Mode) Off Off Mode Off Remarks When HDMI ULTRA HD Deep Color is set to ON.
EXTERNAL CONTROL DEVICE SETUP EXTERNAL CONTROL DEVICE SETUP ENGLISH ENG Communication Parameters Baud rate : 9600 bps (UART) Data length : 8 bits Parity : None Stop bit : 1 bit Communication code : ASCII code Use a crossed (reverse) cable. Transmission [Command1][Command2][ ][Set ID][ ][Data][Cr] * [Command 1] : First command to control the Monitor. * [Command 2] : Second command to control the Monitor. * [Set ID] : You can adjust the set ID to choose desired monitor ID number in optionmenu.
EXTERNAL CONTROL DEVICE SETUP 31 Command Reference List Power Screen Mute Input select (Main) Input select (Sub) Input select (Sub2) Input select (Sub3) Aspect Ratio (Main) Aspect Ratio (Sub) Aspect Ratio (Sub2) Aspect Ratio (Sub3) PBP/PIP PIP Size Main/Sub Screen Change Picture Mode Brightness Contrast Sharpness Brightness Stabilization SUPERRESOLUTION+ BlackLevel HDMIULTRAHD DeepColor DFC Response Time Black Stablilzer Uniformity Gamma Color Temp Red Gain Green Gain Blue Gain Language SMART ENERGY SAVIN
EXTERNAL CONTROL DEVICE SETUP Title ENGLISH ENG Power Screen Mute Input select (Main) Input select (Sub) Input select (Sub2) Input select (Sub3) Aspect Ratio (Main) Aspect Ratio (Sub) Aspect Ratio (Sub2) Aspect Ratio (Sub3) PBP/PIP PIP Size Main/Sub Screen Change Picture Mode Brightness Contrast Sharpness Brightness Stabilization SUPERRESOLUTION+ BlackLevel HDMIULTRAHD DeepColor DFC Response Time Black Stablilzer Uniformity Gamma Color Temp Red Gain Green Gain Blue Gain Language SMART ENERGY SAVING
BEEP GUIDE 33 Beep Guide Location Menu Location Quick Settings 1 Input (PBP / PBP2) - Input List - Main - HDMI 3 2113 Quick Settings - Brightness 11 Input (PBP / PBP2) - Input List - Main - HDMI 4 2114 Quick Settings - Brightness 1 1 1 Slider Quick Settings - Contrast 12 Input (PBP / PBP2) - Input List - Main DisplayPort 2115 Quick Settings - Contrast 1 2 1 Slider Input (PBP / PBP2) - Input List - Main - USB-C 2116 Quick Settings - Volume 13 Input (PBP / PBP2) - Input List - Sub 21
BEEP GUIDE Menu Location Menu Location ENGLISH ENG Input (PBP_4P) - Input List - Main - HDMI 1 2111 Input (PBP_4P) - Aspect Ratio - Sub3 - Original 2242 Input (PBP_4P) - Input List - Main - HDMI 2 2112 Input (PBP_4P) - PBP/ PIP 23 Input (PBP_4P) - Input List - Main - HDMI 3 2113 Input (PBP_4P) - PBP/ PIP - OFF 231 Input (PBP_4P) - Input List - Main - HDMI 4 2114 Input (PBP_4P) - PBP/ PIP - PBP 232 Input (PBP_4P) - Input List - Main - DisplayPort 2115 Input (PBP_4P) - PBP/ PIP - P
BEEP GUIDE Menu Location Menu 35 Location 2222 Picture - Picture Adjust - SUPER RESOLUTION+ - 3 2 4 1 High Input (PIP) - PBP/ PIP 23 Input (PIP) - PBP/ PIP - OFF 231 Input (PIP) - PBP/ PIP - PBP 232 Input (PIP) - PBP/ PIP - PBP2 233 Input (PIP) - PBP/ PIP - PBP_4P 234 Picture - Picture Adjust - SUPER RESOLUTION+ - 3 2 4 4 Off Input (PIP) - PBP/ PIP - PIP_RB 235 Picture - Picture Adjust - Black Level 325 Input (PIP) - PBP/ PIP - PIP_LB 236 Picture - Picture Adjust - Black Level - Hig
BEEP GUIDE Menu Location Menu Location ENGLISH ENG Picture - Color Adjust - Six Color - Red Hue 3461 General - Language - Spanish 414 Picture - Color Adjust - Six Color - Red Hue 34611 Slider General - Language - Italian 415 General - Language - Swedish 416 General - Language - Finnish 417 Picture - Color Adjust - Six Color - Red Saturation 3 4 6 2 Picture - Color Adjust - Six Color - Red Saturation 3 4 6 2 1 Slider General - Language - Portuguese 418 Picture - Color Adjust - Six Co
BEEP GUIDE Menu 37 Location 464 General - DisplayPort Version 47 General - DisplayPort Version - 1.4 471 General - DisplayPort Version - 1.2 472 General - DisplayPort Version - 1.
Supplier’s Declaration of Conformity Trade Name LG Responsible Party LG Electronics USA, Inc. Address 111 Sylvan Avenue, North Building, Englewood Cliffs,NJ 07632 E-mail lg.environmental@lge.com The model and serial number of the product are located on the back and on one side of the product. Record them below in case you ever need service.