ENGLISH OWNER’S MANUAL MONITOR SIGNAGE Please read this manual carefully before operating your set and retain it for future reference. MONITOR SIGNAGE MODELS 47VT30 www.lg.
Table of Contents Licenses Accessories 3 4 Separate Purchase .............................................................................................................4 To Install in Portrait Orientation Using the Remote Control Name and Function of the Parts 5 6 8 Rear View...............................................................................................................................8 Connecting to External Devices 9 When Connecting to your PC......................................
Licenses Supported licenses may differ by model. For more information of the licenses, visit www.lg.com. The terms HDMI and HDMI High-Definition Multimedia Interface, and the HDMI logo are trademarks or registered trademarks of HDMI Licensing LLC in the United States and other countries. ABOUT DIVX VIDEO: DivX® is a digital video format created by DivX, LLC, a subsidiary of Rovi Corporation. This is an official DivX Certified® device that plays DivX video. Visit divx.
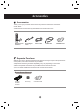
Accessories Accessories Thank you for your purchase. Please check the product as well as the accessories shown below. ❖ Note that the accessories may look different from those shown here. Remote Control / Batteries Power Cable D-Sub Signal Cable USB Cable CD-ROM/ Cards Separate Purchase Without prior notice, optional accessories are subject to change to improve the performance of the product, and new accessories may be added.
To Install in Portrait Orientation - Only on some models. "To install in a portrait orientation, rotate the screen 90 degrees clockwise." Note • When using the wall mounting bracket or the portrait scene mode, the opening can be covered by the stand hole cover.
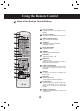
Using the Remote Control Name of the Remote Control Buttons 1 2 3 ENERGY MONITOR INPUT OFF ON .,! GHI 1/a/A SAVING TUV -*# CLEAR ABC JKL PSM 7 MNO P BRIGHT A NESS G E MENU AUTO S.MENU Number and Alphabet Buttons - Type numbers and alphabets. 4 1/a/A Button - Selects the number and alphabet. (SuperSign input only) 5 Volume Up/Down Button - Adjusts the volume. 6 PSM Button - Selects the Picture Status Mode. 7 MUTE Button - Switches the sound on or off.
Using the Remote Control POWER 14 ENERGY MONITOR INPUT 15 OFF ON .,! GHI PQRS 1/a/A Energy Saving Button - Adjust the Energy Saving mode of the SET. 15 INPUT Select Button If you press the button once, the following Input Signal Window will appear. Select the signal type you want using the < > button.
Name and Function of the Parts * The product image in the user's guide could be different from the actual image. Rear View 1 2 3 4 5 6 7 8 1 Power Connector Connect the power cord 2 RS-232C Serial Ports 3 RGB, HDMI/DVI Ports HDMI Supports High Definition input and HDCP (High-bandwidth Digital Content Protection). Some devices require HDCP in order to display HD signals. 4 PC Sound Jack Connect an audio cable to the *LINE OUT jack of the PC sound card.
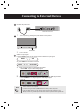
Connecting to External Devices When Connecting to your PC 1 First of all, see if the computer, product and the peripherals are turned off. Then, connect the signal input cable. A. B. When connecting with the D-Sub signal input cable. When connecting with the HDMI-DVI signal input cable (not included). * When HDMI PC is used, a compatiblity problem might occur. A.
Connecting to External Devices 4 Connect the power cord. Rear back of the set 5 1. Turn on power by pressing the power button on the product. On/Off button 2. 6 Turn on the PC. Select an input signal. Press the INPUT button on the remote control to select the input signal. INPUT → → OK Or, press INPUT on the bottom of the set. INPUT →◄ ► → AUTO/SET A. When connecting with a D-Sub signal input cable. • Select RGB : 15-pin D-Sub analog signal. Input List AV B.
Connecting to External Devices When Using the LAN 1 Connect the LAN cable as shown in the below figure . A. B. Connect PC to Monitor directly. Using a router(Switch) LAN LAN Switch Product Product PC PC C. Using the Internet. Network LAN Network Product 2 PC Network Connect the LAN cable and install the eZ-Net Manager program on the CD-ROM. For more information about the program, please refer to eZ-Net Guide in the enclosed CD-ROM.
Connecting to External Devices Daisy Chain Monitors A. When using RGB input To use different products connected to each other Connect one end of the signal input cable (15-pin D-Sub Signal Cable) to the RGB OUT connector of product 1 and connect the other end to the RGB IN connector of other products. 15-pin D-Sub Signal Cable PC PC Product 1 B.
Connecting to External Devices VESA FDMI Wall Mounting This product supports a VESA FDMI compliant mounting interface. These mounts are purchased separately and not available from LG. Refer to the instructions included with wall mount for more info. Kensington Security Slot The Set is equipped with a kensington Security System connector on the back panel. The cable and lock are available separate and are not sold by LG. For more info, visit http://www.kensington.
Connecting to External Devices Video Input 1 Connect the video cable as shown in the below figure and then connect the power cord. When connecting with a BNC cable. •C onnect the input terminal with a proper color match. Product Audio Cable (not included) BNC Cable (not included) VCR/DVD Receiver 2 Select an input signal. Press the INPUT button on the remote control to select the input signal. INPUT → → OK Or, press INPUT on the bottom of the set.
Connecting to External Devices Component Input (480i/480p/576i/576p/720p/1080i/1080p) 1 Connect the video/audio cable as shown in the below figure and then, connect the power cord. • Connect the input terminal with a proper color match. Product BNC Cable (not included) Audio Cable (not included) HDTV Receiver Note - Some devices may require HDCP in order to display HD signals. - Component doesn't support HDCP. 2 Select an input signal.
Connecting to External Devices HDMI Input (480p/576p/720p/1080i/1080p) HDMI Supports High Definition input and HDCP (High-bandwidth Digital Content Protection). Some devices require HDCP in order to display HD signals. 1 Connect the video/audio cable as shown in the below figure and then connect the power cord.
User Menus Screen Adjustment Options 7 6 3 1 On/Off Button 2 Power Indicator 3 MENU Button 4 OSD Select / Adjust Button 2 4 5 1 Press this button to turn on the power. Press this button again to turn it off. This Indicator lights up red when the display operates normally (on mode). If the display is in sleep (Energy Saving) mode, this indicator color changes to amber. Use this button to show/hide the OSD (On Screen Display) menu screen.
User Menus Screen Adjustment Options 5 AUTO/SET Button [For PC Analog signal] Auto in progress For optimal display change resolution to 1920 x 1080 [When XGA Mode is active and 1920 x 1080 is selected] Auto in progress 6 INPUT Button INPUT →◄ ► → AUTO/SET - Toggles between inputs AV Component RGB HDMI/DVI SuperSign Composite Video HDTV, DVD 15-pin D-Sub analog signal Digital signal SuperSign Input List AV 7 IR Receiver Component RGB HDMI/DVI SuperSign This is where the unit receives signals
User Menus OSD Menu Icon Function Description Adjusts screen brightness, contrast and color that you prefer. Picture Adjusts the audio options. Audio Adjusts the timer options. Time Adjusts the screen status according to the circumstances. Option Adjusts the USB Options. USB Note OSD(On Screen Display) • The OSD function enables you to adjust the screen status conveniently since it provides graphical presentation.
User Menus How to Adjust the OSD (On Screen Display) Screen MENU Pops up the menu screen ➩ ➩ Move where you want to adjust ➩ Select a menu icon ➩ ➩ Select a menu list Move where you want to adjust ➩ Adjust the status ➩ Save adjustment Exit from the menu screen. • Use the remote control to adjust the OSD screen. 1 Press the MENU Button, then the main menu of the OSD appears. 2 To access a control, use the 3 When the icon you want becomes highlighted, press the OK Button.
User Menus Adjusting Screen Color Aspect Ratio PICTURE Move Aspect Ratio : 16:9 Aspect Ratio : 16:9 Energy Saving : Off Picture Mode : Standard • Backlight 70 • Contrast 90 • Brightness 50 • Sharpness 70 • Color 60 OK 16:9 16:9 Just scan Original 4:3 14:9 Zoom Cinema Zoom 1 Full Wide ▼ To select the image size of the screen. 16:9: Widescreen mode. Just Scan: D isplays the full signal data without cropping any of the image.
User Menus Adjusting Screen Color Energy Saving PICTURE Move Aspect Ratio : 16:9 ꕫ Energy Saving : Off : Standard Picture Mode OK Off Off Level 1 • Backlight 70 Level 2 • Contrast 90 • Brightness 50 Level 3 • Sharpness 70 • Color 60 ▼ The screen brightness adjusting menu helps you save energy. Level: 4 screen brightness levels are available.
User Menus Adjusting Screen Color Picture Mode PICTURE Move Aspect Ratio OK : 16:9 Energy Saving Picture PictureMode Mode : Off Vivid Standard :: Standard • Backlight 70 • Contrast 90 Cinema • Brightness 50 Sport • Sharpness 70 Game • Color 60 Expert 1 ▼ Standard Standard Expert 2 The picture mode menu toggles between screen presets. Standard: This is the optimum viewing condition for general users. Vivid: Displays a sharp image.
User Menus Adjusting Screen Color Picture Mode PICTURE Aspect Ratio Energy Saving Picture Mode Move OK : 16:9 : Off : Standard (User) • Backlight 70 70 • Contrast 90 • Brightness 50 • Sharpness 70 • Color 60 ▼ Backlight: Adjusts the brightness of LCD panel. Contrast: Adjusts the difference between light and dark levels. Brightness: Adjusts the brightness of the screen. Sharpness: Adjusts the clearness of the screen. (This function can be used only under AV, Component and HDMI/DVI(DTV).
User Menus Adjusting Screen Color Advanced Control PICTURE Move • Contrast 90 • Brightness 50 • Sharpness 70 • Color 60 • Tint 0 • Advanced Control • Picture Reset Screen OK Color Temperature ◄ Medium ► Dynamic Contrast High Dynamic Color High Noise Reduction Medium Gamma Medium Black Level High Film Mode Off Close Color Temperature: Color Settings Cool: Slightly purple temperature. Medium: Slightly blue temperature. Warm: Slightly red temperature.
User Menus Adjusting Screen Color Picture Reset PICTURE Move • Contrast 90 • Brightness 50 • Sharpness 70 • Color 60 • Tint OK Returns Picture Mode to the default factory settings. 0 • Advanced Control • Picture Reset Screen Screen PICTURE Move • Contrast 90 • Brightness 50 • Sharpness 70 • Color 60 • Tint 0 • Advanced Control Screen Screen • Picture Reset OK The screen may blink when resetting to factory values. SCREEN Move Prev.
User Menus Adjusting the Audio Function AUDIO Move Auto Auto Volume Volume Off :: Off Clear Voice II : Off • Level Balance Sound Mode AUDIO OK Clear Voice II Balance 0 Sound Mode : Standard 50 • Bass 50 OK : Off • Level 3 • Treble Move 3 0 : Standard • Treble 50 • Bass 50 • Reset • Reset Speaker ▼ : On Auto Volume Automatically adjusts uneven sound volumes across all channels or signals to the most appropriate level. To use this feature, select On.
User Menus Adjusting the Timer Function TIME Move Clock Clock : −− : −− −−−− Off Time : Off On Time : Off Sleep Timer : Off Auto Off : On Power On Delay : Off OK Clock If the current time is incorrect, reset the clock manually. button to 1) Press the MENU button and then use select the Time menu,input OK button to enter. 2) Press the button and then use button to select clock menu. 3) Press the button and then use button to select date.
User Menus Selecting the Options OPTION Language Language Input Label Move OK English ::English Key Lock : Off Set ID : Off ISM Method : Normal DPM Select : On Power Indicator : On Interface Select : RS232C ▼ Language Chooses the language in which the control names are displayed. Input Label Selects a label for each input source. For example, when connecting to PC in RGB mode, * Select "PC" for the connecting device field. Otherwise, the screen may not display properly.
User Menus Selecting the Options OPTION Move OK ▲ ISM Method : Normal DPM Select Power Indicator : On : On Interface Select : RS232C Network Setup Information Factory Reset DPM Select Turns power saving on/off. Power Indicator Sets the power indicator on the front side of the set to On or Off. If you set to Off, it will go Off. If you set On at any time, the power indicator will automatically be turned on. Interface Select Sets up network connections.
User Menus Adjusts the USB Options. When connecting the USB device When you connect a USB device, this popup menu is displayed, automatically. “POPUP MENU” will not be displayed while the OSD including Menu, EPG or Schedule list is activated. When the Popup menu appears, you can select Music List, Photo List or Movie List in the MY MEDIA menu. In USB device, you cannot add a new folder or delete the existing folder. 1. Connect the USB device to the USB jack on the product. USB 메모리 스틱 2.
User Menus Adjusts the USB Options. Precautions when using the USB device • • • • • • • • • • • • • • • • • • • • Only a USB storage device is recognizable. If the USB storage device is connected through a USB hub, the device is not recognizable. A USB storage device using an automatic recognition program may not be recognized. A USB storage device which uses its own driver may not be recognized. The recognition speed of a USB storage device may depend on each device.
User Menus Adjusts the USB Options. Photo List You can view photo files on USB storage device. The On Screen Display may be different from your product. Images are an example to assist with the product operation. PHOTO(*.JPEG) supporting file Baseline: 15360 x 8640 Progressive : 1024 x 768 • You can play JPEG files only. • Non-supported files are displayed in the form of bitmap.
User Menus Adjusts the USB Options.
User Menus Adjusts the USB Options. How to view photo Detailed operations are available on full-sized photo view screen. The aspect ratio of a photo may change the size of the photo displayed on the screen in full size. Press the EXIT button to move to the previous menu screen. ◄ Slideshow ◘ BGM ◘ 1/17 ꘤ ► Delete Option Hide ►► Slideshow When no picture is selected, all photos in the current folder are displayed during slide show.
User Menus Adjusts the USB Options. Music List You can play music files on USB storage device. Purchased music files(*.MP3) may contain copyright restrictions. Playback of these files may not be supported by this model. Music file on your USB device can be played by this unit. The On Screen Display may be different from your product. Images are an example to assist with the product operation. MUSIC (*.MP3) supporting file Bit rate 32 to 320kbps • Sampling rate MPEG1 layer 3: 32 kHz, 44.1 kHz, 48 kHz.
User Menus Adjusts the USB Options. Music Selection and PopUp Menu As shown, up to 6 music titles are listed per page. Play (During stop) : Play the selected music titles. One playback of a piece of music finishes, the next selected one will be played. When there are no selected music titles to play, the next one in the current folder will be played. If you go to a different folder and press the OK button, the current music in playback will stop. Play Marked: Play the selected music titles.
User Menus Adjusts the USB Options. ■■ If you don't press any button for a while during the playing, the play information box (as shown in the below) will float as a screen saver. ■■ The ‘Screen Saver’? S creen saver is to prevent screen pixel damage due to an fixed image remaining on the screen for a extended period of time. Music S003 0:27 / 3:67 Note • • • • • A damaged or corrupted music does not play but displays 00:00 in playtime.
User Menus Adjusts the USB Options. Movie List The movie list is activated once USB is detected. It is used when playing movie files on monitor. Displays the movies in the USB folder and supports Play. Allows playback of all movies in the folder and user desired files. Video editing is not supported but files can be deleted. It is a movie list that displays folder information and DivX file. Supports up to four drives. Movie List(*.avi/*.
User Menus Adjusts the USB Options.
User Menus Adjusts the USB Options.
User Menus Adjusts the USB Options. When you select the Set Video Play, Picture Size ◀ Subtitle Language ▶ 1/6 Audio Language 1/6 Subtitle File Off ● Language Latin 1 ● Sync +0.5 ● Position Option Full Screen 15 OK Picture Size : Sets to [Full Screen] or [Original Size]. Subtitle Language : Allows to select the language you want for the file with multiple subtitle tracks. This option is not available if the file has only one subtitle track.
User Menus Adjusts the USB Options. DivX Registration Code USB Move OK Photo List Music List Movie List DivX DivXReg. Reg.Code Code Deactivation DivX(R) Video On Demand ꔋ Your registration Code is: xxxxxxxxxx To learn more visit www.divx.com/vod. Close Confirm the DivX registration code number of the monitor. Using the registration number, movies can be rented or purchased at www.divx.com/vod. With a DivX registration code from other monitor, playback of rented or purchased DivX file is not allowed.
User Menus Adjusts the USB Options. Deactivation USB Move OK Photo List Music List Movie List DivX Reg. Code Deactivation Deactivation DivX(R) Video On Demand ꔋ Do you want to deactivate your device? Yes No ➩ DivX(R) Video On Demand This device is deactivated. Your deactivation code is: xxxxxxxx To learn more visit www.divx.com/vod.
Cautions When Using the Touch Screen Cautions When Using the Touch Screen • The monitor is optimized for indoor use. • The touch screen monitor is optimized for Windows 7. • Do not remove the USB cable when using the touch screen monitor. • Use LG TDS(Touch Display Settings) provided with the monitor to set touch coordinates when rotating the monitor connected to a Windows XP computer. • The LG TDS provided with the monitor only supports the following graphic cards: nVidia, ATI and Intel.
Using the Touch Screen (Windows 7) Using the Touch Screen (Windows 7) To Use the Touch Screen on Windows 7 * The monitor can respond to as many as five touch-points at any one time when connected to a Windows 7 computer. Plug a USB cable into a USB port on the back of the monitor. Rear back of the set PC Then, connect the USB cable to your PC so that it automatically recognizes the touch screen monitor. * Once your PC recognizes the monitor, you will be able to use the touch screen.
Using the Touch Screen (Windows XP) Using the Touch Screen (Windows XP) To Use the Touch Screen on Windows XP * The monitor can respond to one touch-point when connected to a Windows XP computer. Plug a USB cable into a USB port on the back of the monitor. Rear back of the set PC Then, connect the USB cable to your PC so that it automatically recognizes the touch screen monitor. * Once your PC recognizes the monitor, you will be able to use the touch screen.
Using the Touch Screen (Windows XP) Using the Touch Screen (Windows XP) Touch Response to Windows XP Touch: Mouse click (action) Long-press: Mouse right click (context menu) * The touch screen monitor is optimized for Windows 7. How to Use LG TDS LG TDS is required to enable portrait mode and the long-touch on Windows XP. Current Display Settings Displays the current screen information.
Troubleshooting No image is displayed ● Is the power cord connected? • See if the power cord is properly connected to the outlet. ● Is the power indicator light on? • See if the power switch is turned on. • May need service. ●P ower is on, power indicator is red. But the screen appears extremely dark. • Adjust brightness and contrast again. • Backlight may need repair. ● Is the power indicator amber? • If the set is in power saving mode, move the mouse or press any key.
Troubleshooting The screen image looks abnormal. ● Is the screen position wrong? • D-Sub analog signal - Press the "AUTO" button in the remote control to automatically select the optimal screen status that fits into the current mode. If adjustment is not satisfactory, use the Position OSD menu. • See if the video card resolution and frequency are supported by the product. If the frequency is out of range, set to the recommended resolution in the Control Panel "Display" Setting menu.
Troubleshooting After-image appears on the product. ●A fter-image appears when the product is turned off. • If you use a fixed image for a long time, the pixels may be damaged quickly. Use the screen-saver function. • If you use a fixed image for a long time, the pixels may be damaged quickly. Use the screen-saver function. • When a dark image is displayed on the screen after an image with high contrast (black and white or gray), this may cause image sticking.
Troubleshooting Screen color is abnormal. ●S creen has poor color resolution (16 colors). • Set the number of colors to more than 24 bits (true color) Select Control Panel - Display - Settings - Color Table menu in Windows. ●S creen color is unstable or monocolored. • Check the connection status of the signal cable. Or, re-insert the PC video card.
Troubleshooting I have a problem with touch response. ● Touch does not respond. • Check the USB cable connection. - This may occur when the USB cable between PC and monitor is not connected. Check the USB cable and make it firmly connected. * Check the connection on Windows 7 Control Panel > System and Security > System - Check the number of touch-points supported under Pen and Touch.
Troubleshooting I have a problem with touch response. ● The location of a touch does not correspond to the touch coordinates. • Change your tablet PC settings (Windows 7). - This may occur when the touch screen is not calibrated properly. C ontrol Panel > Hardware and Sound > Tablet PC Settings > Display > Display options > Calibrate or Reset * For information about gestures and settings on Windows 7, refer to the Windows Help. C hange the display setting to Full Screen (Windows XP).
Troubleshooting My network connection is unstable. ● My network connection is unstable. • Check the PC's or monitor's power. • Check the Internet cable connection. Restart your PC. - Touch may not respond when the system is down due to the unstable network. There is a problem with the power. ● I cannot turn on the power. • Check if the power cord is correctly plugged in to the outlet. • Check if the power switch is turned on (power connector). ● The power is turned off.
Specifications LCD Panel 119.28 cm (46.96 inch) TFT (Thin Film Transistor) LCD (Liquid Crystal Display) Panel Visible diagonal size : 119.28 cm 0.5415 mm x 0.5415 mm x RGB (Pixel Pitch) Power Rated Voltage Power Consumption AC 100-240 V~ 50 / 60 Hz 3.3 A On Mode : 240 W Typ. Sleep Mode : ≤ 1 W (RGB) / 1 W (HDMI/DVI) (If LAN OFF is selected) Off Mode : ≤ 0.
Specifications Video Signal Max. Resolution RGB: 1920x1080 @ 60 Hz HDMI/DVI: 1 920x1080 @ 60 Hz - It may not be supported depending on the OS or video card type. Recommended Resolution RGB: WXGA 1920x1080 @ 60 Hz HDMI/DVI: WXGA 1920x1080 @ 60 Hz - It may not be supported depending on the OS or video card type.
Specifications PC Mode - Preset Mode Preset mode Horizontal Frequency (kHz) Vertical Frequency (Hz) 640 x 350 720 x 400 640 x 480 640 x 480 800 x 600 800 x 600 832 x 624 1024 x 768 1024 x 768 31.469 31.468 31.469 37.5 37.879 46.875 49.725 48.363 60.123 70.8 70.8 59.94 75 60.317 75 74.55 60 75.029 1 2 *3 4 *5 6 7 *8 9 Preset mode *10 11 *12 *13 1280 x 1024 1280 x 1024 1680 x 1050 1920 x 1080 Horizontal Frequency (kHz) Vertical Frequency (Hz) 63.981 79.98 65.290 67.5 60.02 75.02 59.
RS-232C Controlling the Multiple Product Use this method to connect several products to a single PC. You can control several products at a time by connecting them to a single PC. If the [Set ID] menu in [Option] is set to OFF, the monitor ID value should be set between 1 and 99. Connecting the cable Connect the RS-232C cable as shown in the picture. You need to purchase a cable to connect the RS-232C socket as it is not provided as the accessory.
RS-232C Controlling the Multiple Product Command Reference List COMMAND 1 COMMAND 2 01. Power 02. Aspect Ratio 03. Screen Mute 04. Volume Mute 05. Volume Control 06. Contrast 07. Brightness 08. Color 09. Tint 10. Sharpness 11. OSD Select 12. Remote Lock/ key Lock 13. Balance 14. Color Temperature 15. Abnormal state 16. ISM mode 17. Auto configuration 18. Key 19. Picture mode (PSM) 20. Sound mode 21. Fan Fault check 22. Elapsed time return 23. Temperature value 24. Lamp fault check 25. Auto Volume 26.
RS-232C Controlling the Multiple Product COMMAND 1 COMMAND 2 30. Scheduling input select 31. Sleep Time 32. Auto Sleep 33. Power On Delay 34. Language 35. DPM Select 36. Reset 37. Power Saving 38. Power Indicator 39. Serial no. 40. S / W Version 41.
RS-232C Controlling the Multiple Product Transmission / Receiving Protocol Transmission [Command1][Command2][ ][Set ID][ ][Data][Cr] * [Command 1]: First command. (k, j, m, d, f, x) * [Command 2]: Second command.(a to u) * [Set ID]: Set up the Set ID number of product. range : 01H to 63H. by setting '0', server can control all products. * In case of operating with more than 2 sets using set ID as '0' at the same time, it should not be checked the ack message.
RS-232C Controlling the Multiple Product Transmission / Receiving Protocol 01. Power(Command : k a) ► To control Power On / Off of the Set. Transmission [k][a][ ][Set ID][ ][Data][Cr] Data 0 : Power Off 1 : Power On Acknowledgement [a][ ][Set ID][ ][OK][Data][x] ► To show the status of Power On / Off.
RS-232C Controlling the Multiple Product Transmission / Receiving Protocol 02. Aspect Ratio(Command : k c) (Main picture format) ► To adjust the screen format. You can also adjust the screen format using the ARC (Aspect Ratio Control) button on remote control or in the Screen menu.
RS-232C Controlling the Multiple Product Transmission / Receiving Protocol 04. Volume Mute(Command : k e) ► To control On/Off of the Volume Mute. Transmission [k][e][ ][Set ID][ ][Data][Cr] Data 0 : Volume Mute On (Volume Off) 1 : Volume Mute Off (Volume On) Acknowledgement [e][ ][Set ID][ ][OK][Data][x] Data 0 : Volume Mute On (Volume Off) 1 : Volume Mute Off (Volume On) 05.
RS-232C Controlling the Multiple Product Transmission / Receiving Protocol 06. Contrast(Command : k g) ► To adjust screen contrast. You can also adjust the contrast in the Picture menu. Transmission [k][g][ ][Set ID][ ][Data][Cr] Data Min : 00H to Max : 64H Acknowledgement [g][ ][Set ID][ ][OK][Data][x] * Refer to 'Real data mapping' page A7. 07. Brightness(Command : k h) ► To adjust screen brightness. You can also adjust the brightness in the Picture menu.
RS-232C Controlling the Multiple Product Transmission / Receiving Protocol 08. Color(Command : k i) (Video Timing only) ► To adjust the screen color. You can also adjust the color in the Picture menu. Transmission [k][i][ ][Set ID][ ][Data][Cr] Data Min : 00H to Max : 64H (Hexadecimal code) * Refer to 'Real data mapping' page A7. Acknowledgement [i][ ][Set ID][ ][OK][Data][x] Data Min : 00H to Max : 64H 09. Tint(Command : k j) (Video Timing only) ► To adjust the screen tint.
RS-232C Controlling the Multiple Product Transmission / Receiving Protocol 10. Sharpness(Command : k k) (Video Timing only) ► To adjust the screen Sharpness. You can also adjust the sharpness in the Picture menu. Transmission [k][k][ ][Set ID][ ][Data][Cr] Data Min : 00H to Max : 64H (Hexadecimal code) * Refer to 'Real data mapping' page A7. Acknowledgement Data [k][ ][Set ID][ ][OK][Data][x] Min : 00H to Max : 64H 11. OSD Select(Command : k l) ► To control OSD on/off to the set.
RS-232C Controlling the Multiple Product Transmission / Receiving Protocol 13. Balance(Command : k t) ► To adjust the sound balance. Transmission [k][t][ ][Set ID][ ][Data][Cr] Data Min : 00H to Max : 64H (Hexadecimal code) 00H : Step L50 64H : Step R50 Acknowledgement [t][ ][Set ID][ ][OK][Data][x] Data Min : 00H to Max : 64H 00H : Step 0 to L50 64H : Step 100 to R50 * Balance : L50 to R50 14. Color Temperature (Command : k u) ► To adjust the screen color temperature.
RS-232C Controlling the Multiple Product Transmission / Receiving Protocol 15. Abnormal state (Command : k z) ► Abnormal State : Used to Read the power off status when Stand-by mode.
RS-232C Controlling the Multiple Product Transmission / Receiving Protocol 17. Auto Configure(Command: j u) ► To adjust picture position and minimize image shaking automatically. it works only in RGB(PC) mode. Transmission [j][u][ ][Set ID][ ][Data][Cr] Data 1 : To set Acknowledgement [u][ ][Set ID][ ][OK][Data][x] 18. Key(Command : m c) ► To send IR remote key code. Transmission [m][c][ ][Set ID][ ][Data][Cr] Data Key code : Refer to page A 28. Acknowledgement [c][ ][Set ID][ ][OK][Data][x] 19.
RS-232C Controlling the Multiple Product Transmission / Receiving Protocol 20. Sound Mode (Command : d y ) ► To adjust the Sound mode. Transmission [d][y][][Set ID][][Data][X] Data Structure Data(Hex) 01 02 03 04 05 Mode Standard Music Cinema Sport Game Acknowledgement [y][][Set ID][][OK/NG][Data][x] 21. Fan Fault check (Command : d w ) ► To check the Fan fault of the monitor. Transmission [d][w][][Set ID][][Data][x] * The data is always FF(in Hex).
RS-232C Controlling Controllingthe theMultiple MultipleProduct Product Transmission / Receiving Protocol 22. Elapsed time return(Command : d l) ► To read the elapsed time. Transmission [d][l][ ][Set ID][ ][Data][x] * The data is always FF(in Hex). Acknowledgement [l][ ][Set ID][ ][OK/NG][Data][x] * The data means used hours. (Hexadecimal code) 23. Temperature value (Command : d n) ► To read the inside temperature value. Transmission [d][n][ ][Set ID][ ][Data][x] * The data is always FF(in Hex).
RS-232C Controllingthe theMultiple MultipleProduct Product Controlling Transmission / Receiving Protocol 25. Auto volume (Command : d u) ► Automatically adjust the volume level. Transmission [d][u][][Set ID][][Data][x] Data 0 : Off 1 : On Acknowledgement [u][][Set ID][][OK/NG][Data][x] 26. Speaker (Command : d v) ► Turn the speaker on or off.
RS-232C Controlling the Multiple Product Transmission / Receiving Protocol 27. Time (Command : f a) ► Set the current time. Transmission [f][a][][Set ID][][Data1][][Data2][][Data3][Cr] [Data1] 0 : Monday 1 : Tuesday 2 : Wednesday 3 : Thursday 4 : Friday 5 : Saturday 6 : Sunday [Data2] 0H to 17H (Hours) [Data3] 00H to 3BH (Minutes) Acknowledgement [a][][Set ID][][OK/NG][Data1][Data2][Data3][x] *When reading data, FFH is inputted for [Data1], [Data2] and [Data3]. In other cases, all are treated as NG.
RS-232C Controlling the Multiple Product Transmission / Receiving Protocol 28. On Timer (On/Off Timer) Time (Command : f d) ► Set On Timer. Transmission [f][d][][Set ID][][Data1][][Data2][][Data3][Cr] [Data1] 1. f1h to f4h(read one index) f1: read 1st index of On Time List, f2: read 2nd index of On Time List f3: read 3rd index of On Time List f4: read 4th index of On Time List 2.
RS-232C Controlling the Multiple Product Transmission / Receiving Protocol 29. Off Timer (On/Off Timer) Time (Command : f e) ► Set Off Timer. Transmission [f][e][][Set ID][][Data1][][Data2][][Data3][Cr] [Data 1] 1. f1h to f4h(read one index) f1: read 1st index of Off Time List, f2: read 2nd index of Off Time List f3: read 3rd index of Off Time List f4: read 4th index of Off Time List 2.
RS-232C Controlling the Multiple Product Transmission / Receiving Protocol 30. Scheduling Input select (Command : f u) (Main Picture Input) ► To select input source for monitor depending on day. Transmission [f][u][][Set ID][][Data1][][Data2][Cr] [Data 1] 1.
RS-232C Controlling the Multiple Product Transmission / Receiving Protocol 31. Sleep Time (Command : f f) ► Set Sleep Time. Transmission [f][f][][Set ID][][Data][Cr] Data 0 : Off 1 : 10 2 : 20 3 : 30 4 : 60 5 : 90 6 : 120 7 : 180 8 : 240 Acknowledgement [f][][Set ID][][OK/NG][Data][x] 32. Auto Sleep (Command : f g) ► Set Auto Sleep.
RS-232C Controlling the Multiple Product Transmission / Receiving Protocol 33. Power On Delay (Command : f h) ► Set the schedule delay when the power is turned on (Unit: second). Transmission [f][h][][Set ID][][Data][Cr] Data : 00H to 64H (Data value) * Refer to 'Real data mapping' page A7 Acknowledgement [h][][Set ID][][OK/NG][Data][x] 34. Language (Command : f i) ► Set the OSD language.
RS-232C Controlling the Multiple Product Transmission / Receiving Protocol 35. DPM Select (Command : f j) ► Set the DPM (Display Power Management) function. Transmission [f][j][][Set ID][][Data][Cr] Data 0 : Off 1: On Acknowledgement [j][][Set ID][][OK/NG][Data][x] 36 Reset (Command : f k) ► Execute the Picture, Screen and Factory Reset functions.
RS-232C Controlling the Multiple Product Transmission / Receiving Protocol 37. Power saving(Command : f I) ► To set the Power saving mode. Transmission [f][I][][Set ID][][Data][Cr] Data 0 : Off 1: (static level 1) 2: (static level 2) 3: (static level 3) Acknowledgement [I][][Set ID][][OK/NG][Data][x] 38. Power Indicator (Command : f o) ► To set the LED for Power Indicator Transmission [f][o][][Set ID][][Data][Cr] Data 0 : Off 1: On Acknowledgement [o][][Set ID][][OK/NG][Data][x] 39. Serial no.
RS-232C Controlling the Multiple Product Transmission / Receiving Protocol 40. S/W Version (Command : f z) ► Check the software version. Transmission [f][z][][Set ID][][Data][Cr] Data FFH : Read Acknowledgement [z][][Set ID][][OK/NG][Data][x] 41. Input Select (Command : x b) ► To select input source for the Set.
ControllingIR theCodes Multiple Product RS-232C Remote Control IR Code Output waveform single pulse, modulated with 37.917kHz signal at 455kHz Tc Carrier frequency FCAR = 1 / Tc = fosc / 12 Duty ratio = T1 / Tc = 1 / 3 T1 ► Configuration of frame ▪ 1st frame Lead code Low custom code High custom code Data code Data code C0 C1 C2 C3 C4 C5 C6 C7 C0 C1 C2 C3 C4 C5 C6 C7 D0 D1 D2 D3 D4 D5 D6 D7 D0 D1 D2 D3 D4 D5 D6 D7 ▪ Repeat frame Repeat code Tf ► Lead code 9 ms 4.5 ms 0.
RS-232C Code(Hex) ControllingIR theCodes Multiple Product Function 40 41 06 07 08 C4 UP (∧) DOWN (∨) RIGHT (>) LEFT (<) POWER ON/OFF MONITOR ON C5 MONITOR OFF 09 95 0B 43 5B 4D 44 10 11 12 13 14 15 16 17 18 19 79 MUTE Energy Saving INPUT MENU EXIT PSM OK Number Key 0 Number Key 1 Number Key 2 Number Key 3 Number Key 4 Number Key 5 Number Key 6 Number Key 7 Number Key 8 Number Key 9 ARC(MARK) 02 03 Vol+ Vol- Note R/C Button R/C Button R/C Button R/C Button R/C Button R/C Button (Discrete IR Code)
RS-232C Code(Hex) ControllingIR theCodes Multiple Product Function E0 E1 28 99 Bright∧(Page UP) Bright∨(Page Down) BACK AUTO CONFIC 72 71 63 61 7B B0 B1 BA 8F 8E 5A ID ON(Red Color) ID OFF(Green Color) (Yellow Color) (Blue Color ) TILE ► ■ II ◄◄ ►► AV BF COMPONENT D5 RGB PC C6 HDMI/DVI 76 ARC (4:3) 77 ARC (16:9) AF ARC (ZOOM) Note R/C Button R/C Button R/C Button R/C Button (Discrete IR Code) R/C Button R/C Button R/C Button R/C Button R/C Button R/C Button R/C Button R/C Button R/C Butto
E N E RGY STA R i s a s et of p owe rsaving guidelines issued by the U.S. Environmental Protection Agency(EPA). As an ENERGY STAR Partner LGE U. S. A.,Inc. has determined that this product meets the ENERGY STAR guidelines for energy efficiency. M a ke s u re to re a d t h e I m p o r t a n t Precautions before using the product. Keep the Owner's Manual(CD) in an accessible place for future reference. The model and serial number of the SET is located on the back and one side of the SET.