使用手冊 LCD 顯示器 操作裝置之前,請先詳細閱讀本手冊,並妥善保管手冊以供日後參考。 47WV50BR 47WV50MS 47WV50BS www.lg.
目錄 目錄 繁體中文 繁中 4 授權 25 娛樂 25 - 連接有線網路 5 組裝與準備 26 - 網路狀態 5 拆箱 27 - 連接 USB 儲存裝置 6 零件 28 - 瀏覽檔案 7 直式安裝 30 - 觀賞電影 7 安裝前請移除 L 型支架 33 - 檢視相片 8 能保護面板的存放方式 36 - 聽音樂 8 - 正確的方法 38 - 檢視內容清單 8 - 不正確的方法 39 - DivX® VOD 指南 9 安裝在牆壁上 40 - 使用 PIP/PBP 11 外部設備設定 11 - 紅外線接收器 41 自訂設定 12 並排顯示器 41 存取主選單 12 - 如何壁掛安裝電視機 42 - 影像 設定 13 - 如何結合裝置 45 - 音訊 設定 46 - 時間 設定 14 遙控器 47 - 選項 設定 16 顯示連接到輸入連接埠的裝置名稱 52 影像 ID 53 - 網路 設定 17 使用顯示器裝置 54 裝置連接 17 連接到 PC 17
目錄 疑難排解 62 規格 65 紅外線代碼 66 控制多部產品 66 連接纜線 66 RS-232C 配置 66 通訊參數 67 命令參考清單 69 傳送 / 接收通訊協定 繁中 繁體中文 59 3
授權 授權 繁體中文 繁中 支援的授權可能隨型號而異。 如需更多關於授權的資訊,請瀏覽 www.lg.com 。 HDMI 和 HDMI 高解析多媒體介面等名詞及 HDMI 標誌為 HDMI Licensing, LLC 在美國和其他國家的商標或註冊商標。 本 DivX Certified® 裝置通過嚴格測試,可播放 DivX® 視訊。 若要播放所購買的 DivX 電影,請先於 vod.divx.com 上註冊您的裝置。 請在裝置設定選單中的 DivX VOD 部分找出您的註冊碼。 DivX Certified® 可播放畫質高達 HD 1080p 的 DivX® 視訊,包括特級內容。 DivX®、DivX Certified® 與相關標誌是 DivX, Inc.
組裝與準備 5 組裝與準備 繁中 繁體中文 拆箱 請檢查產品包裝箱中是否包含下列配件。 如果缺少任何配件,請連絡您購買本產品的當地經銷商。 本手冊中 的圖例可能與產品及配件的實際外觀有所差異。 CD (使用手冊) / 卡片 電源線整線夾 遙控器和電池 電源線 紅外線接收器 RS-232C 纜線 短型垂直並排導架 長型水平並排導架 (2 顆) (2 顆) M4 x L8 螺絲 (8 顆) M6 螺絲 (4 顆) DVI 纜線 固定鎖式束線帶 (2 顆) (用於整線) 警示 yy 請勿使用任何仿冒配件,以確保安全性與產品使用壽命。 yy 使用仿冒配件所造成的任何損壞或傷害並不在保固範圍內。 附註 yy 產品隨附的配件可能因型號而異。 yy 產品規格或本手冊內容可能因產品功能升級而有所變更,恕不另行通知。 yy SuperSign 軟體與手冊 - 從 LG Electronics 網站下載 - 請造訪 LG Electronics 網站 (http://partner.lge.
組裝與準備 零件 繁體中文 繁中 < 47WV50BR / 47WV50MS > USB DP /DVI DVI IN DVI OUT RGB /COMPONENT OUT AUDIO IN LAN COMPOSITE SPEAKER RGB /COMPONENT IN REMOTE CONTROL IN 連接面板 < 47WV50BS > USB DP /DVI DVI IN DVI OUT RGB /COMPONENT OUT AUDIO IN RGB /COMPONENT IN REMOTE CONTROL IN 連接面板 LAN SPEAKER
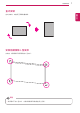
組裝與準備 7 直式安裝 安裝前請移除 L 型支架 安裝前,請移除顯示器四個角的 L 型支架。 附註 yy 請保留卸下的 L 型支架,在稍後移動顯示器時便能派上用場。 繁中 繁體中文 直式安裝時,由產品正面順時鐘旋轉。
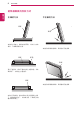
組裝與準備 能保護面板的存放方式 繁體中文 繁中 正確的方法 不正確的方法 面板 面板 若產品必須直立,請握持產品兩側,然後小心向後 傾斜,不讓面板觸及地板。 面板 若產品向面板側邊傾斜,面板底部可能損壞。 軟墊 面板 要放下產品時,請在平整的地板上放置軟墊,然後 面板朝下,在軟墊上放置產品。 面板 若產品向面板邊緣傾斜,面板邊緣可能損壞。 若沒有可用的軟墊,請在乾靜的地板上將面板朝上或朝 下,謹慎地將產品放下。 此時請注意,不要讓任何物 體掉落在面板上。
組裝與準備 安裝在牆壁上 9 警示 10 公分 20 公分 10 公分 10 公分 10 公分 請於距離牆壁至少 10 公分處安裝顯示器,並讓顯 示器的每一側與牆壁之間保留約 10 公分的空間, 確保足夠的通風。 請使用符合 VESA 標準的壁掛板和螺絲。 附註 請勿將產品安裝於不通風處 (例如書櫃或櫥櫃 中),或地毯或軟墊上。 若必須將產品安裝於 牆上,在安裝前請確認通風良好。 - 否則可能因為內部溫度升高而起火。 yy 先拔除電源線,再移動或安裝顯示器裝置。 否則可能導致觸電。 yy 如果將顯示器裝置安裝在天花板或傾斜的牆 上,顯示器裝置可能會掉落,並造成嚴重傷 害。 yy 請勿將螺絲轉得太緊,否則可能造成顯示器 裝置損壞及保固失效。 yy 請使用符合 VESA 標準的螺絲與壁掛架。 不 當使用或使用不適當的配件所造成的任何損 壞或傷害,不在保固範圍內。 繁中 繁體中文 要在牆上安裝顯示器 (選購),請使用本產品所提供 的 VESA 螺絲配件,將顯示器拴緊。
組裝與準備 將產品固定在牆上 (選擇性) 繁體中文 繁中 (視型號而定) 警告 yy 如果產品放置在不夠平穩的位置,可能會因 掉落而造成危險。許多受傷情形,特別是針 對兒童,可藉由採取如下的簡單預防措施來 避免: »» 使用產品製造商建議的電視櫃或底座。 »» 只使用可安全支撐產品的傢俱。 »» 確認產品不超出支撐傢俱的邊緣。 »» 請勿在未將傢俱與產品固定到適當支撐點 的情況下,將產品放置在高大的傢俱上 (如 櫥櫃或書架)。 »» 請勿將產品擺放在產品與支撐傢俱之間放 置布或其他織物的位置上。 »» 請教導兒童爬到傢俱上碰觸產品或其操控 裝置的危險性。 1 在產品背面插入環首螺栓,或裝上產品支架與 螺栓,並且鎖緊。 - 如果環首螺栓位置已插入螺栓,請先取出螺 栓。 2 使用螺栓將壁掛架裝設在牆上。 對準產品背面的壁掛架與環首螺栓的位置。 3 以牢固的繩索緊密連接環首螺栓與壁掛架。 請務必將繩索與平坦表面保持平行。 警示 yy 請勿讓兒童攀爬或吊掛在產品上。 注意 yy 請使用強度與大小足以穩固支撐產品的平台或 櫃子。 yy 支架、螺栓與繩索均為選購配件。 您可以向 當地經銷商購買額
組裝與準備 11 外部設備設定 繁中 繁體中文 紅外線接收器 這能讓使用者自行決定遙控器感應器的位置。 然後顯示器即可透過 RS-232C 纜線來控制其他顯示器。 AUDIO IN REMOTE CONTROL IN 注意 yy 請務必先拔下電源線,再連接或移除紅外線接收器。
組裝與準備 並排顯示器 繁體中文 繁中 如何壁掛安裝電視機 * 2 x 2 並排範例 * 使用用於固定 VESA 壁掛的螺絲,將電視機安裝到壁掛板或牆壁上。 用於固定 VESA 壁掛的螺絲 16-M4 螺絲 ≤ 6 公釐 <裝置與壁掛板的後視圖>
組裝與準備 13 如何結合裝置 將裝置 4 接合至其餘裝 置 (2 x 2 並排) 2 結合其他電視機後,利用並排導架調整電視機之間的間隙。 3 2 x 2 並排至此便告完成。 您可用不同的組合來並排,例如 3 x 3。 附註 yy施加於每一裝置的負載應由壁掛板或使用 VESA 壁掛的牆壁來支撐 (600 x 400)。 yy施加於每部電視機的負載應由使用 VESA 壁掛的壁掛板來支撐 (每部電視機都必須牢固安裝到壁掛板或牆壁上)。 yy安裝電視機時可以不用並排導架;這並不會影響電視機的效能。 yy 鬆開電視機的螺絲,以便安裝並排導架(螺絲與其他元件一同隨附於包裝盒內,包括並排導架)。 繁中 繁體中文 1 使用用於固定 VESA 壁掛的螺絲,以上述相同方式結合其他電視機。
遙控器 遙控器 繁體中文 繁中 本手冊中內容係依遙控器的按鈕而編寫。 請詳細閱讀本手冊並正確使用顯示器。 若要更換電池,請打開電池蓋,並依照電池盒中的標籤對準 蓋。 與 極更換電池 (1.
遙控器 15 繁中 繁體中文 INFO ⓘ 顯示輸入資訊。 SETTINGS 存取主選單,或儲存輸入並離 開選單。 OK 選擇選單或選項,並確認您的 輸入。 AUTO 自動調整影像位置,並盡量減 少影像不穩定的情況 (僅限於 RGB 輸入)。 W.BAL 進入 [White Balance] (白平 衡) 選單。 S.
遙控器 顯示連接到輸入連接埠的裝置名稱 繁體中文 繁中 顯示哪個裝置連接到哪個外部輸入連接埠。 1 存取「Input list」(輸入清單) 畫面,然後按下遙 控器上的藍色 (輸入類別) 按鈕。 2 您可以為 USB 之外的每項輸入指定輸入類 別。 Input Label HDMI DVI-D Display Port Close 附註 yy 支援的外部輸入:HDMI、DVI-D, Display Port yy 可用類別:PC、DTV yy 您變更外部輸入設定時,輸入類別會顯示在 輸入類別畫面,或在螢幕左上方。 yy 若為 DTV/PC 相容訊號,例如 1080p 60 Hz,螢幕設定可能依據輸入類別而改變。 若 PC 連接為外部裝置,則可使用「Just Scan」 (點對點掃描) 選項。
使用顯示器裝置 17 使用顯示器裝置 RGB 連線 您的顯示器裝置支援隨插即用*功能。 從 PC 傳輸類比視訊訊號至顯示器裝置。 使用 D-Sub 15 針纜線連接 PC 與顯示器裝置,如下圖所 示。 * 隨插即用功能:此功能讓電腦可辨識使用者連接 至該電腦並開啟的已連接裝置,並且不需要裝置設 定或使用者介入。 產品背面。 AUDIO RGB /COMPONENT OUT IN RGB /COMPONENT IN REMOTE CONTROL IN Macintosh 轉接器 (未隨附) 附註 yy 建議您使用 HDMI 連接顯示器,以獲得最佳 影像品質。 yy 為符合產品規格,請使用包覆鐵氧體磁芯 的接口纜線,如 D-sub 15 針纜線及 DVI/ HDMI 纜線。 yy 若於顯示器冷卻的情況下開機,畫面可能會 閃爍。 此為正常現象。 yy 畫面可能出現一些紅點、綠點或藍點。 此為 正常現象。 (未隨附) (未隨附) PC/MAC PC 警示 yy 連接訊號輸入線,並以 順時針方向轉緊螺絲。 yy 請勿用手指長時間按壓螢幕,這種做法可能 會導致螢幕暫時失真。 yy 請避免
使用顯示器裝置 繁體中文 繁中 DVI 連接 HDMI 連接 從電腦傳輸數位視訊訊號至顯示器。 使用 DVI 纜線 連接電腦與顯示器裝置,如下圖所示。 在顯示器上 選擇 DVI 輸入訊源。 從電腦傳輸數位視訊和音訊訊號至顯示器裝置。 使 用 HDMI 纜線連接電腦與顯示器裝置,如下圖所 示。 選擇 HDMI 輸入訊源。 產品背面。 AUDIO IN DVI IN DVI IN 產品背面。 AUDIO IN AUDIO IN /DVI IN REMOTE REMOTE /DVI IN DP DP A REMOTE CONTROL IN CONTROL IN CONTROL IN RE C (未隨附) (未隨附) PC PC PC 注意 yy 使用高速 HDMI®/™ 纜線。 yy 若在 HDMI 模式下聽不見聲音,請檢查電腦 環境設定。 使用某些電腦時,您必須手動將 預設音訊輸出變更為 HDMI。 yy 若要使用 HDMI PC 模式,您必須將 PC/DTV 設定為 PC 模式。 yy 使用 HDMI PC 時,可能會出現相容性問題。 yy 使用具有
使用顯示器裝置 紅外線接收器連線 從電腦傳輸數位視訊和音訊訊號至顯示器。 使用 Display Port 纜線連接電腦與顯示器,如下圖所 示。 選擇 Display Port 輸入訊源。 允許使用紅外線接收器延長線。 DP /DVI IN 產品背面。 AUDIO 產品背面。 IN DP /DVI IN AUDIO IN REMOTE CONTROL IN (未隨附) PC 附註 yy 視電腦的 DP 版本而定,可能無法使用音效。 REMOTE CONTROL IN 繁中 繁體中文 Display Port 連接 19
使用顯示器裝置 繁體中文 繁中 調整螢幕 自訂影像選項 選擇影像模式 自訂每一影像模式基本與進階選項,以獲得最佳畫 面品質。 選擇預設的影像模式之一,以最佳化的設定顯示影 像。 1 按下 SETTINGS 存取主選單。 1 按下 SETTINGS 存取主選單。 2 按下導覽按鈕捲動至 PICTURE (影像),然後按 下 OK (確定)。 下 OK (確定)。 3 按下導覽按鈕捲動至 Picture Mode (影像模 式),然後按下 OK (確定)。 3 按下導覽按鈕捲動至 Picture Mode (影像模 式),然後按下 OK (確定)。 4 按下導覽按鈕捲動至您要的影像模式,然後按 下 OK (確定)。 模式 2 按下導覽按鈕捲動至 PICTURE (影像),然後按 描述 Vivid (明亮) 增強 Contrast (對比度)、Brightness (亮 度)、Color (色彩) 與 Sharpness (銳利 度),調整為適合賣場環境的視訊影像。 Standard (標準) 調整為適合一般環境的影像。 Cinema (劇院) 4 按下導覽按鈕捲動至您要
使用顯示器裝置 調整音效 自訂每一影像模式的選項,以獲得最佳畫面品質。 yy 這項功能適用於以下模式:RGB[PC] 模式。 選擇音效模式 1 按下 SETTINGS 存取主選單。 2 按下導覽按鈕捲動至 PICTURE (影像),然後按 下 OK (確定)。 3 按下導覽按鈕捲動至 Screen (畫面),然後按下 OK (確定)。 4 選擇並調整下列選項,然後按下 OK (確定)。 選擇預設的音效模式之一,以最佳化的設定播放音 效。 1 按下 SETTINGS 存取主選單。 2 按下導覽按鈕捲動至 AUDIO (音訊),然後按下 OK (確定)。 3 按下導覽按鈕捲動至 Sound Mode (聲音模 式),然後按下 OK (確定)。 4 按下導覽按鈕捲動至您要的音效模式,然後按 下 OK (確定)。 選項 Resolution 描述 選擇適當的解析度。 (解像度) 模式 Standard Auto 設定為自動調整螢幕Position (位置)、 (標準) Configure Size (大小) 與 Phase (相位)。調高高音會 Music (自動畫面調 增加
使用顯示器裝置 繁體中文 繁中 自訂音效選項 使用其他選項 自訂每一音效模式的選項,以獲得最佳音效品質。 調整畫面比例選擇 1 按下 SETTINGS 存取主選單。 2 按下導覽按鈕捲動至 AUDIO (音訊),然後按下 OK (確定)。 在觀看顯示器裝置時可按下 ARC,將影像大小調整 為適合觀賞的理想大小。 3 按下導覽按鈕捲動至 Sound Mode (音效模 式),然後按下 OK (確定)。 警示 4 按下導覽按鈕捲動至您要的音效模式,然後按 下 OK (確定)。 5 選擇並調整下列選項,然後按下 OK (確定)。 選項 Infinite 描述 LG 的「Infinity Sound」(無限音效) 選項 Sound (無限 能從兩個喇叭提供 5.
使用顯示器裝置 23 - 4:3:選擇後可讓您以原始 4:3 的畫面比例觀賞影 像,畫面左右兩邊會顯示灰色長條列。 - Just Scan (點對點掃描):選擇後可讓您觀看最 佳品質的影像,不會犧牲高解析度影像的原始畫 質。 注意:若原始影像有雜訊,您會在邊緣看見雜 訊。 - Zoom (縮放):選擇後可讓您觀賞影像時不發生變 形,並使影像放大至整個螢幕。 不過,影像的頂 端與底端部分會被裁切。 繁中 繁體中文 - 16:9:選擇後可讓您以線性比例進行水平調整, 使影像放大至整個螢幕 (觀看 4:3 格式的 DVD 時 相當實用)。 Just Scan - 1:1:不調整原訊號的畫面比例。 (僅限 Display Port PC、HDMI PC、DVI-D PC、RGB PC) - Cinema Zoom (劇院縮放):想要以正確的比例 放大影像時,請選擇「Cinema Zoom」(劇院縮 放)。 附註:放大或縮小影像時,影像可能會失真。
使用顯示器裝置 使用輸入清單 繁體中文 繁中 選擇輸入訊源 1 按下 INPUT (輸入) 存取輸入訊源清單。 2 按下導覽按鈕捲動至其中一種輸入訊源,然後 按下 OK (確定)。 輸入訊源 描述 AV 觀看 VCR 或其他外部裝置中的影 片。 Component 觀看 DVD 或其他外部裝置中的內 容,或透過數位機上盒觀看節目。 RGB 在螢幕上檢視電腦顯示畫面 DVI-D 在螢幕上檢視電腦顯示畫面 HDMI 觀看電腦、DVD、數位機上盒或其 他高解析度裝置中的內容。 Display Port 觀看電腦、DVD、數位機上盒或其 他高解析度裝置中的內容。 USB 播放儲存於 USB 內的多媒體檔案。 附註 yy 47WV50BS 不支援複合 (AV) 訊號及輸入。
娛樂 25 娛樂 設定網路設定:(即使顯示器已自動連線,再次執行 設定也不會有任何損害), 如下圖所示,透過 LAN 連接埠連接顯示器與區域 網路 (LAN),並設定網路設定。 僅支援有線網路連線。 進行實體連接後,少數的家用網路可能會需要調整 顯示器網路設定。 顯示器會自動連線到大部分的家 用網路,而無需調整。 如需詳細資訊,請連絡您的網際網路供應商,或參 閱路由器手冊。 1 按下 SETTINGS 存取主選單。 2 按下導覽按鈕捲動至 NETWORK (網路),然後 按下 OK (確定)。 3 按下導覽按鈕捲動至 Network Setting (網絡設 定),然後按下 OK (確定)。 4 如果您已經設定「Network Setting」(網絡設 定),請選擇 Resetting (正在重設)。 新的連線 設定會重設目前的網路設定。 5 選擇 IP Auto Setting (IP 自動設定) 或 IP LAN Router Router @ Internet Internet LAN WAN Manual Setting (IP 手動設定)。 - IP Manual Setti
娛樂 附註 yy 若要使用 DSL 服務,您需要 DSL 數據機,而若 繁體中文 繁中 要使用纜線數據機服務,則需要纜線數據機。 視 yy 如果您想使用顯示器直接存取網際網路,網 際網路連線應保持開啟。 yy 若無法存取網際網路,請由您網路中的 PC 來 檢查網路狀況。 yy 使用 Network Setting (網路設定) 時,請檢 查 LAN 纜線,或檢查路由器中的 DHCP 是 否開啟。 yy 如果未完成網路設定,網路可能無法正常運 作。 存取方法以及您與 ISP 的訂閱合約而定,您可能 無法使用此顯示器所具備的網際網路連線功能, 或可同時連接的裝置數目有所限制。 (如果您的 ISP 將訂閱限制於單一裝置,在已連接 PC 的時候 可能無法連接此顯示器。) yy 視您 ISP 的原則與限制而定,您可能無法使用路 由器,或是使用路由器時會受到限制。 如需詳細 資訊,請直接連絡您的 ISP。 網路設定提示 yy 此顯示器需使用標準 LAN 纜線。 可使用 Cat5, 使用 RJ45 接頭更佳。 yy 許多設定期間發生的網路連線問題,通常可以透 過重新設定路由器或數據機解決。 將顯示器連接
娛樂 連接 USB 儲存裝置 使用 USB 儲存裝置的提示 yy 系統僅能辨識 USB 儲存裝置。 yy 若 USB 儲存裝置是透過 USB 集線器連接,則 無法辨識。 yy 系統可能無法辨識使用自動辨識程式的 USB 儲存裝置。 yy 系統可能會無法辨識使用專屬驅動程式的 USB 儲存裝置。 yy 辨識 USB 儲存裝置的速度,視各裝置而定。 yy 連接的 USB 儲存裝置正在運作時,請勿關閉 或 顯示器電源或拔除 USB 裝置。 如果突然移除 或拔除此類裝置,可能會使儲存的檔案損毀或 USB 儲存裝置受損。 yy 請勿連接在 PC 上經人為處理過的 USB 儲存 裝置, 以免該裝置造成產品故障或無法播 放。 請切記,您只能使用內含一般音樂檔 案、影像檔案或電影檔案的 USB 儲存裝置。 yy 請僅使用格式化為 FAT32 與 NTFS 檔案系統 (Windows 作業系統提供) 的 USB 儲存裝置。 警示 yy 當 EMF(我的媒體) 選單啟動時,請勿關閉顯 示器或拔除 USB 儲存裝置,否則可能導致檔 案遺失或 USB 儲存裝置受損。 yy 請時常備份 USB 儲存裝置中儲存的檔案,因 為檔
娛樂 yy 若 USB 記憶體裝置無法正常運作,請先中斷 繁體中文 繁中 連接後再重新連接。 瀏覽檔案 yy 偵測到 USB 記憶裝置的速度會因裝置而異。 存取相片、音樂或電影清單,並瀏覽檔案。 yy 若於待機模式連接 USB,顯示器開機時,會 1 連接 USB 儲存裝置。 自動載入指定的硬碟。 yy USB 外接式硬碟的建議容量為 1 TB 或以 下,USB 記憶體裝置的建議容量為 32 GB 或 以下。 yy 超出建議容量的裝置可能無法正常運作。 yy 若具有「節能」功能的 USB 外接式硬碟無法 運作,請先關閉硬碟後再次開啟,使其恢復 正常運作。 yy 系統亦支援 USB 2.
娛樂 29 支援的檔案格式 支援的檔案格式 DAT、MPG、MPEG、VOB、AVI、DIVX、MP4、MKV、TS、TRP、TP、ASF、WMV、FLV) 電影 (*.mpg/*.mpeg/*dat/*.ts/*.trp/*.tp/*.vob/*.mp4/*.mov/*.mkv/*.divx/*.avi/*.asf/*.wmv/*.flv/*. avi(motion-jpeg)/*. mp4(motion-jpeg)/*.mkv(motion-jpeg)) 支援的檔案 視訊格式:DivX 3.11, DivX4, DivX5. DivX6 Xvid1.00、Xvid1.01、Xvid1.02、Xvid1.03、Xvid1.10 beta-1/beta-2、 Mpeg-1、Mpeg-2、Mpeg-4、 H.264/AVC、VC1、JPEG、Sorenson H.263 音訊格式:Dolby Digital、AAC、Mpeg、MP3、LPCM、HE-AAC、ADPCM、WMA 位元率:在 32 kbps 至 320 kbps (MP3) 之間 外部字幕格式:*.smi/*.srt/*.
娛樂 觀賞電影 5 播放電影。 繁體中文 繁中 在顯示器上播放視訊檔案。 顯示器可以播放 USB 儲存裝置或電腦上共用資料夾中所儲存的所有視訊 檔案。 1 按下導覽按鈕捲動至 MY MEDIA (我的媒體), 附註 yy不受支援的檔案只由圖示顯示為預覽影像 yy異常的檔案會以點陣圖顯示 。 。 然後按下 OK。 2 按下導覽按鈕捲動至 Movie List (電影清單), 然後按下 OK。 6 請用下列按鈕來控制播放。 3 按下導覽按鈕捲動至您要的資料夾,然後按下 OK。 4 按下導覽按鈕捲動至您要的檔案,然後按下 01:02:30 / 02:30:25 OK。 MENU Hide Option Exit Page 1/1 Movie List Drive1 USB1 USB Drive 001 002 005 006 Page 1/1 003 按鈕 004 描述 停止播放 播放視訊 暫停或繼續播放 反向掃描檔案 Move To Photo list Change Numbers Play P Exit Mark Mode SE
娛樂 使用播放視訊檔案的提示 31 視訊選項 1 按下 SETTINGS 存取快顯選單。 yy 字幕不支援某些特別字元。 2 按下導覽按鈕捲動至 Set Video Play. (設定視訊 yy 字幕不支援 HTML 標籤。 yy 受支援語言以外的字幕語言無法使用。 播放)、Set Video. (設定視訊) 或 Set Audio.
維護 當您選擇 Set Video Play (設定視訊播放) 時, 繁體中文 繁中 1 按下導覽按鈕捲動以顯示 Picture Size (影像大 代碼頁 Latin1 支援語言 英文、西班牙文、法文、德文、義大 利文、瑞典文、芬蘭文、荷蘭文、葡 小)、Audio Language (音訊語言)、Subtitle Language (字幕語言) 或 Repeat (重複)。 萄牙文、丹麥文、羅馬尼亞文、挪威 文、阿爾巴尼亞文、蓋爾文、威爾斯 2 按下導覽按鈕捲動,以進行適當調整。 文、愛爾蘭文、卡達隆尼亞文、瓦倫 西亞文 Latin2 選單 在播放電影時 (影像大小) 選擇所需的影像格式。 Audio 在播放電影時變更音訊的「Language Language Group」(語言群組)。 單一 (音訊語言) 音軌的檔案則無法選擇。 Subtitle 開啟/關閉字幕。 Language (字幕語言) Language 啟動可使用 SMI 字幕, (語言) 並可在字幕內選擇語言。 代碼頁 可選擇字幕的字型。 設為預設值時,系統會使用與一般選 單相同的字
維護 當您選擇 Set Video (設定視訊) 時, Page 1/1 Photo List USB1 USB Drive 001 002 010 011 Drive1 Page 1/1 003 004 005 006 012 013 014 015 當您選擇 Set Audio (設定音訊) 時, 1 按下導覽按鈕捲動以顯示 Sound Mode (聲音 模式)、Clear Voice II (清除語音 II) 或 Balance (平衡)。 2 按下導覽按鈕捲動,以進行適當調整。 View Move Change Numbers To Music List 1 按下導覽按鈕捲動至 My Media (我的媒體),然 後按下 OK。 2 按下導覽按鈕捲動至 Photo List (相片清單),然 後按下 OK。 3 按下導覽按鈕捲動至您要的資料夾,然後按下 OK。 4 按下導覽按鈕捲動至您要的檔案,然後按下 OK。 P Page Change Page 1/1 Mark Mode USB1 USB Drive 001 002 011
維護 使用相片選項 選項 繁體中文 繁中 ENERGY SAVING 檢視相片時,可使用下列選項。 描述 重複按此按鈕可提高畫面亮度。 (節能) yy Slide Speed (幻燈片播放速度):選擇 幻燈片播放速度 (Fast (快)、Medium (中等)、Slow (慢))。 yy TransitionEffect:設定幻燈片播放的 檢視模式。 yy BGM:選擇背景音樂的音樂資料夾。 附註 2/13 Slideshow MENU BGM 選項 Option Hide yy您無法在背景音樂播放時變更 音樂資料夾。 yy您只能選擇儲存在目前顯示相 片之裝置上的 MP3 資料夾。 Exit 已選取相片的總數 隱藏選項視窗。 選項 Slideshow 開始或停止以幻燈片播放選擇的相片。 (幻燈片播 如果未選擇任何相片,則會以幻燈片播 放) 若要顯示選項,請按下 OK。 描述 返回 Photo List (相片清單)。 放目前資料夾中儲存的所有相片。 若要設定幻燈片播放速度,請選擇 Option (選項)。 BGM (背景 音樂) 開啟或關閉背景音樂
維護 35 當您選擇 Set Photo View 時, 2 按下導覽按鈕,捲動以進行適當調整。 過渡效果選項 選項 描述 Sliding 播放下一張幻燈片時,將目前的幻燈片推往畫面外。 Stairs 播放下一張幻燈片時,以階梯形狀推開目前的幻燈片。 Door Open/Close 播放下一張幻燈片時,以類似於開門或關門的方式推開目前的幻燈片。 Shutter 播放下一張幻燈片時,以類似於打開或拉下百葉窗的方式推開目前的幻燈片。 Fade In 目前的相片消失,下一張相片慢慢顯示。 繁中 繁體中文 1 按下導覽按鈕,捲動以選擇 Slide Speed、Transition Effect 或 BGM。
維護 當您選擇 Set Video (設定視訊) 時, 繁體中文 繁中 1 按下導覽按鈕捲動,以進行適當調整。 聽音樂 1 按下導覽按鈕捲動至 MY MEDIA (我的媒體), 然後按下 OK。 2 按下導覽按鈕捲動至 Music List (音樂清單),然 當您選擇 Set Audio (設定音訊) 時, 1 按下導覽按鈕捲動以顯示 Sound Mode (音效 模式)、Clear Voice II (清澈人聲 II) 或 Balance (平衡)。 2 按下導覽按鈕捲動,以進行適當調整。 後按下 OK。 3 按下導覽按鈕捲動至您要的資料夾,然後按下 OK。 4 按下導覽按鈕捲動至您要的檔案,然後按下 OK。 Page 1/1 Music List USB1 USB Drive Drive1 001. - B01.mp3 00:00 Page 1/1 002. -B02.mp3 00:00 003. B03.mp3 00:00 004. - B04.mp3 00:00 005. - B05.
維護 6 請用下列按鈕來控制播放。 播放音樂檔案的提示 Drive1 005. - B05.mp3 00:00 Page 1/1 006. - B06.mp3 00:00 007. - B07.mp3 00:00 005. - B05.mp3 附註 008. - B08.
維護 音樂選項 繁體中文 繁中 1 按下 SETTINGS 存取快顯選單。 2 按下導覽按鈕捲動至 Set Audio Play. (設定音訊 播放) 或 Set Audio.
維護 DivX® VOD 指南 39 DivX® VOD 取消註冊 DivX® VOD 註冊 為了播放購買或租借的 DivX® VOD 內容,您必須 從您的裝置,在 www.divx.com/vod 上,以 10 位 數的 DivX 註冊碼來註冊裝置。 1 按下 SETTINGS 存取主選單。 2 按下導覽按鈕捲動至 MY MEDIA (我的媒體), 然後按下 OK。 1 按下 SETTINGS 存取主選單。 3 按下藍色按鈕。 2 按下導覽按鈕捲動至 MY MEDIA (我的媒體), 4 按下導覽按鈕捲動至 Deactivation (停用),然 然後按下 OK。 後按下 OK。 3 按下藍色按鈕。 5 按下導覽按鈕,選擇 Yes (是) 確認。 4 按下導覽按鈕捲動至 DivX Reg. Code 然後按下 OK。 Deregistration code : ******** Deregister at http://vod.divx.
維護 使用 PIP/PBP 5 從播放清單選擇 PIP 或 PBP 圖示。 繁體中文 繁中 將畫面分割為主畫面和子畫面,在單一顯示器上顯 示 USB 裝置所儲存的視訊或圖片。 1 按下「SETTINGS」(功能表) 按鈕移到「其他選 項」,然後按下「OK」(確定)。 2 按下「PIP/PBP」以選擇「PIP」或「PBP」, 01:02:30 / 02:30:25 MENU 然後按下「OK」(確定)。 Exit Hide Option < Movie List > PIP/PBP Mode Move Pre. Off Position PIP Size PBP 3 從「我的媒體」中選擇「電影清單」或「相片 清單」。 (選取「PIP/PBP」後,「音樂清單」 和「內容清單」會停用。視型號不同,內容清 單的功能可能不受支援。) Movie List Photo List 2/13 Slideshow MENU BGM 擇輸出音效,才能執行 PIP 或 PBP 功能。 Select the sound path.
自訂設定 41 自訂設定 繁中 繁體中文 存取主選單 1 按下 SETTINGS 存取主選單。 2 按下導覽按鈕捲動至下列其中一個選單,然後按下 OK。 3 按下導覽按鈕捲動至所需的設定或選項,然後按 OK。 4 完成之後,按下 EXIT。 若要返回上一個選單,請按下 BACK。 PICTURE (影像) 調整影像大小、品質或效果 PICTURE OPTION (選項) 自訂一般設定 OPTION AUDIO (音訊) 調整音質、效果或音量 AUDIO NETWORK NETWORK (網路) 設定網路設定。 TIME MY MEDIA TIME (時間) 設定時間、日期或定時 器功能 MY MEDIA (我的媒體) 顯示及播放儲存在 USB 上 的電影、相片及音樂內容
自訂設定 影像 設定 PICTURE 繁體中文 繁中 1 按下 SETTINGS 存取主選單。 2 按下導覽按鈕捲動至 PICTURE (影像),然後按下 OK。 : 16:9 • Energy Saving : Off • Easy Brightness Control : Off • Smart Energy Saving : Off • Picture Mode 3 按下導覽按鈕捲動至所需的設定或選項,然後按 OK。 Move • Aspect Ratio - 若要返回上一層,請按下 BACK。 若要返回上一個選單,請按下 BACK。 ꔋ : Standard • Backlight 70 • Contrast 100 • Brightness 4 完成之後,按下 EXIT。 OK 50 • Sharpness 50 • Color 60 • Tint 0 R G • Color Temp.
自訂設定 設定 SCREEN (畫面) (限 RGB-PC 模 式) 描述 修正影像以顯示更流暢的動作序列。 • 低 : De-Judder/De-Blur 值設成 3。 • 高 : De-Judder/De-Blur 值設成 7。 • 使用者 : 可手動設定 De-Judder/De-Blur。 - De-Judder:此功能可調整畫面的顫動現象。 - De-Blur:此功能可調整和去除畫面的模糊現象。 TruMotion • De-Judder • De-Blur ◄ Low ► 3 3 OK 自訂 RGB 模式中的電腦顯示選項。 Option (選項) Resolution (解像度) 選擇適當的解析度。 請參閱「自訂電腦顯示選項」。 Auto Configure (自動畫面調整) 設定為自動調整螢幕位置、時鐘與相位。 在進行設定時,顯示的影像可能有幾秒會出現不穩的情況。 Position/Size/ 在影像不清晰時調整選項,特別是在自動設定後字元搖晃時。 Phase (位置/大小 /相位) Reset (重新設定) 將選項還原為預設設定。 Picture Mode
自訂設定 Advanced Control (進階影像選項) 繁體中文 繁中 設定 描述 Dynamic Contrast (動 態對比度) (Off (關閉)/ Low (低)/Medium (正 常)/High (高)) 根據螢幕亮度調整對比以維持在最佳等級。 此 功能可使亮色部分更亮,暗色部分更暗,以提升影像品質。 (此功能僅適用於 AV(CVBS) 和色 差模式下。) Dynamic Color (動態 色彩) (Off (關閉)/Low (低)/High (高)) 調整畫面色彩,使其看來更為生動、豐富與清晰。 此功能可增強 色調、飽和度與明度,讓紅、藍、綠和白色看起來更鮮明。 (此功能僅適用於 AV(CVBS) 和色 差模式下。) Clear White(純白色) (Off (關閉)/Low (低)/ High (高)) 讓畫面的白色區域更白更亮。 Skin Color (面板色彩) 可偵測視訊中的膚色區域並加以調整,以反映自然膚色。 Noise Reduction (降低雜訊) (Off (關閉)/Low (低)/ Medium (正常)/High (高)) 以
自訂設定 音訊 設定 AUDIO 1 按下 SETTINGS 存取主選單。 • Balance • Sound Mode 2 按下導覽按鈕捲動至 AUDIO (音訊),然後按下 OK。 OK ꔋ : Off 0 L R : Standard • Infinite Sound: Off 3 按下導覽按鈕捲動至所需的設定或選項,然後按 OK。 - 若要返回上一層,請按下 BACK。 • Treble 50 • Bass 50 • Reset • Digital Audio Input 4 完成之後,按下 EXIT。 • Speaker 若要返回上一個選單,請按下 BACK。 : Off 可用的音訊選項如下所述: 設定 描述 Clear Voice ll (清除語音 II) 將人聲從其他聲音範圍區分出來,這可幫助使用者讓對話更清楚。 Balance (平衡) 依據空間環境調整左右喇叭之間的平衡。 Sound Mode (聲音模式) 視您目前觀賞的視訊類型,將自動選擇最佳的聲音音質。 Mode (模式) Standard (標準) 最優先且自然的音訊
自訂設定 時間 設定 TIME 繁體中文 繁中 • Clock • Daylight Saving : Off • Off Time : Off • On Time : Off • Screen Off Time : Off • Sleep Timer : Off • Power On Delay : Off • Auto Off : 15 min.
自訂設定 選項 設定 OPTION Move ꔋ • ISM Method : Normal 2 按下導覽按鈕捲動至 OPTION (選項),然後按下 OK。 • DPM Select : On • Fail Over : Off 3 按下導覽按鈕捲動至所需的設定或選項,然後按下 OK。 • Factory Reset • Set ID - 若要返回上一層,請按下 BACK。 OK :1 • Tile Mode • PIP/PBP 4 完成之後,按下 EXIT。 • Fan 若要返回上一個選單,請按下 BACK。 • USB Content Recovery : Off • Product/Service Info.
自訂設定 設定 描述 繁體中文 繁中 Factory Reset 選擇此選項以還原為原廠預設值。 (重設為出廠設定值) Set ID (ID 設定) 連接多部產品進行顯示時,您可以為每項產品指定唯一的「SET ID NO」(裝置 ID 號碼) (指定 名稱)。 使用按鈕即可指定號碼 (1 至 255),並離開選單。 使用指定的裝置 ID 即可用 Product Control Program (產品控制程式) 來控制個別產品。 Tile Mode (並排顯示模式 Tile Mode (並排顯示模式) 若要使用此功能 - 必須與其他多種產品一起顯示。 - 選取 並排顯示模式,設定列和欄的值,接著輸入 並排顯示 ID 以設定位置。 - 並排顯示模式:列 x 欄 (列 = 1-15,欄 = 1-15)。 - 可達 5 x 5。 Auto Config.
自訂設定 設定 描述 Setting (設定) Mode (模式) 此選項能顯示顯示器的內部溫度,並能控制風扇。 • Auto (自動):依據設定的溫度開啟或關閉風扇電源。 • On (開):風扇電源永遠開啟。 • Manual (手動):依據使用者設定而開啟或關閉風扇電源。 Hysterisis (滯後現象) 在風扇電源開啟與關閉時的溫度差異。 Set Temperature (設定 設定會使風扇電源開啟的溫度。 溫度) Current Temperature (目前溫度) 目前電視機內的溫度。 附註 yy我們建議您使用「Auto mode」(自動模式),以防不正確的風扇設定造成任何故障。 yy如果裝置內部溫度超過 80°C,基於安全考量,該裝置會自動關機。 USB Content Recovery 若在播放內容期間關閉電源,電源恢復時會重新播放 USB 中的內容。 (拔除 USB 並再次連接時,此功能也會操作相同的動作。) Product/Service Info.
自訂設定 Tile Mode (並排模式) 繁體中文 繁中 此顯示器可與其他顯示器並排,產生大型的並排顯示畫面。 • Off (關閉) Tile Mode (並排模式) 選項停用時 • 1X2 使用 2 個顯示器時 ID 1 • 3X3 使用 9 個顯示器時 • 2X2 使用 4 個顯示器時 ID 2 ID 1 ID 2 ID 1 ID 2 ID 3 ID 3 ID 4 ID 4 ID 5 ID 6 ID 7 ID 8 ID 9 並排 ID • 4X4 使用 16 個顯示器時 • 5X5 使用 25 個顯示器時 ID 1 ID 2 ID 3 ID 4 ID 1 ID 2 ID 3 ID 4 ID 5 ID 5 ID 6 ID 7 ID 8 ID 6 ID 7 ID 8 ID 9 ID 10 ID 9 ID 10 ID 11 ID 12 ID 11 ID 12 ID 13 ID 14 ID 15 ID 13 ID 14 ID 15 ID 16 ID 16 ID 17 ID 18 ID 1
自訂設定 PIP/PBP 附註 yy 唯有使用 USB 裝置時才支援子畫面。 yy 47WV50BS 不支援複合 (AV) 訊號及輸入。 Sub Mode (模式) USB *PIP (Picture In Picture,子母畫面):在主畫面中 顯示 Sub (子) 畫面。 *PBP (Picture By Picture,並排畫面):在主畫面 旁顯示 Sub (子) 畫面。 子 畫面 主要 畫面 PIP PBP Position (位置) 調整子畫面的位置 (左上、左下、右上、右下) 左上 右上 Main 右下 Size (大小) 調整子畫面的大小 (大小 0 至 10)。 PBP 960x1080 10 : 960x540 PIP 0: 480x270 < 1920x1080 > O RGB O HDMI/DVI-D/Display Port O AV X yy 您可在 PIP 模式中變更大小和位置。 yy 選取 PBP 後,PICTURE (影像) 功能表中的 Aspect Ratio (畫面比例) 選項會停用 (固定為 16:9)。 yy 執行 PBP
自訂設定 影像 ID 繁體中文 繁中 Picture ID (影像 ID) 用於變更在多視野中使用單一 紅外線接收器的特定裝置 (顯示器) 之設定。 接收紅 外線訊號的裝置是透過 RS-232C 接頭與另一裝置通 訊。 每一裝置是以「Set ID」(裝置 ID) 來分辨。 若 您用遙控器來指定「Picture ID」(影像 ID),您只能 遙控具有相同「Picture ID」與「Set ID」(裝置 ID) 的顯示器。 2 若要變更 [影像 ID],請按下 [ON] 按鈕,或連續 按下左鍵與右鍵按鈕。 請指定您要的 ID。 Picture ID ◄ Off ► Close AUDIO (RGB/DVI) AUDIO (RGB/DVI) RS-232C OUT RS-232C OUT RS-232C IN RS-232C OUT RS-232C OUT RS-232C OUT RS-232C IN RS-232C OUT RS-232C IN REMOTE CONTROL IN RS-232C IN RS-232C IN RS-232C IN REMOTE CONT
自訂設定 網路 設定 NETWORK Move 1 按下 SETTINGS 存取主選單。 ꔋ • Network Setting : Wired 2 按下導覽按鈕捲動至 NETWORK (網路),然後按下 OK。 • Network Status : Not connected 3 按下「Navigation」(導覽) 按鈕以捲動至所需的設定或選 • Server IP Status • Server IP Setting : Not connected 項,然後按 OK (確定)。 - 若要返回上一層,請按下 BACK (返回)。 4 完成之後,按下 EXIT (離開)。 若要返回上一個選單,請按下 BACK (返回)。 可用的選項設定如下所述: 設定 Player Name (播放器名稱設定) OK 描述 設定在 SuperSign Manager 中使用的播放器名稱。(最多 20 個字元) Network Setting 設定網路設定。 (網絡設定) Network Status 顯示網路狀態。 (網絡狀態) - 網際網路已連線:已外部連線 - 家用網路已連線:僅內
裝置連接 裝置連接 繁體中文 繁中 將各種外部裝置連接至顯示器裝置後面板上的連接埠。 1 在下圖中找到您要連接至顯示器裝置的外部裝置。 2 確認外部裝置的連接類型。 3 參閱適用的圖例說明,並查看連接的細節。 高畫質接收器 HDMI DVI AV Component (色差) DVD HDMI DVI AV Component (色差) 喇叭 VCR AV Component (色差) 記憶體儲存裝置 USB 電腦 HDMI DVI RGB LAN Display Port 攝影機/相機 HDMI DVI AV Component (色差) 附註 yy 如果要將遊戲裝置連接至顯示器裝置,請使用遊戲裝置隨附的纜線。 yy 47WV50BS 不支援複合 (AV) 訊號及輸入。 遊戲裝置 HDMI AV Component (色差)
裝置連接 55 HDMI 連接 將高畫質接收器、DVD 或 VCR 播放器連接至顯示 器裝置,並選擇合適的輸入模式。 將數位視訊和音訊訊號從外部裝置傳輸至顯示器裝 置。 使用 HDMI 纜線連接外部裝置與顯示器裝置, 如下圖所示。 DVI 連接 產品背面。 從外部裝置傳輸數位視訊訊號至顯示器裝置。 DVI IN 使用 DVI 纜線連接外部裝置與顯示器裝置,如下圖 所示。 若要傳輸音訊訊號,請使用選購的音訊線進 行連接。 RGB /COMPONENT OUT AUDIO IN /DVI RGB /COMPONENT IN REMOTE CONTROL IN 產品背面。 DVI IN RGB /COMPONENT OUT AUDIO IN (未隨附) /DVI RGB /COMPONENT IN REMOTE CONTROL IN (未隨附) 附註 yy 使用高速 HDMI®/™ 纜線。 yy 高速 HDMI®/™ 纜線經測試可傳輸高達 1080p 與更高畫質的 HD 訊號。 yy 使用具有 HDMI 標誌的認證纜線。 如果您不 是使用經過認證的 HDMI 纜線,畫面可能無
裝置連接 繁體中文 繁中 色差連接 AV 連接 (CVBS) 從外部裝置傳輸類比視訊和音訊訊號至顯示器裝 置。 使用 RGB 色差纜線連接外部裝置與顯示器裝 置,如下圖所示。 從外部裝置傳輸類比視訊和音訊訊號至顯示器裝 置。使用複合纜線連接外部裝置與顯示器裝置,如 下圖所示。 產品背面。 RGB /COMPONENT OUT 產品背面。 AUDIO IN RGB /COMPONENT IN RGB /COMPONENT OUT IN AUDIO IN COMPOSITE AUDIO IN RGB /COMPONENT IN REMOTE CONTROL IN (未隨附) COMPOSITE AUDIO REMOTE REMOTE (未隨附) yy 使用共用介面連接至 AV 或 Component 連接 埠時,連接埠必須與輸入訊源相符。 否則可 能出現雜訊。 CONTROL IN (未隨附) VIDEO OUT 附註 REMOTE CONTROL IN CONTROL IN (未隨附) VIDEO OUT 附註 yy 若是透過 AV 纜線接
裝置連接 57 連接 USB 裝置 A 使用路由器 (交換式集線器) 將 USB 快閃記憶體、外接式硬碟、MP3 播放器或 USB 記憶卡讀卡機等 USB 儲存裝置連接至顯示器 裝置,然後存取 USB 選單,以使用各種多媒體檔 案。 LAN 交換式集線器 產品 B 使用網際網路。 PC Network 或 LAN Network 產品 PC 繁中 繁體中文 連接至 LAN
裝置連接 菊鍊式螢幕 繁體中文 繁中 使用此功能與其他顯示器共用 RGB 視訊訊號,無需另外使用訊號分接盒。 • 若要將不同產品連接在一起,請將訊號輸入線的一端 (15 針 D-Sub 訊號線) 連接至產品 1 的「RGB OUT」 (RGB 輸出) 接頭,再將另一端連接至其他產品的「RGB IN」(RGB 輸入) 接頭 RGB 纜線 15 針 D-Sub 訊號線 (最長 3 公尺) (未隨附) RGB /COMPONENT OUT RGB /COMPONENT OUT RGB /COMPONENT IN RGB /COMPONENT IN 顯示器裝置 1 RGB /COMPONENT OUT RGB /COMPONENT OUT RGB /COMPONENT OUT RGB /COMPONENT OUT RGB /COMPONENT OUT RGB /COMPONENT OUT RGB /COMPONENT IN RGB /COMPONENT IN RGB /COMPONENT IN RGB /COMPONENT IN RGB /COMPONENT IN RGB /COM
疑難排解 59 疑難排解 問題 是否已連接產品電源線? 解決方法 yy 查看電源線是否已正確連接至電源插座。 電源已開啟,但是螢幕非常暗。 yy 再調整一次亮度與對比。 yy 可能需要修理背光。 否顯示「Out of range」(超出 yy 來自電腦 (顯示卡) 的訊號超出產品的垂直或水平頻率範圍。 請參考本 是 範圍) 訊息? 手冊〈規格〉章節,調整頻率範圍。 * 最高解析度 RGB:1920 x 1080 @ 60 Hz HDMI/DVI/DP:1920 x 1080 @ 60 Hz 否顯示「Check signal 是 cable」(檢查訊號線) 訊息? yy 電腦與產品之間的訊號線未連接。 請檢查訊號線。 yy 按下遙控器的「INPUT」(輸入) 選單,檢查輸入訊號。 連接產品時顯示「Unknown Product」(不明產品) 訊息。 問題 您是否安裝了驅動程式? 解決方法 yy 參閱顯示卡使用手冊,查看是否支援隨插即用功能。 螢幕影像看起來不正常。 問題 解決方法 螢幕位置是否錯誤? yy D-Sub 類比訊號:按下遙控器的「AUTO」(自動) 按
疑難排解 產品出現殘影。 繁體中文 繁中 問題 關閉產品電源後出現殘影。 解決方法 yy 若您長時間顯示固定影像,可能會提早損害像素。 請使用螢幕保護功 能。 音訊功能無法運作。 問題 解決方法 沒有聲音? yy 查看音訊線是否正確連接。 yy 調整音量。 yy 查看音效選項是否設定妥當。 聲音過於沈悶。 yy 選擇合適的等化音效。 聲音過於低沈。 yy 調整音量。 螢幕色彩不正常。 問題 解決方法 螢幕色彩解析度過低 (16 色)。 yy 將色彩數量設定為 24 位元以上 (全彩)。在 Windows 中選擇「控制 台」-「顯示」-「設定值」-「色彩表」選單,設定色彩數量。 螢幕色彩不穩定或呈單色。 yy 檢查訊號線的連接狀態。 或者,重新插入電腦顯示卡。 螢幕上是否出現黑點? yy 螢幕上可能出現多種像素 (紅、綠、白或黑色),這可能是因為 LCD 面 板的獨特性所造成, 並不是 LCD 故障。 運作不正常。 問題 電源突然關閉。 解決方法 yy 是否設定了睡眠關機? yy 請檢查電源控制設定。 供電中斷。 附註 yy 若要改善效能
疑難排解 61 警示 建議操作條件 1 使用相同時間間隔來變更背景和字元色彩。 ID : UPM123 PW:**** 2 使用相同時間間隔來變更影像。 ID : UPM123 PW:**** 變更色彩時,使用互補的色彩以避免發生殘影。 變更影像後,請確認字元或影像與在變更影像前維 持在相同的位置。 什麼是殘影? Glass BM CF BM CF BM CF OC PI LC PI TFT Layers Glass ITO or MoTi Pixel Layer I D : UPM123 PW : ****** I D : UPM123 PW : ****** CF 當 LCD 面板顯示靜態影像的時間過長,會導致運作 液晶的電極之間電壓不同。 當電極之間的電壓差累 積一段時間後,液晶會傾向以某一方向維持校準。 在此過程中,會持續見到之前顯示的影像。此現象 又稱為「殘影」。 繁中 繁體中文 yy 觀賞持續變動的影像不會發生殘影,但長時間觀賞固定不動影像就可能會發生此情形。 因此,建議您 按照以下指示操作,以降低觀賞固定不動影像時發生殘影的可能性。建議您至少每 12 小時
規格 規格 繁體中文 繁中 LCD 面板 視訊訊號 螢幕類型 119 公分寬螢幕薄膜電晶體 (TFT) LCD (液晶顯示器) 面板。 可視對角尺寸:119 公分 像素間距 0.5415 公釐 (H) x 0.
規格 音訊 RMS 音訊輸出 10 W + 10 W (左 + 右) 輸入靈敏度 0.
規格 DTV 模式 RGB (PC) 支援模式 繁體中文 繁中 解析度 水平頻率 (kHz) 垂直頻率 (Hz) 解析度 色差 HDMI/DVI (DTV) 640 x 480 31.469 59.94 480i o x o x 640 x 480 37.5 75 576i 720 x 400 31.468 70.8 480p o o 576p o o 720p o o 1080i o o 1080p o o 800 x 600 37.879 60.317 800 x 600 46.875 75 832 x 624 49.725 74.55 1024 x 768 48.363 60 1024 x 768 60.123 75.029 1280 x 720 44.772 59.855 1366 x 768 47.7 60 1280 x 1024 63.981 60.02 1280 x 1024 79.98 75.02 1680 x 1050 65.290 59.
紅外線代碼 65 紅外線代碼 繁中 繁體中文 yy 並非所有型號均提供此功能。 yy 視型號而定,部分按鍵碼不受支援。 代碼 (十六進位) 08 功能 注意 遙控器按鈕 Power 0B INPUT 遙控器按鈕 C4 MONITOR ON 遙控器按鈕 C5 MONITOR OFF 95 ENERGY SAVING ( DC 3D 遙控器按鈕 10 至 19 數字鍵 0 至 9 遙控器按鈕 32 1/a/A 遙控器按鈕 2F CLEAR 遙控器按鈕 02 Volume 遙控器按鈕 03 Volume 遙控器按鈕 79 ARC 遙控器按鈕 99 AUTO 遙控器按鈕 09 MUTE E0 BRIGHTNESS (上一頁) 遙控器按鈕 E1 BRIGHTNESS (下一頁) 遙控器按鈕 4D PSM 遙控器按鈕 AA INFO ⓘ 遙控器按鈕 5F W.
控制多部產品 控制多部產品 繁體中文 繁中 yy 使用此方法,可將數台產品連接至一台 PC。 將多台產品連接至一台 PC,您就可以同時控制這些產品。 yy 在「Option」(選項) 選單中,「Set ID」(裝置 ID) 必須介於 1 和 255 之間,且不得重複。 連接纜線 依下圖所示,連接 RS-232C 纜線。 yy PC 與本產品間使用 RS-232C 通訊協定進行通訊。 您可以從 PC 上開啟/關閉產品、選擇輸入訊源或調 整 OSD 選單。 此顯示器有兩個 RS-232 連接埠。 一個為輸入,另一個為輸出。 可讓您以菊鏈 (daisychain) 方式連接顯示器,無需另外使用訊號分接盒。 RS-232C 纜線 PC 裝置 1 裝置 2 裝置 3 裝置 4 RS-232C 配置 8 線配置 (標準 RS-232C 纜線) DCD RXD TXD GND DTR DSR RTS CTS PC 裝置 1 2 3 5 4 6 7 8 1 3 2 5 6 4 8 7 D-Sub 9 (母) DCD TXD RXD GND DSR DTR CTS RTS D-Sub
控制多部產品 67 命令參考清單 資料 (十六進位) 1 2 01. Power (電源) k a 00 至 01 02. Input Select (輸入選擇) x b 請參閱 'Input Select' (輸入選擇)。 03. 畫面比例選擇 k c 請參閱「畫面比例選擇」。 04. 節能模式 j q 請參閱「節能模式」。 05. 自動影像選擇 d x 請參閱「自動影像選擇」。 06. 對比 k g 00 至 64 07. 亮度 k h 00 至 64 08. 銳利度 k k 00 至 64 09. 色濃度 k i 00 至 64 10. 彩度 k j 00 至 64 11. 色溫 x u 00 至 64 12. 水平位移 f q 00 至 64 13. 垂直位移 f r 00 至 64 14. 水平尺寸 f s 00 至 64 15. Auto configuration (自動設定) j u 01 16. 平衡 k t 00 至 64 17.
控制多部產品 命令 繁體中文 繁中 資料 (十六進位) 1 2 38. 重新設定 f k 00 至 02 39. Tile Mode (並排模式) d d 00 至 01 40. Tile Mode Check (並排模式檢查) d z FF 41. Tile ID (並排 ID) d i 請參閱 'Tile ID' (並排 ID)。 42. Tile H Position (並排水平位移) d e 00 至 32 43. Tile V Position (並排垂直位移) d f 00 至 32 44. Tile H Size (並排水平尺寸) d g 00 至 32 45. Tile V Size (並排垂直尺寸) d h 00 至 32 46. Natural Mode (自然模式) (在 [Tile mode] (並排模式) 中) d j 00 至 01 47. DPM Select (DPM 選擇) f j 00 至 01 48.
控制多部產品 69 傳送 / 接收通訊協定 [Command1][Command2][ ][Set ID][ ][Data][Cr] * [Command1]:控制裝置的第一個命令。 * [Command2]:控制裝置的第二個命令。 * [Set ID]: 您要通訊之裝置的 ID。 輸入 [Set ID] = ‘00(0x00’,即不論裝置的 ID 設定號碼為何,與所有裝置 通訊。 * [Data]:傳送給裝置的資訊。 * [Data1]:傳送給裝置的資訊。 * [Data2]:傳送給裝置的資訊。 * [Data3]:傳送給裝置的資訊。 * [Cr]:歸位字元。 ASCII 碼 ‘0x0D’。 * [ ]:ASCII 碼空格 ‘0x20’ 確認 [Command2][ ][Set ID][ ][OK/NG][Data][x] * 當產品正常接收資料時,會以上述格式傳送確認 (ACK)。 若資料為讀取模式,則代表顯示目前狀態。 若資料 為讀取模式,則僅代表從 PC 傳送而來的資料。 * 若是以 [ID 設定]「00」(=0x00) 傳送命令,則會將資料反映給所有顯示器裝置,且這些裝置會傳送任何確認
控制多部產品 01. Power (電源) (命令:k a) 控制開啟/關閉顯示器電源。 繁體中文 繁中 傳輸 [k][a][ ][Set ID][ ][Data][Cr] Data 00:關 01:開 確認 [a][ ][Set ID][ ][OK/NG][Data][x] * 只有在顯示器裝置完全開機時,才會正確傳回確認 訊號。 * 傳輸與確認訊號之間可能會出現某些程度的時間延 遲。 04. 節能模式 (命令:j q) 設定節能模式功能。 傳輸 [ j][q][ ][Set ID][ ][Data][Cr] Data 00:關 01:最小節能 02:正常節能 03. 最大節能 04:自動節能 05. 螢幕關閉 確認 [q][ ][Set ID][ ][OK/NG][Data][x] ** 視型號而定,可能不支援此功能。 02.
控制多部產品 07. 亮度 (命令:k h) 調整畫面亮度。 Data 00 至 64:亮度 0 至 100 確認 [h][ ][Set ID][ ][OK/NG][Data][x] 08. 銳利度 (命令:k k) 調整畫面銳利度。 * 此功能只能在 AV/Component 輸入中使用。 傳輸 [k][k][ ][Set ID][ ][Data][Cr] Data 00 至 64:銳利度 0 至 100 確認 [k][ ][Set ID][ ][OK/NG][Data][x] 09. 色濃度 (命令:k i) 調整畫面色濃度。 * 此功能只能在 AV/Component 輸入中使用。 傳輸 [k][i][ ][Set ID][ ][Data][Cr] Data 00 至 64:色濃度 0 至 100 確認 [i][ ][Set ID][ ][OK/NG][Data][x] 10.
控制多部產品 繁體中文 繁中 13. 垂直位移 (命令:f r) 調整畫面垂直位移。 * 只有在 [Tile Mode] (並排模式)設定為 [關] 時,才能 使用此功能。 * 操作範圍因 RGB 輸入解析度而異。 (僅適用於 RGB-PC 輸入。) 傳輸 [f][r][ ][Set ID][ ][Data][Cr] 16. 平衡 (命令:k t) 調整音效平衡。 傳輸 [k][t][ ][Set ID][ ][Data][Cr] Data 00 至 64:左 50 至 右 50 確認 [t][ ][Set ID][ ][OK/NG][Data][x] Data 00 至 64:最小 -50 (Bottom) (底部) 至最大 50 (Top) (頂端) 確認 [r][ ][Set ID][ ][OK/NG][Data][x] 14.
控制多部產品 19. 低音 (命令:k s) 調整低音值。 Data 00 至 64:低音 0 至 100 確認 [s][ ][Set ID][ ][OK/NG][Data][x] 20. 揚聲器 (命令:d v) 選擇開啟/關閉揚聲器。 傳輸 [d][v][ ][Set ID][ ][Data][Cr] Data 00:關 01:開 確認 [v][ ][Set ID][ ][OK/NG][Data][x] 22. Volume Control (音量控制) (命令:k f) 設定播放音量。 傳輸 [k][f][ ][Set ID][ ][Data][Cr] Data 00 至 64:音量 0 至 100 確認 [f][ ][Set ID][ ][OK/NG][Data][x] 23.
控制多部產品 25. 預約關機(重複模式/時間) (命令:f e) 設定 [預約關機(重複模式/時間)] 功能。 繁體中文 繁中 傳輸 [f][e][ ][Set ID][ ][Data1][ ][Data2][ ][Data3][Cr] Data1 1. F1 至 F7 (讀取資料) F1:讀取第 1 個預約關機資料 F2:讀取第 2 個預約關機資料 F3:讀取第 3 個預約關機資料 F4:讀取第 4 個預約關機資料 F5:讀取第 5 個預約關機資料 F6:讀取第 6 個預約關機資料 F7:讀取第 7 個預約關機資料 2. E1 - E7 (刪除一個索引),E0 (刪除所有索引) E0:刪除所有預約關機資料 E1:刪除第 1 個預約關機資料 E2:刪除第 2 個預約關機資料 E3:刪除第 3 個預約關機資料 E4:刪除第 4 個預約關機資料 E5:刪除第 5 個預約關機資料 E6:刪除第 6 個預約關機資料 E7:刪除第 7 個預約關機資料 3. 01 至 0C (設定預約關機的日子) 00:關 01:一次 02. 每日 03:星期一至星期五 04:星期一至星期六 05:星期六至星期日 06.
控制多部產品 傳輸 [f][u][ ][Set ID][ ][Data1][Cr] [f][u][ ][Set ID][ ][Data1][Data2][Cr] Data (新增預約) 20:輸入 (AV) 40:Component 60. RGB 70:DVI-D 90:HDMI (HDMI1) C0:Display Port 91:HDMI2/SDI B0:SuperSign Data1 (變更預約) 1.
控制多部產品 31. 自動關閉 (命令:f g) 設定 [自動關閉] 功能。 繁體中文 繁中 傳輸 [f][g][ ][Set ID][ ][Data][Cr] Data 00:關 (15 分後不關機) 01:15 分 (15 分後關機) 確認 [g][ ][Set ID][ ][OK/NG][Data][x] 34. 電源指示 (電源光源) (命令:f p) 設定 [電源指示] (電源光源) 功能。 傳輸 [f][p][ ][Set ID][ ][Data][Cr] Data 00:關 01:開 ** 視型號而定,可能不支援此功能。 確認 [p][ ][Set ID][ ][OK/NG][Data][x] 32.
控制多部產品 傳輸 [m][ j][ ][Set ID][ ][Data1][ ][Data2][ ][Data3][Cr] [ ][Data4][ ][Data5][Cr] Data 1 至 5 (優先順序 1 至 5) 60:RGB 70:DVI-D 90:HDMI(HDMI1) C0:Display Port 91:HDMI2/SDI * 資料項目的數量隨型號而異。 40.
控制多部產品 繁體中文 繁中 43. Tile V Position (並排垂直位移) (命令:d f) 調整並排垂直位移。 * 當 [Tile Mode] (並排模式) 設定為 [開] 時,只有在 [Tile Mode] (並排模式) 的 [Natural] (自然) 選項設定 為 [關] 時,才能使用此功能。 傳輸 [d][f][ ][Set ID][ ][Data][Cr] Data 0 至 32:0 (Bottom) (底部) 至 50 (Top) (頂端) * [Bottom]/[Top] (底部/頂端) 值取決於並排垂直尺 寸。 ** 視型號而定,可能不支援此功能。 46.
控制多部產品 49. FAN Fault Check (風扇故障檢查) (命令:d w) 檢查風扇錯誤。 Data FF:讀取狀態 確認 [w][ ][Set ID][ ][OK/NG][Data][x] Data 00:風扇故障 01:風扇正常 02:不含風扇的型號 50. Temperature Value (溫度值) (命令:d n) 檢查內部的溫度值。 傳輸 [d][n][ ][Set ID][ ][Data][Cr] Data FF:檢查狀態 確認 [n][ ][Set ID][ ][OK/NG][Data][x] [n][ ][Set ID][ ][OK/NG][Data1][Data2][Data3][x] 52. Key (按鍵) (命令:m c) 傳送紅外線遙控器的按鍵碼。 傳輸 [m][c][ ][Set ID][ ][Data][Cr] Data IR_KEY_CODE 確認 [c][ ][Set ID][ ][OK/NG][Data][x] 如需按鍵碼,請參閱「紅外線代碼」。 * 視型號而定,部分按鍵碼不受支援。 53.
控制多部產品 55. Serial No.Check (序號檢查) (命令:f y) 檢查序號。 繁體中文 繁中 傳輸 [f][y][ ][Set ID][ ][Data][Cr] Data FF:檢查產品序號 確認 [y][ ][Set ID][ ][OK/NG][Data][x] * Data 為 ASCII 碼。 58. White Balance Green Gain (白平衡綠色增益) (命 令:j n) 設定 [White Balance Green Gain] (白平衡綠色增 益)。 傳輸 [ j][n][ ][Set ID][ ][Data][Cr] Data 00 至 FE:綠色增益 0 至 254 確認 [n][ ][Set ID][ ][OK/NG][Data][x] * 你可以使用遙控器,在 0 到 255 間調整值。 使用 RS-232C,您可以在 0 到 254 間調整值。 56.
控制多部產品 61. PC Power Control (PC 電源控制) (命令:d t) PC 和顯示器同步時,控制 PC 電源。 Data 00: Synchronized (同步) (顯示器關閉時,PC 也會關 閉。) 01: Not synchronized (不同步) (顯示器關閉,但 PC 會開啟。) 02: 讓電腦維持在開機狀態。 (當您在媒體播放器關 閉時開啟顯示器,則媒體播放器會開啟。) ** 視型號而定,可能不支援此功能。 確認 [t][ ][Set ID][ ][OK][Data][x] 62. PC Power (PC 電源) (命令:d s) PC 和顯示器不同步時,控制 PC 電源。 傳輸 [d][s][ ][Set ID][ ][Data][Cr] Data 00:PC 關閉。 01:PC 開啟。 ** 視型號而定,可能不支援此功能。 確認 [s][ ][Set ID][ ][OK][Data][x] 64.
控制多部產品 65.
若要依 GPL、LGPL、MPL 及其他開放原始 碼授權取得對應的原始碼,請造訪 http:// opensource.lge.com 。除了開放原始碼外, 所有提及的授權條款、免責聲明和版權通知 均可供下載。LG Electronics 亦可以透過收 費 CD-ROM 提供開放原始碼,費用包括 CDROM 成本(例如媒體成本、運費以及處理 費),您可透過 opensource@lge.com 聯 繫。 此服務由購買產品日起計 3 年內有效。 請務必先閱讀《安全事項》再使用產品。 請將《使用者手冊》(光碟) 收置於易取用處, 以供日後參考。 本裝置型號及序號位於其背面和其中一側。 請 記下號碼以便日後如需維修使用。 型號 序號 ENERGY STAR® is a set of power-saving guidelines issued by the U.S.Environmental Protection Agency (EPA). As an ENERGY STAR® Partner LGE U. S. A., Inc.