使用指南 LCD 顯示器 操作裝置之前,請先詳細閱讀本手冊,並妥善保管手冊以供日後參考。 L15 www.lg.
繁體中文 目錄 使用顯示器裝置.............................3 紅外線代碼.................................. 31 -- 使用輸入清單..................................................... 3 -- 調整畫面比例選擇............................................ 3 控制多項產品.............................. 33 娛樂.................................................5 -- 連接纜線............................................................33 -- RS-232C 配置..................................................34 -- 使用網路......................................................
繁體中文 使用顯示器裝置 使用輸入清單 1 按下 INPUT (輸入) 存取輸入訊源清單。 2 按下導覽按鈕捲動至其中一種輸入訊源,然後按下 OK (確定)。 yyRGB-PC yyHDMI yyDVI-D yyUSB yyDisplay Port yyOPS 附註 yy特定型號可能無法使用某些輸入訊號。 調整畫面比例選擇 在觀看顯示器裝置時可按下 ARC,將影像大小調整為適合觀賞的理想大小。 模式 RGB HDMI DVI-D Display Port OPS PC DTV PC DTV PC DTV PC DTV PC 16:9 o o o o o o o o o 點對點掃描 x o x o x o x o x 原始比例 x o x o x o x o x 4:3 o o o o o o o o o 縮放 x o x o x o x o x 劇院縮放1 x o x o x o x o x 畫面比例 附註 yy您也可以使用主選單來變更影像
繁體中文 yy16:9: 選擇後可讓您以線性比例進行水平調整,使影像放大至整個螢幕 (觀看 4:3 格式的 DVD 時相 當實用)。 yy點對點掃描: 選擇後可讓您觀看最佳品質的影像,不會犧牲高解析度影像的原始畫質。 注意:若原始影像有雜訊,您會在邊緣看見雜訊。 yy原始比例:依據輸入訊號,螢幕畫面比例變更為 4:3 或 16:9。 yy4:3:選擇後可讓您以原始 4:3 的畫面比例觀賞影像,畫面左右兩邊會顯示灰色長條列。 yy縮放: 選擇後可讓您觀賞影像時不發生變形,並使影像放大至整個螢幕。 不過,影像的頂端與底 端部分會被裁切。 yy劇院縮放1: 想要以正確的比例放大影像時,請選擇劇院縮放1。 附註:放大或縮小影像時,影像可能會失真。
使用網路 設定網路設定:(即使顯示器已自動連線,再次 執行設定也不會有任何損害), 連接至網路 連接有線網路 若是無線網路連線,請透過 LAN 連接埠將顯 示器連接至區域網路 (LAN),如下圖所示。 然 後,請進行網路設定。 若是無線網路連線,請將 Wi-Fi USB 模組連接至 USB 連接埠。 然後,請 進行網路設定。 進行實體連接後,少數的家用網路可能會需要調 整顯示器網路設定。 顯示器會自動連線到大部分 的家用網路,而無需調整。 如需詳細資訊,請連絡您的網際網路供應商,或 參閱路由器手冊。 LAN Router @ 網際網路 Internet LAN 1 按下 SETTINGS 存取主選單。 2 按下導覽按鈕捲動至 網路,然後按下 OK ( 確定)。 3 按下導覽按鈕捲動至 網絡設定,然後按下 OK (確定)。 4 如果您已經設定 網絡設定,請選擇 Resetting (正在重設)。 新的連線設定會重 設目前的網路設定。 5 選擇 IP 自動設定 或 IP 手動設定。 - IP 手動設定:請按下導覽按鈕與數字按 鈕。 需要手動輸入 IP 位址。 - IP
連接無線網路 繁體中文 1 按下 SETTINGS 存取主選單。 2 按下導覽按鈕捲動至 網路,然後按下 OK (確定)。 3 按下導覽按鈕捲動至 網絡設定,然後按下 OK (確定)。 4 選擇從 AP 清單設定或簡易設定(WPS 按鈕 模式)。 - 從 AP 清單設定:選擇 AP 以連線至無線網 路。 - 簡易設定(WPS 按鈕模式):按下支援 PBC 之無線路由器上的按鈕,以輕鬆連線 至路由器。 5 完成之後,按下 離開。 警示 yy在顯示器連接到實體網路之前,無法使用 網路設定選單。 yy由於有多種連接方式,請遵循電信業者或 網際網路服務供應商的說明進行。 附註 yy如果您想使用顯示器直接存取網際網路, 網際網路連線應保持開啟。 yy若無法存取網際網路,請由您網路中的 PC 來檢查網路狀況。 yy使用 網路設定 時,請檢查 LAN 纜線,或 檢查路由器中的 DHCP 是否開啟。 yy如果未完成網路設定,網路可能無法正常 運作。 網路設定提示 yy此顯示器需使用標準 LAN 纜線。 可使用 Cat5,使用 RJ45 接頭更佳。 yy許多設定期間發生的網路連線問題,通常 可以
無線網路設定提示 使用網路 連接 USB 儲存裝置 將 USB 儲存裝置 (如 USB 快閃記憶體或外接式 硬碟) 連接到顯示器,以使用多媒體功能。 將 USB 快閃記憶體或 USB 記憶卡讀卡機連接 至顯示器,如下圖所示。 隨即出現 我的媒體 畫 面。 或 網路狀態 1 按下 SETTINGS 存取主選單。 2 按下導覽按鈕捲動至 網路,然後按下 OK (確 定)。 3 按下導覽按鈕選擇 網絡狀態。 4 按下 OK (確定) 檢查網路狀態。 5 完成之後,按下 EXIT (離開)。 選項 Setting (設定) 描述 返回網路設定選單。 測試 在設定網路之後測試目前的網路狀態。 離開 返回上一個選單。 警示 yy當 EMF(我的媒體) 選單啟動時,請勿關閉 顯示器或拔除 USB 儲存裝置,否則可能導 致檔案遺失或 USB 儲存裝置受損。 yy請時常備份 USB 儲存裝置中儲存的檔案, 因為檔案可能遺失或損毀,而此問題並不 在保固範圍內。 繁體中文 yy無線網絡可能受到其他操作 2.
使用 USB 儲存裝置的提示 繁體中文 yy系統僅能辨識 USB 儲存裝置。 yy若 USB 儲存裝置是透過 USB 集線器連 接,則無法辨識。 yy系統可能無法辨識使用自動辨識程式的 USB 儲存裝置。 yy系統可能會無法辨識使用專屬驅動程式的 USB 儲存裝置。 yy辨識 USB 儲存裝置的速度,視各裝置而 定。 yy連接的 USB 儲存裝置正在運作時,請勿關 閉顯示器電源或拔除 USB 裝置。 如果突 然移除或拔除此類裝置,可能會使儲存的 檔案損毀或 USB 儲存裝置受損。 yy請勿連接在 PC 上經人為處理過的 USB 儲 存裝置, 以免該裝置造成產品故障或無 法播放。 請切記,您只能使用內含一般音 樂檔案、影像檔案或電影檔案的 USB 儲 存裝置。 yy請僅使用以 FAT32 檔案系統格式化的 USB 儲存裝置。 若儲存裝置是使用 Windows 不支援的公用程式進行格式化,則 可能無法辨識。請連接電源至需外接電源 供應器的 USB 儲存裝置 (0.
繁體中文 瀏覽檔案 瀏覽 USB 儲存裝置中儲存的檔案。 1 按下 SETTINGS 存取主選單。 2 按下搜尋按鈕捲動至我的媒體,然後按下確認。 3 按下 [搜尋] 按鈕移至您要的電影清單、圖片清單或 Content List (內容清單),然後按下確認。 支援的檔案格式 類型 支援的檔案格式 電影 視頻 音頻 編解碼器 媒體容器 規格 MPEG1 / MPEG2 DAT, MPG, MPEG, TS, TP 1080P @ 30 fps MPEG4 (DivX 3.11, DivX 4, DivX 5, DivX 6, Xvid 1.01, Xvid 1.02, Xvid 1.03, Xvid 1.10beta1/2) AVI, DIVX, MP4, MKV, TS, TRP 1080P @ 30 fps H.
繁體中文 類型 相片 支援的檔案格式 JPEG 最小:64 x 64 最大:一般類型:15360 (寬) x 8640 (高) 漸進式類型:1920 (寬) x 1440 (高) BMP 最小:64 x 64 最大:9600 x 6400 PNG 最小:64 x 64 最大:交錯:1200 x 800 非交錯:9600 x 6400 yy不受支援的檔案會顯示為預設圖示。 音樂 mp3 [位元率] 32 kbps ~ 320 kbps [取樣頻率] 16 kHz ~ 48 kHz [支援] MPEG1、MPEG2、Layer2、Layer3 AAC [位元率] 自由格式 [取樣頻率] 8 kHz ~ 48 kHz [支援] ADIF、ADTS M4A [位元率] 自由格式 [取樣頻率] 8 kHz ~ 48 kHz [支援] MPEG-4 OGG [位元率] 自由格式 [取樣頻率] ~ 48 kHz [支援] Vorbis WMA [位元率] 128 kbps ~ 320 kbps [取樣頻率] 8 kHz ~ 48 kHz [支援] WMA7、8、9 Standard WMA 10 Pro [
繁體中文 觀賞電影 播放 USB 儲存裝置中儲存的電影檔案。 1 按下 SETTINGS 存取主選單。 2 按下導覽按鈕捲動至我的媒體,然後按下確認。 3 按下導覽按鈕捲動至電影清單,然後按下確認。 4 按下導覽按鈕捲動至您要的資料夾,然後按下確認。 5 按下導覽按鈕捲動至您要的檔案,然後按下確認。 yy變更裝置:選擇 USB 儲存裝置。 (視型號而定) yy轉至第一層文件夾 : 返回 [My Media] (我的媒體) 的首頁畫面。 yy轉至上層文件夾 : 返回上一個畫面。 yy離開 : 離開 [My Media] (我的媒體)。 遙控器 按鈕 功能 停止播放 播放視訊 暫停或繼續播放 反向掃描檔案 順向掃描檔案 調整畫面亮度以節約能源。 SETTINGS BACK EXIT or 顯示 [選項] 選單。 在全螢幕時隱藏選單。 返回電影清單。 播放時略過檔案中的特定點。 特定點的時間會出現在狀態列上。 某些檔案可能無法順 利使用此功能。
使用播放視訊檔案的提示 繁體中文 yy某些使用者建立的字幕可能無法正常運作。 yy字幕不支援某些特別字元。 yy字幕不支援 HTML 標籤。 yy受支援語言以外的字幕語言無法使用。 yy變更音效語言時,畫面可能會暫時中斷 (影像停止、快轉等)。 yy損毀的電影檔案可能無法正常播放,或某些播放器功能可能無法使用。 yy系統可能無法正常播放以某些編碼器產生的電影檔案。 yy若已錄製檔案的視訊及音訊結構並無交錯,則只會輸出視訊及音訊。 yy視訊框而異,支援最大 1920 x 1080 @ 25/30p 或 1280 x 720 @ 50/60p 的 HD 視訊。 yy視訊框而異,解析度大於 1920 x 1080 @ 25/30p 或 1280 x 720@50/60p 的視訊可能無法正常運 作。 yy無法正常播放指定類型和格式以外的電影檔案。 yy可播放的電影檔案最大位元率為 20 Mbps。 (僅限 Motion JPEG:10 Mbps) yy我們不保證以等級 4.1 或以上編碼的 H.
選擇設定視訊播放 可存取以下選單: 描述 在播放電影時 選擇所需的影像格式。 Audio Language (音訊語言) 在播放電影時變更音訊的「Language Group」(語言群組)。 單一 音軌的檔案則無法選擇。 Subtitle Language (字幕語言) 開啟/關閉字幕。 Language (語言) 啟動可使用 SMI 字幕, 並可在字幕內選擇語言。 代碼頁 可選擇字幕的字型。 設為預設值時,系統會使用與一般選單相同的字型。 Sync (同步) 播放電影時,以 0.
繁體中文 檢視相片 檢視 USB 儲存裝置中儲存的影像檔案。 1 按下 SETTINGS 存取主選單。 2 按下導覽按鈕捲動至我的媒體,然後按下確認。 3 按下導覽按鈕捲動至圖片清單,然後按下確認。 4 按下導覽按鈕捲動至您要的資料夾,然後按下確認。 5 按下導覽按鈕捲動至您要的檔案,然後按下確認。 yy變更裝置:選擇 USB 儲存裝置。(視型號而定) yy轉至第一層文件夾 : 返回 [My Media] (我的媒體) 的首頁畫面。 yy轉至上層文件夾 : 返回上一個畫面。 yy離開 : 離開 [My Media] (我的媒體)。 6 您可以在檢視相片時,存取下列設定。 選項 Slideshow (幻燈片播放) BGM (背景音樂) 描述 開始或停止以幻燈片播放選擇的相片。 如果未選擇任何相片,則會以幻燈片播放目前資料夾中儲存的所有相片。 若要設定幻燈片播放速度,請選擇 選項。 開啟或關閉背景音樂。 若要設定背景音樂資料夾,請選擇 選項。 您可以使用遙控器上的 SETTINGS 按鈕來調整選項。 以順時針方向旋轉相片 (90 °、180 °、270 °、360 °)。
相片選項 按下選單顯示選項選單。 2 按下導覽按鈕捲動至設定相片檢視、設定視訊或設定音效 ,然後按下確認。 附註 yy電影清單 中變更的選項值不會影響到 相片清單 及 音樂清單。 yy相片清單 和 音樂清單 中變更的選項值,在 相片清單 及 音樂清單 中也會變更,但不會影響到 電影 清單。 請選擇 設定相片檢視,存取下列選單: Menu Slide Speed (滑動速度) BGM Repeat (重複) Random (隨機) Description 選擇幻燈片播放速度。 (選項:[Fast] (快速)、[Medium] (正常) 或 [Slow] (慢速)。) 選擇背景音樂的音樂資料夾。 重複播放背景音樂。 以隨機順序播放背景音樂。 繁體中文 1
繁體中文 聆聽音樂 播放 USB 儲存裝置中儲存的音樂檔案。 1 按下 SETTINGS 存取主選單。 2 按下導覽按鈕捲動至我的媒體,然後按下確認。 3 按下導覽按鈕捲動至音樂清單,然後按下確認。 4 按下導覽按鈕捲動至您要的資料夾,然後按下確認。 5 按下導覽按鈕捲動至您要的檔案,然後按下確認。 yy變更裝置:選擇 USB 儲存裝置。 (視型號而定) yy轉至第一層文件夾 : 返回 [My Media] (我的媒體) 的首頁畫面。 yy開啟音樂播放器 : 開啟音樂的設定視窗。此功能只可在播放期間啟動。 yy轉至上層文件夾 : 返回上一個畫面。 yy離開 : 離開 [My Media] (我的媒體)。 6 在播放音樂時,按下 OK 即可存取下列設定。 遙控器 功能 按鈕 停止播放 播放視訊 暫停或繼續播放 反向掃描檔案 順向掃描檔案 調整畫面亮度以節能省電 (僅可使用關閉與螢幕關閉。) SETTINGS 顯示 [選項] 選單。 在全螢幕時隱藏選單。 BACK EXIT 或 返回電影清單。 播放時略過檔案中的特定點。 特定點的時間會出現在狀態列上。 某些檔案可能
播放音樂檔案的提示 繁體中文 yy本裝置不支援內嵌有 ID3 標記的 MP3 檔案。 附註 yy無法播放的損壞或毀損的音樂檔案,其播放時間會顯示 00:00。 yy從受著作權保護的付費服務下載的音樂無法啟動,其播放時間會顯示不適當資訊。 yy如果您按下 OK, 按鈕,螢幕保護程式就會停止。 yy遙控器上的 、 、 yy您可以使用 按鈕選擇下一首音樂,使用 、 、 按鈕在此模式中也可使用。 按鈕選擇前一首音樂。 檔案名稱 002. B02.
繁體中文 檢視內容清單 使用 SuperSign 管理程式中的 匯出 選項可播放儲存的檔案。 1 按下 SETTINGS 存取主選單。 2 按下導覽按鈕捲動至我的媒體,然後按下確認。 3 按下導覽按鈕捲動至 內容清單,然後按下確認。 4 按下導覽按鈕捲動至您要的資料夾,然後按下確認。 5 按下導覽按鈕捲動至您要的檔案,然後按下確認。 yy變更裝置:選擇 USB 儲存裝置。 (視型號而定) yy轉至第一層文件夾 : 返回 [My Media] (我的媒體) 的首頁畫面。 yy轉至上層文件夾 : 返回上一個畫面。 yy離開 : 離開 [My Media] (我的媒體)。 附註 yy播放來自 內容清單 的媒體檔案時,僅返回、離開或音量按鈕可以使用。 選擇返回或離開按鈕會停 止播放媒體檔案,並返回 內容清單。 yy如果 USB 裝置內有 自動播放 資料夾,且該資料夾中的檔案格式受支援,則 USB 裝置連接到顯示 器時會自動播放這些檔案。 yy當您使用透過 SuperSign 軟體進行的發放功能時,系統將會根據剩下的記憶體空間大小,決定用 以儲存內容的儲存裝置。 (注意:若 USB 連
副檔名 轉碼器 .asf .wmv 視訊 VC-1 簡易和主要設定檔 音訊 WMA Standard 、WMA 10 Professional .divx .avi 視訊 DivX3.11, DivX4, DivX5, DivX6, XViD, H.264/AVC, Motion Jpeg, MPEG-4 Part2 音訊 MPEG-1 Layer I, II, MPEG-1 Layer III (MP3), Dolby Digital, LPCM, ADPCM, DTS .mp4 .m4v .mov 視訊 H.264/AVC, MPEG-4 Part2 音訊 AAC, MPEG-1 Layer III (MP3) .3gp .3g2 視訊 H.264/AVC, MPEG-4 Part2 音訊 AAC, AMR-NB, AMR-WB .mkv 視訊 H.264/AVC 音訊 HE-AAC, Dolby Digital .ts .trp .tp .mts .m2ts 視訊 H.
繁體中文 自訂設定 存取主選單 1 按下 SETTINGS 存取主選單。 2 按下導覽按鈕捲動至下列其中一個選單,然後按下 OK。 3 按下導覽按鈕捲動至所需的設定或選項,然後按 OK。 4 完成之後,按下 EXIT。若要返回上一個選單,請按下 BACK。 yy影像:調整影像大小、品質或效果。 yy音訊 : 設定 [音效] 功能。 yy時間 : 設定時間、日期或定時器功能。 yy選項 : 設定 [選項] 功能。 yy網路 : 設定 [網路] : 功能。 yy我的媒體 : 顯示及播放儲存在 USB 上的電影、相片及音樂內容。
1 按下 SETTINGS 存取主選單。 2 按下導覽按鈕捲動至 影像,然後按下 OK。 3 按下導覽按鈕捲動至所需的設定或選項,然後按 OK。 4 完成之後,按下 EXIT。 若要返回上一個選單,請按下 BACK。 繁體中文 影像設定 - 若要返回上一層,請按下 BACK。 可用的影像設定如下所述: 設定 智能節電 模式 智能節約能源 描述 您可降低亮度以節能省電。 選項 關閉 停用 Energy Saving (節能) 功能 最小節能/正常節能/ 最大節能 選擇背光的亮度等級。 視訊關閉 螢幕將於 3 秒內關閉。 依據您設定的時間表調整背光 選項 影像模式 關閉 停用 [Easy Brightness Control] (簡易亮度控制)。 開啟 啟用 [Easy Brightness Control] (簡易亮度控制)。 針對每種模式選擇一種預設的影像或自訂選項,以呈現最佳的顯示器裝置畫面品質。 您也可以自訂每種模式的進階選項。 可用的預設影像模式會因顯示器裝置型號而異。 選項 畫面比例 明亮 增強對比、亮度、色濃度與銳利度,調整為適合賣場環
繁體中文 設定 描述 畫面 自訂 RGB 模式中的電腦顯示選項。 選項 解像度 選擇適當的解析度。 請參閱「自訂電腦顯示選項」。 自動畫面調整 設定為自動調整螢幕位置、時鐘與相位。 在進行設定時,顯示的影像可能有幾秒會出現不穩的情況。 位置/大小/ Phase (相位) 在影像不清晰時調整選項,特別是在自動設定後字元搖晃時。 重新設定 將選項還原為預設設定。 影像模式 選項 設定 描述 背光 制 LCD 背光以調整螢幕亮度。 如果您調低亮度,畫面會變暗,耗電量也會減 控 少,但不會減損視訊訊號。 對比度 增加或減少視訊訊號的升降率。 影像明亮的部分飽和時,您可以使用 對比度。 亮度 調整影像中訊號的基本等級。 影像明亮的部分飽和時,您可以使用 亮度。 銳利度 調整影像中明亮與陰暗區域之間邊緣的清晰等級。 等級越低,影像越柔和。 色彩 調整所有色彩的濃度。 色調 調整紅色與綠色色階之間的平衡。 色溫 設定為暖色以加強紅色等暖色色彩,或設定為冷色讓畫面偏藍色。 進階控制/ 專業控制 您可以針對每個 影像模式 調整影像,或根據特定的影像調整影像設定
進階控制 - 影像模式 (標準/ APS/ 運動/ 遊戲) 繁體中文 設定 描述 動態對比度 根據圖像的亮度,將對比度調整至最佳等級。 動態對比度 將顏色調整令影像顏色更自然。 色域 選擇可展現的色彩範圍。 皮膚顏色 皮膚色譜可分別設定,以執行使用者指定的皮膚顏色。 天藍色 獨立調校天空顏色。 草綠色 可分別調校自然顏色色譜(草地、山等)。 Gamma 值 根據影像訊號與輸入來源的關係以設定級配曲線。 專業控制 - 影像模式 (劇院/ 專家 1/ 專家 2) 設定 描述 動態對比度 根據圖像的亮度,將對比度調整至最佳等級。 色域 選擇可展現的色彩範圍。 邊緣增強器 用於專業調整的模式。 色彩過濾 在 RGB 色彩過濾特定色譜,準確微調色彩飽和度及色相。 色溫 按需要調整畫面的整體色調。在專業模式,可透過 Gamma 值方法等設定仔 細微調。 色彩管理系統 當專家使用測試模式調整色彩,便會使用此系統。他們可於沒有影響其他色 彩區域的情況下選擇六種顏色(紅 / 綠 / 藍 / 青綠 / 品紅 / 黃)。若是正常圖 像,調整可能不會出現明顯的色彩變
繁體中文 音訊設定 1 按下 SETTINGS 存取主選單。 2 按下導覽按鈕捲動至 音訊,然後按下 OK。 3 按下導覽按鈕捲動至所需的設定或選項,然後按 OK。 - 若要返回上一層,請按下 BACK。 4 完成之後,按下 EXIT。 若要返回上一個選單,請按下 BACK。 可用的音訊選項如下所述: 設定 聲音模式 描述 可針對自訂的顯示器安裝方式最佳化音效。 選項 音效 標準 Suitable for all types of video. 新聞/ 音樂/ 劇 院/ 運動/ 遊戲 Sets audio optimized for a specific genre. 用戶可以選擇各種聲音效果。 -音 效 功能只適用於 聲音模式 功能表中的 標準 模式。 選項 音效同步調整 清除語音 II 提升聲音清晰度。 虛擬環繞音效 LG 的專利音效處理技術可讓兩個揚聲器創造出類似 5.
1 按下 SETTINGS 存取主選單。 2 按下導覽按鈕捲動至 時間,然後按下 OK。 3 按下導覽按鈕捲動至所需的設定或選項,然後按下 OK。 繁體中文 時間設定 - 若要返回上一層,請按下 BACK。 4 完成之後,按下 EXIT。 若要返回上一個選單,請按下 BACK。 可用的時間設定如下所述: 設定 時間設定 描述 設定時間功能。 選項 自動節能 連接至網路時,所輸入的目前時間是依所選國家而定。 手動 目前時間必須手動輸入。 預校開機時間/ 預校關機時間 設定顯示器裝置開機或關機的時間。 自動關機(15分鐘) 若 自動關機 功能已啟動且無輸入訊號,裝置會在 15 分鐘後自動切換至關機模式。 自動待機 若一段時間未使用顯示器,它會自動進入待機模式。 附註 yy預校開機時間/預校關機時間最多可儲存七組排程;顯示器會在預約清單中的預設時間開啟或關 閉。 若預約清單上同時儲存多組預設時間,此功能會採用最接近目前時間的預設時間。 yy一旦設定開啟或關閉時間,這些功能會每天依照預設時間運作。 yy預約開機時間和預約關機時間相同時,若裝置為開啟狀態,關機時間的優
繁體中文 選項設定 1 按下 SETTINGS 存取主選單。 2 按下導覽按鈕捲動至 其他選項,然後按下 OK。 3 按下導覽按鈕捲動至所需的設定或選項,然後按下 OK。 - 若要返回上一層,請按下 BACK。 4 完成之後,按下 EXIT。 若要返回上一個選單,請按下 BACK。 可用的選項設定如下所述: 設定 描述 语言(Language) 選擇文字顯示所使用的語言。 國家或地區 選擇您的國家或地區。 DviX(R) VOD 註冊或注銷 DivX。 檢. DivX 註冊碼,播放受DivX保護的視頻。註冊地址.http://vod.divx.com。 使用註冊碼在 www.divx.
描述 建立簡易預錄並使用 [我的媒體] 中的檔案設定播放。 選項 新增日程表 建立內容預錄 - Media (媒體):選擇您想套用內容預錄的檔案。 - 選擇 [建立] 以註冊內容預錄。 播放 播放內容預錄。 全部刪除 刪除所有已註冊的預錄。 附註 yy已註冊之預錄的資訊儲存在您的 USB 儲存裝置。 USB 儲存裝置已移除時 無法使用此功能。 yy影像大小為 1920 x 1080。 yy您僅可使用相片或視訊檔案。 yy您最多可新增 50 個檔案 (相片檔案 + 視訊檔案 = 50)。 yy僅支援解析度在 1920 x 1080 以下的相片。 yy相片的預設顯示時間為 1 分鐘。 電影的播放時間依電影長度而異。 yy您最多可建立 7 個預錄。 yy未選擇任何檔案即無法註冊預錄。 yy曾使用電腦強制變更資訊的內容預錄,可能無法正常運作。 yy透過 SuperSign 軟體播放的發放或內容預錄,會播放上次執行的預錄。 繁體中文 設定 內容預錄
並排模式 繁體中文 此顯示器可與其他顯示器並排,產生大型的並排顯示畫面。 關閉 Tile Mode (並排模式) 選項停用時 1X2 使用 2 個顯示器時 ID 1 ID 2 3X3 使用 9 個顯示器時 2X2 使用 4 個顯示器時 ID 1 ID 2 ID 1 ID 2 ID 3 ID 3 ID 4 ID 4 ID 5 ID 6 ID 7 ID 8 ID 9 並排 ID 4X4 使用 16 個顯示器時 5X5 使用 25 個顯示器時 ID 1 ID 2 ID 3 ID 4 ID 1 ID 2 ID 3 ID 4 ID 5 ID 5 ID 6 ID 7 ID 8 ID 6 ID 7 ID 8 ID 9 ID 10 ID 9 ID 10 ID 11 ID 12 ID 11 ID 12 ID 13 ID 14 ID 15 ID 13 ID 14 ID 15 ID 16 ID 16 ID 17 ID 18 ID 19 ID 20 ID 21 ID 22 ID 23 ID 24 ID 2
繁體中文 網路設定 1 按下 SETTINGS 存取主選單。 2 按下導覽按鈕捲動至 網絡,然後按下 OK。 3 按下「Navigation」(導覽) 按鈕以捲動至所需的設定或選項,然後按 OK。 - 若要返回上一層,請按下 BACK (返回)。 4 完成之後,按下 EXIT。 若要返回上一個選單,請按下 BACK (返回)。 可用的選項設定如下所述: 設定 描述 網絡設定 設定網路設定。 網絡設定 網絡狀態 Wi-Fi 收發器連線時,您可以檢視與連線至任何可用的無線網路。 顯示網路狀態。 網路連線選項 設定 描述 從 AP 清單設定 選擇 AP 以連線至無線網路。 簡易設定(WPS 按鈕模式) 按下支援 PBC 之無線路由器上的按鈕,以輕鬆連線至路由器。
繁體中文 影像 ID 設定 附註 yy僅適用於特定型號。 PICTURE ID (影像 ID) 可變更在多視野中使用單 一紅外線接收器的特定裝置 (顯示器) 之設定。 您可以使用 RS-232C 纜線,在有紅外線接收器 的裝置和其他裝置之間進行通訊。 每一個顯示 器都是以 Set ID (裝置 ID) 加以識別。 如果您 要用遙控器指定 PICTURE ID (影像 ID),只有 PICTURE ID (影像 ID) 和 Set ID (裝置 ID) 相同 的顯示器才能受您遙控。 AUDIO (RGB/DVI) RS-232C OUT RS-232C OUT RS-232C OUT RS-232C IN RS-232C IN RS-232C IN REMOTE CONTROL IN 1 指定 Set ID (裝置 ID) 給您所安裝的顯示器, 如下圖所示。 紅外線與光線感 應器 RS-232C 纜線 PICTURE ID 2 按下遙控器上的紅色 ON 按鈕,即可指定 PICTURE ID (影像 ID)。 3 請指定 Set ID (裝置 ID) 給您所選擇的裝置。
繁體中文 紅外線代碼 yy並非所有型號均提供此功能。 yy視型號而定,部分按鍵碼不受支援。 代碼 (十六進位) 功能 08 注意 遙控器按鈕 (電源) 0B INPUT 遙控器按鈕 C4 MONITOR ON 遙控器按鈕 C5 MONITOR OFF 遙控器按鈕 95 ENERGY SAVING ( DC 3D 遙控器按鈕 10 至 19 數字鍵 0 至 9 遙控器按鈕 32 1/a/A 遙控器按鈕 2F CLEAR 遙控器按鈕 02 Volume 遙控器按鈕 03 Volume 遙控器按鈕 79 ARC 遙控器按鈕 99 AUTO 遙控器按鈕 09 MUTE E0 BRIGHTNESS (上一頁) 遙控器按鈕 E1 BRIGHTNESS (下一頁) 遙控器按鈕 4D PSM 遙控器按鈕 AA INFO 遙控器按鈕 5F W.
繁體中文 代碼 (十六進位) 功能 注意 BA 遙控器按鈕 8F 遙控器按鈕 遙控器按鈕 8E 72 紅色鍵 遙控器按鈕 71 綠色鍵 遙控器按鈕 63 黃色鍵 遙控器按鈕 61 藍色鍵 遙控器按鈕
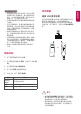
yy使用此方法,可將數台產品連接至一台 PC。 將多台產品連接至一台 PC,您就可以同時控制這些 產品。 yy在「Option」(選項) 選單中,「Set ID」(裝置 ID) 必須介於 1 和 255 (某些特定型號則是 1 到 1,000) 之間,且不得重複。 連接纜線 依下圖所示,連接 RS-232C 纜線。 yyPC 與本產品間使用 RS-232C 通訊協定進行通訊。 您可以從 PC 上開啟/關閉產品、選擇輸入訊源 或調整 OSD 選單。 此顯示器有兩個 RS-232C 連接埠。 一個為輸入,另一個為輸出。 可讓您以菊 鏈 (daisy-chain) 方式連接顯示器,無需另外使用訊號分接盒。 裝置 4 RS-232C OUT RS-232C IN 裝置 3 RS-232C OUT RS-232C IN 裝置 2 RS-232C OUT 4P 纜線 (未隨附) RS-232C IN PC 裝置 1 RS-232C OUT RS-232C IN RS-232C 接頭 RS-232C 纜線 (未隨附) 繁體中文 控制多項產品
繁體中文 RS-232C 配置 通訊參數 yy傳輸速率:9600 BPS yy資料長度:8 位元 yy同位檢查位元:無 yy停止位元:1 位元 yy流程控制:無 yy通訊代碼:ASCII 碼 yy使用交錯 (反轉) 纜線 4P 纜線 4 線配置 (標準 RS-232C 纜線) 裝置 裝置 TXD RXD GND IR RXD TXD GND IR 附註 yy使用 3 線連接時 (非標準),無法使用 IR 菊 鏈。 yy若您想同時控制多個裝置,請使用 3.
命令 1 資料 (十六進位) 2 01 Power (電源) k a 00 至 01 02 Select input (輸入選擇) x b 請參閱 [Select input] 03 Aspect ratio (畫面比例選擇) k c 請參閱 [Aspect ratio] 04 Energy saving (節能模式) j q 請參閱 [Energy saving] 05 Picture mode (自動影像選擇) d x 請參閱 [Picture mode] 06 Contrast (對比) k g 00 至 64 07 Brightness (亮度) k h 00 至 64 08 Sharpness (銳利度) k k 00 至 32 09 Color (色濃度) k i 00 至 64 10 Tint (彩度) k j 00 至 64 11 Color temperature (色溫) x u 00 至 64 12 H position (水平位移) f q 00 至 64
繁體中文 命令 1 2 資料 (十六進位) 34 Product serial number (序號檢查) f y FF 35 Software version (軟體版本) f z FF 36 White balance red gain (白平衡紅色增益) j m 00 至 FE 37 White Balance Green Gain (白平衡綠色增益) j n 00 至 FE 38 White Balance Blue Gain (白平衡藍色增益) j o 00 至 FE 39 Backlight (背光) m g 00 至 64 40 Screen off (靜影) k d 00 至 01 41 Tile Mode (並排模式) d d 請參閱 [Tile Mode (並排 模式)] 42 Tile Mode Check (並排模式檢查) d z 00 至 01 43 Tile ID (並排 ID) d i 請參閱 'Tile ID' (並排 ID)。 44 Tile H Positi
Transmission (傳輸) [Command1][Command2][ ][Set ID][ ][Data][Cr] * [Command1] 識別原廠設定與使用者設定模式。 * [Command2] 控制顯示器。 * [Set ID] 用於選擇您想要控制的裝置。OSD 選單的 [OPTION] 下,每個裝置都會被指派一個 範圍為 1 到 255 (01H 到 FFH) 之間的裝置 ID,某些特定型號則是 1 到 1,000 (001H 到 3e8H) 之間的裝置 ID。選擇「00H」或「000H」作為裝置 ID 可同時控制所有連 線的顯示器。(視型號而定,可能不支援此功能。) * [Data] 傳輸命令資料。 資料計數可能會根據命令而增加。 * [Cr] 歸位字元。 對應 ASCII 碼的「0x0D」。 *[] 空格。 對應 ASCII 碼的「0x20」。 Acknowledgement (確認) [Command2][ ][Set ID][ ][OK/NG][Data][x] * 產品接收正常資料時,會根據此格式傳輸 ACK (確認) 訊息。 此時,若資料為 FF,
繁體中文 01. Power (電源) (命令:k a) 控制開啟/關閉顯示器電源。 04. Energy saving (節能模式) (命令:j q) 設定節能模式功能。 傳輸 傳輸 [k][a][ ][Set ID][ ][Data][Cr] Data 00:關 01:開 [ j][q][ ][Set ID][ ][Data][Cr] Data 00:關 01:最小節能 02:正常節能 03. 最大節能 04:自動節能 05. 螢幕關閉 確認 [a][ ][Set ID][ ][OK/NG][Data][x] * 只有在顯示器裝置完全開機時,才會正確傳回確認訊號。 * 傳輸與確認訊號之間可能會出現某些程度的時間延遲。 確認 [q][ ][Set ID][ ][OK/NG][Data][x] ** 視型號而定,可能不支援此功能。 02. Select input (輸入選擇) (命令:x b) 選擇顯示器的輸入來源。 傳輸 05.
10. Tint (彩度) (命令:k j) 調整畫面彩度。 傳輸 傳輸 [k][h][ ][Set ID][ ][Data][Cr] Data 00 至 64:亮度 0 至 100 [k][ j][ ][Set ID][ ][Data][Cr] Data 00 至 64:彩度 R50 至 G50 確認 確認 [h][ ][Set ID][ ][OK/NG][Data][x] [ j][ ][Set ID][ ][OK/NG][Data][x] 08. Sharpness (銳利度) (命令:k k) 調整畫面銳利度。 11.
繁體中文 13. V position (垂直位移) (命令:f r) 調整畫面垂直位移。 只有在 [Tile Mode] (並排模式)設定為 [關] 時,才能使用此 功能。 * 操作範圍因 RGB 輸入解析度而異。 (僅適用於 RGB-PC 輸入。) 16. Balance (平衡) (命令:k t) 調整音效平衡。 傳輸 [k][t][ ][Set ID][ ][Data][Cr] Data 傳輸 00 至 64:左 50 至 右 50 確認 [f][r][ ][Set ID][ ][Data][Cr] Data 00 至 64:最小 -50 (Bottom) (底部) 至最大 50 (Top) (頂端) [t][ ][Set ID][ ][OK/NG][Data][x] 確認 [r][ ][Set ID][ ][OK/NG][Data][x] 14.
22. Off Time Schedule (關機時間排程) (命令: f c) 啟用/停用 [Off Time Schedule] (關機時間排程)。 傳輸 傳輸 [k][f][ ][Set ID][ ][Data][Cr] Data 00 至 64:音量 0 至 100 [f][c][ ][Set ID][ ][Data][Cr] Data 確認 確認 [f][ ][Set ID][ ][OK/NG][Data][x] 20. Clock 1(Year/ Month/ Day) (時間 1(年/月/日)) (命 令:f a) 設定 [Time 1(Year/ Month/ Day)] (時間 1(年/月/日)) 的值。 [c][ ][Set ID][ ][OK/NG][Data][x] 23.
繁體中文 24. Off timer (repeat mode/time) (預約關機(重複模式/時 間)) (命令:f e) 設定 [預約關機(重複模式/時間)] 功能。 傳輸 25. On timer (repeat mode/time) (預約開機(重複模式/時 間)) (命令:f d) 設定 [預約開機(重複模式/時間)] 功能。 傳輸 [f][e][ ][Set ID][ ][Data1][ ][Data2][ ][Data3][Cr] [f][d][ ][Set ID][ ][Data1][ ][Data2][ ][Data3][Cr] Data1 1. F1 至 F7 (讀取資料) F1:讀取第 1 個預約關機資料 F2:讀取第 2 個預約關機資料 F3:讀取第 3 個預約關機資料 F4:讀取第 4 個預約關機資料 F5:讀取第 5 個預約關機資料 F6:讀取第 6 個預約關機資料 F7:讀取第 7 個預約關機資料 2.
28. Auto off (自動關閉) (命令:f g) 設定 [自動關閉] 功能。 傳輸 傳輸 [f][u][ ][Set ID][ ][Data1][Cr] [f][u][ ][Set ID][ ][Data1][Data2][Cr] Data (新增預約) 60:RGB 70:DVI-D 90:HDMI (HDMI1) 91: OPS (DTV) C0: DISPLAYPORT (DTV) Data1 (變更預約) 1.
繁體中文 30. Reset (重新設定) (命令:f k) 執行 [影像]、[畫面]、[音效] 或 [預設值] 功能。 (畫面重設只能在 RGB 輸入模式中執行。) 33. Time elapsed (傳回經過時間) (命令:d l) 檢查面板的已使用時間。 傳輸 傳輸 [f][k][ ][Set ID][ ][Data][Cr] Data 00:影像重新設定 01:Screen Reset (畫面重新設定) 02:預設值 確認 [d][l][ ][Set ID][ ][Data][Cr] Data FF:讀取狀態 確認 [l][ ][Set ID][ ][OK/NG][Data][x] * 傳回的資料是以十六進位表示的已使用時數。 [k][ ][Set ID][ ][OK/NG][Data][x] 31. Current temperature (溫度值) (命令:d n) 檢查內部的溫度值。 34.
39. Backlight (背光) (命令:m g) 調整畫面背光。 傳輸 傳輸 [ j][m][ ][Set ID][ ][Data][Cr] Data 00 至 FE:紅色增益 0 至 254 [m][g][ ][Set ID][ ][Data][Cr] Data 00 至 64:背光 0 至 100 確認 確認 [g][][set ID][][OK/NG][Data][x] [m][ ][Set ID][ ][OK/NG][Data][x] ** 視型號而定,可能不支援此功能。 40. Screen off (靜影) (命令:k d) 開啟或關閉畫面。 傳輸 37.
繁體中文 42. Tile Mode Check (並排模式檢查) (命令:d z) 檢查 [Tile Mode] (並排模式) 的狀態。 傳輸 [d][z][ ][Set ID][ ][Data][Cr] Data FF:檢查 [Tile Mode] (並排模式) 的狀態。 ** 視型號而定,可能不支援此功能。 確認 [z][ ][Set ID][ ][OK/NG][Data1][Data2][Data3][x] Data1 Data2 Data3 00:[Tile Mode] (並排模式) 關閉 01:[Tile Mode] (並排模式) 開啟 00 至 0F:Tile Row (並排列) 00 至 0F:Tile Column (並排欄) 43.
傳輸 [d][ j][ ][Set ID][ ][Data][Cr] Data 00:關 01:開 確認 [ j][ ][Set ID][ ][OK/NG][Data][x] 繁體中文 48.