OWNER’S MANUAL LG Digital Signage (MONITOR SIGNAGE) Please read this manual carefully before operating your set and retain it for future reference. 55EF5C-M2V 55EF5C-M3V www.lg.com Copyright © 2019 LG Electronics Inc. All Rights Reserved.
ENGLISH TABLE OF CONTENTS IMPORTANT PRECAUTIONS..........3 -- Electrical Power Related Precautions.....................3 -- Precautions for installing the Product...................5 -- Precautions for Moving the Product.......................6 -- Precautions for Using/Cleaning the Product......6 -- Product Disposal (Only, Hg lamp used LCD Monitor)..................................................................................7 -- Mounting on a Wall.....................................................
IMPORTANT PRECAUTIONS Please read these safety precautions carefully before using the product. WARNING Failure to follow those warnings may result in death, serious injury or damage to the product or other property. CAUTION If you ignore the caution message, you may be slightly injured or the product may be damaged. Electrical Power Related Precautions WARNING •• Use only the power cord supplied with the unit or another manufacturer’s authorized cord.
ENGLISH •• If you don’t intend to use the product for a long time, unplug the power cable from the product. -- Layers of dust can cause a fire, or insulation deterioration can cause electric leakage, electric shock or fire. •• Insert the power plug firm so it cannot come loose. -- A loose connection can cause fire. •• Hold the plug when pulling out the power cable. Do not pull the plug out by the wire. Do not bend the power cord with excessive force or put heavy objects on the power cord.
WARNING •• Keep away from heat sources like heaters or open flames. -- Electrical shock, fire, malfunction or deformation may occur. •• Keep the packing anti-moisture material or vinyl packing out of the reach of children. -- Anti-moisture material is harmful if swallowed. If swallowed by mistake, force the patient to vomit and visit the nearest hospital. Additionally, vinyl packing can cause suffocation. Keep it out of the reach of children. •• Do not put heavy objects on the product or sit upon it.
ENGLISH Precautions for Moving the Product WARNING •• Make sure to turn off the product. -- You may be electrocuted or the product can be damaged. •• Make sure to remove all cables before moving the product. -- You may be electrocuted or the product can be damaged. •• When lifting or moving the product, do not hold it upside down while holding only the stand. -- This may cause the product to fall resulting in damage or injury. •• Do not shock the product when moving it.
CHEMICALS Product Disposal (Only, Hg lamp used LCD Monitor) •• The fluorescent lamp used in this product contains a small amount of mercury. •• Do not dispose of this product with general household waste. •• Disposal of this product must be carried out in accordance to the regulations of your local authority. Mounting on a Wall •• Do NOT install this product by yourself as you may injure yourself or cause damage to product. Please contact service personnel authorised by manufacturer.
ENGLISH LICENSES Supported licenses may differ by model. For more information of the licenses, visit www.lg.com. The terms HDMI and HDMI High-Definition Multimedia Interface, and the HDMI logo are trademarks or registered trademarks of HDMI Licensing LLC in the United States and other countries. Manufactured under license from Dolby Laboratories. Dolby and the double-D symbol are trademarks of Dolby Laboratories. For DTS patents, see http://patents.dts.com.
CAUTION •• Always use genuine components to ensure safety and product performance. •• The product warranty will not cover damage or injury caused by the use of counterfeit components. •• Connect the power cord to the product before you plug it into a wall outlet. Plugging the power cord into a wall outlet first may cause an electric shock, which can also damage the product. NOTE •• The accessories provided with your product may vary depending on the model or region.
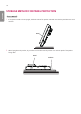
ENGLISH STORAGE METHOD FOR PANEL PROTECTION Correct Method 1 If the product needs to be set upright, hold both sides of the product and make sure that the panel does not touch the floor. Panel 2 When laying down the product, lay a cushion on a flat floor. Put the product on it with the panel of the product facing down.
Incorrect Method Panel 2 If the product is tilted onto the edge of the panel, the panel may be damaged. Panel ENGLISH 1 If the product is tilted onto the bezel, the bottom of the panel may be damaged.
ENGLISH Installing on a Wall Install the monitor at least 200 mm away from the wall and leave about 100 mm of space at each side of the monitor to ensure sufficient ventilation. 100 mm 200 mm 100 mm 100 mm 100 mm CAUTION •• Disconnect the power cord before moving or installing the monitor to avoid risk of electric shock. •• If you install the monitor on a ceiling or slanted wall, it may fall and result in injury.
IR RECEIVER This allows a remote control sensor to be placed in a custom location. Then that display can control other displays via an RS-232C cable.
Mechanically Connecting the displays ENGLISH 1 After joining the sets, use the tiling guide to adjust the gap between the sets. (M3 x L4.5) 2 Now the 2 x 2 tiling is complete. You can tile in various combinations, such as 3 x 3. NOTE •• You may mount the set without using the tiling guide; this does not affect the performance of the device. •• The screws are enclosed with the other components in the box, including the tiling guides.
The descriptions in this manual are based on the buttons on the remote control. Please read this manual carefully to use the monitor correctly. To install batteries, open the battery cover, place batteries (1.5 V AAA) matching and terminals to the labels inside the compartment, and close the battery cover. To remove the batteries, perform the installation actions in reverse. The illustrations may differ from the actual accessories.
ENGLISH or Selects the Picture Mode. Activates the Launcher. Enters the White Balance menu. Accesses the main menus or saves your input and exit menus. SuperSign menu key. Navigation Buttons Scrolls through menus or options. Selects menus or options and confirms your input. Allows you to move back one step in the user interaction function. Quit all OSD tasks and applications.
You can connect various external devices to your monitor. Change the input mode and select the external device you want to connect. For more information about external device connections, see the user manual provided with each device. Connecting to a PC Some of the cables are not provided. This monitor supports the Plug and Play* feature. * Plug and Play: a feature that enables a PC to recognize devices attached by the user without device configuration or user intervention when powering up.
NOTE ENGLISH •• For the best image quality, using the monitor with HDMI connection is recommended. •• To comply with the specifications of the product, use a shielded interface cable with ferrite core, such as a HDMI cable. •• If you turn the monitor on when the set is cold, the screen may flicker. This is normal. •• Sometimes red, green, or blue spots may appear on the screen. This is normal. •• Use a High Speed HDMI®/TM cable (shorter than 3 meters).
→ •• HDMI → DISPLAYPORT → OPS ENGLISH Using the Input List
ENGLISH TROUBLESHOOTING No image is displayed. Problem Is the product power cord connected? Does the “Invalid Format” message appear? Does the “No Signal” message appear? Action •• Check if the power cord is correctly plugged into the power outlet. •• The signal from the PC (Graphics card) is out of the vertical or horizontal frequency range of the product. Adjust the frequency range by referring to the Specifications in this manual. •• The signal cable between PC and product is not connected.
The audio function does not work. No sound? Sound is too dull. Action •• See if the audio cable is connected properly. •• See if the sound is set properly. •• Select the appropriate equalizer sound. Screen color is abnormal. Problem Screen has poor color resolution (16 colors). Screen color is unstable or mono-colored. Do black spots appear on the screen? Action •• Set the number of colors to more than 24 bits (true color). Select [Control Panel] → [Display] → [Settings] → [Color Table] in Windows.
ENGLISH CAUTION •• Image sticking may occur when displaying a fixed image for an extended period of time. It is recommended that you display videos for 18 hours or less per day to decrease the likelihood of image sticking. •• A few horizontal lines may appear on the screens while running the Clear Panel Noise feature (OFF-RS). This is normal, so there is no need for concern. Turning the power on while the Clear Panel Noise feature (OFF-RS) is operating may cause the product to malfunction.
The product specifications below may be changed without prior notice due to upgrade of product functions. “ ” refers to alternating current (AC), and “ ” refers to direct current (DC).
[Unit: mm] ENGLISH Signage Box 4JHOBHF #PY 4JHOBHF #PY
T-con Box NOTE •• May vary depending on the curvature.
HDMI/ DisplayPort/ OPS (PC) Support mode ENGLISH Resolution Horizontal frequency (kHz) Vertical frequency (Hz) 640 x 480 31.469 59.94 800 x 600 37.879 60.317 1024 x 768 48.363 60.0 1152 x 864 53.783 59.959 1280 x 720 45 60 1280 X 800 49.702 59.81 1366 x 768 47.712 59.79 1280 x 1024 63.981 60.02 1600 x 900 60 60 1680 x 1050 65.29 59.954 1920 x 1080 67.5 60 1920 x 1200 74.038 59.95 Only applies to HDMI/ DisplayPort. 3840 x 2160 67.
ENGLISH NOTE •• Resolutions available for the Input Label option in HDMI/ DisplayPort/ OPS input modes. -- PC resolutions: 1280 x 720 / 60 Hz, 1920 x 1080 / 60 Hz -- DTV resolutions: 480p, 720p and 1080p •• Vertical frequency: The product display functions by the screen image changing dozens of times every second like a fluorescent lamp. The vertical frequency or refresh rate is the number of image displays per second. The unit is Hz.
Make sure to read the Safety Precautions before using the product. The model and serial numbers of the SET are located on the back and one side of the SET. Record it below should you ever need service. MODEL SERIAL Temporary noise is normal when powering ON or OFF this device.
USER GUIDE LG Digital Signage (MONITOR SIGNAGE) Please read this manual carefully before operating your set and retain it for future reference. webOS 3.0 www.lg.
2 _index ENGLISH TABLE OF CONTENTS USER SETTINGS.............................3 -- Main Menu Settings.........................................................3 Picture Settings Sound Settings Network Settings General Settings ENTERTAINMENT....................... 15 IR CODES..................................... 36 TO CONTROL MULTIPLE PRODUCTS................................... 38 -- Connecting the Cable...................................................38 -- Communication Parameter.......................
3 NOTE Main Menu Settings Picture Settings To Select Picture Mode / [Picture] [Picture Mode Settings] Select the picture mode that is best suited to the video type. [Picture Mode] •• [Vivid]: Adjusts the video image for a retail environment by enhancing the Contrast, Brightness, and Sharpness. •• [Standard]: Adjusts the video image for a normal environment. •• [APS]: APS (Auto power saving) mode reduces power consumption by dimming control. •• [Cinema]: Optimizes the video image for watching movies.
4 To fine-tune the picture mode _index ENGLISH / [Picture] [Picture Mode Settings] [Customize] •• [Backlight]/[OLED Light]: Adjusts the brightness of the screen by controlling the LCD backlight. The closer the value is to 100, the brighter the screen is. •• [Contrast]: Ajusts the difference between the light and dark areas of the picture. The closer the value is to 100, the greater the difference is. •• [Brightness]: Adjusts the overall brightness of the screen.
5 To set the aspect ratio (Some features may not be supported in certain models.) / [Picture] [Aspect Ratio] Changes the aspect ratio to view the image in its optimal size. •• [16:9]: Displays the image with a 16:9 aspect ratio. •• [Just Scan]: Displays the image in the original size without cutting off the edges. Original is available in HDMI (720p or higher) mode. (On 58:9 models, this option can be selected regardless of the input signal.
6 To use the Energy Saving function _index ENGLISH / [Picture] [Energy Saving] Reduces power consumption by adjusting peak screen brightness. •• [Auto]: Adjusts the brightness of the monitor according to ambient light. (This feature is available only with certain models.) •• [Off]: Disables the Energy Saving mode. •• [Minimum]/[Medium]/[Maximum]: Uses the Energy Saving according to the Energy Saving level specified for your monitor. •• [Screen Off]: Turns off the screen. You will only hear audio.
7 Sound Settings ENGLISH •• Only applies to certain models. To select a Sound Mode _index / [Sound] [Sound Mode] The best sound quality will be selected automatically depending on the video type currently being watched. •• [Standard]: This sound mode works well for content of all types. •• [Cinema]: Optimizes sound for watching movies. •• [Clear Voice III]: Enhances voices so they can be heard more clearly. •• [Sports]: Optimizes sound for watching sports.
8 Selecting Sound Output Device _index ENGLISH / [Sound] [Sound Out] •• [Signage Speaker]: You can output sound through the signage monitor’s internal speakers. This feature is available only for models with built-in signage speakers. •• [LG Sound Sync / Bluetooth]: You can connect Bluetooth audio devices or Bluetooth headsets wirelessly to enjoy richer sound from the signage monitor conveniently.
9 Network Settings To Set Your Wired Network / [Network] [Wired Connection (Ethernet)] •• Connecting to a wired network: Connect your monitor to a local area network (LAN) via the LAN port, and configure the network settings. Only wired network connections are supported. After making a physical connection, a small number of networks may require the display network settings to be adjusted. For most networks, the display will automatically make a connection without any adjustments.
10 Setting up a SoftAP _index ENGLISH (Only applies to certain models.) / [Network] [SoftAP] If you set up a SoftAP, you can connect many devices via a Wi-Fi connection without a wireless router and use wireless Internet. •• To use SIGNAGE, you must have an Internet connection. •• You cannot use the SoftAP feature and the Screen Share feature at the same time. •• On models that support Wi-Fi dongles, the SoftAP menu is enabled only when a Wi-Fi dongle is connected to the product.
11 NOTE •• Do not connect a modular telephone cable to the LAN port. •• Since there are various connection methods, please follow the specifications of your telecommunication carrier or Internet Service Provider. •• Network Setting menu will not be available until the display is connected to a physical network. Tips for Wireless Network Setting •• Wireless networks can be subject to interference from other devices operating at a frequency of 2.4 GHz (wireless phones, Bluetooth devices or microwave ovens).
12 General Settings _index ENGLISH To configure the language / [General] [Menu Language] Select one of the languages on the menu displayed on the screen. •• [Menu Language]: Sets a language for Signage. Setting up the keyboard language / [General] [Keyboard Languages] Select the language you wish to show on the keyboard. •• [Keyboard Languages]: Sets the keyboard language. To set the time/date / [General] You can check or change the time.
13 Configuring Set ID [General] [Set ID] •• When using automatic ID settings, the IR signal only needs to be transmitted to the first set. Malfunctions could occur when the IR signal is transmitted to other sets. Using Tile Mode (Only applies to certain models.) / [General] [Tile Mode] You can configure the integrated screen in the same way as each screen is configured. •• [Row](1 to 15): Sets the number of tile rows. •• [Column](1 to 15): Sets the number of tile columns.
14 Configuring the Dual-View Screen _index ENGLISH (For double-sided flat OLED models only) / [General] [Dual-View Screen Setting] •• [Front Screen Name]: Sets the name of the front screen. •• [Back Screen Name]: Sets the name of the back screen. •• [Screen Swap]: Swaps the images on the front and back side of the screens. •• [Screen Mirroring]: Copies the image of the current screen to the opposite screen. •• [Screen Off]: Turns off the front or back screen.
15 Connecting USB/SD Storage Devices Connect a USB storage device such as a USB flash memory, SD storage devices or an external hard drive to the display and use multimedia features. CAUTION •• Do not turn the monitor off or remove the USB storage device while Photo & Video or Music is playing. •• Back up files you have saved on a USB storage device frequently, as loss or damage to the files may be not covered by the warranty.
16 Tips for using USB/SD storage devices _index ENGLISH •• Only a USB storage device can be recognized. •• A USB device does not work effectively when it is connected via a USB hub. •• A USB storage device using an automatic recognition program may not be recognized. •• A USB storage device using its own driver may not be recognized. •• The recognition speed of a USB storage device may depend on each device.
17 _index ENGLISH •• If your USB storage device has multiple partitions, or if you use a USB multi-card reader, you can use up to four partitions or USB storage devices. •• If a USB storage device is connected to a USB multi-card reader, its volume data may not be detected. •• If the USB storage device does not work properly, disconnect and reconnect it. •• Detection speed differs from device to device.
18 _index ENGLISH Photo & Video •• The photo feature is not supported in OLED models. Supported Photo & Video Files Supported External Subtitle Format •• *.smi, *.srt, *.sub (MicroDVD, SubViewer 1.0/2.0), *.ass, *.ssa, *.txt (TMPlayer), *.psb (PowerDivX), *.dcs (DLP Cinema) NOTE •• Subtitles are not supported in certain models. •• Embedded subtitles are not supported. Supported Video Codecs Extension .asf, .wmv .avi .mp4, .m4v, .mov .3gp, .3g2 .mkv .ts, .trp, .tp, .mts .mpg, .mpeg, .dat .
19 Maximum data transfer rate File Format .jpeg, .jpg, .jpe Format JPEG .png PNG .bmp BMP Item •• Minimum: 64 x 64 •• Maximum -- Normal Type: 15360 (W) x 8640 (H) -- Progressive Type: 1920 (W) x 1440 (H) •• Minimum: 64 x 64 •• Maximum: 5760 (W) x 5760 (H) •• Minimum: 64 x 64 •• Maximum: 1920 (W) x 1080 (H) _index Supported Photo File ENGLISH •• Full HD video H.264 1920 x 1080@60P BP/MP/HP@L4.2 40 Mbps HEVC 1920 x 1080@60P MP@L4.1, Main10 Profile@L4.
20 Viewing Photos and Videos _index ENGLISH / 1 Select your desired storage device. 2 Select and view your desired photo or video. Tips for Playing Video Files •• Some user-created subtitles may not work properly. •• Some special characters in subtitles are not rendered. •• HTML tags are not supported in subtitles. •• Subtitles in languages other than the supported languages are not available. •• The screen may suffer temporary interruptions (image stoppage, faster playback, etc.
21 Scheduled Playing Select your desired storage device. Enter the folder that contains the file you wish to schedule. Click the New Scheduled Playing button in the upper right. Select the content that you would like to schedule to play. Enter schedule details to create a new schedule. Watch your selected content play at the set time. Export •• Only applies to certain models. / 1 2 3 4 5 6 Select your desired storage device. Enter the folder that contains the file you wish to export.
22 Supported Music Files _index ENGLISH Music •• Some of the models that do not support the audio output cannot play the music. File Format .mp3 .wav .ogg .wma Item Bit rate Sample freq. Support Channels Bit rate Sample freq. Support Channels Bit rate Sample freq. Support Channels Bit rate Sample freq.
23 Plays stored files using the Export option in SuperSign Editor. / Only contents distributed by SuperSign Manager are displayed and selectable. If there is a USB/SD storage device connected, the image on the USB/SD device is outputted additionally. NOTE •• If a folder named normal or AutoPlay exists on the USB/SD card and there are playable files, the files will play automatically when the USB/SD card is connected.
24 •• Only applies to certain models. •• The recommended resolution for scheduled photo playback is 4096 x 2160 or below. _index ENGLISH Local Contents Scheduler Setting a Scheduled Playing You can create a scheduled playing using the Local Contents Scheduler and the Photo & Video app. Scheduled Playing with Photo & Video •• 1st Method: Refer to the scheduled playing section in Photo & Video app. •• 2nd Method: / 1 2 3 4 5 6 Press the New Scheduled Playing button in the upper right.
25 Using Screen Share / 1 Connect according to the instructions provided by the guide that can be accessed through the Connection Guide button in the upper right. 2 Once the connection is established, Screen Share between the user device and the monitor is enabled. NOTE Configuring WiDi (Wireless Display) WiDi, which is short for Wireless Display, is a system that wirelessly transmits video and sound files from a laptop that supports Intel WiDi to the display.
26 _index ENGLISH Group Manager •• Only applies to certain models. Using this template-based content editing program, you can produce, manage and play content. There are three modes: Master, Slave and StandAlone. The program can be used to distribute and play schedules between the Master and Slave. It also provides access from mobile device or PC. CAUTION •• A maximum of 5,000 images stored on a USB drive/SD card can be displayed from your PC or mobile device.
27 How to Use _index ENGLISH •• Monitors: Run the app in the Launcher bar and add/edit/delete the desired content. •• Mobile devices: Run the app in the Launcher bar and get access using the QR code or URL provided. NOTE •• If you use a mobile device, you need to go through an authorization process using a PIN code. The default PIN code is ‘000000’. •• When using a PC, use the full screen (F11) feature in 1920 x 1080 (Full HD) resolution to view the same screen as the monitor.
28 _index ENGLISH Leveler Tool •• Only applies to certain models. You can check whether the product is horizontally and vertically level when installing the product outdoors in an enclosure. Accessing the Leveler Tool / You can check whether the product is horizontally and vertically level. Exiting the Leveler Tool Exit the Leveler Tool by pressing the EXIT key on your remote control.
29 CAUTION •• Supported resolutions (this program is optimized for the following resolutions): -- 1280 x 1024 / 375 x 667 •• Supported browsers (this program is optimized for the following browsers): -- IE 11 or later / Chrome 50 or later / Firefox 38 or later •• If set to OSD Portrait Mode, the OSD menu that appears on the captured screen will be in Landscape orientation. Function •• Dashboard: Shows a summary of the product's status and provides links to each page.
30 How to Use _index ENGLISH On a PC 1 2 3 4 Enter ‘https://Product IP address:3737’ in the browser's address bar to access the Control Manager login page. Enter the password in the Password window (The default password is ‘000000’). Click the Login button after entering the password to access the Dashboard. Click the face-shaped image to access the User Menu (Change Password, Logout).
31 On Chrome _index ENGLISH Follow the steps below if you encounter issues with your security certificate while attempting to access.
32 On FireFox _index ENGLISH 1 Click 'Advanced' 2 Click Add 'Exception...
33 3 Click 'Confirm Security Exception' _index ENGLISH On Internet Explorer 1 Click 'Continue to this website (not recommended)'. * The text of the links and buttons may differ depending on the OS (Operating System) or language settings used.
34 _index ENGLISH Multi-Screen •• Only applies to certain models. This feature allows you to view multiple external inputs and videos on a single screen. Accessing Multi-Screen Enter [Multi-screen] to select the screen layout. NOTE •• When entering [Multi-screen], the screen may flicker and the picture may appear abnormal on certain devices while the optimal resolution is selected automatically. If this happens, please restart the monitor.
35 PICTURE ID Settings NOTE (RGB/DVI) RS-232C OUT RS-232C OUT RS-232C OUT RS-232C IN RS-232C IN RS-232C IN REMOTE CONTROL IN 1 Assign the Set ID to the installed monitors as shown below. IR & Light Sensor RS-232C cables PICTURE ID 2 Press the red ON button on the remote control to assign the PICTURE ID. 3 Assign the Set ID to the selection of your choice. •• A set with a different Set ID from the PICTURE ID cannot be controlled by IR signals.
36 _index ENGLISH IR CODES All models do not support the HDMI/USB function. Some key codes may not be supported depending on the model.
37 Code (Hex) 99 Function (SETTINGS (Menu)) Auto Config.
38 _index ENGLISH TO CONTROL MULTIPLE PRODUCTS •• Only applies to certain models. Use this method to connect several products to a single PC. You can control several products at a time by connecting them to a single PC. In the Option menu, the Set ID must be between 1 and 1000 without being duplicated. Connecting the Cable •• The image may be different according to the model. Connect the RS-232C cable as shown in the picture. The RS-232C protocol is used for communication between the PC and product.
39 •• When using three-wire connections (non-standard), an IR daisy chain cannot be used. •• Be sure to only use the provided gender to connect properly. •• When monitors connected via Daisy Chain (that controls multiple monitors) are turned off and on successively, some monitors may not turn on. In this case, you can turn those MONITORS ON by pressing the button, not the button.
40 _index ENGLISH Command Reference List 01 02 03 04 05 06 07 08 09 10 11 12 13 14 15 16 17 18 19 20 21 22 23 24 25 [Power] [Select input] [Aspect Ratio] [Energy Saving] [Picture Mode] [Contrast] [Brightness] [Sharpness] [Color] [Tint] [Color temperature] [Balance] [Sound Mode] [Mute] [Volume Control] [Time 1 (year/month/day)] [Time 2 (hour/minute/second)] [Off time schedule] [On Time Schedule] [Off Timer] ([Repeat]/[Time]) [On Timer] ([Repeat]/[Time]) [On Timer Input] [No Signal Power Off (15Min)] [Aut
41 DATA (Hexadecimal) 00 to 02 FF See [Key] FF FF FF 00 to FE 00 to FE 00 to FE 00 to 7F 00 to 7F 00 to 7F 00 to 64 00 to 01 00 to FF FF See [Tile ID] 00 to 01 00 to 07 00 to 01 00 to FA 00 to 02 See [Fail Over Input Select] 00 to 02 00 to 02 _index [Reset] [Current Temperature] [Key] [Time Elapsed] [Product Serial Number] [Software Version] [White Balance Red Gain] [White Balance Green Gain] [White Balance Blue Gain] [White Balance Red Offset] [White Balance Green Offset] [White Balance Blue Offset] [Ba
42 _index ENGLISH COMMAND 2 v z DATA (Hexadecimal) See [Check the status] 00 to 01 51 52 [Check the status] [Check Screen] 1 s t 53 [Speakers] d v 00 to 01 54 [Daylight Saving Time] s d See [Daylight Saving Time] 55 [PM Mode] s n, 0c 56 [ISM Method] j p 57 [Network Settings] s 58 [Auto-adjustment] j u 01 59 [H Position] f q 00 to 64 60 [V Position] f r 00 to 64 61 [H Size] f s 00 to 64 62 [Power On Status] t r 00 to 02 63 [Wake On LAN] f w 00 to 01
43 COMMAND 2 DATA (Hexadecimal) [Aspect Ratio] ([Rotation]) s n, 89 00 to 01 77 [Easy Brightness Control Mode] s m 00 to 01 78 [Easy Brightness Control Schedule] s s See [Easy Brightness Control Schedule] 79 [MultiScreen] Mode & [Input] x c See [MultiScreen] Mode & [Input] 80 [Aspect Ratio] ([MultiScreen]) x d See [Aspect Ratio] ([MultiScreen]) 81 [Screen Mute] ([MultiScreen]) x e See [Screen Mute] ([MultiScreen]) 82 [Screen Off Always] s n, 0d 00 to 01 83 84 85 86 87 88
44 Transmission _index ENGLISH Transmission/Reception Protocol [Command1][Command2][ ][Set ID][ ][Data][Cr] * [Command1]: Identifies between the factory setting and the user setting modes. * [Command2]: C ontrols monitor sets. * [Set ID]: U sed for selecting a set you want to control. A unique Set ID can be assigned to each set ranging from 1 to 1000(01H~3E8H) under Settings in the OSD menu. Selecting ‘00H’ for Set ID allows the simultaneous control of all connected monitors.
45 03. [Aspect Ratio] (Command: k c) Controls the power on/off of the set. Adjusts the aspect ratio. Transmission (k)(c)( )(Set ID)( )(Data)(Cr) Data Data 00: Off 01: On 02: Restart Acknowledgement (a)( )(Set ID)( )(OK/NG)(Data)(x) * The acknowledgement signal is returned properly only when the monitor is fully powered on. * There may be a delay between the transmission and acknowledgement signals.
46 _index ENGLISH 05. [Picture Mode] (Command: d x) 08. [Sharpness] (Command: k k) Selects a picture mode. Adjusts the screen sharpness. Transmission (d)(x)( )(Set ID)( )(Data)(Cr) Transmission (k)(k)( )(Set ID)( )(Data)(Cr) Data Data 00: Vivid 01: Standard 02: Cinema 03: Sports 04: Game 05: E xpert 1 06: E xpert 2 08: APS 09: Photos 10: Touch 11: Calibration Acknowledgement (x)( )(Set ID)( )(OK/NG)(Data)(x) * Depending on the model, some picture modes may not be supported.
47 15. [Volume Control] (Command: k f) Adjusts the sound balance. Adjusts the playback volume. Transmission (k)(f)( )(Set ID)( )(Data)(Cr) Data Data 00~64: L eft 50 to right 50 Acknowledgement (t)( )(Set ID)( )(OK/NG)(Data)(x) 00~64: Volume 0 to 100 Acknowledgement (f)( )(Set ID)( )(OK/NG)(Data)(x) * It may not be supported depending on the model. * It may not be supported depending on the model. 13. [Sound mode] (Command: d y) 16.
48 _index ENGLISH 17. [Time] 2 (hour/minute/second) (Command: f x) 20. [Off Timer] (Repeat/Time) (Command: f e) Adjusts the Time 2 (hour/minute/second) value. Configures Off Timer (Repeat/Time) settings. Transmission (f)(x)( )(Set ID)( )(Data1)( )(Data2)( )(Data3)(Cr) Data1 00~17: 0 0 to 23 hours Data2 00~3B: 0 0 to 59 minutes Data3 00~3B: 0 0 to 59 seconds * Enter “fx [Set ID] ff” to view the Time 2 (hour/minute/second) settings.
49 22. [On Timer Input] (Command: f u) Configures On Timer (Repeat/Time) settings. Select an external input for the current On Time setting and add a new schedule. Transmission (f)(d)( )(Set ID)( )(Data1)( )(Data2)( )(Data3)(Cr) 2.
50 _index ENGLISH 23. [No Signal Power Off] (15Min) (Command: f g) 26. [Reset] (Command: f k) Sets the monitor to enter Automatic Standby mode if there is no signal for 15 minutes. Performs the reset function. Screen Reset can only be performed in RGB input mode.
51 33. [White Balance Green Gain] (Command: j n) Checks the elapsed time. Adjusts the white balance green gain value. Transmission (j)(n)( )(Set ID)( )(Data)(Cr) Data Data FF: Read status Acknowledgement (l)( )(Set ID)( )(OK/NG)(Data)(x) * The data received is shown as a hexadecimal value. 30. [Product serial number] (Command: f y) 00~FE: Green Gain 0 to 254 FF: Checks the green gain value Acknowledgement (n)( )(Set ID)( )(OK/NG)(Data)(x) 34.
52 _index ENGLISH 37. [White Balance Blue Offset] (Command: s z) 40. [Tile Mode] (Command: d d) Adjusts the white balance blue offset value. Sets the Tile Mode and sets values for the tile rows and columns.
53 46. [Power On Delay] (Command: f h) When displaying the image naturally, the part of the image that would normally be displayed in the gap between the monitors is omitted. Sets the schedule delay when the power turns on. (unit: seconds). Transmission (d)(j)( )(Set ID)( )(Data)(Cr) 00: Off 01: On Acknowledgement (j)( )(Set ID)( )(OK/NG)(Data)(x) Data 00~FA: min. 0 to maximum 250 (seconds) * The maximum value may differ depending on the model.
54 _index ENGLISH 48. [Fail Over Input Select] (Command: m j) 50. [Local Key Operation] (Command: t o) Selects an input source for auto switch. * This command is only available when the Fail Over (auto) mode is set to Custom. Configures the local key operation settings of the product. Transmission (t)(o)( )(Set ID)( )(Data)(Cr) Transmission (m)(j)( )(Set ID)( )(Data1)( )(Data2)( )(Data3)( ) (Data4)...
55 10 (Check Screen) 00: C heck Screen result NG 07: C heck Screen result OK * Sets to NG when Check Screen is set to Off or not supported.
56 _index ENGLISH 55. [PM Mode] (Command: s n, 0c) 57. [Network Settings] (Command: s n, 80 or 81 or 82) Selects the desired PM mode option. Configures network and DNS settings. Transmission (s)(n)( )(Set ID)( )(0c)( )(Data)(Cr) Data 00: S ets the Power Off mode. 01: S ets the Sustain Aspect Ratio mode. 02: S ets the Screen Off mode. 03: S ets the Screen Off Always mode.
57 61. [H Size] (Command: f s) Automatically corrects the position and shaking of the picture. (Works only in RGB-PC input mode.) Adjusts the horizontal size of the screen. This feature only works when the Tile Mode is set to Off. * The operational range varies depending on the RGB input resolution. (Works only in RGB-PC input mode.) Transmission (j)(u)( )(Set ID)( )(Data)(Cr) 01: Execution Acknowledgement (u)( )(Set ID)( )(OK/NG)(Data)(x) * It may not be supported depending on the model.
58 _index ENGLISH 64. [Intelligent Auto] (Command: t i) 67. [Time Sync] (Command: s n, 16) Selects the desired Intelligent Auto option. Configures the Time Sync. Transmission (t)(i)( )(Set ID)( )(Data)(Cr) Transmission (s)(n)( )(Set ID)( )(1)(6)( )(Data)(Cr) Data Data 00: Off 01: On Acknowledgement (i)( )(Set ID)( )(OK/NG)(Data)(x) * It may not be supported depending on the model. 00: Off 01: On * This feature works in the Master mode.
59 73. [DPM Wake up Control] (Command: s n, 0b) Sets Studio Mode to on/off. Sets the DPM Wake up Control Mode. Transmission (s)(n)( )(Set ID)( )(0)(b)( )(Data)(Cr) Data Data 00: Off 01: On Acknowledgement (n)( )(Set ID)( )(OK/NG)(8)(3)(Data)(x) 00: Clock 01: Clock+DATA Acknowledgement (n)( )(Set ID)( )(OK/NG)(0)(b)(Data)(x) * This feature may not be supported in certain models. * This feature may not be supported in certain models. 71. [LAN Daisy Chain] (Command: s n, 84) 74.
60 78. [Easy Brightness Control Schedule] (Command: s s) Controls the Aspect Ratio (Rotation) screen. (This command works only when Content Rotation is on.) Sets Easy Brightness Control schedules. Transmission (s)(n)( )(Set ID)( )(8)(9)( )(Data)(Cr) _index ENGLISH 76. [Aspect Ratio (Rotation)] (Command: s n, 89) Data 00: Full 01: Original Acknowledgement (n)( )(Set ID)( )(OK/NG)(8)(9)(Data)(x) * This feature may not be supported in certain models. 77.
61 81. [Screen Mute] (MultiScreen) (Command: x e) Saves or controls the MultiScreen Mode and input. Turns on/off each screen in MultiScreen.
62 _index ENGLISH 84. [Wireless Wake-on-LAN] (Command: s n, 90) 87. [Holiday Schedule] (Command: s n, 1b) Sets Wireless Wake-on-LAN. Configures the Holiday Schedule. Transmission (s)(n)( )(Set ID)( )(9)(0)( )(Data)(Cr) Data 00: Off 01: On Acknowledgement (n)( )(Set ID)( )(OK/NG)(9)(0)(Data)(x) * This feature may not be supported in certain models. 85. [JustScan Toggle] (Command: s n, 91) Sets JustScan.
63 91. [Luminance Value Read] (Command: m u) Turn Dual Screen On or Off. Reads luminance value. Transmission (s)(n)( )(Set ID)( )(9)(2)( )(Data)(Cr) 00: M ainScreen – On / SubScreen – On 01: M ainScreen – Off / SubScreen – On 02: M ainScreen – On / SubScreen – Off Acknowledgement (n)( )(Set ID)( )(OK/NG)(9)(2)(Data)(x) * This feature may not be supported in certain models. 89. [Fan control] (Command: d o) Sets the fan mode.
64 _index ENGLISH 93. [Power Indicator] (Command: f o) 96. [Hybrid Mode] (Command: s n, 96) Sets the Power Indicator Settings. Sets display’s transparency mode. Transmission (f)(o)( )(Set ID)( )(Data)(Cr) Transmission (s)(n)( )(Set ID)( )(9)(6)( )(Data)(Cr) Data Data 00: Off 01: On Acknowledgement (o)( )(Set ID)( )(OK/NG)(Data)(x) * This may not be supported on some models.
65 102. [No Signal Image] (Command: s n, a9) Uses HDMI data to automatically set Picture Mode. Turns No Signal Image On or Off. Transmission (s)(n)( )(Set ID)( )(a)(9)( )(Data)(Cr) Data Data 00: Off 01: On 00: Off 01: On Acknowledgement (n)( )(Set ID)( )(OK/NG)(9)(9)(Data)(x) Acknowledgement (n)( )(Set ID)( )(OK/NG)(a)(9)(Data)(x) * This feature may not be supported for some models. * This feature may not be supported on some models. 100. [UPnP Mode] (Command: s n, 9c) 103.
66 _index ENGLISH 105. Analog Signage BLU On/Off Time Setting (Command: s n, c3) Set on/off schedule for Analog Signage BLU.
INSTALLATION MANUAL LG Digital Signage (MONITOR SIGNAGE) Please read this manual carefully before operating the your set and retain it for future reference. webOS 3.0 www.lg.
2 ENGLISH CONTENTS ACCESSING INSTALLATION MENU..............................................4 White Balance INSTALLATION MENU...................5 Status Message -- Signage Setup.....................................................................
3 -- Server....................................................................................27 Off Set Automatically Auto Server IP Type Manual -- ISM Method.......................................................................23 Server IP Server Status Mode Port Number Repeat Secured Connection Wait Control Server IP Type Duration Control Server IP Repeat Day Control Server Port Start Time End Time Control Server Status -- Lock Mode....................................................
4 ENGLISH ACCESSING INSTALLATION MENU 1 Press and hold the SETTINGS button for 5 seconds. or 2 When Input ID (The top right corner ) is displayed, enter your password. (The default value is 0, 0, 0, 0 ) 3 When the Installation Menu is displayed, select the desired option. -- Signage Setup -- USB Cloning -- Password Change -- Fail Over -- ISM Method -- Server -- Lock Mode NOTE •• Images in the manual may look different from the actual product.
5 NOTE •• Some features described in the Installation manual may not be supported in certain models. Signage Setup Use this menu to configure the digital signage after installation. Power On Status •• You can select the operating status of the monitor when the main power is switched on. •• You can select from among PWR, STD, and LST. •• PWR sets the status of the monitor to on whenever the main power is switched on. •• STD sets the status of the monitor to standby when the main power is switched on.
6 Power Off Management ENGLISH •• No Signal Power Off (15 Min) -- You can choose whether to use the 15 min force off feature. -- You can set this option to On or Off. -- If you set this option to On, the product turns off when it has remained in no signal status for 15 minutes. -- If you set this option to Off, the 15 min force off feature is disabled. -- Set this option to Off when you use the product for a long period of time. •• Auto Power Off -- You can choose whether to use the 4 hours off feature.
7 NOTE •• Set to Screen Off & Backlight (Outdoor Mode) when installing outdoors. •• When the Outdoor mode is set, you can reduce the cause for internal humidity and condensation in the product. •• When operating in low temperatures, the enclosure may not work for up to one hour to raise the internal temperature of the enclosure. •• For compatibility of some media input devices, set the Sustain Aspect Ratio. ENGLISH •• PM Mode -- Power Off: Normal DC off status.
8 Rotation ENGLISH •• OSD Portrait Mode -- This feature allows you to rotate the OSD clockwise. -- You can set this feature to Off/90/180/270. (Some models only support certain settings.) -- If you set this feature to Off, the feature is disabled. -- If you set this feature to 90, the OSD rotates 90 degrees clockwise. In this case, the mouse cannot be used. -- If you set this feature to 180, the OSD rotates 180 degrees clockwise. In this case, the mouse cannot be used.
9 Beacon Baudrate (9600/115200) •• You can change the RS-232C communication speed for controlling your monitor. •• You can choose 9600 or 115200. •• If you set this option to 9600, the RS-232C communication speed is set at 9600 bps. •• If you set this option to 115200, the RS-232C communication speed is set at 115200 bps. ENGLISH •• Enables BLE Beacon, one of Bluetooth 4.0's features. •• Beacon Mode (on/off toggle): Enables the Beacon feature.
10 Power On Delay (0 ~ 250) ENGLISH •• This feature delays power on in order to prevent overload when multiple monitor sets are turned on simultaneously. •• You can set the delay interval in the range of 0 to 250 seconds. Check Screen •• The Check Screen feature judges whether there are abnormalities at the edges of the screen. R, G, and B OSDs are formed on the screen at one second intervals and an Pixel Sensor tests the areas. •• If set to On, the Check Screen feature is enabled.
11 Interface Selection OPS Power Control •• You can control the power of the OPS. •• Disable: Disables the OPS Power Control. •• Sync (on): Synchronizes the power status of the monitor and the OPS only when monitor is on. •• Sync (on/off): Always synchronizes the power status of the monitor and the OPS. •• When you set the OPS Power Control feature to on, you must set the sustain Aspect Ratio of the PM Mode to off.
12 Sync Mode ENGLISH •• Syncs the products to the time, brightness and content of one product. •• Off: Sync is disabled. •• RS-232C: Syncs multiple monitors connected via RS-232C. -- Master/Slave: These monitors can be set to Master or Slave. Only one monitor should be set to Master mode for this feature to work properly. -- Time Sync: When Time Sync is set to On, the current time of the Master monitor is sent to multiple Slave monitors connected via RS-232C to sync the time.
13 Intelligent Auto Studio Mode •• Outputs the images with a lower color temperature. •• You can set this feature to On or Off. •• Setting this feature to On lowers the color temperature of the images. HDMI IT Contents •• Sets the HDMI IT Contents function. •• Disable: Does not use the HDMI IT Contents function. •• Enable: Uses the HDMI IT Contents function. •• This function automatically changes the Picture mode based on HDMI Contents information when an HDMI signal is entered.
14 Application ENGLISH •• Adds/deletes applications in the Launcher bar. •• We recommend that if you are to remove the Screen Share app from the home launcher by unchecking the Screen Share item, you should reboot your system after removal. •• When Content Rotation or OSD Portrait Mode is set to On, the 'Group Manager' app is removed from the launcher and the 'Group Manager' item is deactivated. •• When the Control Manager is set to On, the Control Manager app will be added to the Launcher bar.
15 Status Message ENGLISH •• Sets up a feature that sends the status of Signage to users' email addresses. •• The administrator can set Status Message to On or Off. •• Messaging Period: Sets a time interval to send messages. You can select either When Failure Status or Weekly. •• Select Date: Available if you have set Messaging Period to Weekly. Select your desired day of the week for message transmission. •• Select Time: Available if you have set Messaging Period to Weekly.
16 SIMPLINK Setup ENGLISH •• When the SIMPLINK Setup is set to On, you can use the SIMPLINK provided by LG Signage. •• Device ID: S ets the ID of the device connected via CEC wiring. You can choose a value between 'All' and 'E'. •• StandBy: Sets the scenarios for sending and receiving the OpStandBy (0x0c) command. Detailed scenarios are as follows: Send Receive Send Only O X Receive Only X O All O O Local Dimming •• Sets whether to use the Local Dimming feature.
17 Analog Signage BLU Setting Crestron •• This function enables synchronization with applications provided by Crestron. •• Server: This menu sets the server's IP address for the network connection with the server (equipment provided by Crestron). •• Port: This menu sets the port for the network connection with the server. The default port number is 41794. •• IP ID: This menu sets a unique ID for synchronizing with the application.
18 Signage 365 Care ENGLISH •• You can install the Signage 365 Care (fault diagnosis) solution for fault diagnosis and prediction service. •• Install: Installs the Signage 365 Care solution. 1) ENTER ACCOUNT NUMBER: Enters the 6-digit account number to install the Signage 365 Care solution. -- Account Number: The number assigned when the Signage 365 Care solution is registered. When the account number is entered, the account name corresponding to the number is obtained.
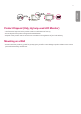
19 Guide to Using Content Rotation Original 2 2 Content Rotation (270 degrees) Rotating displays (90 degrees) 2 ENGLISH [Portrait installation setting] You can turn the image into a portrait image using Content Rotation. When installing the display rotated 90 degrees: Set Content Rotation to 270. When installing the display rotated 270 degrees: Set Content Rotation to 90.
20 ENGLISH [Video wall installation setting] You can implement a landscape and portrait video wall using Content Rotation.
21 You can copy the product settings to other sets. Send to USB •• You can save the current settings in file format to a USB device.
22 ENGLISH Fail Over The input source with the highest priority will be selected. Off •• The Auto-Fail Over feature is disabled. Auto •• The input source changes according to the specified order. When several input sources are found, the input source with the highest priority will be selected. •• Priority Case 1) 1. HDMI, 2. DVI-D, 3. DISPLAYPORT, 4. OPS, 5. RGB, 6. Internal Memory Case 2) 1. HDMI1, 2. HDMI2, 3. OPS/HDMI3/DVI-D or OPS/DVI-D, 4. DP, 5.
23 If a still image is displayed on the screen for an extended period of time, image sticking can occur. The ISM method is a feature that prevents image sticking. Mode •• Selects the desired ISM Method mode. •• Normal: Disables the ISM method. •• White Wash: Displays a white pattern to remove image sticking. •• Color Wash: Alternately displays a white pattern and a color pattern to remove image sticking. •• User Image: Displays your desired images using USB. •• User Video: Plays your desired video.
24 Repeat ENGLISH •• Off, just 1 time: If you select the desired mode and press DONE, ISM operates immediately. •• On: If the screen remains still for a specified wait time, ISM operates for the specified duration time. •• On, with moving detection: Only applies to Orbiter mode. If the screen remains still for the specified Wait time, ISM operates for the specified Duration time. •• On, without moving detection: Only applies to Orbiter mode.
25 Action Cycle Bar Image •• Off: Displays a bar with a fixed resolution of 300 x 1080, then moves the bar. •• On: Displays and moves an image downloaded by the user. The image is displayed with a fixed height of 1080 and the same width as downloaded. However, if the width of the image is below 300, it will have a fixed value of 300. •• This option is available only when you have selected Washing Bar. •• If you have downloaded only one image, the bar is moved and the image is displayed alone.
26 Bar Image Download ENGLISH •• To download an image, the image file must be located under the folder titled "ISM" on your USB drive. •• Make sure to delete the old images stored in the internal memory before downloading a new image file. •• Supported image file types: "BMP", "JPG", "JPEG", "PNG" •• You can download up to four images. (Resolution: 1920 x 1080 or lower) •• If there are no images, or if the existing images have been deleted, the default image is used.
27 Set Automatically •• The monitor settings will be set automatically so that the SuperSign server can search it. Server IP Type •• Select the IPv4 or the IPv6 type. Server IP •• This is a menu where you can set an IP address for the SuperSign server. Server Status •• Server Status displays the status of the connection between your monitor and the SuperSign server. •• Not Connected - indicates that your monitor is not connected to the SuperSign server.
28 ENGLISH Lock Mode USB •• You can prevent the use of USB devices. OSD •• You can prevent OSD from displaying. Wi-Fi •• This feature enables you to turn the Wi-Fi feature on or off. Reset to Initial Settings •• You can restore the initial settings with this feature. IR Operation •• If you set IR Operation to Normal, you can use the remote control. •• If you set IR Operation to Power Key Only, you can only use the Power Key. •• If you set IR Operation to Block All, you cannot use the remote control.