OWNER’S MANUAL LG Digital Signage (MONITOR SIGNAGE) Please read this manual carefully before operating your set and retain it for future reference. 55EF5C-M2V 55EF5C-M3V www.lg.
ENGLISH TABLE OF CONTENTS SAFETY PRECAUTION...................3 -- Precautions for Installing the Product...................3 -- Precautions using the AC Adapter and Electrical Power..................................................................5 -- Precautions for Moving the Product.......................7 -- Precautions for Using the Product..........................8 -- Mounting on a Wall..........................................................9 LICENSES.....................................
SAFETY PRECAUTION Please read these safety precautions carefully before using the product. WARNING If you ignore the warning message, you may be seriously injured or there is a possibility of accident or death. CAUTION If you ignore the caution message, you may be slightly injured or the product may be damaged. Precautions for Installing the Product WARNING •• Keep away from heat sources like electrical heaters. -- Electrical shock, fire, malfunction, or deformation may occur.
ENGLISH •• Do not drop an object on or apply impact to the product. Do not throw any toys or objects on the product screen. -- It can cause injury to human, problem to product and damage the display. •• Do not let the product fall or drop when connecting it with an external device. -- This may cause injury and/or damage to the product. •• When connecting it to a game device, keep a distance of four times the diagonal measurement of the screen from the device.
WARNING •• If water or any foreign substance goes inside the product (TV, monitor, power cord, or AC adapter), disconnect the power cord immediately and contact the service center. -- Otherwise, this may cause a fire or electric shock due to damage to the product. •• Do not touch the power plug or AC adapter with wet hands. If the pins of the plug are wet or dusty, wipe and dry them before use. -- Otherwise, this may cause a fire or electric shock.
ENGLISH •• If you don’t intend to use the product for a long time, unplug the power cable from the product. -- Covering dust can cause a fire, or insulation deterioration can cause electric leakage, electric shock or fire. •• Fix the power cable completely. -- If the power cable is not fixed completely, a fire can break out. •• Do not insert a conductor (like a metal chopstick) into one end of the power cable while the other end is connected to the input terminal on the wall.
WARNING •• Make sure to turn off the product. -- You may be electrocuted or the product can be damaged. •• Make sure to remove all cables before moving the product. -- You may be electrocuted or the product can be damaged. •• Make sure the panel faces forward and hold it with both hands to move. If you drop the product, the damaged product can cause electric shock or fire. Contact an authorized the service center for repair.
ENGLISH Precautions for Using the Product WARNING •• Do not disassemble, repair or modify the product at your own discretion. -- Fire or electric shock accident can occur. -- Contact the service center for check, calibration or repair. •• When the display is to be left unattended for an extended period of time, unplug it from the wall outlet. •• Keep the product away from water. -- Fire or electric shock accident can occur.
WATER CHEMICALS •• Do not use products using high voltage around the Monitor. (e.g., a bug zapper) -- Monitor may have malfunction as its electrical shock. Mounting on a Wall •• Do NOT install this product by yourself as you may injure yourself or cause damage to product. Please contact service personnel authorised by manufacturer. ENGLISH •• Spray water onto a soft cloth 2 to 4 times, and use it to clean the front frame; wipe in one direction only. Too much moisture may cause staining.
ENGLISH LICENSES Supported licenses may differ by model. For more information of the licenses, visit www.lg.com. The terms HDMI and HDMI High-Definition Multimedia Interface, and the HDMI logo are trademarks or registered trademarks of HDMI Licensing LLC in the United States and other countries. Manufactured under license from Dolby Laboratories. Dolby and the double-D symbol are trademarks of Dolby Laboratories. For DTS patents, see http://patents.dts.com.
CAUTION •• Always use genuine components to ensure safety and product performance. •• The product warranty will not cover damage or injury caused by the use of counterfeit components. •• Connect the power cord to the product before you plug it into a wall outlet. Plugging the power cord into a wall outlet first may cause an electric shock, which can also damage the product. NOTE •• The accessories provided with your product may vary depending on the model or region.
ENGLISH STORAGE METHOD FOR PANEL PROTECTION Correct Method 1 If the product needs to be set upright, hold both sides of the product and make sure that the panel does not touch the floor. Panel 2 When laying down the product, lay a cushion on a flat floor. Put the product on it with the panel of the product facing down.
Incorrect Method Panel 2 If the product is tilted onto the edge of the panel, the panel may be damaged. Panel ENGLISH 1 If the product is tilted onto the bezel, the bottom of the panel may be damaged.
ENGLISH Installing on a Wall Install the monitor at least 200 mm away from the wall and leave about 100 mm of space at each side of the monitor to ensure sufficient ventilation. 100 mm 200 mm 100 mm 100 mm 100 mm CAUTION •• Disconnect the power cord before moving or installing the monitor to avoid risk of electric shock. •• If you install the monitor on a ceiling or slanted wall, it may fall and result in injury.
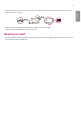
IR RECEIVER This allows a remote control sensor to be placed in a custom location. Then that display can control other displays via an RS-232C cable.
Mechanically Connecting the displays ENGLISH 1 After joining the sets, use the tiling guide to adjust the gap between the sets. (M3 x L4.5) 2 Now the 2 x 2 tiling is complete. You can tile in various combinations, such as 3 x 3. NOTE •• You may mount the set without using the tiling guide; this does not affect the performance of the device. •• The screws are enclosed with the other components in the box, including the tiling guides.
The descriptions in this manual are based on the buttons on the remote control. Please read this manual carefully to use the monitor correctly. To install batteries, open the battery cover, place batteries (1.5 V AAA) matching and terminals to the labels inside the compartment, and close the battery cover. To remove the batteries, perform the installation actions in reverse. The illustrations may differ from the actual accessories.
ENGLISH or Selects the Picture Mode. Activates the Launcher. Enters the White Balance menu. Accesses the main menus or saves your input and exit menus. SuperSign menu key. Navigation Buttons Scrolls through menus or options. Selects menus or options and confirms your input. Allows you to move back one step in the user interaction function. Quit all OSD tasks and applications.
You can connect various external devices to your monitor. Change the input mode and select the external device you want to connect. For more information about external device connections, see the user manual provided with each device. Connecting to a PC Some of the cables are not provided. This monitor supports the Plug and Play* feature. * Plug and Play: a feature that enables a PC to recognize devices attached by the user without device configuration or user intervention when powering up.
NOTE ENGLISH •• For the best image quality, using the monitor with HDMI connection is recommended. •• To comply with the specifications of the product, use a shielded interface cable with ferrite core, such as a HDMI cable. •• If you turn the monitor on when the set is cold, the screen may flicker. This is normal. •• Sometimes red, green, or blue spots may appear on the screen. This is normal. •• Use a High Speed HDMI®/TM cable (shorter than 3 meters).
→ •• HDMI → DISPLAYPORT → OPS ENGLISH Using the Input List
ENGLISH TROUBLESHOOTING No image is displayed. Problem Is the product power cord connected? Does the “Invalid Format” message appear? Does the “No Signal” message appear? Action •• Check if the power cord is correctly plugged into the power outlet. •• The signal from the PC (Graphics card) is out of the vertical or horizontal frequency range of the product. Adjust the frequency range by referring to the Specifications in this manual. •• The signal cable between PC and product is not connected.
The audio function does not work. No sound? Sound is too dull. Action •• See if the audio cable is connected properly. •• See if the sound is set properly. •• Select the appropriate equalizer sound. Screen color is abnormal. Problem Screen has poor color resolution (16 colors). Screen color is unstable or mono-colored. Do black spots appear on the screen? Action •• Set the number of colors to more than 24 bits (true color). Select [Control Panel] → [Display] → [Settings] → [Color Table] in Windows.
ENGLISH CAUTION •• Image sticking may occur when displaying a fixed image for an extended period of time. It is recommended that you display videos for 18 hours or less per day to decrease the likelihood of image sticking. •• A few horizontal lines may appear on the screens while running the Clear Panel Noise feature (OFF-RS). This is normal, so there is no need for concern. Turning the power on while the Clear Panel Noise feature (OFF-RS) is operating may cause the product to malfunction.
The product specifications below may be changed without prior notice due to upgrade of product functions. “ ” refers to alternating current (AC), and “ ” refers to direct current (DC).
ENGLISH [Unit: mm] Signage Box 4JHOBHF #PY 4JHOBHF #PY
T-con Box NOTE •• May vary depending on the curvature.
HDMI/ DisplayPort/ OPS (PC) Support mode ENGLISH Resolution Horizontal frequency (kHz) Vertical frequency (Hz) 640 x 480 31.469 59.94 800 x 600 37.879 60.317 1024 x 768 48.363 60.0 1152 x 864 53.783 59.959 1280 x 720 45 60 1280 X 800 49.702 59.81 1366 x 768 47.712 59.79 1280 x 1024 63.981 60.02 1600 x 900 60 60 1680 x 1050 65.29 59.954 1920 x 1080 67.5 60 1920 x 1200 74.038 59.95 Only applies to HDMI/ DisplayPort. 3840 x 2160 67.
ENGLISH NOTE •• Resolutions available for the Input Label option in HDMI/ DisplayPort/ OPS input modes. -- PC resolutions: 1280 x 720 / 60 Hz, 1920 x 1080 / 60 Hz -- DTV resolutions: 480p, 720p and 1080p •• Vertical frequency: The product display functions by the screen image changing dozens of times every second like a fluorescent lamp. The vertical frequency or refresh rate is the number of image displays per second. The unit is Hz.
Make sure to read the Safety Precautions before using the product. The model and serial numbers of the SET are located on the back and one side of the SET. Record it below should you ever need service. MODEL SERIAL Temporary noise is normal when powering ON or OFF this device.