OWNER’S MANUAL LED TV* * LG LED TV applies LCD screen with LED backlights. Please read this manual carefully before operating your set and retain it for future reference. LN54** LP36** LP63** LP86** LA62** www.lg.
TABLE OF CONTENTS ENG ENGLISH TABLE OF CONTENTS 28 REMOTE CONTROL 3 LICENSES 3 OPEN SOURCE SOFTWARE NOTICE 4 SAFETY INSTRUCTIONS 4 - Viewing 3D Imaging (Only 3D models) 6 INSTALLATION PROCEDURE 6 ASSEMBLING AND PREPARING 6 9 10 11 12 12 13 16 17 18 Unpacking Separate purchase Parts and buttons Lifting and moving the TV Setting up the TV - Attaching the stand - Mounting on a table - Mounting on a wall - Tidying cables - How to use Dual Lock™ 19 MAKING CONNECTIONS 19 19 20 21 22 22 23 24 25
LICENSES / OPEN SOURCE SOFTWARE NOTICE 3 Supported licenses may differ by model. For more information about licenses, visit www.lg.com. Manufactured under license from Dolby Laboratories. “Dolby” and the double-D symbol are trademarks of Dolby Laboratories. The terms HDMI and HDMI High-Definition Multimedia Interface, and the HDMI logo are trademarks or registered trademarks of HDMI Licensing LLC in the United States and other countries.
SAFETY INSTRUCTIONS ENG ENGLISH SAFETY INSTRUCTIONS Please read these safety precautions carefully before using the product. Viewing 3D Imaging (Only 3D models) WARNING Viewing Environment yy Viewing Time -- When watching 3D contents, take 5 - 15 minute breaks every hour. Viewing 3D contents for a long period of time may cause headache, dizziness, fatigue or eye strain.
SAFETY INSTRUCTIONS 5 Viewing Environment � Viewing Distance - Maintain a distance of at least twice the screen diagonal length when watching 3D contents. If you feel discomfort in viewing 3D contents, move further away from the TV. � Viewing Position -- Face the center of the screen at eye level with the head looking straight ahead. Otherwise, you may not be able to view 3D contents properly. Viewing Age yy Infants/Children -- Usage/ Viewing 3D contents for children under the age of 6 are prohibited.
INSTALLATION PROCEDURE / ASSEMBLING AND PREPARING ENG ENGLISH NOTE Image shown may differ from your TV. yy Your TV’s OSD (On Screen Display) may differ slightly from that shown in this manual. yy The available menus and options may differ from the input source or product model that you are yy using. New features may be added to this TV in the future. yy The TV can be placed in standby mode in order to reduce the power consumption.
ASSEMBLING AND PREPARING Owner’s manual Remote control, batteries (AAA) (See p.28, 29, 30, 31) Stand Body / Stand Base (Only LP36**, 32/37/39/42/47LN54**, LP63**) (See p.12) Stand Body / Stand Base (Only LP860*, 55/60LN54**, LA62**) (See p.12) SCART Gender Cable (Only LP869*) (See p.25) Cable holder (Depending on model) (See p.17) Desk-mount screw M4 x 20 (1EA: Only LP36**, 32/37/39/42/47LN54**, LP63**) (2EA : Only 42/47LP860*) (See p.
ASSEMBLING AND PREPARING ENG ENGLISH NOTE Antenna Isolator Installation Guide yy -- Use this to install TV in a place where there is a voltage difference between TV Set and GND of antenna signal. »» If there is a voltage difference between TV Set and GND of antenna signal, the antenna contact might be heated and excessive heat might cause an accident. -- You can improve the safety when watching TV by efficiently removing power voltage from TV antenna.
ASSEMBLING AND PREPARING Separate purchase items can be changed or modified for quality improvement without any notification. Contact your dealer to buy these items. These devices only work with certain models.
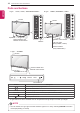
ASSEMBLING AND PREPARING Parts and buttons ENG ENGLISH A type : LP36**, LP63**, 32/37/39/42/47LN54** Screen Screen OK OK SETTINGS SETTINGS INPUT INPUT Speakers Speakers Power indicator and Remote control sensor Buttons Remote control sensor Buttons LG Logo Light (Only LP860*, LA62**) Power indicator (Only 55/60LN54**) C type : 37LP869* Screen OK Power indicator and Remote control sensor ETTINGS NPUT B type : LP860*, 55/60LN54**, LA62** Speakers OK SETTINGS INPUT Touch buttons
ASSEMBLING AND PREPARING 11 When moving or lifting the TV, read the following to prevent the TV from being scratched or damaged and for safe transportation regardless of its type and size. yy When transporting a large TV, there should be at least 2 people. yy When transporting the TV by hand, hold the TV as shown in the following illustration. CAUTION Avoid touching the screen at all times, as this yy may result in damage to the screen.
ASSEMBLING AND PREPARING Setting up the TV ENG ENGLISH (Only LP860*, 55/60LN54**, 55LA62**) *Image shown may differ from your TV.
ASSEMBLING AND PREPARING yy When attaching the stand to the TV set, place the screen facing down on a cushioned table or flat surface to protect the screen from scratches. yy Make sure that the screws are inserted correctly and fastened securely. If they are not fastened securely enough, the TV may tilt forward after being installed. Do not use too much force and over tighten the screws; otherwise screw may be damaged and not tighten correctly.
ASSEMBLING AND PREPARING ENG ENGLISH Securing the TV to a table Adjusting the angle of the TV to suit view Fix the TV to a table to prevent from tilting forward, damage, and potential injury. Mount the TV on a table, and then insert and tighten the supplied screw on the rear of the stand. (Only 32/55/60LN54**, 32LP36**, 32LP63**, 42/47/55LP860*, 55LA62**) Swivel 15 degrees to the left or right and adjust the angle of the TV to suit your view.
ASSEMBLING AND PREPARING (This feature is not available for all models.) Securing the TV to a wall (This feature is not available for all models.) The Kensington security system connector is located at the rear of the TV. For more information of installation and using, refer to the manual provided with the Kensington security system or visit http://www.kensington.com. Connect the Kensington security system cable between the TV and a table.
ASSEMBLING AND PREPARING ENG ENGLISH Mounting on a wall Attach an optional wall mount bracket at the rear of the TV carefully and install the wall mount bracket on a solid wall perpendicular to the floor. When you attach the TV to other building materials, please contact qualified personnel. LG recommends that wall mounting be performed by a qualified professional installer. 10 cm 10 cm 10 cm 10 cm CAUTION Disconnect the power first, and then move yy or install the TV.
ASSEMBLING AND PREPARING 17 *image shown may differ from your TV. (Only LP36**, LN54**, LP63**, LA62**) (Only LP860*) Coaxial Cable Holder 1 Secure the power cord with the protective ENGLISH ENG Tidying cables Cable Holder bracket/bolt. Power Cord Holder Cable Management (Only LP869*) Power Cord Holder (Only 37LP869*) Cable Holder Protective bracket/bolt 2 Gather and bind the cables with the cable holder.
ASSEMBLING AND PREPARING ENG ENGLISH How to use Dual Lock™ (Only LP63**) Fix the set-top box to the TV and use it when you want to. 2 Attach the set-top box to the TV by pressing the Velcro strips together. 1 After removing the protection paper from the Dual Lock, stick it to the TV and the set-top box as shown. Dual Lock™ NOTE Please make sure no foreign substances yy exist on the surface of the product, and then firmly attach the Dual Lock.
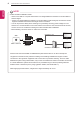
MAKING CONNECTIONS 1 Connect the TV to a wall antenna socket with an RF cable (75 Ω). /DVI IN 2 NOTE LNB IN ANTENNA/ Satellite CABLE IN USB IN This section on MAKING uses diagrams for the LP36** models. Connect various external devices to theCLOCK TV SPEAKER OUT and switch input modes to select an external device. For more information external LAN onVOLUME CONTROL device’s connection, refer to the manual provided withRS-232C each IN device.
ENG ENGLISH HDMI connection PCMCIA CARD SLOT MAKING CONNECTIONS (Only LP869*) /DVI IN Transmits the digital video and audio signals from your PC to the AVTV. Connect the PC and the TV with the 2 IN 3 /DVI IN USB IN 3 (RGB)as shown. Choose any HDMI input port to cable connect. It does not matter which port you use.
MAKING CONNECTIONS 21 /DVI IN 2 3 AV (RGB) RS-232C IN (CONTROL & SERVICE) /DVI INPCMCIA CARD SLOT ANTENNA/ CABLE IN H/P OUT 1 COMPONENT AUDIO IN OPTICAL (COMPONENT/RGB/DVI) AUDIO OUT IN 2 RGB IN (PC) AUDIO 1(ARC) SPEAKER OUT IN AUDIO USB IN (Only LP63**) AV (RGB) IN 3 2 AUDIO IN OPTICAL (COMPONENT/DVI) AUDIO OUT USB IN 1 COMPONENT IN (Only LP869*) PCMCIA CARD SLOT Transmits the digital video signal from an external device to the TV.
MAKING CONNECTIONS Component connection Transmits the video signal from PC to the TV. To transmit an audio signal, connect an audio cable. (Only LN54**, LP36**, LA62**) Transmits the analogue video and audio signals from an external device to the TV. Connect the external device and the TV with the component cable as shown.
MAKING CONNECTIONS 23 Connect the external speaker to the SPEAKER OUT jack on the TV.
MAKING CONNECTIONS SPEAKER OUT /DVI IN 8Ω SPEAKER OUT 8Ω 1 Provided) 2 (*Not AUDIO IN COMPONENT OPTICAL (COMPONENT/RGB/DVI) AUDIO OUT IN + Connect a USB storage device such as s USB flash memory, external hard drive or a USB memory card reader to the TV and access the My media menu to use various multimedia files.
Euro Scart connection View the encrypted (pay) services in digital TV mode. This feature is not available in all countries. Transmits the video and audio signals from an external device to the TV set. Connect the external device and the TV set with the euro scart cable as shown.
MAKING CONNECTIONS NOTE AV (TV Out1) Digital TV Analogue TV, AV Analogue TV Component / RGB Analogue TV HDMI Analogue TV Do not look into the optical output port. yy Looking at the laser beam may damage your vision. Audio with ACP (Audio Copy Protection) yy function may block digital audio output. PCMCIA CARD SLOT Digital TV /DVI IN TV signals.
PCMCIA CARD SLOT MAKING CONNECTIONS Network setup H/P OUT 1 2 This TV can be connected to a Pro:Centric server AUDIO IN COMPONENT OPTICAL (COMPONENT/RGB/DVI) IN AUDIO OUT or local area network (LAN) via the LAN port. After making the physical connection, the TV needs to be set up for network communication. SPEAKER OUT Connect the LAN port of the Modem or Router from Pro:Centric server to the VOLUME LANCONTROL port on the TV. RGB IN (PC) (Image shown may differ from your TV.
REMOTE CONTROL ENG ENGLISH REMOTE CONTROL The descriptions in this manual are based on the buttons on the remote control. Please read this manual carefully and use the TV correctly. To replace batteries, open the battery cover, replace batteries (1.5 V AAA) matching the and ends to the label inside the compartment, and close the battery cover. To remove the batteries, perform the installation actions in reverse. or CAUTION Do not mix old and new batteries, as this may damage the remote control.
REMOTE CONTROL 29 (POWER) Turns the TV on or off. ꕊ ENERGY SAVING Adjusts the brightness of the screen to reduce ENERGY AV MODE energy consumption. AV MODE Selects an AV mode. INPUT Changes the input source. TV/RAD Selects Radio, TV and DTV programme. INPUT TV/ RAD SAVING 1 2 3 4 5 6 7 8 9 LIST 0 Q.VIEW Number buttons Enters numbers. LIST Accesses the saved programme list. Q.VIEW Returns to the previously viewed programme.
REMOTE CONTROL ENG ENGLISH (Only LP869*) TV/ RAD INPUT SUBTITLE Q.MENU AV MODE 1 4 7 LIST 2 5 8 0 3 6 9 Q.VIEW FAV RATIO P PAGE MUTE GUIDE TEXT PORTAL INFO T.OPT EXIT LIVE TV SETTINGS (POWER) Turns the TV on or off. TV/RAD Selects Radio, TV and DTV programme. SUBTITLE Recalls your preferred subtitle in digital mode. Q.MENU Accesses the Quick menus. AV MODE Selects an AV mode. ꕊ ENERGY SAVING Adjusts the brightness of the screen to reduce energy consumption.
REMOTE CONTROL 31 RATIO INPUT AV MODE TV/ RAD 1 2 3 4 5 6 7 8 9 LIST 0 Q.VIEW FAV P MUTE 3D OPTION SETTINGS INFO Q.MENU OK P A G E (POWER) Turns the TV on or off. TV/RAD Selects Radio, TV and DTV programme. RATIO Resizes an image. INPUT Changes the input source. AV MODE Selects an AV mode. Number buttons Enters numbers. LIST Accesses the saved programme list. Q.VIEW Returns to the previously viewed programme. FAV Accesses your favourite programme list.
MAINTENANCE / TROUBLESHOOTING MAINTENANCE ENG ENGLISH Cleaning your TV Clean your TV regularly to keep the best performance and to extend the product lifespan. CAUTION Make sure to turn the power off and disconnect the power cord and all other cables first. yy When the TV is left unattended and unused for a long time, disconnect the power cord from the wall yy outlet to prevent possible damage from lightning or power surges.
CAUTION FOR USING EZSIGN 33 CAUTION FOR USING EZSIGN Do not remove a USB drive while data is being copied. It can corrupt the data and EzSign may not work yy properly. While loading a USB device or dongle, your TV may function slower than normal. yy Some user-created subtitles may not work properly. yy Some special characters are not supported in subtitles. yy HTML tags are not supported in subtitles. yy Subtitles in languages other than the supported languages are not available.
SPECIFICATIONS ENG ENGLISH 60LN54** MODEL 60LN549E-ZE 32LP36** 37LP36** 32LP360H-ZA 37LP360H-ZA 37LP361H-ZA 32LP361H-ZA Dimensions (W x H x D) With stand (mm) 1359 x 866 x 297 738 x 497 x 207 849 x 561 x 236 Without stand (mm) 1359 x 799 x 67.2 738 x 449 x 79.0 849 x 512 x 79.0 Weight With stand (kg) 27.0 7.0 9.1 Without stand (kg) 24.2 6.4 8.
SPECIFICATIONS Environment condition 100.0 mm x 55.0 mm x 5.
SPECIFICATIONS ENG ENGLISH RGB-PC, HDMI/DVI-PC supported mode HDMI/DVI-DTV supported mode (Only LN54**, LP36**, LA62**) Resolution Horizontal Frequency (kHz) Vertical Frequency (Hz) 720x400 31.469 70.08 640x480 31.469 59.94 800x600 37.879 60.31 1024x768 48.363 60.00 1152x864 54.348 60.053 1360x768 47.712 60.015 1280x1024 63.981 60.020 1920x1080 (RGB-PC) 66.587 59.934 1920x1080 (HDMI-PC) 67.50 60.
SPECIFICATIONS 37 Video, which is input as below media contents is switched into the 3D screen automatically. yy The method for 3D digital broadcast may differ depending on the signal environment. If video is not yy switched automatically into 3D, manually convert the settings to view 3D images. 3D supported mode automatically Input Signal 720p HDMI 1080i 1080p Resolution 1280X720 1920X1080 1920X1080 Horizontal Frequency (kHz) 37.5 45 Vertical Frequency (Hz) 50 60 75 50 89.9 / 90 59.
IR CODES IR CODES ENG ENGLISH This feature is not available for all models. yy Code (Hexa) Function 08 (POWER) Note Remote control Button (Power On/Off) 95 ENERGY SAVING Remote control Button 30 AV MODE Remote control Button 0B INPUT Remote control Button F0 TV/RAD Remote control Button 10-19 Number Key 0-9 Remote control Button 53 LIST Remote control Button 1A Q.
EXTERNAL CONTROL DEVICE SETUP 39 RS-232C configurations Connect the RS-232C (serial port) input jack to an external control device (such as a computer or an A/V control system) to control the product’s functions externally. Connect the serial port of the control device to the RS-232C jack on the product back panel. Note: RS-232C connection cables are not supplied with the /DVI IN product.
EXTERNAL CONTROL DEVICE SETUP ENG ENGLISH Communication parameters yy Baud rate: 9600 bps (UART) yy Data length: 8 bits yy Parity : None yy Stop bit: 1 bit yy Communication code: ASCII code yy Use a crossed (reverse) cable. Command reference list (Depending on model) 01. Power 02. Aspect Ratio 03. Screen Mute 04. Volume Mute 05. Volume Control k a DATA (Hexadecimal) 00 to 01 k c (See p.42) 14. Bass k s 00 to 64 k d (See p.42) 15.
EXTERNAL CONTROL DEVICE SETUP 41 Transmission [Command1][Command2][ ][Set ID][ ][Data][Cr] [Command 1] [Command 2] [Set ID] : First command to control the TV.(j, k, m or x) : Second command to control the TV. : You can adjust the set ID to choose desired monitor ID number in option menu. Adjustment range is 1 to 99. When selecting Set ID ‘0’, every connected set is controlled. Set ID is indicated as decimal (1 to 99) on menu and as Hexa decimal (0x0 to 0x63) on transmission/receiving protocol.
EXTERNAL CONTROL DEVICE SETUP ENG ENGLISH 01. Power (Command: k a) 04. Volume Mute (Command: k e) ►► To control Power On/Off of the set. ►► To control volume mute on/off. You can also adjust mute using the MUTE button on remote control. Transmission[k][a][ ][Set ID][ ][Data][Cr] Data 00 : Power Off 01 : Power On Ack [a][ ][Set ID][ ][OK/NG][Data][x] ►► To show Power On/Off.
EXTERNAL CONTROL DEVICE SETUP 13. Treble (Command: k r)(Except for LP86**) ►► To adjust the screen tint. You can also adjust tint in the PICTURE menu. ►► To adjust treble. You can also adjust treble in the AUDIO menu. Transmission [k][j][ ][Set ID][ ][Data][Cr] Data Red : 00 to Green : 64 * Refer to ‘Real data mapping’. See p.45. Transmission [k][r][ ][Set ID][ ][Data][Cr] Data Min : 00 to Max : 64 * Refer to ‘Real data mapping’. See p.45.
EXTERNAL CONTROL DEVICE SETUP ENG ENGLISH 17. Energy Saving (Command: j q) 19. Tune Command (Command: m a) ►► To reduce the power consumption of the TV. You can also adjust Energy Saving in PICTURE menu. ►► Select channel to following physical number.
EXTERNAL CONTROL DEVICE SETUP 23. Input select (Command: x b) 45 24. 3D(Command: x t) (only 3D models) (Depending on model) ► To change 3D mode for TV. ►► To select input source for main picture.
The model and serial numbers of the TV is located on the back of the TV Record it below should you ever need service.