THE ULTIMATE DISPLAY OWNER’S MANUAL Please read this manual carefully before operating your set and retain it for future reference. EG96** EG92** EG91** *MFL68927405* www.lg.
TABLE OF CONTENTS ENGLISH ENG TABLE OF CONTENTS 3 LICENSES 3 OPEN SOURCE SOFTWARE NOTICE INFORMATION 4 SAFETY INSTRUCTIONS 10 - Viewing 3D Imaging (Only 3D models) 12 INSTALLATION PROCEDURE 12 ASSEMBLING AND PREPARING 12 14 15 16 17 18 18 23 24 25 Unpacking Separate purchase Parts and buttons - Using the joystick button Lifting and moving the TV Setting up the TV - Attaching the stand Mounting on a table Mounting on a wall Tidying cables 26 MAKING CONNECTIONS 26 27 28 29 30 30 30 31 31
LICENSES / OPEN SOURCE SOFTWARE NOTICE INFORMATION 3 Supported licenses may differ by model. For more information about licenses, visit www.lg.com. OPEN SOURCE SOFTWARE NOTICE INFORMATION To obtain the source code under GPL, LGPL, MPL, and other open source licenses, that is contained in this product, please visit http://opensource.lge.com. In addition to the source code, all referred license terms, warranty disclaimers and copyright notices are available for download.
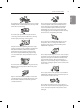
SAFETY INSTRUCTIONS ENGLISH ENG SAFETY INSTRUCTIONS Please read these safety precautions carefully before using the product.
SAFETY INSTRUCTIONS 5 ENGLISH ENG Do not plug too many electrical devices into a single multiple electrical outlet. Otherwise, this may result in fire due to over-heating. Do not insert any metal objects/conductors (like a metal chopstick/cutlery/screwdriver) between power cable plug and input Wall Socket while it is connected to the input terminal on the wall. Additionally, do not touch the power cable right after plugging into the wall input terminal. You may be electrocuted.
SAFETY INSTRUCTIONS ENGLISH ENG Never touch this product or antenna during a thunder or lighting storm. You may be electrocuted. Never touch the wall outlet when there is leakage of gas, open the windows and ventilate. It may cause a fire or a burn by a spark. Do not disassemble, repair or modify the product at your own discretion. Fire or electric shock accident can occur. Contact the service centre for check, calibration or repair.
SAFETY INSTRUCTIONS 7 Install the product where no radio wave occurs. There should be enough distance between an outside antenna and power lines to keep the former from touching the latter even when the antenna falls. This may cause an electric shock. Do not install the product on places such as unstable shelves or inclined surfaces. Also avoid places where there is vibration or where the product cannot be fully supported.
SAFETY INSTRUCTIONS ENGLISH ENG Signal from Remote Control can be interrupted due to external/internal lighting eg Sunlight, fluorescent lighting. If this occurs turn off lighting or darken viewing area. Periodically examine the cord of your appliance, and if its appearance indicates damage or deterioration, unplug it, discontinue use of the appliance, and have the cord replaced with an exact replacement part by an authorized servicer. Prevent dust collecting on the power plug pins or outlet.
SAFETY INSTRUCTIONS 9 ENGLISH ENG As long as this unit is connected to the AC wall outlet, it is not disconnected from the AC power source even if you turn off this unit by SWITCH. If the product feels cold to the touch, there may be a small “flicker” when it is turned on. This is normal, there is nothing wrong with product. When unplugging the cable, grab the plug and unplug it, by pulling at the plug. Don’t pull at the cord to unplug the power cord from the power board, as this could be hazardous.
SAFETY INSTRUCTIONS Viewing 3D Imaging (Only 3D models) ENGLISH ENG WARNING Displaying a still image (e.g., broadcasting channel logo, on-screen menu, scene from a video game or computer screen) for a prolonged time may cause damage to the screen, resulting in retention of the image, which is known as image sticking. It can remain for long time or never disappear. The warranty does not cover the product for image sticking.
SAFETY INSTRUCTIONS 11 Cautions when using the 3D glasses Viewing environment yy Viewing Distance -- Maintain a distance of at least twice the screen diagonal length when watching 3D contents. If you feel discomfort in viewing 3D contents, move further away from the TV. Viewing age yy Infants/Children -- Usage/ Viewing 3D contents for children under the age of 5 are prohibited.
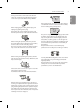
INSTALLATION PROCEDURE / ASSEMBLING AND PREPARING NOTE Image shown may differ from your TV. Your TV’s OSD (On Screen Display) may differ slightly from that shown in this manual. The available menus and options may differ from the input source or product model that you are using. New features may be added to this TV in the future. The TV can be placed in standby mode in order to reduce the power consumption.
ASSEMBLING AND PREPARING 13 ENGLISH ENG Magic remote, Batteries (AA) (See p. 33) Owner’s manual P Component gender cable (See p. 29) Stand Assy (Stand Base/Stand Body) (Only 55EG91**) (See p. 18, 19) Composite gender cable (See p. 29, 30) Stand Assy (Stand Base/Stand Body) (Only 55EG92**) (See p. 19, 20) Cinema 3D glasses The number of 3D glasses may differ depending on the model or country. Stand Assy (Stand Base/Stand Body) (Only 55EG96**) (See p.
ASSEMBLING AND PREPARING ENGLISH ENG Separate purchase Separate purchase items can be changed or modified for quality improvement without any notification. Contact your dealer to buy these items. These devices only work with certain models.
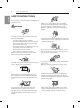
ASSEMBLING AND PREPARING 15 A type : EG91** B type : EG92** Screen Screen Speakers Joystick Button2 Speakers Remote Control Sensor Standby Light C type : EG96** Screen Speakers Joystick Button2 Remote Control Sensor and Intelligent Sensor1 LG Logo Light Joystick Button2 Remote Control Sensor Standby Light ENGLISH ENG Parts and buttons
ENGLISH ENG 1 2 ASSEMBLING AND PREPARING Intelligent sensor - Adjusts the image quality and brightness based on the surrounding environment. Joystick Button - This button is located below the TV screen. NOTE yy You can set the LG Logo Light or Standby Light to on or off by selecting GENERAL in the main menus. Using the joystick button You can operate the TV by pressing the button or moving the joystick left, right, up, or down.
ASSEMBLING AND PREPARING 17 ENGLISH ENG Lifting and moving the TV Please note the following advice to prevent the TV from being scratched or damaged and for safe transportation regardless of its type and size. CAUTION yy Avoid touching the screen at all times, as this may result in damage to the screen. yy It is recommended to move the TV in the box or packing material that the TV originally came in. yy Before moving or lifting the TV, disconnect the power cord and all cables.
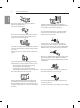
ASSEMBLING AND PREPARING ENGLISH ENG Setting up the TV 3 (Image shown may differ from your TV.) Attaching the stand Only 55EG91** 1 Protective Package 1 1 4 EA M4 x L20 Stand cover 1 When assembling the stand, lay the front screen Protective Package included in the product box on a table or product box and then place the TV screen face down on the Protective Package. 4 CAUTION yy Do not lift your TV without the stand. The protruding Joystick Button may be damaged.
ASSEMBLING AND PREPARING 19 Only 55EG96**, 55EG92** ENGLISH ENG 5 1 Stand cover Protective Package 1 1 Stand Cover 1 When assembling the stand, lay the front screen Protective Package included in the product box on a table or product box and then place the TV screen face down on the Protective Package. CAUTION Cover holder yy Do not lift your TV without the stand. The protruding Joystick Button may be damaged. CAUTION yy Insert the Cover Holder of the Stand Cover into the holes until it clicks.
ASSEMBLING AND PREPARING ENGLISH ENG 3 5 Stand Cover 5 EA M4 x L20 Cover Holder 4 CAUTION Stand Cover CAUTION yy Insert the protruding parts of the Stand Cover into the holes. yy Insert the Cover Holder of the Stand Cover into the holes until it clicks. Press the Stand Cover gently so that the non-woven fabric inside is attached tightly.
ASSEMBLING AND PREPARING Only 65EG96** 21 ENGLISH ENG 3 1 Protective Package 1 1 Stand Cover 1 8 EA M4 x L20 When assembling the stand, lay the front screen Protective Package included in the product box on a table or product box and then place the TV screen face down on the Protective Package. CAUTION yy Do not lift your TV without the stand. The protruding Joystick Button may be damaged. 4 Stand Cover 2 Stand Assy CAUTION yy Insert the protruding parts of the Stand Cover into the holes.
ASSEMBLING AND PREPARING ENGLISH ENG 5 Stand Cover Cover Holder CAUTION yy Insert the Cover Holder of the Stand Cover into the holes until it clicks. Press the Stand Cover gently so that the non-woven fabric inside is attached tightly. CAUTION yy When attaching the stand to the TV set, place the screen facing down on a cushioned table or flat surface to protect the screen from scratches. yy Make sure that the screws are inserted correctly and fastened securely.
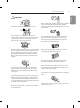
ASSEMBLING AND PREPARING (Image shown may differ from your TV.) 1 Lift and tilt the TV into its upright position on a table. -- Leave a 10 cm (minimum) space from the wall for proper ventilation. 10 cm 10 cm 10 cm 10 cm 5 cm 2 10 cm Connect the power cord to a wall outlet. CAUTION yy Do not place the TV near or on sources of heat, as this may result in fire or other damage.
ASSEMBLING AND PREPARING Securing the TV to a wall ENGLISH ENG (This feature is not available for all models.) Mounting on a wall Attach an optional wall mount bracket at the rear of the TV carefully and install the wall mount bracket on a solid wall perpendicular to the floor. When you attach the TV to other building materials, please contact qualified personnel. LG recommends that wall mounting be performed by a qualified professional installer.
ASSEMBLING AND PREPARING yy Disconnect the power first, and then move or install the TV. Otherwise electric shock may occur. yy If you install the TV on a ceiling or slanted wall, it may fall and result in severe injury. Use an authorized LG wall mount and contact the local dealer or qualified personnel. yy Do not over tighten the screws as this may cause damage to the TV and void your warranty. yy Use the screws and wall mounts that meet the standard.
MAKING CONNECTIONS ENGLISH ENG MAKING CONNECTIONS Antenna connection This section on MAKING CONNECTIONS mainly uses diagrams for the EG96** models. Connect the TV to a wall antenna socket with an RF cable (75 Ω). Connect various external devices to the TV and switch input modes to select an external device. For more information of external device’s connection, refer to the manual provided with each device.
MAKING CONNECTIONS HDMI connection (Only EG91**) ENGLISH ENG Transmits the digital video and audio signals from an external device to the TV. Connect the external device and the TV with the HDMI cable as shown.
MAKING CONNECTIONS ENGLISH ENG (Only EG96**, EG92**) DVI to HDMI connection Picture HDMI ULTRA HD Deep Colour : yy On - Support 4K @ 50/60 Hz (4:4:4, 4:2:2, 4:2:0) yy Off - Support 4K @ 50/60 Hz (4:2:0) Transmits the digital video signal from an external device to the TV. Connect the external device and the TV with the DVI-HDMI cable as shown. To transmit an audio signal, connect an audio cable. If the device connected to Input Port also supports ULTRA HD Deep Colour, your picture may be clearer.
MAKING CONNECTIONS 29 Transmits analogue video and audio signals from an external device to the TV. Connect the external device and the TV with a component gender cable as shown. AV IN ( Audio in) IN AV VIDEO COMPONENT AUDIO PR PB Y (*Not Provided) AUDIO OUT YELLOW (Use the composite gender cable provided.
MAKING CONNECTIONS ENGLISH ENG Composite connection Audio connection Transmits analogue video and audio signals from an external device to the TV. Connect the external device and the TV with a composite gender cable as shown. You may use an external audio system instead of the built-in speaker. Digital optical audio connection Transmits a digital audio signal from the TV to an external device. Connect the external device and the TV with the optical audio cable as shown.
MAKING CONNECTIONS 31 USB connection Transmits the headphone signal from the TV to an external device. Connect the external device and the TV with the headphone as shown. Connect a USB storage device such as a USB flash memory, external hard drive or a USB memory card reader to the TV and access the Smart Share menu to use various multimedia files. (Only EG96**) (Only EG96**, EG92**) Headphone (*Not Provided) NOTE yyAUDIO menu items are disabled when connecting a headphone.
MAKING CONNECTIONS (Only EG91**) ENGLISH ENG HDD (*Not Provided) HUB (*Not Provided) USB (*Not Provided) NOTE yySome USB Hubs may not work. If a USB device connected using a USB Hub is not detected, connect it to the USB IN port on the TV directly. yyConnect the external power source if your USB is needed. yyConnecting via USB 3.0 : Some USB device may not work if it dose not meet USB 3.0 standard. In case, connect it to USB IN 2 or USB IN 3 port.
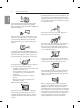
MAGIC REMOTE FUNCTIONS 33 When the message “Magic Remote battery is low. Change the battery.” is displayed, replace the battery. To replace batteries, open the battery cover, replace batteries (1.5 V AA) matching and ends to the label inside the compartment, and close the battery cover. Be sure to point the remote control toward the remote control sensor on the TV. To remove the batteries, perform the installation actions in reverse.
MAGIC REMOTE FUNCTIONS ENGLISH ENG 1. @ 2 abc 3 def 4 ghi 5 jkl 6 mno 7pqrs 8 tuv 9wxyz LIST 0 INFO EXIT GUIDE TEXT T.OPT SUBT. Wheel (OK) Press the center of the Wheel button to select a menu. You can change programmes by using the wheel button. Navigation buttons (up/down/left/right) Press the up, down, left or right button to scroll the menu.
MAGIC REMOTE FUNCTIONS HOME How to register the magic remote BACK To use the Magic Remote, first pair it with your TV. 1 Put batteries into the Magic Remote and turn the TV on. Wheel (OK) P MY APPS 2 Point the Magic Remote at your TV and press the Wheel (OK) on the remote control. * If the TV fails to register the Magic Remote, try again after turning the TV off and back on.
USING THE USER GUIDE / MAINTENANCE ENGLISH ENG USING THE USER GUIDE MAINTENANCE User Guide allows you to more easily access the detailed TV information. Cleaning your TV 1 Press the menu. (HOME) button to access the Home Clean your TV regularly to keep the best performance and to extend the product lifespan. CAUTION 2 Select User Guide and press the button. Wheel(OK) yy Make sure to turn the power off and disconnect the power cord and all other cables first.
TROUBLESHOOTING / EXTERNAL CONTROL DEVICE SETUP 37 Problem Solution Cannot control the TV with the remote control. yy Check the remote control sensor on the product and try again. yy Check if there is any obstacle between the product and the remote control. yy Check if the batteries are still working and properly installed ( to , to ). No image display and no sound is produced. yy Check if the product is turned on. yy Check if the power cord is connected to a wall outlet.
SPECIFICATIONS ENGLISH ENG SPECIFICATIONS (Only EG91**, EG92**, EG96**) Wireless module(LGSBW41) Specifications Wireless LAN Standard IEEE 802.11a/b/g/n 2400 to 2483.5 MHz 5150 to 5250 MHz 5725 to 5850 MHz(for Non EU) Frequency Range Output Power (Max.) 802.11a: 13 dBm 802.11b: 15 dBm 802.11g: 14 dBm 802.11n - 2.4 GHz: 16 dBm 802.11n - 5 GHz: 16 dBm Bluetooth Standard Frequency Range Output Power (Max.) Bluetooth Version 4.0 2400 to 2483.
SPECIFICATIONS Thickness(T) Depth(D) EG96** MODELS Dimensions Weight With stand (mm) (W x H x D) Without stand (mm) (W x H x T(D)) With stand (kg) Without stand (kg) 55EG960T-TA 55EG960Y-TA 55EG965T-TA 55EG965Y-TA 65EG960T-TA 65EG960Y-TA 65EG965T-TA 65EG965Y-TA 1226 x 760 x 213 1447 x 884 x 237 1226 x 719 x 50.1(87.8) 1447 x 842 x 50.1(102.5) 19 26.9 15.3 21.
SPECIFICATIONS Analogue TV (Depending on country) (Depending on country) Television System DVB-T(*DVB-T/T2) PAL B/B, PAL B/G, PAL D/K, PAL-I SECAM B/G, SECAM D/K NTSC-M Programme Coverage VHF, UHF VHF, UHF, CATV ENGLISH ENG Digital TV Maximum number of storable programmes DVB-T/T2 & Analogue TV : 1,500 External Antenna Impedance 75 Ω * : Only DVB-T2 support models.
Record the model number and serial number of the TV. Refer to the label on the back cover and quote this information to your dealer when requiring any service.
OWNER’S MANUAL EXTERNAL CONTROL DEVICE SETUP Please read this manual carefully before operating the set and retain it for future reference. www.lg.
2 KEY CODES ENGLISH ENG KEY CODES • This feature is not available for all models.
EXTERNAL CONTROL DEVICE SETUP 3 • Image shown may differ from your TV. Connect the USB to Serial converter/RS-232C input jack to an external control device (such as a computer or an A/V control system) to control the product’s functions externally. Note: The type of control port on the TV can be different between model series. * Please be advised that not all models support this type of connectivity. * Cable is not provided.
USB USB IN IN 4 EXTERNAL CONTROL DEVICE SETUP (PC) (PC) (TV) (TV) RS-232C IN (CONTROL SERVICE) • You need to purchase the phone-jack to RS-232 cable required for &the connection between the PC and the TV, which is specified in the manual. RS-232C IN (PC) (PC) (CONTROL & SERVICE) * For other models, connect to the USB port. * The connection interface may differ from your TV.
EXTERNAL CONTROL DEVICE SETUP 5 • Baud rate : 9600 bps (UART) • Data length : 8 bits • Parity : None ENGLISH ENG Communication Parameters • Stop bit : 1 bit • Communication code : ASCII code • Use a crossed (reverse) cable. Command reference list (Depending on model) COMMAND1 COMMAND2 DATA (Hexadecimal) 01. Power* k a 00 to 01 02. Aspect Ratio k c (p.7) 03. Screen Mute k d (p.7) k e 00 to 01 k f 00 to 64 06. Contrast k g 00 to 64 07. Brightness k h 00 to 64 08.
6 EXTERNAL CONTROL DEVICE SETUP ENGLISH ENG Transmission / Receiving Protocol Transmission [Command1][Command2][ ][Set ID][ ][Data][Cr] [Command 1] : First command to control the TV. (j, k, m or x) [Command 2] : Second command to control the TV. [Set ID] : You can adjust the [Set ID] to choose desired monitor ID number in option menu. Adjustment range in TV is 1 to 99. If [Set ID] value is selected to ‘0’, every connected set can be controlled.
EXTERNAL CONTROL DEVICE SETUP 7 01. Power (Command: k a) ►► To control Power *On or Off of the set. Transmission[k][a][ ][Set ID][ ][Data][Cr] Data 00 : Power Off 01 : *Power On Ack [a][ ][Set ID][ ][OK/NG][Data][x] ►► To Show TV is Power On or *Off Transmission [k][a][ ][Set ID][ ][FF][Cr] Ack [a][ ][Set ID][ ][OK][Data][x] * Similarly, if other functions transmit ‘FF’ data based on this format, Acknowledgement feedback presents status about each function. 02.
8 EXTERNAL CONTROL DEVICE SETUP ENGLISH ENG Data Min : 00 to Max : 64 * (Depending on model) Ack [i][ ][Set ID][ ][OK/NG][Data][x] 09. Tint (Command: k j) ►► To adjust the screen tint. You can also adjust tint in the PICTURE menu. Transmission [k][j][ ][Set ID][ ][Data][Cr] Data Red : 0 0 to Green : 64 Ack [j][ ][Set ID][ ][OK/NG][Data][x] 10. Sharpness (Command: k k) ►► To adjust the screen sharpness. You can also adjust sharpness in the PICTURE menu.
EXTERNAL CONTROL DEVICE SETUP 0 0 5th Band 1 0 1 0 0 20(decimal) Acknowledgement [v][ ][Set ID][ ][OK/NG][Data][x] * It depends on model, and can adjust when sound mode is EQ adjustable value. 19. Energy Saving (Command: j q) ►► To reduce the power consumption of the TV. You can also adjust Energy Saving in PICTURE menu.
10 EXTERNAL CONTROL DEVICE SETUP ENGLISH ENG Number - 22 : Antenna TV (DTV) – Don’t Use Physical Channel Number - 26 : Cable TV (CADTV) - Don’t Use Physical Channel Number - 46 : Cable TV (CADTV) – Use Major Channel Number Only (One Part Channel) Two bytes are available for each major and minor channel data, but usually the low byte is used alone (high byte is 0). * Tune Command Examples: 1. Tune to the Analog cable (NTSC) channel 35.
EXTERNAL CONTROL DEVICE SETUP ►► To select input source for main picture. Transmission [x][b][ ][Set ID][ ][Data][Cr] Data 00 : DTV 01 : CADTV 02 : Satellite DTV 10 : ATV ISDB-BS (Japan) 03 : ISDB-CS1 (Japan) 04 : ISDB-CS2 (Japan) 11 : CATV O 01 X X X 02 X X X 03 X O O [Data03][x] [t][ ][Set ID][ ][NG][Data00][x] 21 : AV2 41 : Component2 90 : HDMI1 92 : HDMI3 91 : HDMI2 93 : HDMI4 26. Extended 3D(Command: x v) (only 3D models) (Depending on model) ►► To change 3D option for TV.
12 EXTERNAL CONTROL DEVICE SETUP ENGLISH ENG 27. Auto Configure (Command: j u) (Depending on model) ►► To adjust picture position and minimize image shaking automatically. It works only in RGB (PC) mode.