Printing Specification Drawn Checked Approved Signature Kim K.S Kim S.I JongOk.Kim MMM/DD/YYYY Apr/10/2013 Apr/10/2013 Apr/10/2013 1. Model Description Model name : 47LA860V-ZA Brand name : LG Part number 2nd, 3rd Suffix : FP Product name : 47LA860V-ZA (Revision number) : MFL67728112 (1310-REV02) 2. Printing Specification 1.
Pagination sheet Part number : MFL67728112 Total pages : 132 pages Front Cover P/No.
OWNER’S MANUAL LED TV * LG LED TV applies LCD screen with LED backlights. Please read this manual carefully before operating your set and retain it for future reference. LA79** LA86** LA96** LA97** LA98** LM96** P/NO : MFL67728112 (1310-REV02) Printed in Korea www.lg.
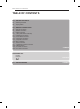
A-2 TABLE OF CONTENTS TABLE OF CONTENTS A-3 SETTING UP THE TV A-3 A-6 Attaching the stand Tidying cables A-8 MAKING CONNECTIONS A-8 A-9 A-9 A-11 A-11 A-12 A-14 A-15 A-16 A-17 A-17 A-18 A-19 A-20 Antenna connection Satellite connection HDMI connection - ARC (Audio Return Channel) Headphone Connection DVI to HDMI connection Component connection Composite connection MHL connection Audio connection - Digital optical audio connection USB connection CI module connection Euro Scart connection COMMON LANGUAGE
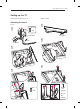
SETTING UP THE TV A-3 Setting up the TV Image shown may differ from your TV.
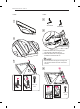
A-4 SETTING UP THE TV LA868* LA965* 1 1 Stand Base Stand Base 2 Stand Base 2 ② ① ① Attach the stand to the TV using the upper mounting hole on the back of the TV. ② Attach the stand to the TV using the lower connection on the back of the TV. NOTE 3 yy Be sure to attach the upper mounting hole first, and then attach the lower connection second.
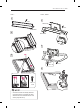
SETTING UP THE TV A-5 LA98**, LM96** LA97** 1 1 Front Stand body Front Stand Base 2 Stand base 2 3 6 EA M5 x 16 3 M4 x 14 4 EA NOTE yy The stand screws are already attached at the back of the TV. Please use these attached screw to assemble the TV and stand.
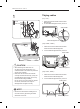
A-6 SETTING UP THE TV Tidying cables 4 (Only LA79**) 4 EA M4 x 20 1 2 Gather and bind the cables with the Cable Management. Fix the Cable Management firmly to the TV. Cable Holder ⨲㘶ᖂ2 ㏪ⱞ⋾#Ɐᴏ Cable Management (Only LA860*, LA960*) 1 2 Gather and bind the cables with the Cable Holder and the Cable Management. Fix the Cable Management firmly to the TV.
MAKING CONNECTION (Only LA965*) (Only LA97**) 1 1 2 Gather and bind the cables with the cable holder on the back of the TV. Fix the Cable Management firmly to the TV. Gather and bind the cables with the cable holder on the back of the TV. Cable Holder Cable Holder Cable Management (Only LA868*) 1 Gather and bind the cables with the cable holder on the back of the TV.
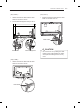
A-8 MAKING CONNECTION MAKING CONNECTIONS Antenna connection This section on MAKING CONNECTIONS mainly uses diagrams for the LA79** models. IN ANTENNA/ CABLE English Connect the TV to a wall antenna socket with an RF cable (75 Ω). NOTE yy Use a signal splitter to use more than 2 TVs. yy If the image quality is poor, install a signal amplifier properly to improve the image quality. yy If the image quality is poor with an antenna connected, try to realign the antenna in the correct direction.
MAKING CONNECTION Satellite connection HDMI connection (Only LA79**, LA86**, LA960*) 3 / DVI IN 4 (MHL) (Only satellite models) DVD/ Blu-Ray / HD Cable Box / HD STB / PC 2 IN 13/18V 700mA Max LNB IN 1 (ARC) Satellite HDMI / DVI IN 3 (MHL) (Only LA965*, LA97**, LA98**, LM96**) 2 Français Connectez la TV à une parabole satellite ou à une prise satellite à l’aide d’un câble satellite RF (75 Ω).
A-10 MAKING CONNECTION English Transmits the digital video and audio signals from an external device to the TV. Connect the external device and the TV with the HDMI cable as shown. Choose any HDMI input port to connect. It does not matter which port you use. NOTE yy It is recommended to use the TV with the HDMI connection for the best image quality. yy Use the latest High Speed HDMI™ Cable with CEC (Customer Electronics Control) function.
MAKING CONNECTION A-11 Headphone connection ARC (Audio Return Channel) English An external audio device that supports yy SIMPLINK and ARC must be connected using HDMI/DVI IN 1 (ARC) port. When connected with a high-speed HDMI yy cable, the external audio device that supports ARC outputs optical SPDIF without additional optical audio cable and supports the SIMPLINK function. OUT Ext.
A-12 MAKING CONNECTION Français Transmet le signal du casque de la TV au périphérique externe. Connectez le périphérique externe et la TV avec le casque comme indiqué sur l’illustration suivante. DVI to HDMI connection (Only LA79**, LA86**, LA960*) REMARQUE Les éléments du menu SON sont désactivés yy lorsque vous branchez un casque. Si vous modifiez le MODE AV avec un yy casque connecté, la modification est appliquée à la vidéo mais pas au son.
MAKING CONNECTION A-13 Français 2 / DVI IN 3 (MHL) (Only LA965*, LA97**, LA98**, LM96**) AV2 Permet de transmettre les signaux vidéo d’un périphérique externe vers la TV. Connectez le périphérique externe et la TV avec le câble DVIHDMI comme indiqué sur l’illustration suivante. Pour émettre un signal audio, raccordez un câble audio. Choisissez un port d’entrée HDMI pour établir la connexion. Peu importe le port que vous utilisez.
A-14 MAKING CONNECTION Component connection English Transmits analog video and audio signals from an external device to the TV. Connect the external device and the TV with a component gender cable as shown. NOTE IN VIDEO yy If cables are not installed correctly, it could cause this image to display in black and white or with distorted colours. COMPONENT AV2 AUDIO PR PB Y Français AV2 YELLOW (Use the composite video cable provided.) GREEN (Use the component video cable provided.
MAKING CONNECTION A-15 Composite connection English Transmits analog video and audio signals from an external device to the TV. Connect the external device and the TV with the composite gender cable as shown. Français AV2 VIDEO IN COMPONENT COMPONENT AUDIO PR PB PB Y Y AV2 YELLOW (Use the composite video cable provided.
A-16 MAKING CONNECTION MHL connection (Only LA965*, LA97**, LA98**, LM96**) 1 (ARC) 2 1 (ARC) 2 3 / DVI IN / DVI IN 3 (MHL) 4 (MHL) (Only LA79**, LA86**, LA960*) MHL passive cable (*Not Provided) MHL passive cable (*Not Provided) Mobile phone Mobile phone English Mobile High-definition Link (MHL) is an interface for transmitting digital audiovisual signals from mobile phones to television sets.
MAKING CONNECTION A-17 Audio connection Français Mobile High-definition Link (MHL) est une interface qui permet de transmettre des signaux audiovisuels numériques depuis des téléphones portables vers des téléviseurs. REMARQUE Connectez le téléphone portable au port yy d’entrée HDMI/DVI IN 4 (MHL) ou HDMI/DVI IN 3 (MHL) pour afficher l’écran du téléphone sur le téléviseur. Le câble passif MHL sert à connecter la TV à yy un téléphone portable.
A-18 MAKING CONNECTION Français Vous pouvez utiliser un système audio externe en option à la place d’un haut-parleur intégré. USB connection (Only LA79**, LA86**, LA960*) 3 USB IN Connexion audio optique numérique PCMCIA CARD SLOT Permet de transmettre un signal audio numérique de la TV au périphérique externe. Connectez le périphérique externe et la TV avec le câble audio optique comme indiqué sur l’illustration suivante. USB 1 HDD IN yy Ne regardez pas dans le port de sortie optique.
MAKING CONNECTION A-19 CI module connection ▼PCMCIA CARD SLOT▼ English Connect a USB storage device such as a USB flash memory, external hard drive, or a USB memory card reader to the TV and access the Smart Share menu to use various multimedia files. NOTE yy Some USB Hubs may not work. If a USB device connected using a USB Hub is not detected, connect it to the USB port on the TV directly. yy Connect the external power source if your USB is needed.
A-20 MAKING CONNECTION Français Affichez les services cryptés (payants) en mode TV numérique. Cette fonction n’est pas disponible dans tous les pays. Euro Scart connection REMARQUE yy Vérifiez si le module CI est inséré dans le bon sens dans la fente de la carte PCMCIA. Si le module est mal inséré, la TV pourrait subir des dommages ainsi que la fente de la carte PCMCIA.
MAKING CONNECTION A-21 Français Transmet les signaux audio et vidéo d’un appareil externe au téléviseur. Raccordez l’appareil externe et le téléviseur à l’aide d’un câble péritel comme illustré ci-dessous. Type de sortie Mode d'entrée actuel TV numérique AV1 (sortie TV1) TV numérique TV analogique, AV Composant TV analogique HDMI 1 Sortie TV : sortie de signaux en mode TV analogique ou en mode TV numérique. REMARQUE Tout câble péritel utilisé doit être blindé.
A-22 MAKING CONNECTION English Connect various external devices to the TV and switch input modes to select an external device. For more information of external device’s connection, refer to the manual provided with each device. Available external devices are: HD receivers, DVD players, VCRs, audio systems, USB storage devices, PC, gaming devices, and other external devices. NOTE yy The external device connection may differ from the model.
MAKING CONNECTION A-23 yy yy yy yy yy yy yy
OWNER’S MANUAL * LED TV * LG LED TV applies LCD screen with LED backlights. Please read this manual carefully before operating your set and retain it for future reference. www.lg.
2 TABLE OF CONTENTS ENGLISH ENG TABLE OF CONTENTS 3 LICENSES 3 OPEN SOURCE SOFTWARE NOTICE 4 SAFETY INSTRUCTIONS 10 - Viewing 3D Imaging (Only 3D models) 12 INSTALLATION PROCEDURE 12 ASSEMBLING AND PREPARING 12 15 16 18 19 20 22 22 23 23 23 Unpacking Separate purchase Parts and buttons Lifting and moving the TV Mounting on a table Mounting on a wall Using Sliding Speaker Using Built-in Camera - Preparing Built-in Camera Name of Parts of Built-in Camera - Checking the Camera's Shooting Range
LICENSES / OPEN SOURCE SOFTWARE NOTICE 3 Supported licenses may differ by model. For more information about licenses, visit www.lg.com. Manufactured under license from Dolby Laboratories. “Dolby” and the double-D symbol are trademarks of Dolby Laboratories. The terms HDMI and HDMI High-Definition Multimedia Interface, and the HDMI logo are trademarks or registered trademarks of HDMI Licensing LLC in the United States and other countries.
4 SAFETY INSTRUCTIONS ENGLISH ENG SAFETY INSTRUCTIONS Please read these safety precautions carefully before using the product.
SAFETY INSTRUCTIONS Do not drop the product or let it fall over when connecting external devices. yy Otherwise, this may result in injury or damage to the product. De sic cant Keep the anti-moisture packing material or vinyl packing out of the reach of children. yy Anti-moisture material is harmful if swallowed. If swallowed by mistake, force the patient to vomit and visit the nearest hospital. Additionally, vinyl packing can cause suffocation. Keep it out of the reach of children.
6 SAFETY INSTRUCTIONS ENGLISH ENG Do not disassemble, repair or modify the product at your own discretion. yy Fire or electric shock accident can occur. Contact the service centre for check, calibration or repair. If any of the following occur, unplug the product immediately and contact your local yy service centre.
SAFETY INSTRUCTIONS Install the product where no radio wave occurs. yy There should be enough distance between an outside antenna and power lines to yy keep the former from touching the latter even when the antenna falls. This may cause an electric shock. Do not install the product on places such as unstable shelves or inclined surfaces. yy Also avoid places where there is vibration or where the product cannot be fully supported.
8 SAFETY INSTRUCTIONS ENGLISH ENG Do not turn the product On/Off by plugging-in or unplugging the power plug to the yy wall outlet. (Do not use the power plug for switch.) It may cause mechanical failure or could give an electric shock. Please follow the installation instructions below to prevent the product from yy overheating. » The distance between the product and the wall should be more than 10 cm. » Do not install the product in a place with no ventilation (e.g., on a bookshelf or in a cupboard).
SAFETY INSTRUCTIONS Contact the service centre once a year to clean the internal parts of the product. yy Accumulated dust can cause mechanical failure. Refer all servicing to qualified service personnel. Servicing is required when the yy apparatus has been damaged in any way, such as power supply cord or plug is damaged, liquid has been spilled or objects have fallen into the apparatus, the apparatus has been exposed to rain or moisture, does not operate normally, or has been dropped.
10 SAFETY INSTRUCTIONS ENGLISH ENG Viewing 3D Imaging (Only 3D models) WARNING Viewing Environment yy Viewing Time -- When watching 3D contents, take 5 - 15 minute breaks every hour. Viewing 3D contents for a long period of time may cause headache, dizziness, fatigue or eye strain. Those that have a photosensitive seizure or chronic illness yy Some users may experience a seizure or other abnormal symptoms when they are exposed to a flashing light or particular pattern from 3D contents.
SAFETY INSTRUCTIONS 11 Viewing Environment yy Viewing Distance -- Maintain a distance of at least twice the screen diagonal length when watching 3D contents. If you feel discomfort in viewing 3D contents, move further away from the TV. Viewing Age yy Infants/Children -- Usage/ Viewing 3D contents for children under the age of 6 are prohibited.
12 INSTALLATION PROCEDURE / ASSEMBLING AND PREPARING ENGLISH ENG NOTE yyImage shown may differ from your TV. yyYour TV’s OSD (On Screen Display) may differ slightly from that shown in this manual. yyThe available menus and options may differ from the input source or product model that you are using. yyNew features may be added to this TV in the future. yyThe TV can be placed in standby mode in order to reduce the power consumption.
ASSEMBLING AND PREPARING 13 ENERGY AV MODE INPUT ENGLISH ENG TV SAVING 1 2 3 4 5 6 7 LIST 8 9 0 FLASHBK MARK FAV VOL 3D CH P A G E MUTE MENU INFO Q.MENU ENTER Tag On BACK EXIT L/R SELECT FREEZE RATIO Owner’s manual Magic remote control, batteries (AA) (Only LA79**, LA86**, LA960*, LA98**, LM96**) (See p. 25) Tag on (Depending on model) Scart gender cable (See p.
14 ASSEMBLING AND PREPARING ENGLISH ENG ENERGY AV MODE INPUT TV SAVING 1 2 3 4 5 6 7 8 9 0 FLASHBK BACK LIST SMART MARK FAV VOL CH 3D P A G E MUTE /Q.MENU MENU INFO Q.MENU P ENTER BACK EXIT L/R SELECT FREEZE RATIO Remote control, batteries (AAA) (Depending on model) (See p. 24) Stand Base (Only LA868*) (See p. A-4) Magic remote control, batteries (AA) (Only LA965*, LA97**) (See p. 26) Stand Base (Only LA97**) (See p. A-5) Stand Base (Only LA965*) (See p.
ASSEMBLING AND PREPARING Separate purchase items can be changed or modified for quality improvement without any notification. Contact your dealer to buy these items. These devices only work with certain models.
16 ASSEMBLING AND PREPARING ENGLISH ENG Parts and buttons B type : LA860*, LA960* A type : LA79** Buttons Screen Video call camera (Only 42/47/55/60LA860*, LA960*) Screen OK Speakers OK SETTINGS INPUT Speakers Remote control sensor LG Logo light SETTINGS INPUT Remote control sensor LG Logo light C type : LA868* Screen Buttons D type : LA965* Video call camera Buttons Buttons Screen OK OK Speakers SETTINGS Speakers SETTINGS INPUT INPUT Remote control sensor LG Logo light Remote c
ASSEMBLING AND PREPARING Video call camera Buttons OK OK Speakers Speakers SETTINGS INPUT Remote control sensor Power Indicator Button Buttons Screen SETTINGS INPUT LG Logo light Remote control and Intelligent1 sensors Description Scrolls Hthrough the saved programmes. HAdjusts the volume level. Selects the highlighted menu option or confirms an input. H S Accesses the main menu, or saves your input and exits the menus. Changes the input source. H Turns the power on or off.
18 ASSEMBLING AND PREPARING ENGLISH ENG Lifting and moving the TV Please note the following advice to prevent the TV from being scratched or damaged and for safe transportation regardless of its type and size. yy When transporting a large TV, there should be at least 2 people. yy When transporting the TV by hand, hold the TV as shown in the following illustration. CAUTION yy Avoid touching the screen at all times, as this may result in damage to the screen.
ASSEMBLING AND PREPARING 1 Lift and tilt the TV into its upright position on a table. -- Leave a 10 cm (minimum) space from the wall for proper ventilation. Adjusting the angle of the TV to suit view (This feature is not available for all models.) Swivel 15 degrees to the left or right and adjust the angle of the TV to suit your view. (Only LA79**) 15 15 10 cm m 10 c 10 cm 10 cm 10 cm 2 Swivel 10 degrees to the left or right and adjust the angle of the TV to suit your view.
20 ASSEMBLING AND PREPARING ENGLISH ENG CAUTION yy When adjusting the angle adof the product, watch out for your fingers. »»Personal injury may occur if hands or fingers are pinched. If the product is tilted too much, it may fall, causing damage or injury. CAUTION yy Make sure that children do not climb on or hang on the TV. NOTE yy Use a platform or cabinet that is strong and large enough to support the TV securely. yy Brackets, bolts and ropes are not provided.
ASSEMBLING AND PREPARING 21 yy Be sure to use the existing Components provided with the TV. Do NOT use components supplied with Wall Bracket to install Wall Bracket to TV. (Only LA97**) Wall mount inner spacers 4EA Wall mount screw 4EA, M6 x 54 (Only 55LA97**) 4EA, M8 x 44 (Only 65LA97**) Make sure to use screws and wall mount bracket that meet the VESA standard. Standard dimensions for the wall mount kits are described in the following table.
22 ASSEMBLING AND PREPARING ENGLISH ENG Using Sliding Speaker Using Built-in Camera (Only LA97**) (Depending on model) This TV does not support the use of an external camera. NOTE Sliding Speaker 1 When TV is turned ON - the hidden speaker slides out from inside the TV. 2 Go to More ➡ Settings ➡ SOUND ➡ Sliding Speaker to set Sliding Speaker.
ASSEMBLING AND PREPARING 3 Pull down the built-in camera when you are not using it. 1 Pull up the slide at the back of the TV. Slide Name of Parts of Built-in Camera Microphone Indicator NOTE Camera Lens Remove the protective film before using the yy built-in camera. 2 You can adjust the angle of the camera with the angle adjustment lever on the back of the builtin camera (within 5 degrees vertically).
24 REMOTE CONTROL ENGLISH ENG REMOTE CONTROL The descriptions in this manual are based on the buttons on the remote control. Please read this manual carefully and use the TV correctly. To replace batteries, open the battery cover, replace batteries (1.5 V AAA) matching the and ends to the label inside the compartment, and close the battery cover. To remove the batteries, perform the installation actions in reverse. CAUTION yy Do not mix old and new batteries, as this may damage the remote control.
MAGIC REMOTE CONTROL FUNCTIONS 25 When the message “Magic Remote Control battery is low. Change the battery.” is displayed, replace the battery. To replace batteries, open the battery cover, replace batteries (1.5 V AA) matching and ends to the label inside the compartment, and close the battery cover. Be sure to point the remote control toward the remote control sensor on the TV. To remove the batteries, perform the installation actions in reverse.
26 MAGIC REMOTE CONTROL FUNCTIONS ENGLISH ENG (Only LA965*, LA97**) Pointer (RF transmitter) (POWER) Turns the TV on or off. Navigation buttons (up/down/left/right) Scrolls through menus or options. BACK Returns to the previous level. Wheel(OK) Selects menus or options and confirms your input. Scrolls through the saved programmes. If you press the navigation button while moving the pointer on the screen, the pointer disappears, and the Magic Remote Control works as a regular remote control.
MAGIC REMOTE CONTROL FUNCTIONS 27 ENGLISH ENG Registering Magic Remote Control It is necessary to ‘pair’ (register) the magic remote control to your TV before it will work. BACKto register HOME How the Magic Remote Control P MY APPS 1 To register automatically, turn the TV on and press the Wheel(OK) button. When registration is completed, the completion message appears on the screen. 2 If registration fails, turn the TV off and back on, then press the Wheel(OK) button to complete registration.
28 USING THE USER GUIDE ENGLISH ENG USING THE USER GUIDE User Guide allows you to more easily access the detailed TV information. 1 Press the SMART button to access the Smart Home menu. 2 Select User Guide and press Wheel(OK). OPTION > To set language 1 SMART Settings OPTION Language Selects Menu Language and Audio Language displayed on the screen. Menu Language Selects a language for the display text.
MAINTENANCE / TROUBLESHOOTING 29 Cleaning your TV Clean your TV regularly to keep the best performance and to extend the product lifespan. CAUTION yy Make sure to turn the power off and disconnect the power cord and all other cables first. yy When the TV is left unattended and unused for a long time, disconnect the power cord from the wall outlet to prevent possible damage from lightning or power surges.
30 EXTERNAL CONTROL DEVICE SETUP / SPECIFICATIONS ENGLISH ENG EXTERNAL CONTROL DEVICE SETUP To obtain the external control device setup information, please visit www.lg.com SPECIFICATIONS Wireless LAN module(TWFM-B006D) specification Standard IEEE802.11a/b/g/n 2400 to 2483.5 MHz Frequency Range 5150 to 5250 MHz 5725 to 5850 MHz (for Non EU) 802.11a: 11 dBm 802.11b: 14 dBm Output Power 802.11g: 10.5 dBm (Max.) 802.11n - 2.4GHz: 11 dBm 802.11n - 5GHz: 12.
Record the model number and serial number of the TV. Refer to the label on the back cover and quote this information to your dealer when requiring any service.
MANUEL D'UTILISATION * Téléviseur LED * Le téléviseur LED de LG combine un écran LCD et un rétroéclairage LED. Veuillez lire attentivement ce manuel avant de mettre en service votre produit et conservez-le afin de pouvoir vous y référer ultérieurement. www.lg.
2 TABLE DES MATIÈRES TABLE DES MATIÈRES FRANÇAIS FRA 3 LICENCES 3 INFORMATIONS SUR LES LOGICIELS LIBRES 4 CONSIGNES DE SÉCURITÉ 10 - Visionnage d'images 3D (modèles 3D uniquement) 12 PROCÉDURE D'INSTALLATION 12 ASSEMBLAGE ET PRÉPARATION 12 15 16 18 19 20 22 22 23 23 23 Déballage Achat séparé Pièces et boutons Soulever et déplacer la TV Installation sur une table Fixation du support mural Utilisation du Haut-parleur coulissant Utilisation de la caméra intégrée - Préparation de la caméra intég
LICENCES / INFORMATIONS SUR LES LOGICIELS LIBRES 3 LICENCES Les licences prises en charge peuvent varier d'un modèle à l'autre. Pour plus d'informations sur les licences, consultez le site www.lg.com. Les termes HDMI et High-Definition Multimedia Interface et le logo HDMI sont des marques commerciales ou des marques déposées de HDMI Licensing LLC aux Etats Unis et dans d’autres pays. À PROPOS DES VIDÉOS DIVX : DIVX® est un format de vidéo numérique créé par DivX, LLC, filiale de Rovi Corporation.
4 CONSIGNES DE SÉCURITÉ CONSIGNES DE SÉCURITÉ Veuillez lire attentivement ces consignes de sécurité avant d’utiliser le produit.
CONSIGNES DE SÉCURITÉ 5 Ne branchez pas trop d'appareils électriques sur une seule multiprise murale yy Le non-respect de cette consigne peut provoquer un incendie résultant d'une surchauffe. icca nt Respectez les règles de sécurité lors de la mise au rebut des batteries pour éviter yy qu'un enfant ne les avale. En cas d'ingestion, consultez immédiatement un médecin.
6 CONSIGNES DE SÉCURITÉ FRANÇAIS FRA Ne démontez pas le produit, ne le réparez pas et n'y apportez aucune modification. yy Vous risqueriez de provoquer une électrocution ou un incendie. Contactez le centre de services pour les vérifications, les calibrages et les réparations. Si vous êtes confronté à l'une des situations suivantes, débranchez immédiatement yy le produit et contactez votre centre de services local.
CONSIGNES DE SÉCURITÉ 7 ATTENTION Installez le produit à l'écart des ondes radio. yy N'installez pas le produit sur des étagères instables ou des surfaces inclinées. yy Évitez également les endroits soumis à des vibrations ou ne permettant pas de supporter correctement le produit. Dans le cas contraire, le produit risque de tomber ou de se retourner, ce qui peut provoquer des blessures ou endommager le produit. Si vous installez la TV sur un support, veillez à empêcher le produit de se yy renverser.
8 CONSIGNES DE SÉCURITÉ FRANÇAIS FRA Ne mettez pas le produit sous/hors tension en branchant et en débranchant le yy cordon d'alimentation de la prise. (N'utilisez pas le cordon d'alimentation en tant qu'interrupteur.) Vous risqueriez de provoquer une panne mécanique ou une électrocution. Veuillez suivre les instructions d'installation ci-après pour empêcher une surchauffe yy du produit. --La distance entre le produit et le mur doit être d'au moins 10 cm.
CONSIGNES DE SÉCURITÉ 9 Vous devez être deux pour déplacer ou déballer le produit car ce dernier est lourd. yy Le non-respect de cette consigne peut entraîner des blessures. Confiez l'ensemble des réparations à du personnel qualifié.
10 CONSIGNES DE SÉCURITÉ Visionnage d'images 3D (modèles 3D uniquement) AVERTISSEMENT FRANÇAIS FRA Environnement de visionnage yy Durée de visionnage -- Lors du visionnage de contenu 3D, veillez à faire une pause de 5 à 15 minutes toutes les heures. Le visionnage prolongé de contenu 3D peut provoquer des maux de tête, des vertiges et une fatigue générale ou oculaire.
CONSIGNES DE SÉCURITÉ 11 ATTENTION Environnement de visionnage Âge pour le visionnage yy Bébés/Enfants -- L’utilisation/le visionnage de contenu 3D par des enfants de moins de 6 ans est interdit. -- Les enfants de moins de 10 ans peuvent réagir de manière excessive car leur vision est en cours de développement (ils peuvent, par exemple, essayer de toucher l’écran ou de sauter dedans).
12 PROCÉDURE D'INSTALLATION / ASSEMBLAGE ET PRÉPARATION REMARQUE FRANÇAIS FRA yy L’image ci-dessous peut être différente de celle affichée sur votre téléviseur. yy L'affichage à l'écran de votre TV peut différer légèrement de celui qui est présenté dans ce manuel. yy Les menus et options disponibles peuvent être différents selon la source d'entrée ou le modèle de produit utilisé. yy De nouvelles fonctionnalités pourront être ajoutées ultérieurement à ce téléviseur.
ASSEMBLAGE ET PRÉPARATION 13 ENERGY AV MODE INPUT TV SAVING 1 2 3 4 5 6 7 8 9 0 FLASHBK LIST MARK FAV VOL 3D CH P A G E MUTE MENU INFO Q.MENU ENTER Tag On BACK EXIT L/R SELECT RATIO Manuel d’utilisation Télécommande Magic Remote, piles (AA) (Uniquement LA79**, LA86**, LA960*, LA98**, LM96**) (voir p. 25) Tag on (selon le modèle) Câble péritel mâle (voir p.
14 ASSEMBLAGE ET PRÉPARATION ENERGY AV MODE INPUT TV SAVING 1 2 3 4 5 6 7 8 9 0 FLASHBK BACK LIST SMART MARK FAV VOL CH 3D P A G E MUTE /Q.MENU MENU INFO Q.MENU P ENTER BACK EXIT FRANÇAIS FRA L/R SELECT FREEZE RATIO Télécommande et piles (AAA) (selon le modèle) (voir p. 24) Base du support (Uniquement LA868*) (voir p. A-4) Télécommande Magic Remote, piles (AA) (Uniquement LA965*, LA97**) (voir p. 26) Base du support (Uniquement LA97**) (voir p.
ASSEMBLAGE ET PRÉPARATION 15 Achat séparé Des articles vendus séparément peuvent faire l’objet de remplacements ou de modifications sans préavis dans le but d’améliorer la qualité du produit. Contactez votre revendeur pour vous procurer ces articles. FRANÇAIS FRA Ces périphériques fonctionnent uniquement avec certains modèles.
16 ASSEMBLAGE ET PRÉPARATION Pièces et boutons Type B : LA860*, LA960* Type A : LA79** FRANÇAIS FRA Boutons Écran Écran Caméra pour appels vidéo (Uniquement42/47/55/60LA860*, LA960*) Boutons OK Haut-parleurs SETTINGS INPUT OK Haut-parleurs INPUT Capteur de la télécommande Éclairage du logo LG Capteur de la télécommande Éclairage du logo LG Type D : LA965* Type C: LA868* Écran SETTINGS Caméra pour appels vidéo Boutons Boutons Écran OK Haut-parleurs OK SETTINGS Haut-parleurs SETTINGS
ASSEMBLAGE ET PRÉPARATION Type F : LA98**, LM96** Type E : LA97** Écran 17 Caméra pour appels vidéo Boutons Haut-parleurs SETTINGS INPUT INPUT Capteur de la télécommande Voyant d’alimentation Boutons SETTINGS Éclairage du logo LG Télécommande et capteurs intelligents1 Description PermetHde parcourir les chaînes enregistrées. HPermet de régler le niveau du volume. Permet de sélectionner l'option du menu en surbrillance ou de confirmer une entrée.
18 ASSEMBLAGE ET PRÉPARATION Soulever et déplacer la TV FRANÇAIS FRA Lisez les consignes suivantes afin d'éviter de rayer ou d'endommager la TV en la déplaçant, en la soulevant ou en la transportant, quels que soient le type et les dimensions de l'appareil. yy Si votre téléviseur est volumineux, faites-vous aider par une autre personne. yy Lorsque vous transportez la TV, tenez-la comme indiqué sur l'illustration suivante.
ASSEMBLAGE ET PRÉPARATION Installation sur une table 1 10 cm m 10 c 10 cm 10 cm 10 cm 2 Branchez le cordon d'alimentation sur une prise murale. Ajustement de l'angle de la TV afin de trouver le meilleur angle de vue (Cette option n'est pas disponible sur tous les modèles.) Faites pivoter la TV de 15 degrés vers la gauche ou la droite ou réglez l'angle d'inclinaison pour obtenir le meilleur confort visuel.
20 ASSEMBLAGE ET PRÉPARATION ATTENTION ATTENTION FRANÇAIS FRA yy Faites attention à vos doigts lorsque vous ajustez l'angle du produit. »»Vous pourriez vous blesser en cas d'écrasement des mains ou des doigts. Si le produit est trop incliné, il peut tomber, provoquant des dommages ou des blessures.  yy Veillez à empêcher les enfants de grimper sur la TV ou de s'y suspendre.
ASSEMBLAGE ET PRÉPARATION ATTENTION ATTENTION Vis pour fixation murale 4EA, M6 x 54 (Uniquement 55LA97**) 4EA, M8 x 44 (Uniquement 65LA97**) Veillez à utiliser des vis et un support mural conformes aux normes VESA. Les dimensions standard des kits de support mural sont indiquées dans le tableau suivant.
22 ASSEMBLAGE ET PRÉPARATION Utilisation du Haut-parleur coulissant Utilisation de la caméra intégrée (Uniquement LA97**) (selon le modèle) FRANÇAIS FRA Ce téléviseur ne prend pas en charge l’utilisation d’une caméra externe. REMARQUE Haut-parleur coulissant 1 Lorsque la TV est mise sous tension, le hautparleur caché apparaît de l’intérieur de la TV. 2 Aller à Plus ➡ Paramètres ➡ SON ➡ Hautparleur coulissant pour régler le Haut-parleur coulissant.
ASSEMBLAGE ET PRÉPARATION Préparation de la caméra intégrée 23 3 Abaissez la caméra intégrée lorsque vous ne vous en servez pas. 1 Soulevez le volet à l’arrière du téléviseur FRANÇAIS FRA Volet Nom des pièces de la caméra intégrée Microphone Indicateur REMARQUE Objectif Retirez le film protecteur avant d'utiliser la yy caméra intégrée. 2 Ajustez l’inclinaison de la caméra via le dispositif d’ajustement de l’inclinaison à l’arrière de la caméra intégrée (plage de 5 °) dans un axe vertical).
24 TÉLÉCOMMANDE TÉLÉCOMMANDE FRANÇAIS FRA Les descriptions contenues dans ce manuel font référence aux touches de la télécommande. Veuillez lire attentivement ce manuel et utiliser correctement la TV. Pour changer les piles, ouvrez le couvercle et remplacez-les (modèle : 1,5 V AAA). Faites correspondre les pôles et avec les signes sur l'étiquette placée à l'intérieur du compartiment, puis refermez le couvercle. Pour retirer les piles, faites l'inverse de la procédure l'installation.
FONCTIONS DE LA MAGIC REMOTE 25 FONCTIONS DE LA MAGIC REMOTE ou ATTENTION yy N'associez pas des piles neuves avec des piles anciennes, car cela pourrait endommager la télécommande. (Uniquement LA79**, LA86**, LA960*, LA98**, LM96**) (MARCHE-ARRÊT) Permet d’éteindre ou d’allumer BACK(Retour) Permet de revenir au niveau précédent. Molette(OK) Permet de sélectionner les menus ou options et de confirmer votre entrée.
26 FONCTIONS DE LA MAGIC REMOTE (Uniquement LA965*, LA97**) FRANÇAIS FRA Pointeur (émetteur RF) (MARCHE-ARRÊT) Permet d’éteindre ou d’allumer BACK(Retour) Permet de revenir au niveau précédent. Molette(OK) Permet de sélectionner les menus ou options et de confirmer votre entrée. Permet de parcourir les canaux enregistrés Si vous appuyez sur la touche de navigation tout en déplaçant le pointeur à l’écran, le pointeur disparaît et la télécommande magique fonctionne comme une télécommande classique.
FONCTIONS DE LA MAGIC REMOTE 27 Enregistrement de la Magic remote Vous devez coupler (enregistrer) la télécommande magique avec votre téléviseur avant de l’utiliser. P MY APPS 1 Pour l’enregistrer automatiquement, allumez la TV et appuyez sur la touche Molette (OK). Une fois l’enregistrement terminé, le message de fin apparaît à l’écran. 2 Si l’enregistrement échoue, éteignez la TV, rallumez-la, puis appuyez sur la touche Molette (OK) pour réessayer.
28 UTILISATION DU GUIDE DE L'UTILISATEUR UTILISATION DU GUIDE DE L'UTILISATEUR Le guide de l'utilisateur vous permet d'accéder plus facilement aux informations complètes sur la TV. FRANÇAIS FRA Appuyez sur la touche d’accueil SMART pour accéder au menu correspondant. Sélectionnez Guide de l’utilisateur et appuyez sur (OK) sur la molette. 1 2  OPTION > Pour définir la langue 1 SMART Paramètres OPTION Langue Permet de sélectionner Langue menu et Langue audio affichés à l’écran.
MAINTENANCE / DÉPANNAGE 29 MAINTENANCE Nettoyage de votre TV ATTENTION yy Avant toute chose, veillez à couper l’alimentation et à débrancher le cordon d’alimentation et tous les autres câbles. yy Lorsque vous prévoyez de ne pas utiliser le téléviseur pendant une longue période, débranchez le cordon d’alimentation de la prise murale afin d’éviter tout endommagement dû à une étincelle ou une surtension.
30 CONFIGURATION DU PÉRIPHÉRIQUE DE CONTRÔLE EXTERNE / SPÉCIFICATIONS CONFIGURATION DU PÉRIPHÉRIQUE DE CONTRÔLE EXTERNE FRANÇAIS FRA Pour obtenir plus d’informations sur la configuration du périphérique de contrôle externe, rendez-vous sur www.lg.com. SPÉCIFICATIONS Spécifications du module LAN sans fil (TWFM-B006D) Norme IEEE802.11a/b/g/n 2 400 à 2 483,5 MHz Plage de fréquence 5 150 à 5 250 MHz 5 725 à 5 850 MHz (Hors Europe) 802.11a : 11 dBm 802.11b : 14 dBm Puissance en sortie (max.) 802.
Notez le numéro du modèle et le numéro de série du téléviseur. Consultez l’étiquette située sur la façade arrière du téléviseur et indiquez ces références à votre revendeur pour toute communication.
ﻳﻮﺟﺪ ﺍﺳﻢ ﻃﺮﺍﺯ ﺍﻟﺘﻠﻔﺰﻳﻮﻥ ﻭﺭﻗﻤﻪ ﺍﻟﺘﺴﻠﺴﻠﻲ ﺑﺎﻟﺠﺰء ﺍﻟﺨﻠﻔﻲ ﻣﻦ ﺍﻟﺘﻠﻔﺰﻳﻮﻥ ﻗﻢ ﺑﺘﺪﻭﻳﻨﻬﻤﺎ ﻓﻲ ﺣﺎﻟﺔ ﺍﺣﺘﻴﺎﺟﻚ ﺇﻟﻰ ﺃﻱ ﺧﺪﻣﺔ ﻓﻲ ﺍﻟﻤﺴﺘﻘﺒﻞ.
30 ﺇﻋﺪﺍﺩ ﺟﻬﺎﺯ ﺍﻟﺘﺤﻜﻢ ﺍﻟﺨﺎﺭﺟﻲ /ﺍﻟﻤﻮﺍﺻﻔﺎﺕ ﺇﻋﺪﺍﺩ ﺟﻬﺎﺯ ﺍﻟﺘﺤﻜﻢ ﺍﻟﺨﺎﺭﺟﻲ ﻟﻠﺤﺼﻮﻝ ﻋﻠﻰ ﻣﻌﻠﻮﻣﺎﺕ ﺣﻮﻝ ﺇﻋﺪﺍﺩ ﺟﻬﺎﺯ ﺍﻟﺘﺤﻜﻢ ﺍﻟﺨﺎﺭﺟﻲ ،ﻳﺮﺟﻰ ﺯﻳﺎﺭﺓ ﻋﻨﻮﺍﻥ ﺍﻟﻤﻮﻗﻊ ﺍﻟﺘﺎﻟﻲ www.lg.com ﺍﻟﻌﺮﺑﻴﺔ ﺍﻟﻤﻮﺍﺻﻔﺎﺕ ﻣﻮﺍﺻﻔﺎﺕ ﻭﺣﺪﺓ ﺍﻟﺸﺒﻜﺔ ﺍﻟﻤﺤﻠﻴﺔ LANﺍﻟﻼﺳﻠﻜﻴﺔ )(TWFM-B006D ﺍﻟﻘﻴﺎﺳﻲ IEEE802.11a/b/g/n ﻣﻦ 2400ﺇﻟﻰ 2483.5ﻣﻴﺠﺎﻫﺮﺗﺰ ﻣﻦ 5150ﺇﻟﻰ 5250ﻣﻴﺠﺎﻫﺮﺗﺰ ﻧﻄﺎﻕ ﺍﻟﺘﺮﺩﺩ ﻣﻦ 5725ﺇﻟﻰ 5850ﻣﻴﺠﺎﻫﺮﺗﺰ )ﻟﻠﺒﻠﺪﺍﻥ ﺧﺎﺭﺝ ﺍﻻﺗﺤﺎﺩ ﺍﻷﻭﺭﻭﺑﻲ( 11 :802.11aﺩﻳﺴﻴﺒﻞ ﻣﻴﻠﻠﻲ ﻭﺍﻁ 14 :802.11bﺩﻳﺴﻴﺒﻞ ﻣﻴﻠﻠﻲ ﻭﺍﻁ 10.
ﺍﻟﺼﻴﺎﻧﺔ /ﺍﺳﺘﻜﺸﺎﻑ ﺍﻷﺧﻄﺎء ﻭﺇﺻﻼﺣﻬﺎ 29 ﺍﻟﺼﻴﺎﻧﺔ ﺗﻨﻈﻴﻒ ﺍﻟﺘﻠﻔﺎﺯ ﺍﻫﺘﻢ ﺑﺘﻨﻈﻴﻒ ﺍﻟﺘﻠﻔﺎﺯ ﺑﺎﻧﺘﻈﺎﻡ ﻟﻠﺤﻔﺎﻅ ﻋﻠﻰ ﺃﻓﻀﻞ ﺃﺩﺍء ﻟﻪ ﻭﻹﻃﺎﻟﺔ ﻋﻤﺮﻩ ﺍﻻﻓﺘﺮﺍﺿﻲ. ﺗﻨﺒﻴﻪ ﺍﻟﺸﺎﺷﺔ ﻭﺍﻹﻃﺎﺭ ﻭﺍﻟﻬﻴﻜﻞ ﺍﻟﺨﺎﺭﺟﻲ ﻭﺍﻟﺤﺎﻣﻞ • ﻹﺯﺍﻟﺔ ﺍﻟﻐﺒﺎﺭ ﺃﻭ ﺍﻷﺗﺮﺑﺔ ﺍﻟﺨﻔﻴﻔﺔ ،ﺍﻣﺴﺢ ﺍﻟﺴﻄﺢ ﺑﻘﻄﻌﺔ ﻗﻤﺎﺵ ﻧﺎﻋﻤﺔ ﻭﻧﻈﻴﻔﺔ ﻭﺟﺎﻓﺔ. ﻓﻮﺭﺍ ﺑﻘﻄﻌﺔ ﻗﻤﺎﺵ ﺟﺎﻓﺔ. • ﻹﺯﺍﻟﺔ ﺍﻷﻭﺳﺎﺥ ﺍﻟﻜﺒﻴﺮﺓ ،ﺍﻣﺴﺢ ﺳﻄﺢ ﺍﻟﺸﺎﺷﺔ ﺑﻘﻄﻌﺔ ﻗﻤﺎﺵ ﻧﺎﻋﻤﺔ ﻣﺮﻃﺒﺔ ﺑﻤﺎء ﻧﻈﻴﻒ ﺃﻭ ﻣﻨﻈﻒ ﻣﻌﺘﺪﻝ ﺧﻔﻴﻒ .ﺛﻢ ﺍﻣﺴﺤﻪ ً ﺗﻨﺒﻴﻪ • • • • ﺗﺠﻨﺐ ﻟﻤﺲ ﺳﻄﺢ ﺍﻟﺸﺎﺷﺔ ﻓﻲ ﻛﻞ ﻭﻗﺖ ،ﺇﺫ ﻗﺪ ﻳﺆﺩﻱ ﺫﻟﻚ ﺇﻟﻰ ﺇﻟﺤﺎﻕ ﺍﻟﻀﺮﺭ ﺑﻬﺎ.
ﺍﺳﺘﺨﺪﺍﻡ ﺩﻟﻴﻞ ﺍﻟﻤﺴﺘﺨﺪﻡ 28 ﺍﺳﺘﺨﺪﺍﻡ ﺩﻟﻴﻞ ﺍﻟﻤﺴﺘﺨﺪﻡ .ﻳﺘﻴﺢ ﻟﻚ ﺩﻟﻴﻞ ﺍﻟﻤﺴﺘﺨﺪﻡ ﺍﻟﻮﺻﻮﻝ ﺑﺸﻜﻞ ﺃﺳﻬﻞ ﺇﻟﻰ ﻣﻌﻠﻮﻣﺎﺕ ﺍﻟﺘﻠﻔﺎﺯ ﺍﻟﻤﻔﺼﻠﺔ ﻟﻠﻮﺻﻮﻝ ﺇﻟﻰ ﺍﻟﻘﺎﺋﻤﺔ ﺍﻟﺮﺋﻴﺴﻴﺔ SMART Settings ¨ OPTION ¨ Language Selects Menu Language and Audio Language displayed on the screen. Menu Language Selects a language for the display text. [In Digital Mode Only] Audio Language When watching a digital broadcast containing several audio languages, you can select the language you want.
ﻭﻇﺎﺋﻒ ﻭﺣﺪﺓ ﺍﻟﺘﺤﻜﻢ ﺍﻟﺴﺤﺮﻳﺔ ﻋﻦ ﺑُﻌﺪ 27 Magic ﺗﺴﺠﻴﻞ ﻭﺣﺪﺓ ﺍﻟﺘﺤﻜﻢ ﻋﻦ ﺑُﻌﺪ Magic ﻳﺠﺐ ﺗﺴﺠﻴﻞ ﻭﺣﺪﺓ ﺍﻟﺘﺤﻜﻢ ﻋﻦ ﺑُﻌﺪ Magicﻣﻊ ﺍﻟﺘﻠﻔﺎﺯ ﻟﺪﻳﻚ ﻗﺒﻞ ﺍﻹﺳﺘﺨﺪﺍﻡ. ﻛﻴﻔﻴﺔ ﺗﺴﺠﻴﻞ ﻭﺣﺪﺓ ﺍﻟﺘﺤﻜﻢ ﻋﻦ ﺑُﻌﺪ Magic 1ﻟﻠﺘﺴﺠﻴﻞ ﺗﻠﻘﺎﺋﻴًﺎ ،ﻗﻢ ﺑﺘﺸﻐﻴﻞ ﺍﻟﺘﻠﻔﺎﺯ ﻭﺍﺿﻐﻂ .ﻋﻨﺪ ﺍﻛﺘﻤﺎﻝ ﻋﻠﻰ ﺯﺭ ﺍﻟﺘﺴﺠﻴﻞ ،ﺗﻈﻬﺮ ﺭﺳﺎﻟﺔ ﺍﻻﻛﺘﻤﺎﻝ ﻋﻠﻰ ﺍﻟﺸﺎﺷﺔ. 2ﻓﻲ ﺣﺎﻟﺔ ﻓﺸﻞ ﺍﻟﺘﺴﺠﻴﻞ ،ﻗﻢ ﺑﺈﻳﻘﺎﻑ ﺗﺸﻐﻴﻞ ﺍﻟﺘﻠﻔﺎﺯ ﺛﻢ ﺃﻋﺪ ﺗﺸﻐﻴﻠﻪ ،ﻭﺍﺿﻐﻂ ﻋﻠﻰ ﺯﺭ ﻹﻛﻤﺎﻝ ﺍﻟﺘﺴﺠﻴﻞ.
26 ﻭﻇﺎﺋﻒ ﻭﺣﺪﺓ ﺍﻟﺘﺤﻜﻢ ﺍﻟﺴﺤﺮﻳﺔ ﻋﻦ ﺑُﻌﺪ Magic )ﺍﻟﻄﺮﺍﺯﺍﺕ ﻭ ﻓﻘﻂ( ﺍﻟﻤﺆﺷﺮ )ﻣﺮﺳﻞ ﺍﻟﺘﺮﺩﺩ ﺍﻟﺮﺍﺩﻳﻮﻱ( )ﺍﻟﻄﺎﻗﺔ( ﻟﺘﺸﻐﻴﻞ ﺍﻟﺘﻠﻔﺎﺯ ﺃﻭ ﺇﻳﻘﺎﻑ ﺗﺸﻐﻴﻠﻪ. ﺃﺯﺭﺍﺭ ﺍﻟﺘﻨﻘﻞ )ﺃﻋﻠﻰ/ﺃﺳﻔﻞ/ﻳﺴﺎﺭ/ﻳﻤﻴﻦ( ﻟﻠﺘﻨﻘﻞ ﻋﺒﺮ ﺍﻟﻘﻮﺍﺋﻢ ﺃﻭ ﺍﻟﺨﻴﺎﺭﺍﺕ. ﺍﻟﻌﺮﺑﻴﺔ SMART ﻟﻠﻮﺻﻮﻝ ﺇﻟﻰ ﺍﻟﻘﻮﺍﺋﻢ ﺍﻟﺮﺋﻴﺴﻴﺔ ﺍﻟﺨﺎﺻﺔ ﺑـ .Smart ﺍﻟﺘﻌﺮّﻑ ﻋﻠﻰ ﺍﻟﺼﻮﺕ )ﺣﺴﺐ ﺍﻟﻄﺮﺍﺯ( Q.MENU ﻟﻠﻮﺻﻮﻝ ﺇﻟﻰ ﺍﻟﻘﻮﺍﺋﻢ ﺍﻟﺴﺮﻳﻌﺔ. ﻟﻠﻮﺻﻮﻝ ﺇﻟﻰ ﺍﻟﺘﺤﻜﻢ ﺍﻟﺸﺎﻣﻞ. )ﻻ ﺗﺘﻮﻓﺮ ﻫﺬﻩ ﺍﻟﻤﻴﺰﺓ ﻓﻲ ﺟﻤﻴﻊ ﺍﻟﺒﻼﺩ(. ) BACKﺭﺟﻮﻉ( ﻟﻠﻌﻮﺩﺓ ﺇﻟﻰ ﺍﻟﻤﺴﺘﻮﻯ ﺍﻟﺴﺎﺑﻖ.
ﻭﻇﺎﺋﻒ ﻭﺣﺪﺓ ﺍﻟﺘﺤﻜﻢ ﺍﻟﺴﺤﺮﻳﺔ ﻋﻦ ﺑُﻌﺪ 25 Magic ﻭﻇﺎﺋﻒ ﻭﺣﺪﺓ ﺍﻟﺘﺤﻜﻢ ﺍﻟﺴﺤﺮﻳﺔ ﻋﻦ ُﺑﻌﺪ MAGIC ﻋﻨﺪ ﻇﻬﻮﺭ ﺍﻟﺮﺳﺎﻟﺔ "ﺑﻄﺎﺭﻳﺔ ﺍﻟﺠﻬﺎﺯ ﺍﻟﺴﺤﺮﻱ ﻟﻠﺘﺤﻜﻢ ﻋﻦ ﺑُﻌﺪ ﻣﻨﺨﻔﻀﺔ .ﻗﻢ ﺑﺘﻐﻴﻴﺮ ﺍﻟﺒﻄﺎﺭﻳﺔ ، ".ﻓﻌﻠﻴﻚ ﺍﺳﺘﺒﺪﺍﻝ ﺍﻟﺒﻄﺎﺭﻳﺔ. ﻻﺳﺘﺒﺪﺍﻝ ﺍﻟﺒﻄﺎﺭﻳﺎﺕ ،ﺍﻓﺘﺢ ﻏﻄﺎء ﺍﻟﺒﻄﺎﺭﻳﺎﺕ ،ﻭﺍﺳﺘﺒﺪﻝ ﺍﻟﺒﻄﺎﺭﻳﺎﺕ ) 1.5ﻓﻮﻟﺖ ﺑﺤﺠﻢ (AAﺑﺤﻴﺚ ﻳﺘﻄﺎﺑﻖ ﺍﻟﻄﺮﻓﺎﻥ ﻭ ﻣﻊ ﺍﻟﺮﻣﺰ ﺍﻟﻤﻄﺒﻮﻉ ﺩﺍﺧﻞ ﺣﺠﺮﺓ ﺍﻟﺒﻄﺎﺭﻳﺎﺕ ﺛﻢ ﺃﻏﻠﻖ ﻏﻄﺎء ﺍﻟﺒﻄﺎﺭﻳﺔ .ﺗﺄﻛﺪ ﻣﻦ ﺗﻮﺟﻴﻪ ﻭﺣﺪﺓ ﺍﻟﺘﺤﻜﻢ ﻋﻦ ﺑُﻌﺪ ﺑﺎﺗﺠﺎﻩ ﻣﺴﺘﺸﻌﺮ ﺍﻟﺘﺤﻜﻢ ﻋﻦ ﺑُﻌﺪ ﺍﻟﻤﻮﺟﻮﺩ ﻋﻠﻰ ﺍﻟﺘﻠﻔﺎﺯ.
24 ﻭﺣﺪﺓ ﺍﻟﺘﺤﻜﻢ ﻋﻦ ﺑُﻌﺪ ﻭﺣﺪﺓ ﺍﻟﺘﺤﻜﻢ ﻋﻦ ُﺑﻌﺪ ﺗﺮﺗﻜﺰ ﺍﻟﻤﻮﺍﺻﻔﺎﺕ ﺍﻟﻤﻮﺟﻮﺩﺓ ﻓﻲ ﻫﺬﺍ ﺍﻟﺪﻟﻴﻞ ﻋﻠﻰ ﺃﺯﺭﺍﺭ ﻭﺣﺪﺓ ﺍﻟﺘﺤﻜﻢ ﻋﻦ ﺑُﻌﺪ. ﻳﺮﺟﻰ ﻗﺮﺍءﺓ ﻫﺬﺍ ﺍﻟﺪﻟﻴﻞ ﺑﻌﻨﺎﻳﺔ ﻭﺍﺳﺘﺨﺪﺍﻡ ﺍﻟﺘﻠﻔﺎﺯ ﺑﺸﻜﻞ ﺻﺤﻴﺢ. ﻻﺳﺘﺒﺪﺍﻝ ﺍﻟﺒﻄﺎﺭﻳﺎﺕ ،ﺍﻓﺘﺢ ﻏﻄﺎء ﺍﻟﺒﻄﺎﺭﻳﺎﺕ ،ﻭﺍﺳﺘﺒﺪﻝ ﺍﻟﺒﻄﺎﺭﻳﺎﺕ ) 1.5ﻓﻮﻟﺖ ﺑﺤﺠﻢ (AAAﺑﺤﻴﺚ ﻳﺘﻄﺎﺑﻖ ﺍﻟﻄﺮﻓﺎﻥ ﻣﻊ ﺍﻟﺮﻣﺰ ﺍﻟﻤﻄﺒﻮﻉ ﺩﺍﺧﻞ ﺣﺠﺮﺓ ﺍﻟﺒﻄﺎﺭﻳﺎﺕ ﺛﻢ ﺃﻏﻠﻖ ﻏﻄﺎء ﺍﻟﺒﻄﺎﺭﻳﺔ. ﻹﺯﺍﻟﺔ ﺍﻟﺒﻄﺎﺭﻳﺎﺕ ،ﻗﻢ ﺑﺘﻨﻔﻴﺬ ﺇﺟﺮﺍءﺍﺕ ﺍﻟﺘﺮﻛﻴﺐ ﺑﺘﺮﺗﻴﺐ ﻋﻜﺴﻲ.
ﺍﻟﺘﺠﻤﻴﻊ ﻭﺍﻟﺘﺤﻀﻴﺮ 23 ﺗﺤﻀﻴﺮ ﺍﻟﻜﺎﻣﻴﺮﺍ ﺍﻟﻤﺪﻣﺠﺔ 1 3ﺍﺳﺤﺐ ﺍﻟﻜﺎﻣﻴﺮﺍ ﺍﻟﻤﺪﻣﺠﺔ ﻷﺳﻔﻞ ﻋﻨﺪ ﻋﺪﻡ ﺍﺳﺘﺨﺪﺍﻣﻬﺎ. ﻳﻤﻜﻨﻚ ﺿﺒﻂ ﺯﺍﻭﻳﺔ ﺍﻟﻜﺎﻣﻴﺮﺍ ﺑﻮﺍﺳﻄﺔ ﺭﺍﻓﻌﺔ ﺿﺒﻂ ﺍﻟﺰﺍﻭﻳﺔ ﻓﻲ ﺍﻟﺠﺰء ﺍﻟﺨﻠﻔﻲ ﻣﻦ ﺍﻟﻜﺎﻣﻴﺮﺍ ﺍﻟﻤﺪﻣﺠﺔ )ﺿﻤﻦ 5ﺩﺭﺟﺎﺕ ﻋﻤﻮﺩﻳًﺎ(. ﺍﻟﻌﺮﺑﻴﺔ ﻣﺰﻻﻕ ﺍﺳﻢ ﺃﺟﺰﺍء ﺍﻟﻜﺎﻣﻴﺮﺍ ﺍﻟﻤﺪﻣﺠﺔ ﺍﻟﻤﻴﻜﺮﻭﻓﻮﻥ ﺍﻟﻤﺆﺷﺮ ﻋﺪﺳﺔ ﺍﻟﻜﺎﻣﻴﺮﺍ ﻣﻼﺣﻈﺔ • ﻗﻢ ﺑﺈﺯﺍﻟﺔ ﺍﻟﻔﻴﻠﻢ ﺍﻟﻮﻗﺎﺋﻲ ﻗﺒﻞ ﺍﺳﺘﺨﺪﺍﻡ ﺍﻟﻜﺎﻣﻴﺮﺍ ﺍﻟﻤﺪﻣﺠﺔ. 1 ﺭﺍﻓﻌﺔ ﺿﺒﻂ ﺍﻟﺰﺍﻭﻳﺔ 2 3 ﺍﺿﻐﻂ ﻋﻠﻰ ﺍﻟﺰﺭ SMARTﺍﻟﻤﻮﺟﻮﺩ ﻋﻠﻰ ﻭﺣﺪﺓ ﺍﻟﺘﺤﻜﻢ ﻋﻦ ﺑُﻌﺪ ﻟﻌﺮﺽ ﻗﺎﺋﻤﺔ ﺍﻟﻤﺰﻳﺪ.
22 ﺍﻟﺘﺠﻤﻴﻊ ﻭﺍﻟﺘﺤﻀﻴﺮ ﺍﺳﺘﺨﺪﺍﻡ ﻛﺎﻣﻴﺮﺍ ﻣﺪﻣﺠﺔ ﺍﺳﺘﺨﺪﺍﻡ ﻣﻜﺒﺮ ﺍﻟﺼﻮﺕ Sliding )ﺣﺴﺐ ﺍﻟﻄﺮﺍﺯ( )ﺍﻟﻄﺮﺍﺯﺍﺕ ** LA97ﻓﻘﻂ( ﻻ ﯾﻌﺘﻤﺪ ھﺬا اﻟﺘﻠﻔﺎز اﺳﺘﺨﺪام ﻛﺎﻣﯿﺮا ﺧﺎرﺟﯿﺔ. ﻣﻼﺣﻈﺔ ﺍﻟﻌﺮﺑﻴﺔ ﻣﻜﺒﺮ ﺍﻟﺼﻮﺕ Sliding ﺍﻟﺼﻮﺕ ﺇﻋﺪﺍﺩﺍﺕ ﺍﻧﺘﻘﻞ ﺇﻟﻰ ﺍﻟﻤﺰﻳﺪ Slidingﻟﻀﺒﻂ ﻣﻜﺒﺮ ﺍﻟﺼﻮﺕ ﺍﻟﻤﻨﺰﻟﻖ. ➡ ➡ 2 ➡ 1 ﻋﻨﺪﻣﺎ ﻳﻜﻮﻥ ﺍﻟﺘﻠﻔﺎﺯ ﻗﻴﺪ ﺍﻟﺘﺸﻐﻴﻞ -ﻳﻨﺰﻟﻖ ﻣﻜﺒﺮ ﺍﻟﺼﻮﺕ ﺍﻟﻤﺨﺒّﺄ ﺇﻟﻰ ﺍﻟﺨﺎﺭﺝ ﻣﻦ ﺩﺍﺧﻞ ﺍﻟﺘﻠﻔﺎﺯ.
ﺍﻟﺘﺠﻤﻴﻊ ﻭﺍﻟﺘﺤﻀﻴﺮ 21 ﺗﻨﺒﻴﻪ ﺗﻨﺒﻴﻪ • ﺍﺣﺮﺹ ﻋﻠﻰ ﺍﺳﺘﺨﺪﺍﻡ ﺍﻟﻤﻜﻮﻧﺎﺕ ﺍﻟﻤﺘﻮﻓﺮﺓ ﻣﻊ ﺍﻟﺘﻠﻔﺎﺯ .ﻻ ﺗﺴﺘﺨﺪﻡ ﺍﻟﻤﻜﻮﻧﺎﺕ ﺍﻟﻤﺘﻮﻓﺮﺓ ﻣﻊ ﻗﻮﺱ ﺍﻟﺘﺜﺒﻴﺖ ﻋﻠﻰ ﺍﻟﺤﺎﺋﻂ ﻟﺘﺜﺒﻴﺖ ﻫﺬﺍ ﺍﻷﺧﻴﺮ ﻋﻠﻰ ﺍﻟﺘﻠﻔﺎﺯ) .ﺍﻟﻄﺮﺍﺯﺍﺕ ** LA97ﻓﻘﻂ( • • • ﺍﺣﺮﺹ ﻋﻠﻰ ﺍﺳﺘﺨﺪﺍﻡ ﻣﺴﺎﻣﻴﺮ ﻭﻗﻮﺱ ﺗﺜﺒﻴﺖ ﻋﻠﻰ ﺍﻟﺤﺎﺋﻂ ً ﻭﻓﻘﺎ ﻟﻤﻌﺎﻳﻴﺮ ً ﻭﺻﻔﺎ ﻟﻸﺑﻌﺎﺩ ﺍﻟﻘﻴﺎﺳﻴﺔ ﻟﻤﺠﻤﻮﻋﺔ ﻗﻮﺱ .VESAﻳﻮﻓﺮ ﺍﻟﺠﺪﻭﻝ ﺍﻟﺘﺎﻟﻲ ﺍﻟﺘﺜﺒﻴﺖ ﻋﻠﻰ ﺍﻟﺤﺎﺋﻂ.
20 ﺍﻟﺘﺠﻤﻴﻊ ﻭﺍﻟﺘﺤﻀﻴﺮ ﺗﻨﺒﻴﻪ ﺗﻨﺒﻴﻪ • ﻋﻨﺪ ﺿﺒﻂ ﺯﺍﻭﻳﺔ ﺍﻟﻤﻨﺘﺞ ،ﺍﻧﺘﺒﻪ ﺇﻟﻰ ﺃﺻﺎﺑﻌﻚ. ﺇﺫ ﻗﺪ ﺗﺤﺪﺙ ﺇﺻﺎﺑﺔ ﺷﺨﺼﻴﺔ ﻓﻲ ﺣﺎﻟﺔ ﺍﻟﻀﻐﻂ ﻋﻠﻰ ﺍﻷﻳﺪﻱ ﺃﻭﺍﻷﺻﺎﺑﻊ .ﻭﻗﺪ ﻳﺴﻘﻂ ﺍﻟﻤﻨﺘﺞ ﻓﻲ ﺣﺎﻟﺔ ﺇﻣﺎﻟﺘﻪ ﺑﺼﻮﺭﺓ ﺯﺍﺋﺪﺓ ،ﻣﻤﺎ ﻳﺘﺴﺒﺐ ﻓﻲ ﺣﺪﻭﺙ ﺗﻠﻒ ﺃﻭ ﻭﻗﻮﻉ ﺇﺻﺎﺑﺔ. • ﺍﺣﺮﺹ ﻋﻠﻰ ﻋﺪﻡ ﻗﻴﺎﻡ ﺍﻷﻃﻔﺎﻝ ﺑﺎﻟﺘﺴﻠﻖ ﻋﻠﻰ ﺍﻟﺘﻠﻔﺎﺯ ﺃﻭ ﺍﻟﺘﻌﻠﻖ ﺑﻪ. ﻣﻼﺣﻈﺔ ﺍﻟﻌﺮﺑﻴﺔ ﻛﺎﻑ ﻟﺘﺤﻤﻞ ﺟﻬﺎﺯ • ﺍﺳﺘﺨﺪﻡ ﻣﻨﺼﺔ ﺃﻭ ﺧﺰﺍﻧﺔ ﻗﻮﻳﺔ ﻭﻛﺒﻴﺮﺓ ﺑﺸﻜﻞ ٍ ﺍﻟﺘﻠﻔﺎﺯ ﺑﺸﻜﻞ ﺁﻣﻦ. • ﺍﻷﻗﻮﺍﺱ ،ﺍﻟﻤﺴﺎﻣﻴﺮ ﻭﺍﻟﺤﺒﺎﻝ ﻏﻴﺮ ﻣﺮﻓﻘﺔ .ﻳﻤﻜﻦ ﺍﻟﺤﺼﻮﻝ ﻋﻠﻰ ﺍﻟﻤﻠﺤﻘﺎﺕ ﺍﻹﺿﺎﻓﻴﺔ ﻣﻦ ﺍﻟﻮﻛﻴﻞ ﺍﻟﻤﺤﻠﻲ.
ﺍﻟﺘﺠﻤﻴﻊ ﻭﺍﻟﺘﺤﻀﻴﺮ 19 ﺍﻟﺘﺜﺒﻴﺖ ﻋﻠﻰ ﺍﻟﻄﺎﻭﻟﺔ 1 ﺿﺒﻂ ﺯﺍﻭﻳﺔ ﺍﻟﺘﻠﻔﺎﺯ ﻟﺘﺘﻨﺎﺳﺐ ﻣﻊ ﺯﺍﻭﻳﺔ ﺍﻟﻌﺮﺽ ﺍﺭﻓﻊ ﺍﻟﺘﻠﻔﺎﺯ ﻭﺃﻣﻠﻪ ﺇﻟﻰ ﺍﻟﻮﺿﻊ ﺍﻟﻤﺴﺘﻘﻴﻢ ﻋﻠﻰ ﺍﻟﻄﺎﻭﻟﺔ. ﺍﺑﻖ ﻣﺴﺎﻓﺔ 10ﺳﻢ )ﻋﻠﻰ ﺍﻷﻗﻞ( ﻣﻦ ﺍﻟﺤﺎﺋﻂ ﻟﺘﻬﻮﻳﺔ ﻣﻨﺎﺳﺒﺔ. ِ - 15 10ﺳﻢ 0 1ﺳﻢ 15 10ﺳﻢ ﺍﻟﻌﺮﺑﻴﺔ 10ﺳﻢ 10ﺳﻢ 2 )ﻫﺬﻩ ﺍﻟﻤﻴﺰﺓ ﻏﻴﺮ ﻣﺘﻮﻓﺮﺓ ﻓﻲ ﻛﻞ ﺍﻟﻄﺮﺍﺯﺍﺕ(. ﺃﺩﺭ ﺍﻟﺘﻠﻔﺎﺯ 15ﺩﺭﺟﺔ ﺇﻟﻰ ﺍﻟﻴﺴﺎﺭ ﺃﻭ ﺍﻟﻴﻤﻴﻦ ﻭﺍﺿﺒﻂ ﺯﺍﻭﻳﺔ ﺍﻟﺘﻠﻔﺎﺯ ﺑﻤﺎ ﻳﻼﺋﻤﻚ) .
18 ﺍﻟﺘﺠﻤﻴﻊ ﻭﺍﻟﺘﺤﻀﻴﺮ ﺣﻤﻞ ﺍﻟﺘﻠﻔﺎﺯ ﻭﻧﻘﻠﻪ ﻋﻨﺪ ﻧﻘﻞ ﺍﻟﺘﻠﻔﺎﺯ ﺃﻭ ﺣﻤﻠﻪ ،ﻳُﺮﺟﻰ ﻗﺮﺍءﺓ ﺍﻹﺭﺷﺎﺩﺍﺕ ﺍﻟﺘﺎﻟﻴﺔ ﻟﺘﺠﻨﺐ ﺧﺪﺷﻪ ﺃﻭ ﺇﻟﺤﺎﻕ ﺍﻟﻀﺮﺭ ﺑﻪ ﻭﻟﻀﻤﺎﻥ ﺍﻟﻨﻘﻞ ﺍﻵﻣﻦ ﺑﻐﺾ ﺍﻟﻨﻈﺮ ﻋﻦ ﻧﻮﻉ ﺍﻟﺘﻠﻔﺎﺯ ﻭﺣﺠﻤﻪ. • ﻳﺘﻄﻠﺐ ﻧﻘﻞ ﺟﻬﺎﺯ ﺗﻠﻔﺎﺯ ﻛﺒﻴﺮ ﺷﺨﺼﻴﻦ ﻋﻠﻰ ﺍﻷﻗﻞ. • ﻋﻨﺪ ﻧﻘﻞ ﺍﻟﺘﻠﻔﺎﺯ ﺑﺎﻟﻴﺪ ،ﻳﺠﺐ ﺍﻹﻣﺴﺎﻙ ﺑﻪ ﻛﻤﺎ ﻫﻮ ﻣﻮﺿﺢ ﻓﻲ ﺍﻟﺼﻮﺭﺓ ﺍﻟﺘﺎﻟﻴﺔ. ﺗﻨﺒﻴﻪ • ﺗﺠﻨﺐ ﻟﻤﺲ ﺳﻄﺢ ﺍﻟﺸﺎﺷﺔ ﻓﻲ ﻛﻞ ﻭﻗﺖ ،ﺇﺫ ﻗﺪ ﻳﺆﺩﻱ ﺫﻟﻚ ﺇﻟﻰ ﺇﻟﺤﺎﻕ ﺍﻟﻀﺮﺭ ﺑﻬﺎ. ﺍﻟﻌﺮﺑﻴﺔ • ﻳﻮﺻﻰ ﺑﻨﻘﻞ ﺍﻟﺘﻠﻔﺎﺯ ﻓﻲ ﺍﻟﺼﻨﺪﻭﻕ ﺃﻭ ً ﻣﻐﻠﻔﺎ ﺑﻤﻮﺍﺩ ﺍﻟﺘﻌﺒﺌﺔ ﺍﻟﺘﻲ ﺃﺭﻓﻘﺖ ﺑﻪ.
ﺍﻟﺘﺠﻤﻴﻊ ﻭﺍﻟﺘﺤﻀﻴﺮ 17 ﺍﻟﻨﻮﻉ : Eﺍﻟﻄﺮﺍﺯﺍﺕ ** LA97ﻓﻘﻂ ﻛﺎﻣﻴﺮﺍ ﻣﻜﺎﻟﻤﺎﺕ ﺍﻟﻔﻴﺪﻳﻮ ﺍﻷﺯﺭﺍﺭ OK ﺍﻟﺸﺎﺷﺔ ﺍﻷﺯﺭﺍﺭ ﻣﻜﺒﺮﺍﺕ ﺍﻟﺼﻮﺕ SETTINGS 4 ﺍﻟﻨﻮﻉ : Fﺍﻟﻄﺮﺍﺯﺍﺕ ﻭ ﻓﻘﻂ ﺍﻟﺸﺎﺷﺔ OK 4 SETTINGS INPUT ﺍﻟﻌﺮﺑﻴﺔ INPUT ﻣﻜﺒﺮﺍﺕ ﺍﻟﺼﻮﺕ LG Logo light )ﺇﺿﺎءﺓ ﺷﻌﺎﺭ(LG ﻣُﺴﺘﺸﻌﺮ ﻭﺣﺪﺓ ﺍﻟﺘﺤﻜﻢ ﻋﻦ ﺑُﻌﺪ ﻣﺆﺷﺮ ﺍﻟﺘﺸﻐﻴﻞ ﺍﻟﺰﺭ ﺍﻟﻮﺻﻒ s 1 ﻭﺣﺪﺓ ﺍﻟﺘﺤﻜﻢ ﻋﻦ ﺑُﻌﺪ ﻭﻭﺣﺪﺓ ﺍﻻﺳﺘﺸﻌﺎﺭ ﺍﻟﺬﻛﻴﺔ 1 ﻟﻠﺘﻨﻘﻞ ﻋﺒﺮ ﺍﻟﺒﺮﺍﻣﺞ ﺍﻟﻤﺤﻔﻮﻇﺔ. ﻟﻀﺒﻂ ﻣﺴﺘﻮﻯ ﺍﻟﺼﻮﺕ.
16 ﺍﻟﺘﺠﻤﻴﻊ ﻭﺍﻟﺘﺤﻀﻴﺮ ﺍﻷﺟﺰﺍء ﻭﺍﻷﺯﺭﺍﺭ ﺍﻟﻨﻮﻉ : Aﺍﻟﻄﺮﺍﺯﺍﺕ ** LA79ﻓﻘﻂ ﺍﻷﺯﺭﺍﺭ ﺍﻟﻨﻮﻉ : Bﺍﻟﻄﺮﺍﺯﺍﺕ * LA860ﻭ * LA960ﻓﻘﻂ ﺍﻟﺸﺎﺷﺔ ﺍﻷﺯﺭﺍﺭ ﺍﻟﻌﺮﺑﻴﺔ ﻣﻜﺒﺮﺍﺕ ﺍﻟﺼﻮﺕ SETTINGS 4 SETTINGS ﻣﻜﺒﺮﺍﺕ ﺍﻟﺼﻮﺕ INPUT INPUT ﻣُﺴﺘﺸﻌﺮ ﻭﺣﺪﺓ ﺍﻟﺘﺤﻜﻢ ﻋﻦ ﺑُﻌﺪ LG Logo light )ﺇﺿﺎءﺓ ﺷﻌﺎﺭ(LG ﻣُﺴﺘﺸﻌﺮ ﻭﺣﺪﺓ ﺍﻟﺘﺤﻜﻢ ﻋﻦ ﺑُﻌﺪ LG Logo light )ﺇﺿﺎءﺓ ﺷﻌﺎﺭ(LG ﺍﻟﻨﻮﻉ : Cﺍﻟﻄﺮﺍﺯﺍﺕ * LA868ﻓﻘﻂ ﺍﻟﻨﻮﻉ : Dﺍﻟﻄﺮﺍﺯﺍﺕ * LA965ﻓﻘﻂ ﻛﺎﻣﻴﺮﺍ ﻣﻜﺎﻟﻤﺎﺕ ﺍﻟﻔﻴﺪﻳﻮ ﺍﻟﺸﺎﺷﺔ ﺍﻷﺯﺭﺍﺭ
ﺍﻟﺘﺠﻤﻴﻊ ﻭﺍﻟﺘﺤﻀﻴﺮ 15 ﺍﻟﻌﻨﺎﺻﺮ ﺍﻟﺘﻲ ﻳﺘﻢ ﺷﺮﺍﺅﻫﺎ ﺑﺸﻜﻞ ﻣﻨﻔﺼﻞ ﻳﻤﻜﻦ ﺗﻐﻴﻴﺮ ﺍﻟﻌﻨﺎﺻﺮ ﺍﻟﺘﻲ ﻳﺘﻢ ﺷﺮﺍﺅﻫﺎ ﺑﺸﻜﻞ ﻣﻨﻔﺼﻞ ﺃﻭ ﺗﻌﺪﻳﻠﻬﺎ ﺑﻬﺪﻑ ﺗﺤﺴﻴﻦ ﺍﻟﺠﻮﺩﺓ ﻣﻦ ﺩﻭﻥ ﺃﻱ ﺇﺷﻌﺎﺭ. ﺍﺗﺼﻞ ﺑﺎﻟﻮﻛﻴﻞ ﻟﺸﺮﺍء ﻫﺬﻩ ﺍﻟﻌﻨﺎﺻﺮ. ﺗﻌﻤﻞ ﻫﺬﻩ ﺍﻟﻮﺣﺪﺍﺕ ﻣﻊ ﺑﻌﺾ ﺍﻟﻄﺮﺍﺯﺍﺕ ﻓﻘﻂ.
14 ﺍﻟﺘﺠﻤﻴﻊ ﻭﺍﻟﺘﺤﻀﻴﺮ BACK SMART /Q.
ﺍﻟﺘﺠﻤﻴﻊ ﻭﺍﻟﺘﺤﻀﻴﺮ 13 Tag On ﻧﻈﺎﺭﺍﺕ ﺍﻟﻠﻌﺐ ﺍﻟﺜﻨﺎﺋﻲ )ﺣﺴﺐ ﺍﻟﻄﺮﺍﺯ( ﻧﻈﺎﺭﺍﺕ ﺍﻟﺴﻴﻨﻤﺎ ﺛﻼﺛﻴﺔ ﺍﻷﺑﻌﺎﺩ ﻗﺪ ﻳﺨﺘﻠﻒ ﻋﺪﺩ ﻧﻈﺎﺭﺍﺕ ﺍﻷﺑﻌﺎﺩ ﺍﻟﺜﻼﺛﻴﺔ ﺗﺒﻌًﺎ ﻟﻠﺒﻠﺪ ﺃﻭ ﺍﻟﻄﺮﺍﺯ.
12 ﻋﻤﻠﻴﺔ ﺍﻟﺘﺜﺒﻴﺖ /ﺍﻟﺘﺠﻤﻴﻊ ﻭﺍﻟﺘﺤﻀﻴﺮ ﻣﻼﺣﻈﺔ • • • • • • ﻗﺪ ﺗﺨﺘﻠﻒ ﺍﻟﺼﻮﺭﺓ ﺍﻟﻤﻌﺮﻭﺿﺔ ﻋﻦ ﺻﻮﺭﺓ ﺍﻟﺘﻠﻔﺎﺯ ﻟﺪﻳﻚ. ﻗﺪ ﺗﺨﺘﻠﻒ ﺧﻴﺎﺭﺍﺕ ﺍﻟﻌﺮﺽ ﻋﻠﻰ ﺍﻟﺸﺎﺷﺔ ﺍﻟﺨﺎﺻﺔ ﺑﻜﻞ ﺟﻬﺎﺯ ﺗﻠﻔﺎﺯ ﺑﺸﻜﻞ ﺑﺴﻴﻂ ﻋﻤﺎ ﻫﻮ ﻣﺒﻴﻦ ﻓﻲ ﻫﺬﺍ ﺍﻟﺪﻟﻴﻞ. ﻗﺪ ﺗﺨﺘﻠﻒ ﺍﻟﻘﻮﺍﺋﻢ ﻭﺍﻟﺨﻴﺎﺭﺍﺕ ﺍﻟﻤﺘﻮﻓﺮﺓ ﻋﻦ ﻣﺼﺪﺭ ﺍﻹﺩﺧﺎﻝ ﺃﻭ ﻃﺮﺍﺯ ﺍﻟﻤﻨﺘﺞ ﺍﻟﺬﻱ ﺗﺴﺘﺨﺪﻣﻪ. ﻳﻤﻜﻦ ﺇﺿﺎﻓﺔ ﻣﻴﺰﺍﺕ ﺟﺪﻳﺪﺓ ﺇﻟﻰ ﻫﺬﺍ ﺍﻟﺘﻠﻔﺎﺯ ﻓﻲ ﺍﻟﻤﺴﺘﻘﺒﻞ. ﻳﻤﻜﻦ ﺿﺒﻂ ﺍﻟﺘﻠﻔﺎﺯ ﻋﻠﻰ ﻭﺿﻊ ﺍﻻﺳﺘﻌﺪﺍﺩ ﻟﻠﺤﺪ ﻣﻦ ﺍﺳﺘﻬﻼﻙ ﺍﻟﻄﺎﻗﺔ .
ﺗﻌﻠﻴﻤﺎﺕ ﺍﻷﻣﺎﻥ 11 ﺗﻨﺒﻴﻪ ﺑﻴﺌﺔ ﺍﻟﻤﺸﺎﻫﺪﺓ • ﻣﺴﺎﻓﺔ ﺍﻟﻤﺸﺎﻫﺪﺓ ﺣﺎﻓﻆ ﻋﻠﻰ ﻭﺟﻮﺩ ﻣﺴﺎﻓﺔ ﻻ ﺗﻘﻞ ﻋﻦ ﺿﻌﻒ ﻃﻮﻝ ﺍﻟﺸﺎﺷﺔ ﺍﻟﻘﻄﺮﻱ ﻋﻨﺪ ﻣﺸﺎﻫﺪﺓ ﻣﺤﺘﻮﻳﺎﺕ ﺛﻼﺛﻴﺔ ﺍﻷﺑﻌﺎﺩ .ﻓﻲ ﺣﺎﻟﺔ ﻋﺪﻡ ﺍﻟﺸﻌﻮﺭ ﺑﺎﻟﺮﺍﺣﺔ ﻋﻨﺪﻣﺸﺎﻫﺪﺓ ﺍﻟﻤﺤﺘﻮﻳﺎﺕ ﺛﻼﺛﻴﺔ ﺍﻷﺑﻌﺎﺩ ،ﺍﺑﺘﻌﺪ ﻋﻦ ﺍﻟﺘﻠﻔﺎﺯ. ﻋﻤﺮ ﺍﻟﻤﺸﺎﻫﺪ ﺗﻨﺒﻴﻬﺎﺕ ﻋﻨﺪ ﺍﺳﺘﺨﺪﺍﻡ ﻧﻈﺎﺭﺍﺕ ﺍﻷﺑﻌﺎﺩ ﺍﻟﺜﻼﺛﻴﺔ • • • • • ﻗﺎﺩﺭﺍ ﻋﻠﻰ ﻣﺸﺎﻫﺪﺓ ﻣﻘﺎﻃﻊ ﺍﻟﻔﻴﺪﻳﻮ ﺛﻼﺛﻴﺔ ﺍﻷﺑﻌﺎﺩ ﺑﺸﻜﻞ ﺻﺤﻴﺢ. ﺗﺄﻛﺪ ﻣﻦ ﺍﺳﺘﺨﺪﺍﻡ ﻧﻈﺎﺭﺍﺕ ﺍﻷﺑﻌﺎﺩ ﺍﻟﺜﻼﺛﻴﺔ ﺍﻟﺨﺎﺻﺔ ﺑـ .
10 ﺗﻌﻠﻴﻤﺎﺕ ﺍﻷﻣﺎﻥ ﻋﺮﺽ ﺍﻟﺼﻮﺭ ﺛﻼﺛﻴﺔ ﺍﻷﺑﻌﺎﺩ )ﺍﻟﻄﺮﺍﺯﺍﺕ ﺛﻼﺛﻴﺔ ﺍﻷﺑﻌﺎﺩ ﻓﻘﻂ( ﺗﺤﺬﻳﺮ ﺑﻴﺌﺔ ﺍﻟﻤﺸﺎﻫﺪﺓ ﺍﻟﻌﺮﺑﻴﺔ • ﻭﻗﺖ ﺍﻟﻌﺮﺽ ﻋﻨﺪ ﻣﺸﺎﻫﺪﺓ ﻣﺤﺘﻮﻳﺎﺕ ﺛﻼﺛﻴﺔ ﺍﻷﺑﻌﺎﺩ ،ﺧﺬ ًﻗﺴﻄﺎ ﻣﻦ ﺍﻟﺮﺍﺣﺔ ﻗﺪﺭﻩ 15 - 5ﺩﻗﻴﻘﺔ ﻛﻞ ﺳﺎﻋﺔ .ﺣﻴﺚ ﻗﺪ ﻳﺘﺴﺒﺐ ﻋﺮﺽ ﺍﻟﻤﺤﺘﻮﻳﺎﺕ ﺛﻼﺛﻴﺔ ﺍﻷﺑﻌﺎﺩ ﻟﻔﺘﺮﺓ ﻃﻮﻳﻠﺔ ﻓﻲ ﺍﻹﺻﺎﺑﺔ ﺑﺎﻟﺼﺪﺍﻉ ﺃﻭ ﺍﻟﺪﻭﺍﺭ ﺃﻭ ﺍﻹﺭﻫﺎﻕ ﺃﻭ ﺇﺟﻬﺎﺩ ﺍﻟﻌﻴﻦ.
ﺗﻌﻠﻴﻤﺎﺕ ﺍﻷﻣﺎﻥ 9 • ﻋﻨﺪ ﺗﺤﺮﻳﻚ ﺍﻟﻤﻨﺘﺞ ﺃﻭ ﻓﻚ ﺗﻐﻠﻴﻔﻪ ،ﺍﺳﺘﻌﻦ ﺑﺸﺨﺺ ﺁﺧﺮ ﻟﺤﻤﻠﻪ ﻷﻥ ﺍﻟﻤﻨﺘﺞ ﺛﻘﻴﻞ. ﻭﺇﻻ ﻓﻘﺪ ﻳﺘﺴﺒﺐ ﺫﻟﻚ ﻓﻲ ﺣﺪﻭﺙ ﺇﺻﺎﺑﺔ. • ﺍﺗﺼﻞ ﺑﻤﺮﻛﺰ ﺍﻟﺨﺪﻣﺔ ﻣﺮﺓ ﻭﺍﺣﺪﺓ ﺳﻨﻮﻳًﺎ ﻟﺘﻨﻈﻴﻒ ﺃﺟﺰﺍء ﺍﻟﻤﻨﺘﺞ ﺍﻟﺪﺍﺧﻠﻴﺔ. ﻗﺪ ﻳﺘﺴﺒﺐ ﺍﻟﻐﺒﺎﺭ ﺍﻟﻤﺘﺮﺍﻛﻢ ﺑﻌﻄﻞ ﻣﻴﻜﺎﻧﻴﻜﻲ. ﻳﺘﻌﺮﺽ ﺍﻟﺠﻬﺎﺯ ﻷﻱ • ﺃﻭﻛﻞ ﺃﻋﻤﺎﻝ ﺍﻟﺨﺪﻣﺔ ﻭﺍﻟﺼﻴﺎﻧﺔ ﻟﻔﺮﻳﻖ ﺍﻟﺨﺪﻣﺔ ﺍﻟﻤﺆﻫﻞ .
8 ﺗﻌﻠﻴﻤﺎﺕ ﺍﻷﻣﺎﻥ • ﻻ ﺗﻘﻢ ﺑﺘﺸﻐﻴﻞ/ﺇﻳﻘﺎﻑ ﺗﺸﻐﻴﻞ ﺍﻟﻤﻨﺘﺞ ﻣﻦ ﺧﻼﻝ ﺗﻮﺻﻴﻞ ﻗﺎﺑﺲ ﺍﻟﻄﺎﻗﺔ ﺃﻭ ﻓﺼﻠﻪ ﻣﻦ ﻣﺼﺪﺭ ﺍﻟﻄﺎﻗﺔ ﺑﺎﻟﺤﺎﺋﻂ) .ﻻ ﺗﺴﺘﺨﺪﻡ ﻗﺎﺑﺲ ﺍﻟﻄﺎﻗﺔ ﻛﻤﻔﺘﺎﺡ(. ﻓﻘﺪ ﻳﺆﺩﻱ ﺫﻟﻚ ﺇﻟﻰ ﻋﻄﻞ ﻣﻴﻜﺎﻧﻴﻜﻲ ﺃﻭ ﺍﻟﺘﺴﺒﺐ ﻓﻲ ﺣﺪﻭﺙ ﺻﺪﻣﺔ ﻛﻬﺮﺑﺎﺋﻴﺔ. ﺍﻟﻌﺮﺑﻴﺔ • ﻳُﺮﺟﻰ ﺍﺗﺒﺎﻉ ﺗﻌﻠﻴﻤﺎﺕ ﺍﻟﺘﺜﺒﻴﺖ ﺍﻟﻤﻮﺿﺤﺔ ﺃﺩﻧﺎﻩ ﻟﺘﻔﺎﺩﻱ ﺣﺪﻭﺙ ﺳﺨﻮﻧﺔ ﻣﻔﺮﻃﺔ ﻟﻠﻤﻨﺘﺞ. ﻳﺠﺐ ﺃﻥ ﺗﺘﺠﺎﻭﺯ ﺍﻟﻤﺴﺎﻓﺔ ﺑﻴﻦ ﺍﻟﻤﻨﺘﺞ ﻭﺍﻟﺤﺎﺋﻂ 10ﺳﻢ.ﻻ ﺗﻘﻢ ﺑﺘﺜﺒﻴﺖ ﺍﻟﻤﻨﺘﺞ ﻓﻲ ﻣﻜﺎﻥ ﻻ ﺗﻮﺟﺪ ﻓﻴﻪ ﺗﻬﻮﻳﺔ )ﻋﻠﻰ ﺳﺒﻴﻞ ﺍﻟﻤﺜﺎﻝ ،ﻋﻠﻰ ﺍﻟﺮﻑ ﻓﻲ ﻣﻜﺘﺒﺔ ﺃﻭ ﻓﻲ ﺧﺰﺍﻧﺔ(.ﻻ ﺗﻘﻢ ﺑﺘﺜﺒﻴﺖ ﺍﻟﻤﻨﺘﺞ ﻋﻠﻰ ﺳﺠﺎﺩﺓ ﺃﻭ ﻭﺳﺎﺩﺓ.
ﺗﻌﻠﻴﻤﺎﺕ ﺍﻷﻣﺎﻥ 7 ﺗﻨﺒﻴﻪ ﺧﺎﻝ ﻣﻦ ﺍﻟﻤﻮﺟﺎﺕ ﺍﻟﻼﺳﻠﻜﻴﺔ. • ﻗﻢ ﺑﺘﺜﺒﻴﺖ ﺍﻟﻤﻨﺘﺞ ﻓﻲ ﻣﻜﺎﻥ ٍ • ﻳﻨﺒﻐﻲ ﺗﻮﻓﺮ ﻣﺴﺎﺣﺔ ﻛﺎﻓﻴﺔ ﺑﻴﻦ ﺍﻟﻬﻮﺍﺋﻲ ﺍﻟﺨﺎﺭﺟﻲ ﻭﺧﻄﻮﻁ ﺍﻟﻄﺎﻗﺔ ﻟﻠﻤﺤﺎﻓﻈﺔ ﻋﻠﻰ ﻋﺪﻡ ﺗﻼﻣﺲ ﺍﻷﻭﻝ ﻣﻊ ﺍﻟﺜﺎﻧﻲ ﺣﺘﻰ ﻓﻲ ﺣﺎﻟﺔ ﺳﻘﻮﻁ ﺍﻟﻬﻮﺍﺋﻲ. ﺇﺫ ﻗﺪ ﻳﺆﺩﻱ ﺫﻟﻚ ﺇﻟﻰ ﺣﺪﻭﺙ ﺻﺪﻣﺔ ﻛﻬﺮﺑﺎﺋﻴﺔ. • ﻓﻲ ﺣﺎﻟﺔ ﺗﺮﻛﻴﺐ ﺍﻟﺘﻠﻔﺎﺯ ﻋﻠﻰ ﺣﺎﻣﻞ ،ﺳﺘﺤﺘﺎﺝ ﺇﻟﻰ ﺍﻟﻘﻴﺎﻡ ﺑﺒﻌﺾ ﺍﻹﺟﺮﺍءﺍﺕ ﻟﺘﻔﺎﺩﻱ ﺳﻘﻮﻁ ﺍﻟﻤﻨﺘﺞ .ﻭﺇﻻ ﻓﻘﺪ ﻳﺴﻘﻂ ﺍﻟﻤﻨﺘﺞ ﻣﻤﺎ ﻗﺪ ﻳﺘﺴﺒﺐ ﻓﻲ ﺣﺪﻭﺙ ﺇﺻﺎﺑﺔ.
6 ﺗﻌﻠﻴﻤﺎﺕ ﺍﻷﻣﺎﻥ • ﻻ ﺗﻘﻢ ﺑﺘﻔﻜﻴﻚ ﺍﻟﻤﻨﺘﺞ ﺃﻭ ﺇﺻﻼﺣﻪ ﺃﻭ ﺗﻌﺪﻳﻠﻪ ً ﻭﻓﻘﺎ ﻟﺘﻘﺪﻳﺮﻙ ﺍﻟﺨﺎﺹ. ﻓﻘﺪ ﻳﻨﺸﺐ ﺣﺮﻳﻖ ﺃﻭ ﺗﺤﺪﺙ ﺻﺪﻣﺔ ﻛﻬﺮﺑﺎﺋﻴﺔ. ﺍﺗﺼﻞ ﺑﻤﺮﻛﺰ ﺍﻟﺨﺪﻣﺔ ﺍﻟﻤﺤﻠﻲ ﻟﻔﺤﺺ ﺍﻟﻤﻨﺘﺞ ﺃﻭ ﻣﻌﺎﻳﺮﺗﻪ ﺃﻭ ﺇﺻﻼﺣﻪ. ﺍﻟﻌﺮﺑﻴﺔ • ﻓﻲ ﺣﺎﻟﺔ ﺣﺪﻭﺙ ﺃﻱ ﻣﻤﺎ ﻳﻠﻲ ،ﻗﻢ ﺑﻔﺼﻞ ﺍﻟﻤﻨﺘﺞ ﻋﻠﻰ ﺍﻟﻔﻮﺭ ﻭﺍﺗﺼﻞ ﺑﻤﺮﻛﺰ ﺍﻟﺨﺪﻣﺔ ﺍﻟﻤﺤﻠﻲ. ﺗﺄﺛﺮ ﺍﻟﻤﻨﺘﺞ ﺑﺎﻟﺼﺪﻣﺔﺗﻠﻒ ﺍﻟﻤﻨﺘﺞﺩﺧﻮﻝ ﺃﺟﺴﺎﻡ ﻏﺮﻳﺒﺔ ﺩﺍﺧﻞ ﺍﻟﻤﻨﺘﺞﺻﺪﻭﺭ ﺩﺧﺎﻥ ﺃﻭ ﺭﺍﺋﺤﺔ ﻏﺮﻳﺒﺔ ﻣﻦ ﺍﻟﻤﻨﺘﺞﻓﻘﺪ ﻳﺘﺴﺒﺐ ﺫﻟﻚ ﻓﻲ ﻧﺸﻮﺏ ﺣﺮﻳﻖ ﺃﻭ ﺣﺪﻭﺙ ﺻﺪﻣﺔ ﻛﻬﺮﺑﺎﺋﻴﺔ.
ﺗﻌﻠﻴﻤﺎﺕ ﺍﻷﻣﺎﻥ 5 • ﻻ ﺗﻘﻢ ﺑﺘﻮﺻﻴﻞ ﺍﻟﻜﺜﻴﺮ ﻣﻦ ﺍﻷﺟﻬﺰﺓ ﺍﻟﻜﻬﺮﺑﺎﺋﻴﺔ ﺑﻤﺼﺪﺭ ﻛﻬﺮﺑﺎﺋﻲ ﻭﺍﺣﺪ ﻣﺘﻌﺪﺩ ﺍﻟﻤﻨﺎﻓﺬ. ﻭﺇﻻ ﻓﻘﺪ ﻳﺘﺴﺒﺐ ﺫﻟﻚ ﻓﻲ ﻧﺸﻮﺏ ﺣﺮﻳﻖ ﺑﺴﺒﺐ ﺍﻟﺴﺨﻮﻧﺔ ﺍﻟﺰﺍﺋﺪﺓ. • ﺍﺣﺮﺹ ﻋﻠﻰ ﻋﺪﻡ ﺳﻘﻮﻁ ﺍﻟﻤﻨﺘﺞ ﺃﻭ ﻭﻗﻮﻋﻪ ﻋﻨﺪ ﺗﻮﺻﻴﻞ ﺃﺟﻬﺰﺓ ﺧﺎﺭﺟﻴﺔ. ﻭﺇﻻ ﻓﻘﺪ ﻳﺘﺴﺒﺐ ﺫﻟﻚ ﻓﻲ ﺣﺪﻭﺙ ﺇﺻﺎﺑﺔ ﺷﺨﺼﻴﺔ ﺃﻭ ﺗﻠﻒ ﺍﻟﻤﻨﺘﺞ. • ﺗﺨﻠﺺ ﻣﻦ ﺍﻟﺒﻄﺎﺭﻳﺎﺕ ﺑﺤﺮﺹ ﻟﻤﻨﻊ ﺍﻷﻃﻔﺎﻝ ﻣﻦ ﺗﻨﺎﻭﻟﻬﺎ ﺑﺎﻟﻔﻢ. ﻓﻲ ﺣﺎﻟﺔ ﺗﻨﺎﻭﻝ ﺍﻟﻄﻔﻞ ﻟﻠﺒﻄﺎﺭﻳﺎﺕ ﺑﺎﻟﻔﻢ ،ﺍﺻﻄﺤﺒﻪ ﺇﻟﻰ ﺍﻟﻄﺒﻴﺐ ﻋﻠﻰ ﺍﻟﻔﻮﺭ.
4 ﺗﻌﻠﻴﻤﺎﺕ ﺍﻷﻣﺎﻥ ﺗﻌﻠﻴﻤﺎﺕ ﺍﻷﻣﺎﻥ ﻳﺮﺟﻰ ﻗﺮﺍءﺓ ﺍﺣﺘﻴﺎﻃﺎﺕ ﺍﻷﻣﺎﻥ ﻫﺬﻩ ﺑﻌﻨﺎﻳﺔ ﻗﺒﻞ ﺍﺳﺘﺨﺪﺍﻡ ﺍﻟﻤﻨﺘﺞ.
ﺍﻟﺘﺮﺍﺧﻴﺺ /ﺇﺷﻌﺎﺭ ﺍﻟﺒﺮﺍﻣﺞ ﻣﻔﺘﻮﺣﺔ ﺍﻟﻤﺼﺪﺭ 3 ﺍﻟﺘﺮﺍﺧﻴﺺ ﻗﺪ ﺗﺨﺘﻠﻒ ﺍﻟﺘﺮﺍﺧﻴﺺ ﺍﻟﻤﻌﺘﻤﺪﺓ ﺑﺤﺴﺐ ﺍﻟﻄﺮﺍﺯ .ﻟﻠﺤﺼﻮﻝ ﻋﻠﻰ ﻣﺰﻳﺪ ﻣﻦ ﺍﻟﻤﻌﻠﻮﻣﺎﺕ ﺣﻮﻝ ﺍﻟﺘﺮﺍﺧﻴﺺ ،ﻳُﺮﺟﻰ ﺯﻳﺎﺭﺓ ﺍﻟﻤﻮﻗﻊ .www.lg.com ﻣﺼﻨﻌﻪ ﺑﺘﺼﺮﻳﺢ ﻣﻦ ﻣﻌﺎﻣﻞ ﺩﻭﻟﺒﻰ. " ﺩﻭﻟﺒﻰ" ﻭ ﻋﻼﻣﻪ ﺩ – ﺍﻟﻤﺰﺩﻭﺟﻪ ﻋﻼﻣﺎﺕ ﺗﺠﺎﺭﻳﻪ ﻟﻤﻌﺎﻣﻞ ﺩﻭﻟﺒﻰ. "ﻳﻌﺪ ﻣﺼﻄﻠﺤﺎ HDMIﻭ HDMI High-Definition Multimedia Interfaceﻭﺷﻌﺎﺭ HDMIﻋﻼﻣﺎﺕ ﺗﺠﺎﺭﻳﺔ ﺃﻭ ﻋﻼﻣﺎﺕ ﺗﺠﺎﺭﻳﺔ ﻣﺴﺠﻠﺔ ﻟﺸﺮﻛﺔ HDMI Licensing, LLCﻓﻲ ﺍﻟﻮﻻﻳﺎﺕ ﺍﻟﻤﺘﺤﺪﺓ ﻭﺩﻭﻝ ﺃﺧﺮﻯ".
2 ﺟﺪﻭﻝ ﺍﻟﻤﺤﺘﻮﻳﺎﺕ ﺟﺪﻭﻝ ﺍﻟﻤﺤﺘﻮﻳﺎﺕ ﺍﻟﻌﺮﺑﻴﺔ 3 ﺍﻟﺘﺮﺍﺧﻴﺺ 3 ﺇﺷﻌﺎﺭ ﺍﻟﺒﺮﺍﻣﺞ ﻣﻔﺘﻮﺣﺔ ﺍﻟﻤﺼﺪﺭ 4 ﺗﻌﻠﻴﻤﺎﺕ ﺍﻷﻣﺎﻥ 10 -ﻋﺮﺽ ﺍﻟﺼﻮﺭ ﺛﻼﺛﻴﺔ ﺍﻷﺑﻌﺎﺩ )ﺍﻟﻄﺮﺍﺯﺍﺕ ﺛﻼﺛﻴﺔ ﺍﻷﺑﻌﺎﺩ ﻓﻘﻂ( 12 ﻋﻤﻠﻴﺔ ﺍﻟﺘﺜﺒﻴﺖ 12 ﺍﻟﺘﺠﻤﻴﻊ ﻭﺍﻟﺘﺤﻀﻴﺮ 12 15 16 18 19 20 22 22 23 23 23 ﻓﻚ ﺍﻟﺘﻐﻠﻴﻒ ﺍﻟﻌﻨﺎﺻﺮ ﺍﻟﺘﻲ ﻳﺘﻢ ﺷﺮﺍﺅﻫﺎ ﺑﺸﻜﻞ ﻣﻨﻔﺼﻞ ﺍﻷﺟﺰﺍء ﻭﺍﻷﺯﺭﺍﺭ ﺣﻤﻞ ﺍﻟﺘﻠﻔﺎﺯ ﻭﻧﻘﻠﻪ ﺍﻟﺘﺜﺒﻴﺖ ﻋﻠﻰ ﺍﻟﻄﺎﻭﻟﺔ ﺍﻟﺘﺜﺒﻴﺖ ﻋﻠﻰ ﺍﻟﺤﺎﺋﻂ ﺍﺳﺘﺨﺪﺍﻡ ﻣﻜﺒﺮ ﺍﻟﺼﻮﺕ Sliding ﺍﺳﺘﺨﺪﺍﻡ ﻛﺎﻣﻴﺮﺍ ﻣﺪﻣ
ﺩﻟﻴﻞ ﺍﻟﻤﺎﻟﻚ ﺗﻠﻔﺎﺯ LED * * ﺇﻥ ﺗﻠﻔﺎﺯ LEDﻣﻦ LGﻣﺰﻭّﺩ ﺑﺸﺎﺷﺔ LCDﻣﻊ ﺇﺿﺎءﺓ ﺧﻠﻔﻴﺔ ﺑﺘﻘﻨﻴﺔ .LED ﻳﺮﺟﻰ ﻗﺮﺍءﺓ ﻫﺬﺍ ﺍﻟﺪﻟﻴﻞ ﺑﻌﻨﺎﻳﺔ ﻗﺒﻞ ﺗﺸﻐﻴﻞ ﺍﻟﺠﻬﺎﺯ ﻭﺍﻻﺣﺘﻔﺎﻅ ﺑﻪ ﻟﻠﺮﺟﻮﻉ ﺇﻟﻴﻪ ﻓﻲ ﺍﻟﻤﺴﺘﻘﺒﻞ. www.lg.
SPECIFICATIONS B-1 SPECIFICATIONS Product specifications may be changed without prior notice due to upgrade of product functions. For the power supply and power consumption, refer to the label attached to the product. MODELS 42LA79** 47LA79** 55LA79** 42LA790V-ZA, 42LA790W-ZA, 42LA7909-ZA 47LA790V-ZA, 47LA790W-ZA, 47LA7909-ZA 55LA790V-ZA, 55LA790W-ZA, 55LA7909-ZA 1077x 690 x 285 1247 x 789 x 326 1077 x 625 x 34.1 1247 x 722 x 34.1 18.5 25.
B-2 SPECIFICATIONS MODELS 42LA868* 47LA868* 55LA868* 42LA868V-ZD 47LA868V-ZD 55LA868V-ZD 1059 x 682 x 251 1229 x 784 x 310 1059 x 625 x 35.1 1229 x 721 x 35.1 19.7 26.7 17.2 23.4 948 x 619 x 251 Dimensions With stand (mm) (W x H x D) Without stand(mm) 948 x 562 x 35.1 15.9 Weight With stand (kg) Without stand (kg) Power requirement 13.
SPECIFICATIONS B-3 MODELS 84LA98** 84LM96** 84LA980V-ZB 84LA980V-ZD 84LM960V-ZD 84LM960W-ZD Dimensions With stand (mm) 1916 x 1214 x 399 (W x H x D) Without stand(mm) 1916 x 1120 x 39.9 1916 x 1214 x 399 Weight 1916 x 1120 x 39.9 With stand (kg) 81.7 81.7 Without stand (kg) 70.4 70.4 AC 100-240 V~ 50 / 60 Hz 520 W AC 100-240 V~ 50 / 60 Hz 520 W Power requirement Power consumption CI Module Size (W x H x D) Environment condition 100.0 mm x 55.0 mm x 5.
B-4 SPECIFICATIONS HDMI/DVI-DTV supported mode Component port connecting information Resolution Horizontal Frequency (kHz) Vertical Frequency (Hz) 640X480 31.469 31.5 59.94 60 720X480 31.469 31.5 59.94 60 720X576 31.25 50 1280X720 37.5 44.96 45 50 59.94 60 1920X1080 33.72 33.75 28.125 26.97 27 33.716 33.75 56.25 67.43 67.5 59.94 60 50 23.97 24 29.976 30.00 50 59.94 60 53.95 54 56.25 61.43 67.5 23.976 24.00 25.00 29.970 30.
SPECIFICATIONS B-5 [ULTRA HD] Video Supported Codec yy Maximum resolution : 3840 x 2160 @ 30p yy Maximum data transfer rate : 3840 X 2160(H.264 L5.1) : 50Mbps(megabits per second) 3840 X 2160(H.265 L5.0) : 25Mbps Extension .mkv / .mp4 / .ts .ts Codec Video H.264/AVC Audio Dolby Digital, Dolby Digital Plus, AAC, HE-AAC Video H.265(HEVC) Audio Dolby Digital, Dolby Digital Plus, AAC, HE-AAC NOTE yy Unsupported codecs are only available after a software upgrade.
B-6 SPECIFICATIONS 3D supported mode yy Video, which is input as below media contents is switched into the 3D screen automatically. yy The method for 3D digital broadcast may differ depending on the signal environment. If video is not switched automatically into 3D, manually convert the settings to view 3D images. 3D supported mode automatically Input Signal 640x480 Horizontal Frequency (kHz) 576p 59.94 / 60 HDMI 1080i 1080p 31.469 / 31.5 62.938 / 63 Frame Packing, Line Alternative 31.
SPECIFICATIONS B-7 3D supported mode manually Signal Resolution Horizontal Frequency (kHz) Verticla Frequency (Hz) HD / SD - - ATV(CVBS) SD - - Component HD / SD - - 1024X768 48.36 1360X768 47.71 Input DTV 60 HDMI-PC 2D to 3D, Side by Side(Half), Top & Bottom 2D to 3D, Side by Side(Half), Top & Bottom, Checker Board, Frame Sequential, Row Interleaving, Column Interleaving 1920X1080 67.5 3840X2160 (Only LA97**, LA965*, LA98**, LM96**) 54 56.25 67.5 24.00 25.00 30.
B-8 SPECIFICATIONS 3D supported mode manually Signal Input USB, DLNA (Photo) Miracast/Widi Resolution Horizontal Frequency (kHz) Verticla Frequency (Hz) Playable 3D video format Under 320x240 - - 2D to 3D Over 320x240 - - 2D to 3D, Side by Side(Half), Top & Bottom 1024X768p - 30 / 60 1280x720p - 30 / 60 1920X1080p - 30 / 60 Others - - 2D to 3D, Side by Side(Half), Top & Bottom 2D to 3D
Record the model number and serial number of the TV. Refer to the label on the back cover and quote this information to your dealer when requiring any service.