Scan to see the online manual. OWNER'S MANUAL VACUUM CLEANER Read this owner's manual thoroughly before operating the appliance and keep it handy for reference at all times. ENGLISH A9********** MFL71780970 Rev.00_011824 www.lg.com Copyright © 2024 LG Electronics Inc. All Rights Reserved.
TABLE OF CONTENTS 3 IMPORTANT SAFETY INSTRUCTIONS 3 3 8 READ ALL INSTRUCTIONS BEFORE USE WARNING STATEMENTS CAUTION STATEMENTS 9 INSTALLATION 9 12 15 Product Overview Installing the Charging Station Storing the Accessories 17 OPERATION 17 19 20 22 Getting Started Charging the Battery Using the Mop Nozzle Using the Nozzles and Tools 26 SMART FUNCTIONS 26 28 Using LG ThinQ Application Smart Diagnosis™ Function 29 MAINTENANCE 29 31 Cleaning the Appliance Cleaning the Nozzle 36 TROUBLESHOOTING
IMPORTANT SAFETY INSTRUCTIONS 3 IMPORTANT SAFETY INSTRUCTIONS Safety Messages Your safety and the safety of others are very important. We have provided many important safety messages in this manual and on your appliance. Always read and follow all safety messages. This is the safety alert symbol. This symbol alerts you to potential hazards that can kill or injure you and others. All safety messages will follow the safety alert symbol and either the word WARNING or CAUTION.
IMPORTANT SAFETY INSTRUCTIONS Battery • Never use the battery, adapter, and the charging station from other appliances with this appliance. Use only the battery and the charging station provided by LG Electronics. • Use appliances only with specifically designated battery packs. Use of any other battery packs may create a risk of injury and fire. • Recharge only with the charger specified by the manufacturer.
IMPORTANT SAFETY INSTRUCTIONS 5 • Avoid operating the appliance in areas where there is a risk of leakage of flammable gas, industrial oil or metallic dust. • Do not store or install the appliance, power cord or plug near heating devices or open flames. • To prevent tipping, self-standing mode installations should be anchored to the wall using the provided stand anchoring screw, anchoring block and double-sided tape.
IMPORTANT SAFETY INSTRUCTIONS • Only qualified technicians or service personnel from LG Electronics may disassemble, repair or modify the appliance. • Never insert a sharp metal object such as a pin, nail or knife in a hole or gap in the appliance or the charging station. • Do not vacuum liquids with this appliance. Make sure that no water, beverage or detergent gets inside the appliance or the charging station.
IMPORTANT SAFETY INSTRUCTIONS 7 • Do not spray or use water, flammable materials such as gasoline or thinners, or surfactants such as detergent or bath soap near the appliance. Disposal • Keep packing materials out of the reach of children. Packaging materials can pose a suffocation risk for children. • Destroy the carton, plastic bag, and other packing materials after the appliance is unpacked. Children might use them for play.
IMPORTANT SAFETY INSTRUCTIONS CAUTION STATEMENTS CAUTION • To reduce the risk of injury to persons, malfunction, or damage to the product or property when using the appliance, follow basic safety precautions, including the following: Operation • This appliance has a built-in safety device to prevent damage from overheating. If the appliance becomes overheated after extended use, it may automatically turn off.
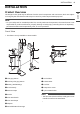
INSTALLATION 9 INSTALLATION The images in this guide may be different from the actual components and accessories, which are subject to change by the manufacturer without prior notice for product improvement purposes. NOTE • For your safety and for extended product life, use only authorized components. The manufacturer is not responsible for product malfunction, property damage or bodily injury caused by the use of separately purchased unauthorized components, parts, or non-LG products.
INSTALLATION Accessories b Slim Hard Floor Nozzle† Included Accessories c Dual Floor Max Nozzle† d Bedding Nozzle† e Pet Nozzle† Installation Kit a Wall Anchoring Block† a Charging Station b Extension Pipe b Double-Sided Tape† c Drywall Anchor† c Adapter d Wall Anchoring Screw† d Pre-filter e Stand Anchoring Screw† e Battery (Dual Battery†) Tools and Accessory Bag f Floor Stand Dock† g Floor Stand Pipe† Basic Accessories a Combination Tool b Crevice Tool c Cleaning Brush Nozzles a Hard
INSTALLATION 11 Mop Kit b Detachable Nozzle and Mop Pads Storage† c Mop Pads for General Cleaning† † This accessory is only available on some models. NOTE • The mop pads, batteries, exhaust filter and the pre-filter will eventually need to be replaced. Contact an LG Electronics customer service center. a Mop Nozzle† Specifications Appliance Model A9********** Dimensions (Width X Depth X Height) 10.2 in X 10.6 in X 44.1 in 260 mm X 270 mm x 1120 mm Weight Approximately 5.67 lb (2.
INSTALLATION Installing the Charging Station CAUTION NOTE • The charging station can be removed as needed. To remove it, hold the floor stand dock steady and pull up on the charging station. • Do not allow children or pets to hang onto the charging station. They could be injured or cause damage to the appliance. • Take care not to drop the product parts while unpacking them to avoid appliance damage or personal injury.
INSTALLATION 13 4 Assemble the charging station onto the top of the floor stand pipe. ENGLISH 8 Plug the power cord into the power outlet. Using Double-Sided Tape to Secure the Appliance 5 Connect the power adapter to the port on the back of the charging station. 1 Use the double-sided tape a to attach the wall anchoring block b to the charging station. • Remove the center section of double-sided tape before attaching it to the wall anchoring block.
INSTALLATION CAUTION • Do not use double-sided tape to attach the charging station to wallpaper. The weight of the charging station and the product body could damage the paper. • Use the stand anchoring screw on concrete or solid walls. If the appliance is not anchored securely and falls, it could result in damage to property or the product. 1 2 Connect the power adapter to the port on the back of the charging station. Drill 2 holes and insert the drywall anchors (if needed) at least 3.
INSTALLATION 15 CAUTION Storing the Tools Store the frequently used tools such as the combination tool, crevice tool and cleaning brush at the bottom of the charging station. • Slide the cleaning brush up into the tool holder. • Slide the combination tool over the cleaning brush and onto the tool holder. • To remove a tool, press the release button at the front of the tool. Assembling the Appliance Follow these steps to safely assemble the appliance.
INSTALLATION • The nozzle storage cradle is compatible with the Universal Nozzle or Slim Hard Floor Nozzle. Storing the Mop Pads Up to 2 mop pads can be stored in the detachable mop pads storage. • Make sure that the mop pads are completely dry before storing them to prevent unpleasant odors.
OPERATION 17 OPERATION • Do not use tools to clean a TV, monitor or LCD display as they may scratch these surfaces. Before Using the Appliance • Make sure that the exhaust filter and pre-filter are properly assembled before using the appliance. • Close the dust bin cover properly before using the appliance. If the dust bin cover is left open, the suction strength may deteriorate and affect the cleaning performance. • This appliance has a built-in safety device to prevent overheating.
OPERATION 3 Adjust the extension pipe by pressing the length adjustment button d on the back of the pipe and sliding until it clicks into place at the desired length. • The extension pipe extends in four steps. 4 Press the Power button to activate the Normal mode. • To turn off the appliance, press the Power button again. Adjusting the Suction Power Adjust the suction power using the suction power adjustment button on the handle.
OPERATION 19 Charging the Battery Before Charging the Battery ENGLISH • Make sure that the adapter is connected to both the charging station and the power outlet. • Fully charging a single battery usually takes about 4 hours. It will take twice as long to charge both the main and auxiliary batteries. • The battery will not be charged if the indoor temperature is below 41 °F (5°C). Only charge the battery when indoor temperatures are between 41 °F (5°C) and 100 °F (38 °C).
OPERATION • Do not let the appliance stand on the floor while the wet mop pads are attached. Doing so may result in damage or swelling of wood flooring. • Do not use on PVC or polyurethane mats for infants or children. Friction can cause the motor to overheat. Using the Mop Nozzle Before Use • You cannot adjust the rotation speed of the mop plates on the mop nozzle.
OPERATION 21 3 Close the water inlet cap tightly. 3 • If the water inlet cap is not closed properly, water may leak. • Press firmly to attach the Velcro on the mop pad to the mop plate. Attaching the mop pad upside down or improperly may affect the cleaning performance. Attach the water tank to the mop nozzle again. • Insert the 2 tabs e at the front of the water tank into the slots f on the top of the mop nozzle. Lower the back of the water tank into place.
OPERATION Drying the Water Tank and Mop Pads 2 Drying the Water Tank Leave the 2 water inlet caps open and allow the water tank to dry in a well-ventilated area out of direct sunlight for at least 24 hours. • Only store the water tank once it is completely empty and dry. Moisture or residual water in the tank may cause odor. When cleaning is completed, make sure to empty the water tank and dry it before storing the mop nozzle.
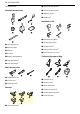
OPERATION 23 Specialized attachments can help you clean more effectively. Tools and nozzles can be attached to the product body or the extension pipe. Use this nozzle for soft surfaces and pet hair removal. ENGLISH • Adjust the suction power if the inlet gets stuck on the floor, carpet, or bedding. Pet Nozzle • Each nozzle is equipped with a motor and may make a sound when operating. CAUTION • Do not use the Hard Floor Nozzle or Universal Nozzle on PVC or polyurethane mats for infants and children.
OPERATION Use the tool in the brush mode to clean delicate surfaces such as frames or furniture. - To convert modes, press the adjustment button a and push forward. Hard Dirt Tool Firm bristles remove solidified dirt from hard surfaces. Clean up hair or foreign objects that are entangled in carpets or rugs. Mattress Tool Use this tool to clean up dust and foreign objects from mattresses, delicate fabrics, and upholstery.
OPERATION 25 Using the Kompressor Lever • The vacuum must be turned off before using the Kompressor lever. • Compressing the dust clears it off the interior walls of the dust bin and allows you to vacuum for longer periods before emptying the dust bin. It also makes cleaning the dust bin easier and less messy. • The dust bin must be at least half full for the compression plate to be effective.
SMART FUNCTIONS SMART FUNCTIONS Using LG ThinQ Application Before Using LG ThinQ Application The LG ThinQ application allows you to communicate with the appliance using a smartphone. 1 LG ThinQ Application Features • If the appliance is too far from the router, the signal becomes weak. It may take a long time to register or fail to install the application. • Cleaning History - Shows the cleaning history, such as monthly cleaning time, cleaning frequency, and cleaning mode, etc.
SMART FUNCTIONS 27 unplug the appliance and wait about a minute before trying again. • The wireless network name (SSID) should be a combination of English letters and numbers. (Do not use special characters.) • Smartphone user interface (UI) may vary depending on the mobile operating system (OS) and the manufacturer. • If the security protocol of the router is set to WEP, network setup may fail. Change the security protocol (WPA2 is recommended), and connect the product again.
SMART FUNCTIONS try to correct the interference by one or more of the following measures: • Reorient or relocate the receiving antenna. • Increase the separation between the equipment and the receiver. • Connect the equipment into an outlet on a circuit different from that to which the receiver is connected. • Consult the dealer or an experienced radio/TV technician for help.
MAINTENANCE 29 MAINTENANCE Before Cleaning the Appliance To maintain the optimum suction power, the cyclonic mesh filter, the exhaust filter and the prefilter should be cleaned regularly and washed under running water at least once a month. • If the inlets are not completely blocked, the foreign objects clogging alarm indicator may not light up. • If the sound of the appliance becomes loud or the cleaning performance is poor, check for foreign objects. • Turn off the power before cleaning the appliance.
MAINTENANCE 5 Wash the cyclonic mesh filter under running water. • To avoid odor and the malfunction of the motor, allow the cyclonic mesh filter to dry completely in a well-ventilated area out of direct sunlight for at least 24 hours before reassembling. 3 Press the dust bin cover release button b to open the dust bin cover. Shake the dust bin to empty it. • Be careful as dust or foreign objects may spill out when opening the dust bin.
MAINTENANCE 31 ENGLISH 10 Turn the product body over, lift the Kompressor lever h up, and clean the inside of the working plate with the towel-wrapped brush handle. 4 Use the combination tool d to clean any dust off the motor. • Do not wash the motor with water. Cleaning the Filters 5 Clean the exhaust filter and the pre-filter when the filter cleaning icon K lights up. Clean filters by brushing the dust off and wash them in running water at least once a month.
MAINTENANCE CAUTION • Always separate the nozzle from the product body or remove the battery before cleaning. If the nozzle starts to operate during cleaning, it could cause an injury. • Keep fingers away from pinch points when assembling the nozzle on the appliance or the rotating brush on the nozzle. 5 • Do not use the rotating brush as a wet mop. Doing so may cause product damage. Use a damp towel or cloth to remove any remaining foreign objects and dust from the brush and the bottom of the nozzle.
MAINTENANCE 33 Press the nozzle release button a to remove the nozzle from the extension pipe or product body. 2 Turn the nozzle upside down. Press the button on the nozzle and turn the cover lock clockwise. 3 Pull the brush cover forward and pull the main brush out. 4 With the left button of the sub-brush pressed, pull the sub-brush out. 5 Attach the crevice tool to the product body and use the vacuum to remove foreign objects and dust from the main brush, subbrush and the bottom of the nozzle.
MAINTENANCE the bottom of the nozzle. After cleaning, wipe the nozzle dry. • Do not rinse or submerge the nozzle in water. 6 Use a damp towel or cloth to remove any remaining foreign objects and dust from both the brush and the bottom of the nozzle. Cleaning the Pet Nozzle 1 Press the nozzle release button a to remove the nozzle from the extension pipe or product body. 2 Hold down the PUSH button on the nozzle while removing the rotating brush.
MAINTENANCE 35 ENGLISH 5 Insert the left side of the brush b into the groove c inside the nozzle. 6 Press the brush cover until it clicks to lock the brush in place. Cleaning the Mop Nozzle 1 Press the nozzle release button to remove the mop nozzle from the extension pipe, and turn the nozzle upside down. 2 Use a damp towel or cloth to remove any remaining foreign objects and dust from the bottom of the mop nozzle. Remove foreign objects, debris and hair from all nozzle rollers using tweezers.
TROUBLESHOOTING TROUBLESHOOTING Before Calling for Service Operation Problem The appliance does not operate. Possible Cause & Solution Battery is fully discharged. • Charge the battery. Appliance is turned off. • Press the Power button to turn on the appliance. Suction power is too weak. Dust bin is full of dust. • Empty the dust bin. Filters are clogged. • Clean the pre-filter and the exhaust filter. Inlet is clogged. • Remove any foreign objects from inside the product body or the extension pipe.
TROUBLESHOOTING 37 Problem Battery is not fully charged. • The battery must be fully charged before cleaning. If the problem persists when the battery is fully charged and the pipes and attachments are clear from obstructions, contact an LG customer information center for service. Foreign object is in the product body, extension pipe, inlet port or nozzle. • Remove any foreign objects from the product body, extension pipe, inlet port or nozzle. Filters are clogged.
TROUBLESHOOTING Wi-Fi Problem Your home appliance and smartphone are not connected to the Wi-Fi network. Possible Cause & Solution Battery is fully discharged. • Charge the battery, then connect your appliance in the LG ThinQ app. The password for the Wi-Fi that you are trying to connect to is incorrect. • Find the Wi-Fi network connected to your smartphone and remove it, then connect your appliance in the LG ThinQ app. Mobile data for your smartphone is turned on.
LIMITED WARRANTY 39 LIMITED WARRANTY TERMS AND CONDITIONS ARBITRATION NOTICE: THIS LIMITED WARRANTY CONTAINS AN ARBITRATION PROVISION THAT REQUIRES YOU AND LG ELECTRONICS (“LG”) TO RESOLVE DISPUTES BY BINDING ARBITRATION INSTEAD OF IN COURT, UNLESS YOU CHOOSE TO OPT OUT. IN ARBITRATION, CLASS ACTIONS AND JURY TRIALS ARE NOT PERMITTED. PLEASE SEE THE SECTION TITLED “PROCEDURE FOR RESOLVING DISPUTES” BELOW.
LIMITED WARRANTY • Damage or failure of the Product resulting from operating the Product in a corrosive atmosphere or contrary to the Product owner’s manual. • Damage or failure of the Product caused by accidents, pests and vermin, lightning, wind, fire, floods, acts of nature, or any other causes beyond the control of LG.
LIMITED WARRANTY 41 PROCEDURE FOR RESOLVING DISPUTES: Definitions. For the purposes of this section, references to “LG” mean LG Electronics U.S.A., Inc.
LIMITED WARRANTY Hearings and Location. If your claim is for $25,000 or less, you may choose to have the arbitration conducted solely on the basis of (1) documents submitted to the arbitrator, (2) through a telephonic hearing, or (3) by an in-person hearing as established by the AAA Rules. If your claim exceeds $25,000, the right to a hearing will be determined by the AAA Rules.
Memo 43
LG Customer Information Center For inquiries or comments, visit www.lg.com or call: 1-800-243-0000 1-888-542-2623 U.S.A. CANADA Register your product Online! www.lg.