ENGLISH ITALIANO ESPAÑOL FRANÇAIS OWNER’S MANUAL AIR CONDITIONER DEUTSCH Please read this manual carefully before operating your set and retain it for future reference. TYPE : Convertible type www.lg.
Multi Type Air Conditioner Ownerʼs Manual TABLE OF CONTENTS FOR YOUR RECORDS Safety Precautions.................3 Write the model and serial numbers here: Model # Prior to operation ...................8 Operating Instructions...........9 Additional features...............18 Maintenance and Service ....21 Serial # You can find them on a label on the side of each unit. Dealer's Name Date Purchased n Staple your receipt to this page in the event you need it to prove date of purchase or for warranty issues.
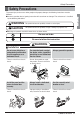
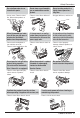
Safety Precautions Safety Precautions WARNING This symbol indicates the possibility of death or serious injury. CAUTION This symbol indicates the possibility of injury or damage to properties only. n Meanings of symbols used in this manual are as shown below. Be sure not to do. Be sure to follow the instruction. WARNING n Installation Do not use a defective or underrated circuit breaker. Use this appliance on a dedicated circuit.
Safety Precautions Do not modify or extend the power cable. • There is risk of fire or electric shock. Do not install, remove, or re-install the unit by yourself (customer). • There is risk of fire, electric shock, explosion, or injury. For installation, always contact the dealer or an Authorized Service Center. • There is risk of fire, electric shock, explosion, or injury. Do not install the product on a defective installation stand. • It may cause injury, accident, or damage to the product.
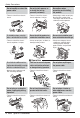
Safety Precautions Do not store or use flammable gas or combustibles near the product. Do not use the product in a tightly closed space for a long time. • It may cause There is risk of fire, failure of the product, or electric shock. • There is risk of fire or failure of product. • Oxygen deficiency could occur. Gasolin When flammable gas leaks, turn off the gas and open a window for ventilation before turn the product on. If strange sounds, or small or smoke comes from product.
Safety Precautions When the product is not be used for a long time, disconnect the power supply plug or turn off the breaker. • There is risk of product damage or failure, or unintended operation. Take care to ensure that nobody could step on or fall onto the outdoor unit. • This could result in personal injury and product damage. CAUTION n Installation Always check for gas (refrigerant) leakage after installation or repair of product. • Low refrigerant levels may cause failure of product.
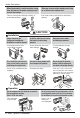
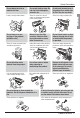
Safety Precautions Do not block the inlet or outlet of air flow. • It may cause product failure. Use a soft cloth to clean. Do not use harsh detergents, solvents, etc. • There is risk of personal injury. ENGLISH • There is risk of fire, electric shock, or damage to the plastic parts of the product. Do not touch the metal parts of the product when removing the air filter. They are very sharp! x Wa Thinner Do not step on or put anyting on the product.
Prior to operation Prior to operation Preparing for operation 1. Contact an installation specialist for installation. 2. Connect the power cable between indoor unit and outdoor unit properly. 3. Use a dedicated circuit. 4. If the cord/plug is damaged, replace it with only an authorized replacement part. Usage 1. Being exposed to direct airflow for an extended period of time could be hazardous to your health. Do not expose occupants, pets, or plants to direct airflow for extended periods of time. 2.
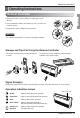
Operating Instructions Operating Instructions Remote Controller ENGLISH 1. Remove the battery cover by pulling it according to the arrow direction. 2. Insert new batteries making sure that the (+) and (-) of battery are installed correctly. 3. Reattach the cover by sliding it back into position. NOTICE� : Use 2 AAA(1.5volt) batteries. Do not use rechargeable batteries. Storage and Tips For Using the Remote Controller • The remote controller may be stored by mounting it on a wall.
Operating Instructions Remote Control Operation The Remote Controller transmits the signals to the system. 1 START/STOP BUTTON Operation starts when this button is pressed and stops when the button is pressed again. 2 OPERATION MODE SELECTION BUTTON Used to select the operation mode. 3 ROOM TEMPERATURE SETTING BUTTONS Used to select the room temperature. 4 INDOOR FAN SPEED SELECTOR Used to select fan speed in four steps low, medium, high and CHAOS.
Operating Instructions Cooling Operation ENGLISH 1 Press the Start/Stop button. The unit will respond with beep sound. 2 Open the door on the Remote Controller. To select Cooling Operation, press the Operation Mode Selection button. Each time the button is pressed, the operation mode is shifted in the direction of the arrow. Cooling Auto Healthy� Dehumidification Heating� (Heat pump model only) (Cooling Only� (Heat Pump� model) model) 3 ON Set the temperature lower than the room temperature.
Operating Instructions Auto Operation 1 Press the Start/Stop button. The unit will respond with beep sound. 2 Open the door on the Remote Controller. To select Auto Operation, press the Operation Mode Selection button. Each time the button is pressed, the operation mode is shifted in the direction of the arrow.
Operating Instructions Healthy Dehumidification Operation Press the Start/Stop button. The unit will respond with beep sound. 2 Open the door on the Remote Controller. To select Healthy Dehumidification Operation, press the Operation Mode Selection button. Each time the button is pressed, the operation mode is shifted in the direction of the arrow. Cooling (Cooling Only� (Heat Pump� model) model) 3 ON ENGLISH 1 Auto Healthy Heating� Dehumidification (Heat pump model only) Set the fan speed.
Operating Instructions Heating Operation(Heat pump model only) 1 Press the Start/Stop button. The unit will respond with beep sound. 2 Open the door on the Remote Controller. To select Heating Operation, press the Operation Mode Selection button. Each time the button is pressed, the operation mode is shifted in the direction of the arrow. Cooling 3 Auto Healthy� Dehumidification Heating� (Heat pump model only) Set the temperature higher than the room temperature.
Operating Instructions Jet Cool ENGLISH 1 Press the Start/Stop button. The unit will respond with beep sound. 2 Press the Jet Cool button to operate the speed cooling mode and the unit will operate in super high fan speed on cooling mode. 3 To cancel the Jet Cool mode, press the Jet Cool button or the fan button or the room temperature setting button again and the unit will operate in high fan speed in cooling mode.
Operating Instructions PLASMA Purification Operation(Optional) 1 Press the Start/Stop button. The unit will respond with beep sound. 2 Open the door on the Remote Controller. Press the PLASMA air purifying operation ON/OFF button. Operation will start when the button is pressed and stop when the button is pressed again. 3 Set the fan speed. You can select the fan speed in four steps-low, medium, high or CHAOS. Each time the button is pressed, the fan speed mode is shifted.
Operating Instructions 2nd F Operation ENGLISH 1 Press the Start/Stop button. The unit will respond with beep sound. 2 Open the door of the Remote Controller and press the 2nd F button to operate functions printed in blue at bottom of buttons. (Check the indication of 2nd function on Remote Controller display.
Operating Instructions Additional features Sleep Mode 1. Press the Sleep Mode Auto button to set the time you want the unit to turn off automatically. 1. The Timer is programmed in one-hour increments by pressing the Sleep Mode Auto button 1 to 7 times. The sleep mode is available for 1 to 7 times. To alter the time period in steps of 1 hour, press the Sleep Mode Button while aiming at air conditioner. 3. Make sure the Sleep Mode Auto LED lights up.
Operating Instructions Vertical Airflow Direction Control NOTICE o If you press the CHAOS swing button, the horizontal airflow direction is changed automatically based on the CHAOS algorithm to distribute the air in the room evenly and at the same time to make the human body feel most comfortable, as if enjoying a natural breeze. o Always use the Remote Controller to adjust the up/down airflow direction. Manually moving the vertical airflow direction louver by hand could damage the air conditioner. 1.
Operating Instructions Forced Operation The operation will be started operation if the power button is pressed without remote controller. If you want to stop operation, re-press the button. Cooling Model Operating mode Indoor FAN Speed Setting Temperature Cooling High 22°C Power button R Room Temp. ≥ 24°C Heat pump Model 21°C ≤ Room Temp. < 24°C Room Temp.
Maintenance and Service Maintenance and Service Before performing any maintenance, turn off the main power to the system. ENGLISH Indoor Unit Grille, Case, and Remote Control o Turn the system off before cleaning. To clean, wipe with a soft, dry cloth. Do not use bleach or abrasives. NOTICE : Supply power must be disconnected before cleaning the indoor unit. o Never use any of the followings: • Water hotter than 40°C. Could cause deformation and/or discoloration.
Maintenance and Service When the air conditioner is not going to be used for a long time. When air conditioner is not going to be used for a long time. 1 Operate the air conditioner on Air circulation mode (Refer to page 19) for 2 to 3 hours. • This will dry out the internal mechanisms. 2 Turn off the circuit breaker, and disconnect the power cable. WARNING When the air conditioner is to be used again. 1 Clean the air filter and install it in the indoor unit. (Refer to page 21 for cleaning filters.
Maintenance and Service Troubleshooting Check the following points before requesting repairs or service.... If the fault persists, please contact your dealer or service center. Explanation See page 18 The air conditioner does not operate. • Check room temperature setting? • Check if circuit breaker is on? The room has a peculiar odor. • Check that this is not a damp smell exuded by the walls, carpet, furniture, or cloth items in the room.
Memo 24 Multi Type Air Conditioner
ITALIANO MANUALE DEL’UTENTE CLIMATIZZATORE Leggere con attenzione questo manuale prima di usare l’unità e conservare per uso futuro. www.lg.
Manuale dellʼutente del Condizionatore d'aria - Tipo convertibile SOMMARIO Precauzioni di sicurezza........3 DATI DA RICORDARE Annotare qui il numero di serie e il modello: Prima dellʼuso ........................8 N°. modello N°. di serie Istruzioni per il funzionamento ..............................................9 I numeri sono riportati sull'etichetta a lato di ogni unità. Nome del rivenditore Data di acquisto Funzionalità aggiuntive .......18 Manutenzione e assistenza .
Precauzioni di sicurezza Precauzioni di sicurezza Per evitare infortuni dell'utente o altre persone e danni alle cose, attenersi alle seguenti istruzioni. n Lʼuso errato causato dalla mancata osservanza delle istruzioni può causare danni o lesioni. Lʼimportanza è classificata dalle seguenti indicazioni. ATTENZIONE Questo simbolo indica la possibilità di decesso o di grave infortunio. AVVISO Questo simbolo indica la possibilità di infortunio o danni alle cose.
Precauzioni di sicurezza Non modificare o prolungare il cavo di alimentazione. L'unità non deve essere installata né rimossa dall'utente (cliente). Disimballare e installare il prodotto con attenzione. • Vi è il rischio di scosse elettriche o incendio. • Vi è il rischio di scosse elettriche, incendio, esplosione o lesioni. • I bordi taglienti possono causare infortuni. Fare particolare attenzione ai bordi del contenitore e alle alette del condensatore e dell'evaporatore.
Precauzioni di sicurezza Evitare l'ingresso di acqua nelle parti elettriche. Non conservare o utilizzare gas infiammabili o combustibili in prossimità del prodotto. Non utilizzare il prodotto in luoghi chiusi per periodi prolungati. • Vi è il rischio di scosse elettriche, incendio o guasti al prodotto. • Vi è il rischio di incendio o guasti al prodotto. • Potrebbe esservi una scarsità di ossigeno. Gasolin In caso di rumori, odori o fumo anomali provenienti dal prodotto.
Precauzioni di sicurezza In caso di inutilizzo del prodotto per lunghi periodi, scollegare il cavo di alimentazione e spegnere l'interruttore automatico. Evitare che l'unità esterna sia calpestata da qualcuno. • Ciò potrebbe lesioni personali e danni al prodotto. • Vi è il rischio di guasti al prodotto o attivazione accidentale. AVVISO n Installazione Dopo l'installazione o la riparazione del prodotto, verificare sempre che non vi siano perdite di gas (refrigerante).
Precauzioni di sicurezza Non bloccare l'ingresso o l'uscita del flusso d'aria. Utilizzare un panno soffice per la pulizia. Non utilizzare detergenti aggressivi, solventi ecc. • In caso contrario, si potrebbero verificare guasti al prodotto. • Vi è il rischio di scosse elettriche, incendio o danno alle parti in plastica del prodotto. Non toccare le parti metalliche del prodotto durante la rimozione del filtro dell'aria. Sono molto appuntite! • Vi è il rischio di lesioni personali.
Prima dell'uso Prima dell'uso Preparazione per l'uso 1. Rivolgersi a un tecnico specializzato per lʼinstallazione. 2. Collegare correttamente il cavo di alimentazione tra unità interna e unità esterna. 3. Utilizzare un circuito dedicato. 4. Se il cavo o la spina sono danneggiati, sostituirli con un ricambio originale. Uso 1. Lʼesposizione prolungata al flusso diretto dellʼaria può essere pericolosa per la salute. Non esporre persone, animali o piante al flusso diretto dellʼaria per periodi prolungati. 2.
Precauzioni di sicurezza Istruzioni per il funzionamento Telecomando 1 Rimuovere il coperchio delle batterie estraendolo nella direzione della freccia. 2 Inserire batterie nuove facendo attenzione alla corretta installazione dei poli (+) e (-). 3 Reinserire il coperchio facendolo scorrere in posizione. ITALIANO NOTA • Utilizzare 2 batterie 2 AAA (1,5 V). Non utilizzare batterie ricaricabili. Conservazione e suggerimenti per lʼuso del telecomando • Il telecomando può essere montato alla parete.
Istruzioni per il funzionamento Funzionamento del telecomando Il telecomando trasmette segnali al sistema. Ricettore � di segnale 5 6 1 TASTO AVVIO/STOP Alla pressione di questo tasto lʼunità si avvia e si arresta premendo nuovamente lo stesso tasto. 2 TASTO DI SELEZIONE DELLA MODALITÀ DI FUNZIONAMENTO Utilizzato per selezionare la modalità (Heat Pump) di funzionamento 3 TASTI DI IMPOSTAZIONE DELLA TEMPERATURA DELLʼAMBIENTE. Utilizzato per impostare la temperatura dellʼambiente.
Istruzioni per il funzionamento Funzionamento in raffreddamento Premere il tasto di Avvio/Stop. Lʼunità emette un segnale acustico. 2 Aprire lo sportellino del telecomando. Per selezionare il Funzionamento in raffreddamento, premere il tasto di selezione della modalità di funzionamento. Ogniqualvolta si preme il tasto, la modalità di funzionamento cambia sulla base del ciclo indicato dalla direzione della freccia.
Istruzioni per il funzionamento Funzionamento automatico 1 Premere il tasto di Avvio/Stop. Lʼunità emette un segnale acustico. 2 Aprire lo sportellino del telecomando. Per selezionare il Funzionamento automatico, premere il tasto di selezione della modalità di funzionamento. Ogniqualvolta si preme il tasto, la modalità di funzionamento cambia sulla base del ciclo indicato dalla direzione della freccia.
Istruzioni per il funzionamento Funzionamento per deumidificazione Premere il tasto di Avvio/Stop. Lʼunità emette un segnale acustico. 2 Aprire lo sportellino del telecomando. Per selezionare il Funzionamento per deumidificazione, premere il tasto di selezione della modalità di funzionamento. Ogniqualvolta si preme il tasto, la modalità di funzionamento cambia sulla base del ciclo indicato dalla direzione della freccia.
Istruzioni per il funzionamento Funzionamento in riscaldamento (solo modelli a pompa di calore) 1 Premere il tasto di Avvio/Stop. Lʼunità emette un segnale acustico. 2 Aprire lo sportellino del telecomando. Per selezionare il Funzionamento per deumidificazione, premere il tasto di selezione della modalità di funzionamento. Ogniqualvolta si preme il tasto, la modalità di funzionamento cambia sulla base del ciclo indicato dalla direzione della freccia.
Istruzioni per il funzionamento Raffreddamento/riscaldamento rapido Premere il tasto di Avvio/Stop. Lʼunità emette un segnale acustico. 2 Premere il tasto di raffreddamento rapido per azionare la modalità di raffreddamento rapido e attivare il ventilatore a una velocità estremamente elevata.
Istruzioni per il funzionamento Operazione di depurazione PLASMA (opzionale) 1 Premere il tasto di Avvio/Stop. Lʼunità emette un segnale acustico. 2 Aprire lo sportellino del telecomando. Premere il tasto di accensione/spegnimento della depurazione aria PLASMA. Alla pressione di questo tasto lʼunità si avvia e si arresta premendo nuovamente lo stesso tasto. 3 Impostare la velocità del ventilatore. È possibile selezionare una delle quattro velocità del ventilatore, bassa, media, alta o CHAOS.
Istruzioni per il funzionamento Funzionamento del tasto 2nd F Premere il tasto di Avvio/Stop. Lʼunità emette un segnale acustico. 2 Aprire lo sportellino del telecomando e premere il tasto 2nd F (seconda funzione) per attivare le funzioni indicate in blu nella parte bassa dei tasti (controllare lʼindicazione della seconda funzione sul display del telecomando).
Istruzioni per il funzionamento Funzionalità aggiuntive Modalità Sleep 1. Premere il tasto di modalità Sleep automatica per impostare lʼora in cui si desidera che lʼunità si spenga automaticamente. 2. Il timer è programmabile in incrementi di unʼora mediante la pressione del tasto di modalità Sleep automatica da uno a sette orari. La modalità Sleep è disponibile da 1 a 7 orari. Per modificare il periodo di tempo in incrementi di unʼora, premere il tasto di modalità Sleep puntando verso il condizionatore.
Istruzioni per il funzionamento Controllo dellʼorientamento del flusso dʼaria in uscita Lʼorientamento verticale del flusso dʼaria in uscita può essere controllato per mezzo del telecomando. ITALIANO NOTA o Usare sempre il telecomando per registrare il senso su/giuʼ del flusso dʼaria. Manualmente spostare la feritoia verticale di senso del flusso dʼaria puoʼ danneggiare a mano il condizionatore dellʼaria.
Istruzioni per il funzionamento Forzato Funzionamento Può succedere che si desideri utilizzare il condizionatore senza però disporre del telecomando. In questo caso si può sollevare la griglia frontale e premere il pulsante FORCED OPERATION. Quando il condizionatore viene attivato utilizzando questa procedura, vengono automaticamente impostate le seguenti funzioni: Versione priva di pompa di calore Funzione Versione dotata di pompa di calore Temperatura amb.
Manutenzione e assistenza Manutenzione e assistenza AVVISO: prima di effettuare interventi di manutenzione, spegnere lʼalimentazione del sistema. Unità interna Griglia, mobile e telecomando o Spegnere il condizionatore e pulire con un panno morbido leggermente inumidito. Evitare di utilizzare alcool, benzina, solventi oppure sostanze o spugnette abrasive. ITALIANO NOTA : Prima di pulire l’unità interna la si deve scollegare dalla presa di corrente.
Manutenzione e assistenza Quando il climatizzatore non verrà usato per un lungo periodo di tempo Quando il climatizzatore non verrà usato per un lungo periodo di tempo. 1 Attivare la funzione di ventilazione (vedere a pagina 19) per almeno 2-3 ore. • In questo modo si farà asciugare perfettamente lʼeventuale condensa. 2 Chiudere lʼinterruttore della linea a cui è collegato il condizionatore.
Manutenzione e assistenza Si prega di rivolgersi al proprio rivenditore. Controllate i seguenti suggerimenti prima di richiedere riparazioni o assistenza... Se il problema persiste contattare il proprio rivenditore o centro di assistenza. Custodia Il condizionatore non si accende. Sullʼunità da interno si forma della condensa. Il condizionatore non si riavvia immediatamente. Il condizionatore non raffredda o riscalda convenientemente lʼambiente. Il condizionatore è rumoroso.
Nota 24 Condizionatore d'aria - Tipo convertibile
ESPAÑOL MANUAL DEL PROPIETARIO AIRE ACONDICIONADO Por favor lea este manual detenidamente antes de utilizar su equipo y guárdelo para consultas futuras. www.lg.
Aire Acondicionado de Uso Interior - Tipo Convertible Manual de Usuario ÍNDICE PARA SU REGISTRO Escriba aquí el modo y los números de serie : Precautiones de seguridad ...3 Nº modelo Nº serie Antes de la operación............8 Instrucciones de operación ..9 Características adicionales.18 Mantenimiento y servicio ....21 Puede encontrarlos en la etiqueta de la parte lateral de cada unidad.
Precauciones de seguridad Precauciones de seguridad Para evitar lesiones al usuario o a otras personas y daños a la propiedad, siga estas instrucciones. n Una operaciʼon incorrecta por ignorar las instrucciones provocará lesiones o daños. La seriedad se clasifica por las siguientes indicaciones. ADVERTENCIA Este símbolo indica la posibilidad de muerte o de seria lesión. PRECAUCIÓN Este símbolo indica sólo la posibilidad de lesión o daño a la propiedad.
Precauciones de seguridad No modifique ni extienda el cable de alimentación. • Existe riesgo de incendio o descarga eléctrica. Para la instalación, póngase en contacto siempre con su vendedor o centro de asistencia técnica autorizado. • Existe riesgo de incendio, descarga eléctrica, explosión o lesiones. No instale, retire ni vuelva a instalar la unidad por sí mismo (cliente). Tenga cuidado al desembalar e instalar el aparato. • Existe riesgo de incendio, descarga eléctrica , explosión o lesiones.
Precauciones de seguridad No permita que entre agua en las partes eléctricas. • Existe riesgo de incendio, avería del aparato o descarga eléctrica. No almacene ni utilice gas inflamable o combustibles cerca del aparato. • Existe riesgo de incendio o avería del aparato. No utilice el aparato en un espacio cerrado durante un periodo prolongado de tiempo. • Podría producirse una falta de oxígeno. Gasolin Si hay fugas de gas, apague el gas y abra una ventana para ventilar antes de encender el aparato.
Precauciones de seguridad Cuando no vaya a utilizar el aparato durante un largo periodo de tiempo, desenchufe la clavija de alimentación o apague el interruptor automático. • Existe riesgo de daños en el aparato o avería, o funcionamiento intempestivo. Asegúrese de que nadie se siente o apoye sobre la unidad exterior. • Podrían producirse lesiones personales y daños en el aparato.
Precauciones de seguridad No bloquee la entrada ni la salida del flujo de aire. • Podría causar una avería en el aparato. Utilice un paño suave para limpiar. No utilice detergentes abrasivos, disolventes, etc. No toque las partes de metal del aparato al sacar el filtro del aire. ¡Son muy afiladas! • Existe riesgo de incendio, descarga eléctrica o daños en las partes de plástico del aparato. • Existe riesgo de lesiones personales. x Wa Thinner No se suba ni coloque nada sobre el aparato.
Antes de la operación Antes de la operación Prepararse para la operación del aparato 1. Contacte con un especialista en instalación para efectura la instalación del aparato. 2. Conecte el cable de alimentación que hay entre la unidad interior y la exterior debidamente. 3. Use un circuito propio para el aparato. 4. Cuando el cable de alimentación/enchufe esté dañado, recámbielo sólo por piezas de recambio autorizadas. Uso 1.
Instrucciones de operación Instrucciones de operación Mando a distancia 1 Retire la tapa de las pilas tirando en la dirección indicada por la flecha. 2 Inserte las pilas nuevas asegurándose de que los signos (+) y (-) de la pila corresponden correctamente. 3 Coloque de nuevo la tapa deslizándola hasta su posición. AVISO • Use 2 pilas tipo AAA(1.5 voltios) . No utilice pilas recargables. • El mando a distancia puede colocarse en la pared.
Instrucciones de operación Operación del mando a distancia El mando a distancia transmite las señales al sistema.
Instrucciones de operación Operación para frío 1 Pulse el botón de arranque/parada. La unidad responderá con un pitido. 2 Abra la carátula del mando a distancia. Para seleccionar la operación del frío, pulse el botón de selección del modo de operación. Cada vez que se pulse el botón, el modo de operación cambiará en la dirección que marca la flecha.
Instrucciones de operación Operación automática 1 Pulse el botón de arranque/parada. La unidad responderá con un pitido. 2 Abra la carátula del mando a distancia. Para seleccionar la operación automática, pulse el botón de selección del modo de operación. Cada vez que se pulse el botón, el modo de operación cambiará en la dirección que marca la flecha.
Instrucciones de operación Operación de la deshumidificación saludable 1 Pulse el botón de arranque/parada. La unidad responderá con un pitido. 2 Abra la carátula del mando a distancia. Para seleccionar la operación de deshumidificación saludable, pulse el botón de selección del modo de operación. Cada vez que se pulse el botón, el modo de operación cambiará en la dirección que marca la flecha.
Instrucciones de operación Calor (sólo modelo con bomba de calor) 1 Pulse el botón de arranque/parada. La unidad responderá con un pitido. 2 Abra la carátula del mando a distancia. Para seleccionar la operación de calor, pulse el botón de selección del modo de operación. Cada vez que se pulse el botón, el modo de operación cambiará en la dirección que marca la flecha.
Instrucciones de operación Jet Cool Pulse el botón de arranque/parada. La unidad responderá con un pitido. 2 Pulse el botón Jet Cool para operar la velocidad del modo frío y la unidad funcionará en velocidad de ventilador alta en modo frío durante. 3 Para cancelar el modo Jet Cool, pulse el botón Jet Cool o el botón del ventilador o el botón de ajuste de la temperatura de la sala de nuevo y la unidad se pondrá en marcha en velocidad de ventilador alta en modo frío.
Instrucciones de operación Operación de la purificación PLASMA (Opcional) 1 Pulse el botón de arranque/parada. La unidad responderá con un pitido. 2 Abra la carátula del mando a distancia. Pulse el botón de ARRANQUE/PARADA de la operación de purificación de aire PLASMA. La operación se iniciará cuando se pulse el botón y se detendrá al volver a pulsar el botón. 3 Ajuste la velocidad del ventilador. Puede seleccionar la velocidad del ventilador en cuatro etapas : baja, media, alta o CHAOS.
Instrucciones de operación Operación 2ºF Pulse el botón de arranque/parada. La unidad responderá con un pitido. 2 Abra la carátula del mando a distancia y pulse el botón 2nd F para hacer funcionar las funciones impresas en azul que verá debajo de los botones. (Compruebe la indicación de la función 2° en la pantalla del mando a distancia).
Instrucciones de operación Características adicionales Modo Sleep 1. Pulse el botón de Modo Sleep automático para ajustar la hora en la que desee que la unidad se apague automáticamente. Para cancelar el Modo Sleep, pulse el botón de Modo Sleep automático varias veces hasta que la estrella ( ) desaparezca de la pantalla de operación. 2. El temporizador se programa en incrementos de una hora pulsando el botón de Modo Sleep automático entre 1 y 7 veces. El modo Sleep está disponible entre 1 y 7 veces.
Instrucciones de operación Control de la Dirección Vertical de Flujo de Aire El flujo de aire hacia arriba/ abajo (Flujo de aire Vertical) puede ser ajustado usando el control remoto. Para ajustar la dirección izquierda / derecha (Flujo de aire Horizontal) Ajustar la dirección de flujo de aire izquierda / derecha con la mano. PRECAUCIÓN :Mientras ajusta las persianas verticales, tenga cuidado de no tocar el evaporador. Modo de circulación de aire Hace circular el aire de la estancia sin frío o calor. 1.
Instrucciones de operación Operación Forzada Power button R La operación procede cuando el control remoto no puede ser usado. Presionar el botón de Operación Forzada. Si desea parar la operación, presionar nuevamente. Al arrancar, las condiciones de la operación están fijadas automáticamente como sigue : Durante la Operación Forzada, el modo inicial continúa. Modelo para frío Modo de operación Veloc. VENTILADOR interior Temperatura de ajuste Frío Alta 22°C Temp.
Mantenimiento y servicio Mantenimiento y servicio PRECAUCIÓN: antes de realizar cualquier trabajo de mantenimiento, desconecte la electricidad del sistema. Unidad interior Rejilla, Alojamiento, y Control Remoto p Apagar el sistema antes de limpiar. Para la limpieza, hacer con una tela suave y seca. No utilizar blanqueador o abrasivos. AVISO El cable de energía debe ser desconetado antes de limpiar la unidad interna.
Mantenimiento y servicio Cuando no vaya a utilizar el aire acondicionado durante un periodo prolongado de tiempo Cuando no lo vaya a usar durante un periodo prolongado de tiempo 1 Utilice el aire acondicionado en el modo de Circulación de Aire (consulte página 19) durante 2 a 3 horas. Cuando vaya a usar el aire acondicionado de nuevo 1 Limpiar el filtro de aire y reinstalarlo en la unidad interna. (Referir a la página 21 de la limpieza de filtros.
Mantenimiento y servicio Consejos para la solución de problemas. Ahorre tiempo y dinero. Haga las comprobaciones siguientes antes de llamar a un servicio técnico para reparaciones o mantenimiento. Si el fallo de funcionamiento persiste, póngase en contacto con su distribuidor.
LG ESPAÑA, S.A. RED DE SERVICIOS DE ASISTENCIA TECNICA AIRE ACONDICIONADO POLIGONO INDUSTRIAL, "SECTOR 13", PARCELA 27 A 46190 RIBARROJA DEL TURIA (Valencia) TEL.
ANDALUCIA ELECTRO ALTAMIRA, S.A. C/. ALTAMIRA, 10, BAJO 04005 ALMERIA TEL. 950 22 01 54 SERVIRAP C/. ANGEL OCHOTORENA, 11 04005 ALMERIA TEL. 950 27 40 67 CRUZ Y LATORRE CENTRAL DE SERVICIOS C/. UNIVERSIDAD DE TEXAS, 2 (ESQ. DR. CARRACI) 04005 ALMERIA TELS. 950 22 43 00 / 22 4 JUAN MANUEL LLORCA SOLIS C/. VILLA MARIA, 119 04008 CRUZ DE CARAVACA ALMERIA TEL. 950 27 39 57 M.J. RODRIGUEZ PELEGRIN, S.L. C/. CONVENTO, 27, BAJO 04610 CUEVAS DE ALMANZOR - ALMERIA TEL. 950 45 65 44 REPARACIONES LLERGO C/.
CENTRAL SERVICIOS SM, S.L. AVDA. REP. ARGENTINA, 5-B 16002 CUENCA TEL. 969 21 20 20 CASCALLAR C/. LA PRESA, 2 24010 TROBAJO DEL CAMINO - LEON TEL. 987 80 18 15 TECNO MAE, S.C.P. C/. LLIBERTAT, 45-47 08240 MANRESA BARCELONA TEL. 93 874 66 08 CAMUÑASE, S.L. C/. ISABEL I DE CASTILLA, 52 16630 MOTA DEL CUERVO CUENCA TEL. 967 18 22 25 MULTISER C/. EMBALSES DE BARCENA, 11, 1º D 24400 PONFERRADA - LEON TEL. 987 41 05 80 S.A.T. FCO. BLANDINO C/. LAYNA SERRANO, 26 19002 GUADALAJARA TEL.
COMUNIDAD VALENCIANA EXTREMADURA JOASA SERVICIOS, S.L. C/. ESCORPION, 8, LOC. IZQ. 03006 ALICANTE TEL. 96 528 73 33 J. FCO. CALDERON LONGARES C/. MARTIRES, 11 06300 ZAFRA - BADAJOZ TEL. 924 55 17 64 ANGEL JOSE COMPA� GARCIA C/. CUESTA DE LAS NARICES, 34 - ED. EL PERAL 03590 ALTEA - ALICANTE TEL. 96 584 36 94 ELECTRONICA CENTENO AVDA. DE ZAFRA, BLOQUE 1 06310 PUEBLA SAN PEREZ BADAJOZ TEL. 924 55 27 03 B. AGUILAR AVDA. ALICANTE, 3 03700 DENIA - ALICANTE TEL. 96 578 19 69 DAVID TORREGROSA JORDA C/.
CENTRAL ASSISTÊNCIA TÉCNICA PORTUGAL MEGALÃNDIA Rua Actriz Adelina Fernandes, n°7-7 A 2795 Linda-a-Velha (Lisboa) (also MNT SVC) Telefone 4146480 Fax 4146499 LINHA BRANCA - ÁLVARO JOSÉ MORAIS Lugar do Ratiço Noura 5090 Murça Tel.059/511117 Fax.059/511117 - RUI VAS,Lda Quinta da Carriça - Apartado 169 6230 Fundão Tel.075/776375 Fax.075/776375 - ELECTRO REPARADOURA DA COLINA,Lda. Rua de São Sebastião,122 4700 Braga Tel.053/273131 Fax.053/273131 - CLIMALBI - Lúcio Ribeiro Costa,Lda. Largo São João, Ger.
FRANÇAIS MANUEL D’UTILISATION CLIMATISEUR Veuillez lire attentivement ce manuel avant d’utiliser votre appareil, et le conserver pour toute consultation ultérieure. www.lg.
Manuel du Propriétaire du Climatiseur domestique - Type convertible TABLE DES MATIÈRES POUR VOS ARCHIVES Mesures de sécurité...............3 Écrivez les numéros de modèle et de série ici : Modèle # Avant lʼutilisation ..................8 Mode dʼutilisation...................9 Série # Vous les trouverez sur la plaque signalétique située sur le côté de chaque unité. Nom du Distributeur: Date dʼachat Fonctions supplémentaires 18 Entretien et Service..............
Mesures de sécurité Mesures de sécurité Les instructions ci-après doivent être observées dans le but de prévenir tout risque de dommages corporels ou matériels. n L'utilisation non conforme, résultant de la négligence des instructions, est susceptible de provoquer des dommages corporels ou matériels dont la gravité est signalée par les indications suivantes : AVERTISSEMENT Ce symbole indique un risque de blessure grave, voire mortelle.
Mesures de sécurité Ne modifiez ni prolongez le cordon d'alimentation. N'installez, n'enlevez ni remettez en place l'unité vousmême (si vous êtes un client). • Ceci risquerait de provoquer un incendie ou un choc électrique. • Vous pourriez provoquer un incendie, un choc électrique, une explosion ou vous blesser. Prenez soin lorsque vous déballez et installez ce produit. • Les bords aiguisés peuvent provoquer des blessures.
Mesures de sécurité Ne permettez pas que de l'eau s'écoule dans les pièces électriques. • Ceci pourrait provoquer un incendie, une défaillance de l'appareil ou un choc électrique.. N'emmagasinez ni utilisez de substances inflammables ou combustibles près de ce produit. • Ceci entraînerait un risque d'incendie ou de défaillance du produit. N'utilisez pas ce produit dans espace fermé hermétiquement pendant une longue période de temps. • Il peut se produire un manque d'oxygène.
Mesures de sécurité Si vous n'allez pas utiliser le produit pour une longue période de temps, débranchez le cordon d'alimentation ou mettez le disjoncteur sur la position Arrêt (off). • Autrement, vous risquerez d'endommager le produit ou de provoquer une défaillance de celui-ci ou bien une mise en marche involontaire. Assurez-vous que personne ne peut marcher ou tomber sur l'unité extérieure. • Ceci pourrait provoquer des blessures personnelles et des dommages au produit.
Mesures de sécurité Ne bloquez pas l'entrée ou la sortie d'air. • Ceci peut provoquer une défaillance du produit. Utilisez un chiffon doux pour le nettoyage. N'employez pas de détergents agressifs, de dissolvants, etc. • Ceci risquerait de provoquer un incendie, un choc électrique ou des dommages aux pièces plastiques du produit. Ne touchez pas les pièces métalliques du produit lorsque vous enlevez le filtre à air. Elles sont très aiguisées! • Vous risquez de subir des blessures.
Avant lʼutilisation Avant lʼutilisation Mise en marche de lʼappareil 1. Contactez un technicien spécialisé pour réaliser l'installation. 2. Raccordez correctement le câble électrique entre l'unité intérieure et l'unité extérieure. 3. Utilisez un circuit spécialisé. 4. Si le cordon ou la prise dʼalimentation sont endommagés, remplacez-les seulement par des pièces de rechange authentiques. Utilisation 1.
Mesures de sécurité Mode dʼutilisation Télécommande 1 Retirez le couvercle des piles en le poussant dans le sens de la flèche. 2 Insérez les piles fraîches an vous assurant que le (+) et le (-) des piles soient bien installés. 3 Refermez le couvercle en le faisant glisser dans le sens contraire. REMARQUE • Utilisez 2 piles AAA (1.5volt). N’utilisez pas de piles rechargeables. Emplacement et Conseils pour utiliser la télécommande • La télécommande peut être conservée montée sur un mur.
Mode dʼutilisation Fonctionnement de la Télécommande La Télécommande transmet les signaux au système. Transmetteur � de signal 5 6 1 BOUTON DÉMARRAGE/ARRÊT Le fonctionnement démarre quand ce bouton est pressé et il sʼarrête quand ce bouton est pressé de nouveau. 2 BOUTON DE SÉLECTION DU MODE DE FONCTIONNEMENT (Cooling Only) (Heat Pump) Utilisé pour sélectionner le mode de fonctionnement. 3 BOUTONS DE RÉGLAGE DE LA TEMPÉRATURE AMBIANTE Utilisé pour sélectionner la température ambiante.
Mode dʼutilisation Fonctionnement Refroidissement 1 Pressez le bouton Démarrage/Arrêt. Lʼunité répondra en émettant un bip. 2 Ouvrez le couvercle de la télécommande. Pour sélectionner Fonctionnement Refroidissement, pressez le bouton de sélection du mode de fonctionnement. Chaque fois que ce bouton est pressé, le mode de fonctionnement change dans le sens de la flèche.
Mode dʼutilisation Fonctionnement automatique 1 Pressez le bouton Démarrage/Arrêt. Lʼunité répondra en émettant un bip. 2 Ouvrez le couvercle de la télécommande. Pour sélectionner Fonctionnement automatique, pressez le bouton de sélection du mode de fonctionnement. Chaque fois que ce bouton est pressé, le mode de fonctionnement change dans le sens de la flèche.
Mode dʼutilisation Fonctionnement Déshumidification saine 1 Pressez le bouton Démarrage/Arrêt. Lʼunité répondra en émettant un bip. 2 Ouvrez le couvercle de la télécommande. Pour sélectionner Fonctionnement Déshumidification saine, pressez le bouton de sélection du mode de fonctionnement. Chaque fois que ce bouton est pressé, le mode de fonctionnement change dans le sens de la flèche.
Mode dʼutilisation Fonctionnement Réchauffement (Modèle Pompe à chaleur uniquement) 1 Pressez le bouton Démarrage/Arrêt. Lʼunité répondra en émettant un bip. 2 Ouvrez le couvercle de la télécommande. Pour sélectionner Fonctionnement Réchauffement, pressez le bouton de sélection du mode de fonctionnement. Chaque fois que ce bouton est pressé, le mode de fonctionnement change dans le sens de la flèche.
Mode dʼutilisation Jet de froid Pressez le bouton Démarrage/Arrêt. Lʼunité répondra en émettant un bip. 2 Pressez le bouton Jet de froid pour démarrer le mode de vitesse refroidissement et lʼunité fonctionnera à une vitesse du ventilateur super haute en mode refroidissement/réchauffement pendant.
Mode dʼutilisation Fonctionnement Purification PLASMA (Optionnel) 1 1 Pressez le bouton Démarrage/Arrêt. Lʼunité répondra en émettant un bip. 2 Ouvrez le couvercle de la télécommande. Pressez le bouton ON/OFF de fonctionnement du purificateur dʼair PLASMA. Le fonctionnement démarre quand ce bouton est pressé et il sʼarrête quand le bouton est pressé de nouveau. 3 Réglez la vitesse du ventilateur. Vous pouvez sélectionner la vitesse du ventilateur à quatre niveaux: basse, moyenne, haute et CHAOS.
Mode dʼutilisation Fonctionnement 2nd F 1 1 Pressez le bouton Démarrage/Arrêt. Lʼunité répondra en émettant un bip. 2 Ouvrez le couvercle de la télécommande et pressez le bouton 2nd F pour activer les fonctions imprimées en bleu en bas des boutons. (Vérifiez lʼindication de la 2nde fonction sur lʼafficheur de la télécommande.
Mode dʼutilisation Fonctions supplémentaires Mode Sleep 1. Pressez le bouton du mode Auto Sleep pour régler lʼheure à laquelle vous voulez que lʼunité sʼarrête automatiquement. Pour annuler le mode Sleep, pressez le bouton du mode Auto Sleep plusieurs fois jusquʼà ce que lʼétoile ( ) disparaisse de lʼafficheur de fonctionnement. 2. La Minuterie est programmée dans des augmentations dʼune heure en appuyant sur le bouton du mode Auto Sleep de 1 à 7 fois. Le mode Sleep est disponible de 1 à 7 fois.
Mesures de sécurité Orientation du débit d'air L'orientation verticale du débit d'air peut être réglée depuis la télécommande. 1. Presser la touche de marche/arrêt afin de mettre le climatiseur en marche. REMARQUE o L'orientation du volet de débit d'air doit toujours être réglée à l'aide de la télécommande. Un réglage manuel est susceptible d'endommager le climatiseur. o Lors de la mise hors service du climatiseur, le volet d'orientation verticale de débit d'air coupe la sortie d'air.
Mode dʼutilisation Fonctionnement Force Power button R Ce mode de fonctionnement permet d'utiliser le climatiseur sans la télécommande. Presser la touche « Forced Operation ». Pour arrêter le climatiseur, presser cette touche à nouveau. Lors du démarrage, les réglages ci-dessous sont automatiquement mis en service. En fonctionnement forcé, le mode initial se poursuit.
Entretien et Service Entretien et Service ATTENTION: Mettre le climatiseur hors tension avant toute intervention. Unité interne Volet, boîtier et télécommande o Mettre le climatiseur hors tension avant de nettoyer en essuyant avec un linge doux et sec. Ne pas utiliser d'eau de Javel ou d'abrasif. REMARQUE : Mettre le climatiseur hors tension avant de nettoyer l'unité intérieure. o Ne jamais utiliser : • Eau à plus de 40°C Risque de déformation et/ou de décoloration.
Entretien et Service Quand le climatiseur ne sera pas utilisé pendant longtemps Quand il ne sera pas utilisé pendant longtemps Quand le climatiseur doit être de nouveau utilisé Faire fonctionner le climatiseur en mode de recyclage d'air (voir page 19) pendant 2 à 3 heures. • Ceci permet de sécher tous les pièces internes. Actionner le disjoncteur. 1 Nettoyer les éléments du filtre à air et remettre le filtre en place dans l'unité intérieure.
Entretien et Service Les astuces de recherche des problèmes font économiser du temps et de l'argent ! Regardez d'abord le tableau ci-dessous avant de demander des réparations... Si le mauvais fonctionnement persiste, contactez SVP votre revendeur.
Note 24 Climatiseur domestique - Type convertible
KLIMAANLAGE AIR CONDITIONER DEUTSCH Bitte lesen Sie diese Bedienungsanleitung vor dem Betrieb des Gerätes aufmerksam durch und bewahren Sie es zum späteren Nachschlagen auf. www.lg.
Fensterklimagerät – Benutzerhandbuch INHALTSVERZEICHNIS FÜR IHRE AUFZEICHNUNGEN Sicherheitshinweise...............3 Tragen Sie hier die Modell- und Seriennummer ein: Modell-Nr. Vor dem Betrieb .....................8 Betriebsanleitungen...............9 Seriennr. Diese Nummern finden Sie auf einem Etikett an der Seite jedes Gerätes. Händlername Kaufdatum Weitere Funktionen..............18 n Heften Sie den Kaufbeleg an diese Seite, um das Kaufdatum bei einem evtl. Garantiefall zu belegen.
Sicherheitshinweise Sicherheitshinweise Um Verletzungen des Benutzers oder anderer Personen sowie Sachbeschädigungen zu vermeiden, müssen die folgenden Anleitungen befolgt werden. n Ein unsachgemäßer Betrieb bei Missachtung von Anleitungen führt zu Verletzungen oder Beschädigungen. Die Schweregrade werden durch folgende Symbole gekennzeichnet. Symbol bedeutet Lebensgefahr oder Gefahr schwerer WARNUNG Dieses Verletzungen.
Sicherheitshinweise Netzkabel nicht verändern oder verlängern. • Es besteht Feuer- oder Stromschlaggefahr. Zur Montage immer den Händler oder ein qualifiziertes Service-Center verständigen. • Es besteht Feuer-, Stromschlag-, Explosions- oder Verletzungsgefahr. Das Gerät niemals selbst (vom Kunden) montieren, entfernen oder neu installieren. Das Gerät vorsichtig auspacken und montieren. • Es besteht Feuer-, Stromschlag-, Explosions- oder Verletzungsgefahr. • Scharfe Kanten bergen Verletzungsgefahr.
Sicherheitshinweise Es darf kein Wasser in elektrische Bauteile gelangen. • Dadurch kann das Gerät beschädigt oder ein Feuer/Stromschlag verursacht werden. Keine brennbaren Gase oder Flüssigkeiten in der Nähe des Gerätes lagern. • Es besteht die Gefahr von Feuer und des Ausfalls des Gerätes. Gerät nicht für eine längere Zeit in geschlossenen Räumen betreiben. • Es könnte ein Sauerstoffmangel eintreten.
Sicherheitshinweise Wenn das Gerät eine längere Zeit nicht betrieben wird, Netzstecker ziehen oder Sicherung ausschalten. Es muss gewährleistet werden, dass niemand auf das Außengerät tritt oder fällt. • Es besteht die Gefahr von Beschädigungen oder Ausfällen oder unbeabsichtigtes Einschalten des Gerätes. • Es besteht die Gefahr von Verletzungen sowie von Beschädigungen des Gerätes. VORSICHT n Montage Nach der Montage oder Reparatur des Gerätes immer auf Gaslecks (Kältemittel) überprüfen.
Sicherheitshinweise Lufteinlass und -auslass nicht verdecken. Zur Reinigung ein weiches Tuch verwenden. Keine scharfen Reiniger, Lösungen usw. verwenden. • Ansonsten könnte das Gerät ausfallen. • Es besteht die Gefahr von Feuer, Stromschlägen oder Beschädigungen der Kunststoffteile des Gerätes. Metallteile des Gerätes beim Entfernen des Luftfilters nicht berühren. Sie sind sehr scharfkantig! • Es besteht Verletzungsgefahr. x Wa Thinner Nicht auf das Gerät treten und nichts ablegen.
Vor dem Betrieb Vor dem Betrieb Vorbereitung auf den Betrieb 1. Verständigen Sie zur Montage dieses Gerätes einen Monteur. 2. Schließen Sie das Netzkabel fest an Innengerät und Außengerät an. 3. Verwenden Sie einen separaten Stromkreis. 4. Wenn Kabel oder Netzstecker beschädigt sind, dürfen Sie nur durch ein genehmigtes Ersatzteil ausgetauscht werden. Betrieb 1. Wenn Sie längere Zeit einem direkten Luftstrom ausgesetzt sind, könnte dies gesundheitsschädlich sein.
Betriebsanleitungen Betriebsanleitungen Fernbedienung 1. Entfernen Sie das Batterieklappe durch Schieben in Pfeilrichtung. 2. Legen Sie die neue Batterien ein und achten Sie auf die richtige Polung (+) und (-) der Batterie. 3. Schieben Sie die Klappe wieder zu. HINWEIS • Nur 2 AAA (1,5 V) Batterien verwenden. Keine wiederaufladbaren Batterien verwenden. Aufbewahrung und Tipps zur Verwendung der Fernbedienung • Die Fernbedienung kann an die Wand montiert werden.
Betriebsanleitungen Funktionen der Fernbedienung Die Fernbedienung überträgt Signale an das System. 1 TASTE START/STOP Der Betrieb wird bei Tastendruck gestartet und bei erneutem Tastendruck angehalten. 2 TASTE OPERATION MODE SELECTION Dient zur Auswahl des Betriebsmodus. Signalsender 3 4 5 6 1 6 TASTE CHAOS SWING Dient zum Starten/Anhalten der Luftklappenbewegung und zum Einstellen der Luftstromrichtung nach oben/nach unten.
Betriebsanleitungen Kühlungsbetrieb 1 Drücken Sie die Taste Start/Stop. Daraufhin gibt das Gerät einen Signalton aus. 2 Öffnen Sie die Klappe der Fernbedienung. Um den Kühlungsbetrieb auszuwählen, drücken Sie die Taste Operation Mode Selection. Bei jedem Tastendruck wird der Betriebsmodus in Pfeilrichtung umgeschaltet.
Betriebsanleitungen Auto-Betrieb 1 Drücken Sie die Taste Start/Stop. Daraufhin gibt das Gerät einen Signalton aus. 2 Öffnen Sie die Klappe der Fernbedienung. Um den AutoBetrieb auszuwählen, drücken Sie die Taste Operation Mode Selection. Bei jedem Tastendruck wird der Betriebsmodus in Pfeilrichtung umgeschaltet.
Betriebsanleitungen Gesunder Entfeuchtungsbetrieb 1 Drücken Sie die Taste Start/Stop. Daraufhin gibt das Gerät einen Signalton aus. 2 Öffnen Sie die Klappe der Fernbedienung. Um den Gesunden Entfeuchtungsbetrieb auszuwählen, drücken Sie die Taste Operation Mode Selection. Bei jedem Tastendruck wird der Betriebsmodus in Pfeilrichtung umgeschaltet.
Betriebsanleitungen Heizbetrieb (Nur Geräte mit Wärmepumpe) 1 Drücken Sie die Taste Start/Stop. Daraufhin gibt das Gerät einen Signalton aus. 2 Öffnen Sie die Klappe der Fernbedienung. Um den Heizbetrieb auszuwählen, drücken Sie die Taste Operation Mode Selection. Bei jedem Tastendruck wird der Betriebsmodus in Pfeilrichtung umgeschaltet. Kühlung 3 Auto Gesunde� Entfeuchtung Heizung (Nur Geräte mit Wärmepumpe) Stellen Sie die Temperatur höher als die Raum-temperatur ein.
Betriebsanleitungen Schnellkühlung 1 Drücken Sie die Taste Start/Stop. Daraufhin gibt das Gerät einen Signalton aus. 2 Drücken Sie die Taste Jet Cool, um die Schnellkühlung/-erwärmung zu starten. Das Gerät lang mit extrem hoher Lüftergeschw. im Kühlungs-/Heizmodus. 3 Um den Jet Cool-Modus anzuhalten, drücken Sie die Jet Cool-bzw. Lüftertaste oder die Taste zur Einstellung der Raumtemperatur erneut. Das Gerät wird wieder bei hoher Lüftergeschwindigkeit im Kühlungs- betrieben.
Betriebsanleitungen PLASMA-Reinigungsbetrieb (Optional) 1 Drücken Sie die Taste Start/Stop. Daraufhin gibt das Gerät einen Signalton aus. 2 2 Öffnen Sie die Klappe der Fernbedienung. Drücken Sie die EIN/AUS-Taste für PLASMA-Luftreinigungsbetrieb. Der Betrieb wird bei Tastendruck gestartet und bei erneutem Tastendruck angehalten. 3 Stellen Sie die Lüftergeschwindigkeit ein. Sie kann in vier Schritten ausgewählt werden: niedrig, mittel, hoch oder CHAOS.
Betriebsanleitungen 2nd F-Betrieb 1 Drücken Sie die Taste Start/Stop. Daraufhin gibt das Gerät einen Signalton aus. 2 Öffnen Sie die Klappe der Fernbedienung und drücken Sie die Taste 2nd F, um die Blau gedruckten Tastenfunktionen zu starten.(Überprüfen Sie die Anzeige der 2. Funktion auf der Anzeige der Fernbedienung.) Über diese Tasten wird der Timer wie folgt eingestellt: CANCEL ON OFF SET CANCEL ON OFF SET AUTO CLEAN 3 Die 2.
Betriebsanleitungen Weitere Funktionen Ruhemodus 1. Drücken Sie die Taste Sleep Mode Auto, um die Uhrzeit für das automatische Ausschalten einzustellen. 2. Der Timer wird durch 1- bis 7-faches Drücken der Taste Sleep Mode Auto in Schritten zu einer Stunde eingestellt. Der Ruhemodus steht 1 bis 7 Mal zur Verfügung. Um die Zeitperiode in Schritten zu einer Stunde zu ändern, drücken Sie die Taste Sleep Mode und richten Sie die Fernbedienung dabei auf das Klimagerät. 3.
Betriebsanleitungen Einstellung der Luftaustrittsrichtung Die vertikale Luftaustrittsrichtung kann nach Ihren Bedürfnissen mit der Fernbedieung eingestellt werden. HINWEIS o Benutzen Sie zur Einstellung der vertikalen Luftrichtung immer die Fernbedienung. Verstellen Sie die vertikale Luftablenkeinrichtung niemals von Hand, da dies zu Beschädigungen am Gerät führt. o Wenn das Klimagerät abgeschaltet wird, verschließt sich die Luftaustrittsöffnung selbsttätig.
Betriebsanleitungen Notbetrieb Power button Diese Funktion wird benötigt, falls die Fernbedienung nicht benutzt werden kann. In diesem Fall drücken Sie auf den Knopf “Notbetrieb”. Um den Notbetrieb wieder abzuschalten, betätigen Sie die Taste noch einmal. Ist der Notbetrieb eingeschaltet, arbeitet das Gerät nach den Werten in der nachfolgenden Tabelle. Beim Notbetrieb wird die initiale Betriebsart kontinuiert. R Mit Heizung Ohne Heizung Raum Temp. ≥ 24°C 21°C ≤ Raum Temp.< 24°C Raum Temp.
Wartung und Service Wartung und Service VORSICHT: Bevor Sie mit Wartungs- und Reinigungsarbeiten beginnen, schalten Sie den Leistungsschalter aus. Innengerät Luftansauggitter, Gehäuse und Fernbedienung o Schalten Sie das Gerät aus bevor Reinigung. Reinigen Sie mit einem weichen und trocknen Tuch. Benutzen Sie nie Bleichmittel oder Scheuermittel. HINWEIS Das Gerät muß vor der Reinigung vom Stromnetz getrennt werden. o Benutzen Sie zur Reinigung nie eines der folgenden Mittel: • Wasser wärmer als 40°C.
Wartung und Service Wenn Sie die Klimaanlage länger nicht benutzen wollen Wenn die Klimaanlage längere Zeit nicht benutzt wird 1 2 Lassen Sie das Gerät in der Betriebsart des Ventilators für 2 bis 3 Stunden mit folgenden Einstellungen laufen(Siehe Seite 19): • Dadurch wird die im Gerät enthaltene Feuchtigkeit entfernt. Während der Kühlsaison 1 Machen Sie den Luftfilter sauber und bringen Sie diesen wieder an seinen Platz im Gerät. (Siehe für die Reinigung der Filters Seite 21.
Wartung und Service Hinweis für Störungsbeseitigung! Zeit und Geld sparen! Überprüfen Sie bitte folgende Punkte, bevor Sie den Kundendienst rufen. Wenn Sie weiter Probleme mit dem Gerät haben, rufen Sie den Verkäufer oder Kundendienst an. Störung Gerät arbeitet nicht. Beschreibung • Ist die Netzsicherung in Ordnung? Siehe Seite 18 • Haben Sie bei der Programmierung der Schaltuhr einen Fehler gemacht? - Im Raum riecht es ungewöhnlich.