
Owner's Manual


Installing
and
Composition
15
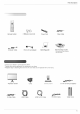
Accessories
for
wall
mounting
bracket
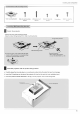
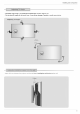
Wall
mounting
bracket
-
Detach
bolt
from
wall
mounting
bracket.
-
Detach
product
fixing
bracket
from
Wall
mounting
bracket.
Bolts
for
wall
mounting
bracket
Wall
anchor
bolt
sleeves
Bolts
for
fixing
the
bracket
Fixing
fixers
Bolts
for
using
the
wood
Installing
Wall
mounting
bracket
Detach
the
products
Wall
mounting
bracket
Product
fixing
bracket
Bracket
fixing
bolt
*
After
inserting
the
projector,
you
use
this
bolt.(Refer
to
p.18)
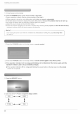
Press
the
upper
of
the
wall
bracket
with
both
hands
to
tilt
the
bracket.
It's
convenient
when
joining
the
fixing
bolt.(Refer
to
p.18)
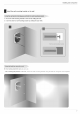
a.
Carefully
place
the
lens
side
down
on a
cushioned
surface
that
will
protect
the
lens
from
damage.
b.
Insert
the
2
fixing
fixers
on
the
top
of
the
projector.(It's
top
that
the
point
of
auto
ventilation
door.)
c.
Insert
the
product
brackets
detached
in
the
fig.1
on
the
projector
with
bracket
fixing
bolts.
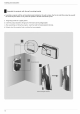
Bracket
fixing
bolt
Fixing
fixer
1
Assemble
projector
with
the
product
fixing
bracket
2