
Owner's Manual


Information
44
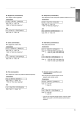
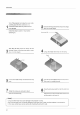
1
Turn
off
the
projector
and
unplug
the
power
cable.
Carefully
place
the
lens
side
down
on a
cushioned
surface
that
will
protect
the
lens
from
damage.
(Allow
the
lamp
to
cool
for
1
hour
before
replacing
it.)
2
Unscrew
the
fixing
bolts
of
the
lamp
cover
using
a
driver
or
a
similar
object.
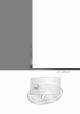
Lamp
case
bolt
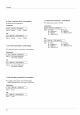
3
After
lifting
the
lamp
cover
off,
remove
the
two
retaining
screws on
the
lamp
case
with
a
screw-
driver
or
similar
objects.
4
Lift
up
the
fixed
wire
knob
on
the
lamp.
5
Pull
out
the
handle
slowly
and
remove
the
lamp
case.
6
Insert
the
new
lamp
gently
into
the
correct
position.
Make
sure
it
is
inserted
correctly.
7
Tighten
the
screws
you
removed
in
step
3.
(Make
sure
it
is
fixed
hardly.)
8
Close
the
lamp
cover
and
fix
it
with
the
bolts
from
2.
(If
the
lamp
cover
is
open,
the
lamp
indicator
flashes
green
and
the
projector
is
not
turned
on.)
Replacing
the
Lamp
Bolt
Knob
Using
and
other
lamp
may
cause
damage
to
the
projector
or
lamp.
Make
sure
the
lamp
cover
is
securely
fastened.
If
the
lamp
cover
is
open,
and
the
projector
is
not
turned
on.
In
this
case,
contact
your
service
center
after
checking
the
lamp
to
fix
well.