
Installation Manual


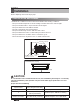
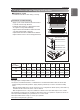
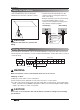
Table Of Contents

• Select and mark the position for fixing bolts.
•
Drill the hole for set anchor on the face of ceiling.
• Insert the set anchor and washer onto the
suspension bolts for locking the suspension
bolts on the ceiling.
•
Mount the suspension bolts to the set anchor firmly.
• Secure the installation plates onto the
suspension bolts (adjust level roughly) using
nuts, washers and spring washers.
1 Set anchor
Old building New building
2 Plate washer
3 Spring washer
4 Nut
5 Suspension
bolts
Connect the wires to the terminals on the control board individually according to the outdoor unit connection.
• Ensure that the color of the wires of outdoor unit and the terminal No. are the same as those of indoor
unit respectively.
Clamping of cables
1) Arrange 2 power cables on the control panel.
2) First, fasten the steel clamp with a screw to the inner boss of control panel.
3) For the cooling model, fix the other side of the clamp with a screw strongly. For the heat pump
model, put the 0.75 mm
2
(AWG18) cable(thinner cable) on the clamp and tighten it with a plastic
clamp to the other boss of the control panel.
Wiring Connection
Tighten the nut and bolt to prevent unit
falling.
Make sure that the screws of the terminal are free from looseness.
The Power cord connected to the unit should be selected according to the following
specifications.
10 Indoor Unit
Installation
- -----ABAB
GND 12V
DRY2DRY1
INTERNETIDUODU
Outdoor UnitIndoor Unit
Terminal Block Indoor
Terminal Block Indoor
L(L1) N(L2)
GN/YL
Indoor Power Input
Wired Remote
Controller
YL RD BK A B
Indoor Unit Installation
WARNING
!
CAUTION
!
CAUTION
!