
ARV Engineering Manual
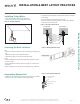
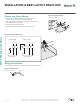
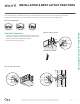

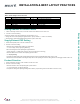
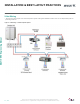
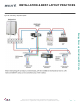
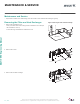
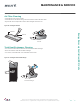
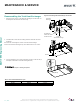
Table Of Contents

|
ERV
|
21
Energy Recovery Ventilation (ERV) Units
Due to our policy of continuous product innovation, some specifications may change without notification.
LG Electronics U.S.A., Inc..., Englewood Cliffs, NJ. All rights reserved. “LG” is a registered trademark of LG Corp.
INSTALLATION & BEST LAYOUT PRACTICES
Installing Fixing Bolts
• Select and mark the position for the fixing bolts.
• Drill a hole on the face of the ceiling for the anchor.
Figure 14: Installing Fixing Bolts
• Insert the anchor and washer on the suspension bolts to lock them
in the ceiling.
• Firmly mount the suspension bolts to the anchor.
• User nuts, washers and spring washers to secure the installation
plates onto the suspension bolt.
Figure 15: Securing Suspension Rods
1 Set anchor
Old building New building
2 Plate washer
3 Spring washer
4 Nut
5 Suspension
bolts
Selecting the Best Location
Do’s
• Place the unit where it will be level and can support the weight of the
unit.
• Install the unit where it can withstand vibration.
• Install the unit where service can be performed easily.
Don’ts
• Avoid installing the unit where inflammable gas is generated, flows,
stored or vented.
• Avoid installing the unit where sulfurous acid gas or corrosive gas is
generated.
• Avoid installing the unit near places near high frequency generators.
Figure 16: Selecting the Best Location
Assembling Washer Nut
• Tighten the commercial washer nut (more than 13/16) for the outside
diameter of 3/8” to the commercial ceiling fixing bolt 3/8”.
Figure 17: Assembling the Washer Nut
Ceiling Fixing Bolt
(3/8” 1/2”)
Nut
Washer, Spring Lock
Washer, Plain
Nut