OWNER’S MANUAL HIGH PERFORMANCE 3D AV RECEIVER SYSTEM Please read this manual carefully before operating your set and retain it for future reference. MODEL ARX9500 (ARX9500/ARX9500W, S94P4-F/S/C/W) NA9530P-FH.DZAFLLK_ENG_MFL67781456.
1 Safety Information Safety Information 1 Safety Information CAUTION RISK OF ELECTRIC SHOCK DO NOT OPEN CAUTION: TO REDUCE THE RISK OF ELECTRIC SHOCK DO NOT REMOVE COVER (OR BACK) NO USERSERVICEABLE PARTS INSIDE REFER SERVICING TO QUALIFIED SERVICE PERSONNEL.
Safety Information This device is equipped with a portable battery or accumulator. Safety way to remove the battery or the battery from the equipment: Copyrights It is forbidden by law to copy, broadcast, show, broadcast via cable, play in public, or rent copyrighted material without permission. This product features the copy protection function developed by Macrovision. Copy protection signals are recorded on some discs. When recording and playing the pictures of these discs picture noise will appear.
Contents Contents 3 Installation 1 Safety Information 2 3 12 Connecting the system cable 12 Installing speakers 13 Connecting speakers 15 Connecting video devices Cautions and Warnings 15 Using an HDMI cable Copyrights 17 Using a composite video cable 18 Connecting audio devices 19 Connecting other devices 20 About the “ ” Symbol Display Connecting the antennas 20 6 Symbols Used in this Manual Connecting a portable device 21 6 Accessories Connecting headphones 7 Required
Contents 4 5 Operation Maintenance 25 Turning On the unit 38 25 Selecting the input source 26 Adjusting the speaker levels 27 Enjoying various sound mode 6 Sound effect Troubleshooting 28 Bass Blast 39 28 Setting the USER EQ Listening to FM radio 2 Troubleshooting 28 Automatic tuning 7 28 Manual tuning Appendix 29 Presetting radio stations 29 Tuning to preset stations 29 Deleting the preset stations 29 Deleting all the preset stations 30 1 Handling the Unit 27 28 5
Preparation 2 Preparation 2 Introduction Accessories Preparation Please check and identify the supplied accessories. About the “ ” Symbol Display “ ” may appear on your TV display during operation and indicates that the function explained in this owner’s manual is not available on that specific media.
Preparation 7 Required cables The hookup diagrams on the subsequent pages assume the use of the following connection cables. You must purchase the connection cables separately if necessary. • Coaxial digital audio cable • • USB cable • HDMI cable • Portable cable ( 3.
Preparation Remote control • • • • • • • • • a • • • • • • • • POWER (1): Switches the unit ON or OFF. TV control buttons: Controls the TV. (LG TV only) - 1: Turns the TV on or off. - AV/INPUT: Switches the TV’s input source between the TV and other input sources. 2 Preparation INPUT buttons: Selects the input source you want to use. (Page 26) - AV: Selects the input source connected to AV IN 1/2 jack. - PORTABLE: Selects the input source connected to PORT. IN jack.
Preparation • • • • • • • • • b • • • • • • • • • • • • • • • • • d • • • • • • • • C/V (SKIP): Goes to the next or previous chapter / track / file. SETUP: Displays or exits the [SETUP] menu. c/v (SCAN): Searches backward or forward. RETURN (x): Moves backwards in the menu or exits the setup menu. INFO/DISPLAY ( ): Displays or exits On-screen Display. (Page 33,34,36) z(PLAY): Starts playback. ENTER ( ): Acknowledges menu selection. M (PAUSE): Pauses playback.
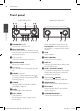
Preparation Front panel AV RECEIVER SYSTEM a b c f e g h ij k SUBWOOFER AMPLIFIER d e 2 Preparation l m n a STANDBY/ON (1/!) Switches the unit ON or OFF. o p q Moves to the BASS mode if you press PLAY/PAUSE on the front panel while the “USER EQ” is displayed in the display window. b INPUT SELECTION Selects the input source. Rotate this knob until the input source you want appears on the display window. j STOP Stops playback. c Display window Shows the current status of the unit.
Preparation 11 Rear panel AV RECEIVER SYSTEM a SUBWOOFER AMPLIFIER b 2 h i a Speakers connectors Connects the speaker cables. b COAXIAL IN 1/2 (DIGITAL AUDIO IN 1/2) Connects other components with a coaxial digital audio output. c SYSTEM Connector Connects the system cable. d ANTENNA connectors FM – Connects the FM wired antenna. e AV IN 1 (VIDEO IN, L-AUDIO-R) Connects the components with analog audio/video output jacks. NA9530P-FH.DZAFLLK_ENG_MFL67781456.
Installation 3 Installation Connecting the system cable 3 Installation You can enjoy 7.2 channel surround sound by using this unit. It is necessary to connect the system cable before using this unit. If the system cable is not connected, ‘CHECK CABLE’ appears on the display window every 10 seconds. Before connecting the system cable, be sure to disconnect the AC power cord. Installing speakers The unit allows you to use 7.2 channel system.
Installation Front speaker (left) Front speaker (right) Place the front speakers to the sides of the monitor or screen and as flush with the screen surface as possible. 13 Connecting speakers Before connecting the cables, be sure to disconnect the AC power cord. Center speaker Place the center speaker above or below the monitor or screen. / Surround speaker (left) 1, 2 / Surround speaker (right) 1, 2 Place these speakers behind your listening position, facing slightly inwards.
Installation 1. Connect the wires to the unit. To connect the cable to the unit, press each plastic finger pad to open the connection terminal. Insert the wire and release the finger pad. > Caution • Be careful to make sure children not to put their hands or any objects into the *speaker duct. *Speaker duct : A hall for plentiful bass sound on speaker cabinet (enclosure). • Place the center speaker at a safe distance from the child’s reach.
Installation 15 1. Connect the HDMI IN 1/2/3 jack on AV Receiver System to your video device with HDMI OUT jack using a HDMI cable. Connecting video devices 2. Connect the HDMI OUT jack on AV Receiver System to the HDMI IN jack on your TV. You can watch the input image from your video device. There are two ways of connecting your video device to AV Receiver System. 3. Set the input source to HDMI (Pages 25-26). , Note • Before connecting the cables, be sure to disconnect the AC power cord.
Installation , Note • HDMI is the abbreviated name for High Definition Multimedia Interface. It is an interface which transmits video and audio signals in digital format. If a connected HDMI device does not accept the audio output of the unit, the HDMI device’s audio sound may be distorted or may not output. Resolution Setting The unit provides several output resolutions for HDMI OUT jack. You can change the resolution using [Setup] menu. 1. Press SETUP. The [Setup] menu appears.
Installation Using a composite video cable To enjoy both sounds and images from your device, you have to connect analog audio cable as well as composite video cable. Audio cable 17 1. Connect the VIDEO IN jack on AV Receiver System to the VIDEO OUT jack on your video device using a composite video cable. 2. Connect the left and right AUDIO IN jacks of AV Receiver System to the left and right AUDIO OUT jacks on your video device using an audio cables. 3.
Installation 1. Connect AV IN 1, COAXIAL 1/2 or OPTICAL 1/2 jack on AV Receiver System to your audio device’s OUTPUT jack you want. Connecting audio devices 2. Set the input source to AV IN 1, COAXIAL 1/2 or OPTICAL 1/2 you connect.(Pages 2526). You can hear the sound from your TV, DVD player, Blu-ray player, CD player, etc. It is not necessary to connect all the cables. Connect AV Receiver System to an AV IN, a COAXIAL or an OPTICAL jack on your device you want to connect.
Installation 19 1. Connect the VIDEO IN jack on the front panel of AV Receiver System to the VIDEO OUT jack on your device using a video cable. Connecting other devices You can easily connect other devices (camcorder, game console, etc) to the jacks on the front panel of AV Receiver System. 2. Connect the left and right AUDIO IN jacks on the front of AV Receiver System to the audio left and right OUT jacks on your device using an audio cables. 3.
Installation Connecting the antennas Connect the supplied FM wire antenna. Before connecting the antenna, be sure to disconnect the AC power cord. FM wire antenna 3 Connecting a portable device 1. Connect the PORT. IN jack on AV Receiver System to the head phone or LINE OUT jack on your Portable device (MP3 player, etc.) using a portable cable ( 3.5 mm stereo plug). AV Receiver System Installation , Note Be sure to fully extend the FM wire antenna.
Installation Connecting headphones 21 Settings Adjusting the Setup Settings Connect a pair of stereo headphones ( 3.5 mm phone plug) to AV Receiver System’s PHONES jack for private listening. AV Receiver System You can change the settings of the unit in the [Setup] menu. 1. Press SETUP. The [Setup] menu appears. 3 Installation Headphones 2. Use W/S to select the first setup option, and press D to move to the second level. , Note • Always turn down the volume before connecting your headphones.
Installation [Language] Menu Menu Language Select a language for the [Setup] menu and on-screen display. [Display] Menu TV Aspect Select which screen aspect to use based on the shape of your TV screen. 3 Installation [4:3] Select when a standard 4:3 TV is connected. [16:9] Select when a 16:9 wide TV is connected. Display Mode The Display Mode setting works only when the TV Aspect mode is set to 4:3. Resolution Sets the output resolution of the HDMI video signal.
Installation [Audio] Menu Speaker Setup Make the following settings for the built-in 7.2 channel surround speaker. 1. Select [Speaker Setup] on the [Audio] menu. 2. Press ENTER ( ) The [SPEAKER] menu appears. [Speaker] Select a speaker that you want to adjust. , Note Certain speaker settings are prohibited by the Dolby Digital licensing agreement. [Size] Since the speaker settings are fixed, you cannot change the settings. There is the other way to adjust the speaker levels. Refer to page 26.
Installation DRC (Dynamic Range Control) When a title encoded in Dolby Digital or Dolby Digital Plus is playing back, you may wish to compress the dynamic range of the audio output (the difference between the loudest sounds and the quietest ones). This allows you to listen to a movie at a lower volume without losing clarity of sound. Set [DRC] to [On] for this effect. HD AV Sync 3 Installation Sometimes Digital TV encounters a delay between picture and sound.
Operation 25 4 Operation Turning On the unit To select the Display Component connected to AV IN 1 jack AV 1 Before connecting the power cord, connect all your speakers and AV components. Component connected to AV IN 2 jack AV 2 1. Plug the power cord into an AC wall outlet. Portable device connected to PORT.
Operation To select the required input source using the remote control, use the INPUT buttons. 4 To select the Button Component connected to AV IN 1/2 jack AV Portable device connected to PORT. IN jack PORTABLE Component connected to OPTICAL IN 1/2 jack OPTICAL Component connected to COAXIAL IN 1/2 jack COAXIAL Component connected to HDMI 1/2/3 jack HDMI IN Built-in tuner RADIO USB device connected to USB port USB Adjusting the speaker levels You can adjust the level of each speaker.
Operation Enjoying various sound mode You can enjoy various sound mode. For details, refer to the Sound effect, Bass Blast and USER EQ. (Pages 27-28) Sound effect You can select a suitable sound mode. Rotate SOUND EFFECT repeatedly until the desired mode appears on the display window. Description NAT PLUS You can enjoy the natural sound effect same as a 5.1 channel. NATURAL You can enjoy comfortable and natural sound. Local specialization equalizer Regionally optimized sound effect.
Operation Bass Blast Listening to FM radio You can set the BASS BLAST sound mode directly. Press BASS BLAST repeatedly. Display Description BASS BLAST During playback, reinforces the bass sound. BYPASS You can enjoy the sound without equalizer effect. Setting the USER EQ 4 You can listen to music with desired sound effect by adjusting the BASS, MIDDLE and TREBLE. Operation 1. Press USER EQ on the front panel. “USER EQ” appears on the display window. 2.
Operation Presetting radio stations Tuning to preset stations You can preset up to 50 FM stations.Then you can easily tune in the stations you often listen to. Before tuning to preset stations, make sure you preset radio stations. (Page29) 1. Rotate INPUT SELECTION to select tuner (FM). Or press RADIO with the remote control to select tuner (FM). 2. Tune in the station that you want to preset using Automatic tuning or Manual tuning. 3. Press ENTER ( ).
Operation Playing the USB device This unit can play movie, music and photo files contained in the USB device. To stop playback MUSIC MOVIE PHOTO Press Z (STOP) during playback. To pause playback MUSIC MOVIE Press M (PAUSE) during playback. Press d (PLAY) to resume playback. Basic operations 1. Insert an USB device to the USB port until it fits into place. AV Receiver System 4 Operation USB device 2. Rotate INPUT SELECTION on the front panel to select until the “USB” appears on the display window.
Operation To slow down the playing speed MOVIE While the playback is paused, press v repeatedly to play various speeds of slow motion. Resume playback 31 , Note • Devices which require additional program installation connected to a computer, are not supported. • Do not extract the USB device while in operation. • For a large capacity USB, it may take longer than a few minute to be searched. MUSIC MOVIE • Regular back up is recommended to prevent data loss.
Operation , Note Listening to music You can play music files contained in a USB device. 1. Select [Music] using A/D on the [USB] menu. • The file requirements are described on page 33. • You can use various playback functions. Refer to pages 30-31. 2. Press ENTER ( ). The unit plays music files automatically. Playing your favorite music Using the [MUSIC] menu This enables you to play the marked music in order by marking your favorite files. 1.
Operation Playing repeatedly or randomly Music file requirement During playback, press REPEAT repeatedly to select a desired mode. Music file compatibility with this unit is limited as follows : • Sampling frequency : within 32 to 48 kHz (MP3), within 32 to 48 kHz (WMA) The current file will be played repeatedly. • Bit rate : within 32 to 320 kbps (MP3), 40 to 192 kbps (WMA) All the files will be played repeatedly.
Operation a Title – current title number/total number of titles b Time – elapsed playing time/total playback time c Audio – selected audio language or channel d Subtitle – selected subtitle e Code Page – selected subtitle code page 2. Select an option using W/S. 1. During playback, press INFO/DISPLAY ( ) to display the On-Screen display. 2. Use W/S to select the [Audio] option. 3. Use A/D to select desired audio language, audio track or audio channel. Selecting a subtitle language 1.
Operation Movie file requirement Movie file compatibility with this unit is limited as follows : • Available resolution: within 720 x 576 (W x H) pixels. The file name of the DivX subtitle should be entered within 45 characters. • If there is impossible code to express in the DivX file, it may be displayed as “ _ “ mark on the display. • Frame rate : less than 30 fps. • If the video and audio structure of recorded files is not interleaved, either video or audio is outputted.
Operation To stop a slide show Photo file requirement Press Z (STOP) during slide show. Photo file compatibility with this unit is limited as follows : To pause a slide show • Max pixel in width : 2760 x 2048 pixel Press M (PAUSE) during slide show. Press d (PLAY) or M (PAUSE) to re-start the slide show. • Maximum files : Under 999 • Some files may not operate due to a different recording format or the condition of file. To skip to the next/previous photo • File extensions: “.jpg”, “.
Operation 37 Using the Sleep Timer You can set the unit to turn off automatically at a specified time. Press SLEEP repeatedly. The indicator changes cyclically in the display window as follows. SLEEP 180 : 150 : 120 : 90 : 80 : 70 : 60 : 50 : 40 : 30 : 20 : 10 : Off (No display) To check the remaining time, press SLEEP. The remaining time appears on the display window.
Maintenance 5 Maintenance Handling the Unit When shipping the unit Cleaning the unit Please save the original shipping carton and packing materials. If you need to ship the unit, for maximum protection, re-pack the unit as it was originally packed at the factory. To clean the unit, use a soft, dry cloth. If the surfaces are extremely dirty, use a soft cloth lightly moistened with a mild detergent solution.
Troubleshooting 39 6 Troubleshooting Troubleshooting PROBLEM No power. No sound. CAUSE & SOLUTION • The power cord is disconnected. Plug the power cord into the wall outlet securely. • The system cable is disconnected. Connect the system cable. • The speaker wires are disconnected. Check the speaker connections. • The MASTER VOLUME is adjusted too low. Adjust the MASTER VOLUME. • MUTE button is pressed to ON. Press MUTE button to cancel the muting effect.
Troubleshooting Radio stations can’t be tuned in properly. • The antenna is positioned or connected poorly. Check the antenna connection and adjust its position. • The signal strength of the radio station is too weak. Tune to the station manually. • No stations have been preset or preset stations have been cleared (when tuning by scanning preset channels). Preset some radio stations, see page 29 for details. Preset stations cannot • be received. • The memorized stations are cleared.
Appendix 41 7 Appendix Trademarks and Licenses HDMI, the HDMI logo and High-Definition Multimedia Interface are trademarks or registered trademarks of HDMI licensing LLC. Manufactured under license from Dolby Laboratories. Dolby and the double-D symbol are trademarks of Dolby Laboratories. DivX®, DivX Certified® and associated logos are trademarks of Rovi Corporation or its subsidiaries and are used under license. 7 Appendix NA9530P-FH.DZAFLLK_ENG_MFL67781456.
Appendix Specifications General Tuner • Power requirements: Refer to main label. • FM Tuning Range: 87.50 to 108.00 MHz or 87.5 to 108.0 MHz • Power consumption: Refer to main label. • Dimensions (W x H x D): 430 x 150 x 312 mm Amplifier • Net Weight (Approx.): 8.55 kg (AV Receiver System : 4.52 kg, Subwoofer Amplifier: 4.
Appendix 43 Speakers • Front speaker • Center speaker Type: 2 Way 3 speaker Type: 2 Way 3 speaker Impedance: 6 Ω Impedance: 6 Ω Rated Input Power: 220 W Rated Input Power: 220 W Max. Input power: 440 W Max. Input power: 440 W Net Dimensions (W x H x D): 255 x 1014 x 314 mm Net Dimensions (W x H x D): 545 x 206 x 194 mm Net Weight: 19.3 kg Net Weight: 5.
NA9530P-FH.DZAFLLK_ENG_MFL67781456.