
Owner's Manual


68
LAN Control
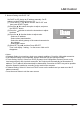
Preparation:
1. Equipments: PC, projector, cables
2. Connection procedures:
Connect the projector to routers or switches of the LAN by direct or cross cable. If it fails to
connect PC and projector by parallel cable, please switch to cross cable as suggested.
3. After the computer is booted and the projector is plugged in, indicator lights of LAN interface
and computer interface will flash continuously.
< NOTE >
▪Use a standard LAN cable with this Projector. Cat5 or better with a RJ45 connector.
▪Many network connection problems during set up can often be fixed by re-setting the router
or modem. After connecting the player to the home network, quickly power off and/or disconnect
the power cable of the home network router or cable modem. Then power on and/or connect the
power cable again.
▪A 10 Base-T or 100 Base-TX LAN port is required for connection to this Projector. If your internet
service does not allow for such a connection, you will not be able to connect the Projector.
▪To connect to the wireless router, a router that supports wireless connection is necessary, and the
wireless connection function of the corresponding router must be activated.
▪To connect to a wireless router, verify the SSID and security setting of the wireless router. Please
refer to the user guide of the corresponding router for SSID and security setting of the wireless router.
▪When Ad-hoc is used, it may not be able to connect according to the device (for example : notebook
computer) that is connected.
▪ The connection method may vary according to the manufacturer of the wireless router.
Operation
procedures:
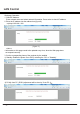
1. Press MENU button of the remote or the projector.
The MENU will display. Use arrow button ▲▼ to select
network icon.
2. Press SELECT or ► to enter network setting .
3. Use arrow button ▲▼ to select network settings and then
press SELECT.
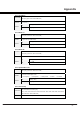
4. Network Setting with DHCP "On"
Set DHCP to On: Assign an IP address to the projector from
an external DHCP server automatically.
(1) Press SELECT, use ▲▼ to choose “DHCP On” and then
press SELECT again.
(2) Select SET by ▲▼ and then Press SELECT.
Then it will display "waiting…"on the screen. Wait until
it disappears.
LAN
DHCP
On
IP
Address
Subnet
Gateway
DNS
Network
Setting
. . .
. . .
. . .
. . .
set cancel