USB Plus (Go to page 8) DVD/CD RECEIVER OWNER’S MANUAL XTS & XTS Pro (Go to page 15) Model : HT302SD, HT302SD-A8 SH32SD-SZ, SH32SD-WZ Virtual Sound (Go to page 15) FM & AM Tuner Function (Go to page 19) USB plus Before connecting, operating or adjusting this product, please read this instruction booklet carefully and completely. P/No.
Dear Customer Thank You for Purchasing the LG DVD Player. After going through the instruction manual , you will be able to enjoy all the features and functions of the Product . CAUTION RISK OF ELECTRIC SHOCK DO NOT OPEN CAUTION : TO REDUCE THE RISK OF ELECTRIC SHOCK DO NOT REMOVECOVER (OR BACK) NO USER-SERVICEABLE PARTS INSIDE REFER SERVICING TO QUALIFIED SERVICE PERSONNEL.
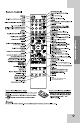
Welcome to your new DVD Receiver Contents Introduction ................................................................................. 5 Maintenance & Service ............................................................... 5 Main Unit ..................................................................................... 6 Remote Control ........................................................................... 7 Hooking up the Unit (Audio & Video) ..........................................
Before Use It is recommended to remove any disc from the player while moving the set CD-G CD-G Discs /CD Receiver " Always keep a disc inside the Receiver to prevent optical lens damage due to dust " 5
Front Panel/Rear Panel Connect a microphone to MIC Port.
EQ EQ You Can Choose 8 Fixed Sound Impressions.
Hooking up the unit Audio In connection Connect jacks on the unit and your TV (DVD player or Digital Device etc.) using the cables. INPUT AUX IN L Check the jacks of your TV, and choose the , or connection. Picture quality improves to . in order from R The unit’s Audio jacks are colour coded (red for right audio and white for left audio). If your TV has only one output for audio (mono), connect it to the left (white) ?white audio jack on the unit.
Antenna Connection Function Selection Connect the supplied FM/AM antenna for listening to the radio. You can select the different functions by pressing the different function keys in the remote as follows: Band (for FM & AM), DVD/CD, AUX, USB) • Connect the AM Loop aerial to the AM aerial connector. • Connect the FM Wire aerial to the FM aerial connector. Notes: • To prevent noise pickup, keep the AM Loop aerial away from the DVD/CD Receiver and other components.
Initial Settings AUDIO 5.1 Speaker Setup DRC Vocal Select On On AUDIO 5.1 Speaker Setup DRC Vocal Select On On AUDIO Speaker Front L Small Size Volume Move Distance Select First Level Prev. o dB o m(ft) off Test Enter Select Second Level Move Return Third Level Initial Settings b 9 to 15. 23 -Refer to the turn ON/OFFsubtitle.
If you are using the Component Video jacks for connection to a TV or monitor that is compatible with a progressive scan signal, set Progressive Scan to On. To Turn ON progressive scan: Connect component out of the DVD/CD Receiver to the input of your monitor / television, set your television or monitor to Component Input. 1. Select “Progressive Scan” on the DISPLAY menu then press . / buttons. 2. Select “On” using the 3. Pressing ENTER will set the player to Progressive scan mode.
Displaying Disc Information on-screen Displaying Disc Information more you can do You can select an item by pressing Symptom No power The power is on, but the DVD/CD Receiver does not work. No Picture There is no sound or only a very low level sound is heard. The Playback picture is poor. The DVD/CD Receiver does not start playback. Loud hum or noise is heard. Radio Stations cannot be tuned in. The Remote control does not work properly The front panel display is too dim.
General features DVD, Divx disc: 6 steps, Video CD: 5 steps, MP3, WMA, Audio CD, 3 steps RETURN ( ) Press to move backwards in the menu or exit the menu. REPEAT A-B During playback, press REPEAT A-B to select a point A and a point B and repeats a sequence from point A(Starting point) to point B (End point). SLOW In the pause mode, press SLOW (7 or 8 ) to select required speed.
a PBC Set Playback Control (PBC) to On or Off. On: Video CDs with PBC are played according to the PBC. Off: Video CDs with PBC are played in the same way as Audio CDs. b b four digit c 23 on page No 10 OTHERS a OTHERS PBC On DivX(R) Registration Select Semi Karoake On Move c 14 b Select c Semi Karoake When a chapter/ title / track is fully finished , this function shows the score in the screen with a fanfare sound. Semi Karaoke on : - Turn the “Semi Karaoke” function on.
EQUALIZER EFFECT You can choose 8 fixed sound impressions and adjust the Bass, MIDDLE and TREBLE. - You can select a desired sound mode by using EQ button on the remote control. When you want to change a sound mode press the EQ button repeatedly with in 3 seconds. Each time you press the button the setting changes in the display window as shown below. NORMAL (NORMAL) à India (INDIA) à USr EQ (User EQ) à POP (POP) à CLASS (CLASSIC) à ROCK (ROCK) à DRAMA (DRAMA) à JAZZ (JAZZ) à NORMAL (NORMAL)...
Press REPEAT key repeatedly, and the current title, chapter or all tracks will be played back repeatedly. To return to normal playback, press REPEAT repeatedly. Selecting a subtitle language During playback, press SUBTITLE ( ) repeatedly to select a desired subtitle language. Slow down the playing speed While playback is paused, press SCAN 1.5 speed playback VCD MP3 You can quickly enjoy a music and movie. The 1.
When playing a mixed disc or USB Flash Drive containing with DivX, MP3/ WMA and JPEG files together, you can select menu of files which you would like to play by pressing Title key.
Using an USB device 1 Connect the USB device to the USB port of the unit. 2. Select the USB function 3 Select a file you want to play USB BAND / DVD / AUX Compatible USB Devices • MP3 Player : Flash type MP3 player. • USB Flash Drive : Devices that support USB2.0 or USB1.1. • The USB function of this unit does not support all USB devices. USB device requirement • Devices which require additional program installation when you have connected it to a computer, are not supported. Look out for the follows.
About the Symbol Display Introduction ‘ ’ may appear on your TV display during operation and indicates that the function explained in this owner’s manual is not available on that specific DVD video disc. Do not attach any seal or label to either side (the labeled side or the recorded side) of a disc. Do not use irregularly shaped CDs (e.g., heart-shapedor octagonal). It may result in malfunctions. Regional Codes This unit has a regional code printed on the rear of the unit.
Power Supply Power consumption External dimensions (W x H x D) Net Weight (Approx.) Operating temperature: Operating humidity Refer to main label Refer to main lable 360 x 63 x 307 mm 2.4 kg 5 °C to 35 °C, Operation status: Horizontal 5 % to 85 % Tuner FM FM Tuning Range FM Intermediate Frequency AM Tuning Range AM Intermediate Frequency 87.5 - 108.0 MHz or 65.0 - 74.0 MHz, 87.5 - 108.0 MHz 10.