ALMATY_CD-371.372.376.377(ENG)-69V CD CASSETTE RECORDER OWNER'S MANUAL MODEL: CD-371A/AX/S CD-372A/AX/S CD-376A/AX/S CD-377A/AX/S Please read this manual carefully before operating your set. Retain it for future reference. Designs and specifications are subject improvement.
Precautions CAUTION Use of controls CAUTION procedures RISK OF ELECTRIC or adjustments or performance of specified herein may other than those result in hazardous radiation exposure. SHOCK DO NOT OPEN Laser is tion component in this product exceeding the limit for Class 1. capable of radia- emitting CAUTION:TO REDUCE THE RISK OF ELECTRIC SHOCK DO NOT REMOVE COVER(OR BACK) NO CAUTION:INVISIBLE LASER RADIATION WHEN OPEN AND INTERLOCKS DEFEATED. AVOID EXPOSURE TO BEAM.
Before Use Precautions Safety shipping the unit The original shipping carton and packing materials come in handy. For maximum protection, re-pack the unit as it was originally packed at the factory. To discs Fingerprints and dust on the disc can cause poor picture quality and sound distortion. Before playing, clean the disc with a clean cloth. Wipe the disc from the unit Handling When Cleaning the center out. keep the surface clean Do not use volatile liquids, such as the unit.
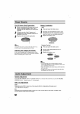
Up Panel/Front Panel 5 6 1 2 7 3 8 4 Front Panel 9 (CD-371A/AX/S, CD-376A/AX/S) 10 Front Panel 12 11 10 (CD-372A/AX/S, CD-377A/AX/S) 1. CD DOOR 2. VOLUME CONTROL 8. / ( ) buttons ? PRESET ? UBB button / ( ) buttons 3. POWER button ? CLOCK button 4. CD FUNCTION buttons ? TIMER button ? SET/MEMORY/PROGRAM button ? MODE/RIF button ? CD PLAY/PAUSE ? CD ( SKIP/SEARCH( ) 9.
Rear Panel/Display Window 1 4 INTRODUC 2 5 3 6 10 7 11 8 12 9 13 1. FM ANTENNA 2. HEADPHONE SOCKET ( ): 3.5mm 8. CD PLAY/PAUSE indicator 9. CD REPEAT PLAY indicator 3. BATTERY COMPARTMENT 10. TIMER ON/OFF indicator 4. AC POWER INPUT SOCKET 11. STEREO indicator 5. VOLTAGE SELECTOR 12. SLEEP indicator 6. CD SYNCHRO RECORDING indicator 7. MEMORY indicator (OPTIONAL) 13. EQUALIZER indicator Remote Control 1. POWER button 5 1 6 2 7 8 3 4 9 2.
Power Source The AC Power Cord Connection 1 2 Battery Before connecting the AC power cord, check that the operating voltage of your unit is identical with the voltage of your local power supplied. Connect one (supplied) Press and open the 1 2 end of the AC power cord to the AC IN socket located at the Plug cover. battery cover. Remote Control Note the AC power cord from the wall outlet if you do not to use for an extended period of time.
Radio You can Operation preset 30 stations for FM and AM. Before tuning, make sure that you have turned down the volume to the minimum. the radio stations Presetting 1 2 Press TUNER/BAND control) (unit) to the radio Listening BAND or (remote to select radio function. a station you want by pressing TUNING (- / +) buttons. Tuning in manually Press TUNING (- / +) briefly and repeatedly. Tuning in automatically Press TUNING (- / +) for more than 1 seconds.
CD Operation Basic Playback Setup Program Play Setup You Press CD button to select CD function. 1 2 Press CD DOOR to open the disc Load 3 a disc with the Close the disc printed facing up and compartment. Press CD PLAY/PAUSE 4 side compartment. ) button ( to begin play. The total track number will be shown in the To Pause display. Play Press CD PLAY/PAUSE ) button ( to pause during playback. When track is a paused, "" Press CD PLAY/PAUSE ( will flash in the display.
the CLOCK Setting 1 Press CLOCK. (If the clock is CLOCK for 2. Select requires setting, press more than 2 seconds.) 24 hour a TIME pressing cycle (-/+). (12HR) 3 or 12 hour and hold cycle by (24HR) or Press SET to confirm the selected hour cycle. 4 5 6. 7 8 Use TIME (-/+) to set the correct hours. Press SET. Use TIME (-/+) to set the correct minutes. Press SET and the correct time is shown the on display. Press CLOCK at any time to for about 3 seconds.
Setting the TIMER ? This function is ? Select your desired radio station 1 automatically turned on and off at the time you want. press CD and load or disc. a Set the minute to switch off Press CLOCK to check the current time. 10 (-/+). For your reference 2 Press TIMER to enter the timer setting mode. display window. display window in turn. the volume level 12 Adjust(-/+). "TIMER ON" appears in the "TUN-Cd" flashes in the Set the hour to switch on Switch the system off. 14 on.
Specifications MODEL SECTION Power SWAM (optinal)(MW [TAPE] Designs panel of the unit. 20W (W x H x D) 500 191 x x 317 mm Output Power Speakers Battery Operation Frequency response Signal-to-noise ratio 4.5WX2 T.H.D 0.7 % Tuning Range Intermediate Frequency 10.7 MHz Antenna Telescopic Tuning Range Intermediate Frequency 522-1611kHzor530-1610kHz 3.2ΩX2 DC 12V, 100 eight "D"(R20) batteries 59 dB 87.
P/NO : 3828R-A069V