CD/RADIO CASSETTE RECORDER Owner's Manual MODEL: CD-964A(AX)/969A(AX) CD-964L/969L(MW/FM/LW) CD-964S/969S(MW/FM/SW) Please read this manual P/NO.: 3828R-A025B carefully before operating your set.
To reduce the risk of fire expose this appliance or electric shock, do not CAUTION Use of controls to rain or moisture. or other than those adjustments or performance specified herein may result of procedures in hazardous radiation exposure. This class B digital apparatus meets all requirements Causing Equipment Regulations.
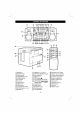
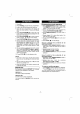
1 2 3456789101112 13 26 14 / 25 24 23 22 21 20 19 18 17 16 15 23435 33 14 4 15 19 32 36 18 31 27 20 12 29 28 30 26 1 Speaker (L) 14 PRESET( 2 POWER button 15 SET/PROG.
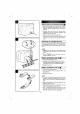
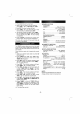
Power Source A The AC power cord connection (see fig. A ) 1. Before connecting the AC power cord, check that the operating voltage of your unit is identical with the voltage of your local power supplied. 2. Connect one end of the AC power cord (supplied) to the AC IN socket located at the backside of your main unit. 3. Plug the other end into the wall outlet. Unplug the AC power cord from the wall outlet if you do not to use for an extended period of time.
Speaker D Speaker Attachment 1. Position the guide ribs 2. on (see fig. D) with the speaker guide slots the main unit. Gently push the speaker downwards until the speaker release lever automatically locks the speaker into place. Speaker 1. Connection Lead Connection (see fig. E ) Plug the right speaker lead into the "R" speaker socket located at the backside of your main unit. 2. Plug the left speaker lead into the Speaker E 1. Unplug Detachment the speaker "L" F (see fig.
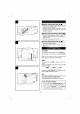
1. Repeatedly press TUNER/BAND to select your desired waveband. 2. Tune to your station using TUNING( Manual: Tap TUNING(- or+) change the station. Automatic: Press 1 one 1. Press TAPE. 2. or+). by one 3. to 4. 5. TUNING(- or+) for about automatically stop second, your radio will on by pressing ST/EJ. )(DeckAorB) Insert a cassette and push close the door. Press PLAY to playback. Press PAUSE( ) to pause. Press PAUSE( ) again to resume play. the cassette door Open / ( 6.
1. Press CD. 2. Press 3. Load a disc with the 4. Close the disc 1. Press The MEMORY indicator will appear in the display. The track number will flash. printed side facing up. compartment. The display will show the total number of tracks and time. 5. Press PLAY/PAUSE( ) to track number and the elapsed be shown in the display. 6. Press PLAY/PAUSE( will track is paused, 7. Press PLAY/PAUSE( 2. Select the first track in your program playing pressing SKIP/SEARCH( 3. Press stored. begin play.
Sleep 1. Function Recording Operation Repeatedly press SLEEP to select a desired minutes. The "SLEEP" will be shown in the NOTE: 1. display. 2. To confirm the remaining sleep time press SLEEP once. The remaining time will be shown in the 2. and metal tapes cannot be used. display. 3. To cancel, repeatedly press SLEEP until the "SLEEP" disappear. Clearing 1. 3. If you press Basic Malfunction 2. Insert a blank cassette into deck A. right side of main unit for 5 seconds by using a pointed tool.
Setting The Clock Specifications 1. Press CLOCK until the time flash. 2. Select a 24 hour cycle or 12 hour using TIME (- or+) "AM 12:00" 3 Press RADIO SECTION Tuning range cycle by or "0:00" 530~1720kHz(USA) FM 4. Press TIME( or+) to select the hour; when the correct hour is selected press SET. 6. Press CLOCK to confirm the current time. Press it again, the time will be disappeared. S/N ratio 65dB(1kHz) GENERAL 8Ωx2 Speaker 7.5Wx2 Output power (T.H.