
Owner's Manual


-4-
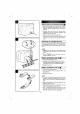
The
AC
power
cord
connection
(see
fig.
)
1.
Before
connecting
the
AC
power
cord,
check
that
the
operating
voltage
of
your
unit
is
identical
with
the
voltage
of
your
local
power
supplied.
2.
Connect
one
end
of
the
AC
power
cord
(supplied)
to
the
AC
IN
socket
located
at
the
backside
of
your
main
unit.
3.
Plug
the
other
end
into
the
wall
outlet.
Unplug
the
AC
power
cord
from
the
wall
outlet
if
you
do
not
to
use
for
an
extended
period
of
time.
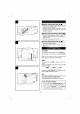
Adjusting
the
voltage(optional)
If
your
set
is
equipped
with
a
voltage
selector
at
the
backside,
be
sure
to
set
it
to
your
local
power
supplied
before
connecting
the
AC
power
cord.
NOTE:
1.
"HELLO"
will
be
shown
in
the
display
when
you
connect
the
AC
power
cord
to
the
wall
outlet.
2.
Press
POWER
to
turn
the
main
unit
on.
(Press
it
again
to
turn
off.)
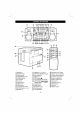
Battery
installation
(see
fig.
)
1.
Press
open
the
battery
cover.
2.
Put
eight
"D"(R20)
batteries
and
four
"AA"
(R06)
batteries
into
the
compartment
making
sure
the
+
and
-
are
correctly
positioned.
3.
Replace
the
cover.
Battery
installation
(see
fig.
)
1.
Slide
open
the
battery
cover.
2.
Put
two
"
AAA"(R03)
batteries
into
the
compartment.
3.
Replace
the
cover.
NOTE:
1.
To
avoid
damage
from
possible
battery
leakage,
remove
the
batteries
if
you
do
not
plan
to
use
the
set
for
an
extended
period
of
time.
2.
When
the
batteries
are
weak,
replace
all
the
batteries
with
new
one.
3.
During
the
AC
power
cord
connect
to
the
wall
outlet,
the
batteries
are
not
worn
out.
4.
The
"AA"(R06)
batteries
operates
on
the
clock
and
retain
the
preset
radio stations
even
when
the
AC
power
cord
is
unplugged.
Power
Source
2
2
1
1
A
A
B
C
B
C