OWNER’S MANUAL HOM-BOT • Charge the battery fully before using the product for the first time. • Before using, carefully read the Safety Precautions to allow for safe operation of the product. • After reading this manual, keep it in an easily accessible location. CR3*65** www.lg.com MFL67680080 Copyright © 2017 LG Electronics Inc. All Rights Reserved.
TABLE OF CONTENTS BEFORE USING MAINTENANCE 3 Features 50 Cleaning the Dust Bin 4 Safety Precautions 51 Cleaning the Dust Bin Filter 9 Included with Product 52 Cleaning the Brush 10 Parts 53 Cleaning the Sensor/Charging Terminal 12 Button Functions 54 Cleaning the Side Brush 14 Display Status 55 15 Before Starting Cleaning the Ultra Microfiber Mop (on some models) 16 Overview ADDITIONAL INFORMATION METHOD OF USE 56 Troubleshooting 59 Before Calling for Service 17 Installin
FEATURES Corner Master The Robot Cleaner's ability to navigate around walls is part of what makes its cleaning performance so efficient. Learning Mode The Robot Cleaner memorizes the cleaning environment for smarter cleaning via its Smart Operation feature. Turbo Mode In the Turbo mode, the Robot Cleaner operates the suction motor and the brushes at a greater speed giving cleaner results. When selected, the Turbo mode activates automatically, cleaning carpets more efficiently.
SAFETY PRECAUTIONS This guide contains many important safety messages. Always read and obey all safety messages. Read all instructions before using. SAVE THESE INSTRUCTIONS Basic Safety Precautions After reading this manual, please keep it in an easily accessible location. This is the safety alert symbol. This symbol alerts you to potential hazards that can result in property damage and/or serious bodily harm or death.
SAFETY PRECAUTIONS WARNING To reduce the risk of explosion, fire, death, electric shock, or injury to persons when using this product, follow basic safety precautions, including the following. 1) Place the cords from other appliances out of the area to be cleaned. 2) Do not operate the vacuum in a room where an infant or child is sleeping. 3) Do not operate the vacuum in an area where there are lit candles or fragile objects on the floor to be cleaned.
SAFETY PRECAUTIONS WARNING To reduce the risk of explosion, fire, death, electric shock, or injury to persons when using this product, follow basic safety precautions, including the following. • Do not allow children or pets to play with or rest upon the Robot Cleaner at any time. Do not use the Robot Cleaner while an object is hanging from it. • Do not leave children or pets near the Robot Cleaner unsupervised.
SAFETY PRECAUTIONS CAUTION To reduce the risk of injury to persons, malfunction, or damage to the product or property when using this product, follow basic precautions, including the following. • Frequently empty the dust bin and keep it clean. The dust collected in the dust bin can trigger allergies and may contain harmful insects. it should be cleaned after each use. • Remove any cables or string from the floor before use.
SAFETY PRECAUTIONS CAUTION • Disconnect the battery pack from the appliance before making any adjustments, changing accessories, or storing the appliance. Such preventive safety measures reduce the risk of starting the appliance accidentally. • When battery pack is not in use, keep it away from other metal objects, like paper clips, coins, keys, nails, screws or other small metal objects, that can make a connection from one terminal to another.
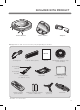
INCLUDED WITH PRODUCT Robot Cleaner Home station Adapter s Appearance and accessories may vary depending on model. Manual Cleaning Tool Dust bin filter* (spare) Manual Virtual Walls magnetic strip (some models) for cleaning sensors for cleaning the filter Cleaning brush (on dust bin cover) Remote controller (some models) *Available on some models.
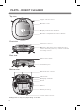
PARTS - ROBOT CLEANER Top view Upper camera sensor Dust bin cover Display and function buttons Dust bin compartment release button Front view Ultrasonic sensors Obstacle detecting sensor window, home station detecting sensors, remote controller receiving sensors. Rear view Main Power switch Ventilation port Bottom view Cliff detection sensors Side brush Charging terminals Brush Wheel Battery housing Lower camera sensor s Appearance may vary depending on model.
PARTS – HOME STATION / DUST BIN Home station Remote holder Charging terminal Adapter jack Power cord keeper Dust bin Dust bin handle Cleaning brush Dust bin cover Suction port flap Sponge filter Dust bin lid opening button Particulate filter Filter cover s Appearance may vary depending on model.
BUTTON FUNCTIONS – ROBOT CLEANER TURBO START/STOP • After the power switch is in the ON position, press the Start/Stop button to start cleaning. • Press to stop cleaning. • Press and hold for two seconds to return to standby mode. • If button is pressed during Smart Diagnosis, the diagnosis will end. MODE • Press to change the mode. The mode icon will illuminate on the display when selected. • The Spot Clean mode is not available if the Robot Cleaner is at the home station.
BUTTON FUNCTIONS – REMOTE Remote not included with all models.
DISPLAY STATUS Mute Lock. Remote connection Appears when a smartphone connects to the robot cleaner. Battery level AM/PM Schedule Shows once or daily icon Turbo Repeat cleaning Homing Zigzag cleaning My Space cleaning Spot cleaning Cell by Cell cleaning Time display Tip 14 •T he Robot Cleaner defaults to the last cleaning mode selected. • To cancel the reservation, please press the Schedule button on the remote for 3 seconds while the Robot Cleaner is recharging.
BEFORE STARTING Before Cleaning • Do not use this device in a room where a child is left alone. The child could be injured. • Remove fragile or unnecessary objects from the room to be cleaned, especially expensive ceramics and valuables which could fall or break. • Close the cover of the dust bin compartment before cleaning. • Remove any moisture that might be on the floor. • Remove cables, strips, towels, mats etc. from the floor so they will not get tangled in the brushes.
OVERVIEW 1 Install the home station. (p17) Insert the power cord plug into an outlet and locate the station against a wall. If power is not supplied to the home station, the Robot Cleaner will not charge. 2 Turn on the power supply of the Robot Cleaner. (p18) 3 Check the dust bin. 4 Select the desired cleaning mode and options. (p24-30) 5 Start cleaning. (p19) 6 Automatic charge. (p20-22) 5 ft.(1.5 m) 5 ft.(1.5 m) 61/2 ft.
INSTALLING THE HOME STATION 1. P osition the home station against a wall on hard, level flooring to prevent sliding during docking. Installing the home station on carpet is not recommended. The robot cleaner may have difficulty docking. Remove objects within 5 ft. (1.5 m) to the right and left side and within 61/2 ft. (2 m) to the front. 5 ft. (1.5 m) 5 ft. (1.5 m) 61/2 ft. (2 m) 2. Plug the jack into the home station. 3. Plug the power cord into an outlet.
TURNING THE ROBOT CLEANER ON/OFF Turning On the Main Power Supply Flip the power switch to the ON position. ※D o not press the Start/Stop button at the same time as flipping the power switch. Doing so may delay the operation. ※ Turn off the power switch when the Robot Cleaner is not used for long periods. The switch must be turned back on for the Robot Cleaner to charge.
HOW TO START AND STOP CLEANING Using the Robot Cleaner's Buttons Once the Robot Cleaner is turned on, press the START/STOP button on the top of the Robot Cleaner to begin cleaning. A melody sounds and cleaning begins. Press the START/STOP button any time during the cleaning cycle to stop cleaning. ※ To start cleaning when the Robot Cleaner is in standby mode, press START/STOP once to turn on the power, then press again to start cleaning.
CHARGING THE BATTERY Automatic Charging The Robot Cleaner returns to the home station at the end of a cleaning cycle or when its battery is running low. ※ If 10 minutes elapse without the Robot Cleaner moving or the battery is too low, the Robot Cleaner automatically goes into standby mode. ※ The power switch has to be in the ON position in order for the Robot Cleaner to charge at the home station. If the switch is OFF, an error message sounds.
CHARGING THE BATTERY Battery Level Indicator The battery level indicator is located on the status display. • The battery level indicator flashes if recharging is in progress, showing the charge level. • If recharging is complete, only the battery and clean mode icons are displayed to save energy. • The first level of the battery level icon flashes when the Robot Cleaner needs to be charged.
CHARGING THE BATTERY Energy Saving Charging Mode You can recharge the battery with the Energy Saving mode, if you don't use the Robot Cleaner for a long period of time or overnight. Step 1. P ress the Power button on the remote. All functions of the Robot Cleaner are turned off except the recharging mode. ※ After recharging is complete, press the Power button on the remote to use the Robot Cleaner.
USING MAGNETIC WALL STRIPS Use a Magnetic Wall strip to block off areas the robot cleaner should not enter. The Magnetic Wall strip is only included with some models. To purchase a strip for use with a model that did not include one, or to purchase additional strips, visit the LG website at www.lg.com. 1. Use a Magnetic Wall strip to block off areas the robot cleaner should not enter. Living room Bathroom Magnetic Wall Magnetic Wall strip 2.
CHOOSING A CLEANING MODE Zigzag Cleaning In Zigzag mode, the Robot Cleaner zigzags through each spot of the cleaning area. Select the Zigzag mode to quickly clean an area. Selecting the Zigzag Mode Press the Mode button continuously, on either the Robot Cleaner or remote, until the Zigzag icon illuminates. ※ The default mode on the Robot Cleaner is the Zigzag mode. Cell by Cell Cleaning Select the Cell by Cell mode for meticulous cleaning.
CHOOSING A CLEANING MODE My Space Cleaning Select the My Space mode to manually set the cleaning space. Selecting the My Space Mode 1. Press the My Space button. 2. Using the arrow buttons on the remote, guide the Robot Cleaner around the perimeter of the desired cleaning space. ※ Cleaning space must be smaller than 31/4 ft. (3 m). My Space 3. Once the area is specified, press the Start button. NOTE: If the cleaning area is not correctly outlined, an error message sounds.
AUXILIARY CLEANING MODES Manual Cleaning Manual mode moves the Robot Cleaner manually to the front, back and either side using the arrow buttons on the remote. While in Manual mode, the Robot Cleaner runs into obstacles placed behind it if the back arrow key on the remote is held down. Spot Cleaning The Spot mode cleans the area where it is placed within a 41/2 ft (1.37 m) diameter. Starting Spot Mode 1. Place the Robot Cleaner in the desired cleaning area. 2.
AUXILIARY CLEANING MODES Turbo Mode Select Turbo Mode for a more intense, powerful clean. Turbo Mode reduces the battery duration. Selecting Turbo Mode Press the Turbo button on the remote or on the Robot Cleaner to activate the Turbo mode. Press the Turbo button at any time during the cleaning operation to cancel the Turbo mode. ※ Turbo Mode (Floor Master Function) Turbo mode activates automatically on carpets.
SETTING THE CLOCK You can set or change the current time on the Robot Cleaner. Pressing the Clock button on the remote when the Robot Cleaner is in standby mode starts the clock setting mode. Flickering Flickering s Select by using s buttons on the remote. The function can be heard through the voice guide. Flickering Set the hour by using uv buttons on the remote. Set the minutes using uv buttons on the remote. Set AM/PM using uv buttons on the remote.
SCHEDULING CLEANING Cleaning can be scheduled so that the Robot Cleaner starts cleaning at a scheduled time. Press the Schedule button on the remote while the Robot Cleaner is recharging to set a scheduled cleaning. Setting/Cancelling a scheduled cleaning is only possible when the unit is recharging on the home station Flickering Select Schedule Once or Schedule Daily option using the uv buttons on the remote. A voice message confirms the schedule. Set the hour using the uv buttons on the remote.
MOP CLEANING (on some models) Remove dust on hard floors by attaching the ultra microfiber mop to the Robot Cleaner. When the mop plate is attached, the Robot Cleaner will not climb on to carpets or over thresholds, in order to prevent transferring dirt from the mop. Caution Do not cover the bottom camera sensor with the mop. Mounting the Mop and Mop Plate 1. A ttach the ultra microfiber mop to the Velcro of the mop plate as shown in the figure. 2.
LOCATION SEARCH FUNCTION The Robot Cleaner remembers its location while cleaning. If the user moves the Robot Cleaner while it is operating, it will search for the location it was moved from by using its navigational location search function before continuing to clean. ※ The navigational function is activated after the Robot Cleaner adequately recognizes the cleaning environment. Change location Manual Relocation 1. With the power off, locate the Robot Cleaner near where it was originally moved from.
SMART DIAGNOSIS™ Robot Cleaner uses the Smart Diagnosis feature to run a self-diagnosis. If any irregularity is found from the diagnosis, contact the local LG Electronics service center. ※ During Smart Diagnosis, the Robot Cleaner moves about within a 13/8 ft. (50 cm) radius. So, make sure no objects are in the way within a 31/4 ft. (1 m) radius around the home station, before starting Smart Diagnosis. 1.
SMART DIAGNOSIS™ Refer to the following table to resolve error messages encountered during Smart Diagnosis. Voice message Solution Robot Cleaner Smart Diagnosis will be started. Please step away and clear around 1 meter around the home station. Clear any object within a 31/4 ft. (1 m)radius around Home Station, and stay back until the diagnosis is complete. Smart Diagnosis can start when it is being charged. Please dock Robot Cleaner to the home station to charge.
SMART APPLICATION FUNCTION You can control the Robot Cleaner from your smartphone. The LG Smart ThinQ application provides the following functions: • Cleaning Diary, Schedule Cleaning, Smart Diagnosis AP with Internet access Robot Cleaner with network access Smartphone (Android) Application Requirements Some models and OS versions may restrict the use, or render the application inoperable from the smartphone. Special characters in the ID of the router may hamper product connection or registration.
SMART APPLICATION FUNCTION Creating an Account You must create an account and register the product to a home network to control the Robot Cleaner from a smartphone. 1. Run the LG Smart ThinQ application. Select "LG Account Login" on the start-up screen. 2. Press Create Account on the sign in screen. Read and agree to the terms and conditions. Fill in the required information and press OK. 3. A confirmation email is sent to the email you entered in step 2.
SMART APPLICATION FUNCTION 1. Registering the Product You will need to register the product in the application to control the Robot Cleaner from your smartphone. Add your Robot Cleaner to the app with the Tag On feature to use the Smart Functions. 1. Sign in to the LG Smart ThinQ application and select Register Product. 2. Select Robot Vacuum from the product list.
SMART APPLICATION FUNCTION 2. Verifying the Product Verify that the product has a Smart ThinQ logo, then select No on the Tag On Screen and select Yes on the Wi-Fi screen. [Product category] Tip [Product category 2] •R egistering the product is required for the initial connection only; you can then connect to the Robot Cleaner without having to repeat this process.
SMART APPLICATION FUNCTION 3. Connecting to the Network (Android) 1. A fter creating an account and using Wi-Fi to recognize the product, connect the product to your home Wi-Fi network. 2. Select your home network from the list and enter your password if necessary. Turn on the robot cleaner and press and hold the Turbo button on the cleaner for 3 seconds to register the product on the network. The Product Users screen now shows your e-mail in the user list. 3.
SMART APPLICATION FUNCTION 2. Connecting to the Network (iOS) 1. Enter your home network name (SSID) and your password. 2. Turn on the Robot Cleaner and place it near your router. Press and hold the Turbo button for 3 seconds until it chimes. 3. Turn on the Wi-Fi connection function in the iPhone settings. 4. Select LG-HOMBOT_REG from the network list and press Check Connection. 5. T he robot cleaner appears on the Dashboard screen once registration is complete.
SMART APPLICATION FUNCTION Application Startup Screen The following screen will open when you connect to the Robot Cleaner for the first time from the LG Smart ThinQ application: Displays the product nickname. The home icon selects the product list page. (Dashboard) Press to check alert history Menu Schedule Cleaning, Cleaning Diary, Smart Diagnosis, Settings. Simple Control Operate the robot cleaner manually from the Simple control screen. Displays the status of Robot Cleaner.
SMART APPLICATION FUNCTION Application Startup Screen Menu Schedule Cleaning, Cleaning Diary, Smart Diagnosis, Settings. Simple Control Operate the robot cleaner manually from the Simple Control screen. The screen also contains buttons to start cleaning or return the vacuum to the home station for charging. Mode Menu Cleaning mode, Repeat mode, Turbo mode.
SMART APPLICATION FUNCTION Simple Control Operate the robot cleaner manually from the Simple Control screen. The screen also contains buttons to start cleaning or to send the robot cleaner back to the charging station. The Start Cleaning button will change to the Cleaning Paused button once cleaning has begun. TheStart Charging button will change to the Stop button during its return to the docking station. Tip •P ressing the Change Gyro [ smartphone.
SMART APPLICATION FUNCTION Scheduling Cleaning Use Schedule Cleaning to set a regular time for the Robot Cleaner to begin cleaning. To set a regular cleaning schedule, open the menu at the top right of the Dashboard and select Schedule Cleaning. Toggle the Schedule Cleaning function on and select a time. Choose either "Once" or "Daily" and press "Save" to complete the setup. Tip •T he Schedule Cleaning menu in the application has the same function as that of the remote control.
SMART APPLICATION FUNCTION Using the Cleaning Diary View the Cleaning Diary to check your cleaning history. The Cleaning Diary records the date, cleaning mode, and start and completion times of each cleaning. Press the Play button to the right of each list item to see an active cleaning map of that cleaning session. [Cleaning Diary] The cleaning map shows an animated map of the Robot Cleaner in cleaning mode; you can control the playback speed or rotate the map.
SMART APPLICATION FUNCTION Using Smart Diagnosis™ The Robot Cleaner can self-diagnose with the Smart Diagnosis function. Click "Start Smart Diagnosis" while the Robot Cleaner is charging. Be sure to resolve any issue identified in the diagnosis by taking the recommended measures. If the symptom persists, contact an LG Electronics Customer Information Center. Tip •S mart Diagnosis in the application provides the same function as that of the remote control.
SMART APPLICATION FUNCTION Setting Menu You can check or change the Robot Cleaner settings. Press "Voice gender" to change the voice of the Robot Cleaner to male or female. Press "Product nickname" to change the current nickname of the Robot Cleaner; a pop-up where you can enter a new nickname opens (up to 10 characters allowed including English, Korean and numeric). You can check the current software version of the Robot Cleaner and the latest version.
SMART APPLICATION FUNCTION Updating Software The network-enabled model of the Robot Cleaner can update the software automatically via the application. 1. M ake sure that the LG Smart ThinQ application is up to date on the Play Store.(Unless you update the app to the latest version, software update will not be available.) 2. If a new version is available upon connecting to the Robot Cleaner, an update will start. Tip •S oftware update can only be done while the Robot Cleaner is charging.
SMART APPLICATION FUNCTION Operating Modes The Robot Cleaner has 3 operating modes. Select a mode to change how the Robot Cleaner operates. Home mode : starts searching for home station Away mode : starts cleaning Sleep mode : starts searching for the home station [Mode] [Away mode] [Edit mode] ※ If more than one Robot Cleaner is registered, only one of them can use the mode function.
PRODUCT INFO INITIALIZATION Initializing Product Info Initialize the product if you are planning to sell it or need to reset the product to factory default settings. 1. T urn the power on and press and hold the Turbo and Home buttons for 3 seconds until you hear a chime. 2. P ress Start/Stop to initialize the product. The power will be turned off. 3. Press Start/Stop again to turn the Robot Cleaner back on. ※ Any dispute between seller and buyer is an issue between the two parties.
CLEANING THE DUST BIN If the dust bin is full, suction power may be reduced. Clean the dust bin before or after each cleaning session. Clean the dust bin using the following sequence: 1. O pen the dust bin compartment cover by pressing the PUSH button on the Robot Cleaner. 2. G rab the handle of the dust bin and pull it upward. 3. P ull the hook on the left of the filter cover on the rear of the dust bin to separate the filter and the sponge.
CLEANING THE DUST BIN FILTER The Dust Bin Filter consists of a particulate filter and a sponge filter. Clean both the particulate filter and sponge filters using the following sequence. 1. P ull the hook on the left of the particulate filter module on the rear side of the dust bin to separate the particulate filter and the sponge filter. 2. T horoughly clean out the fine dust particles on the particulate filter with a vacuum cleaner or cleaning brush. ※D o NOT wash the particulate filter with water.
CLEANING THE BRUSH The rotating brush, located on the bottom of the Robot Cleaner, helps collect dust. Clean the brush using the following sequence. ※ Before turning over the main unit, lay a soft cloth on the floor and remove the Dust Bin. Otherwise, the main unit can get scratched and dust will fall from the Dust Bin. 52 Turn the main power switch OFF before starting to clean. Remove the dust bin and put the Robot Cleaner upside down on a soft cloth.
CLEANING THE SENSORS/CHARGING TERMINALS There are sensors on the Robot Cleaner that detect obstacles, stairways and the home station for charging the battery. In order to maintain the performance of the Robot Cleaner, regularly clean the sensors and charging terminals as follows: 1. Turn off the power switch on the rear side of the Robot Cleaner. If the Robot Cleaner activates unexpectedly, it may cause injury. 2.
CLEANING THE SIDE BRUSH Foreign objects/materials such as hair can easily adhere to the side brush. Remove such materials at least once a week. If excessive amounts of foreign materials are stuck to the brush, there is the risk of damage to the brushes. If the floor is rough or frequently cleaned, the side brushes may bend or become deformed. In this case, use the following method to straighten the side brush. 1. T urn the main power switch at the rear of the unit to Off (O). 1 2.
CLEANING THE ULTRA MICROFIBER MOP (on some models) To avoid odors, dirt and dust should be washed off the mop after it is used for cleaning. Follow these directions to wash the ultra microfiber mop: 1. Separate the ultra microfiber mop from the mop plate. 210 mm 2. Carefully clean it with warm water. 3. Use the mop after completely drying it in direct sunlight. ※ I f the mop is used in a damp or wet state, it will cause the Robot Cleaner to malfunction.
TROUBLESHOOTING "The wheels are not touching the floor. Please move Robot Cleaner onto flat floor." A warning message will be given if a wheel does not contact the floor surface for any reason. • Is a wheel trapped in the front door, balcony, stairway, etc? s Move the Robot Cleaner on to a flat floor. "Please remove foreign material on the left/right wheel." • Is any foreign material wound around the wheel? sT urn off the main power switch on the rear side of the Robot Cleaner.
TROUBLESHOOTING "Please check if the dust bin is installed with the filter." A warning message will be given if there is no dust bin or filter housing fitted. • Is the dust bin fitted to the Robot Cleaner? sO pen the dust bin compartment cover and check to ensure the dust bin is in place. sD o NOT leave the dust bin cover open. • Make sure the filter housing is assembled onto the dust bin. "Battery is low. Please move Robot Cleaner onto the home station to charge.
TROUBLESHOOTING "Please remove foreign material from the brushes on the bottom." A warning message will be given if foreign materials restrict the brush's rotation. Turn off the main power switch on the rear of the Robot Cleaner. Remove the dust bin, lay a soft cloth on the floor and put the Robot Cleaner upside down on it. ※ Before turning over the main unit, remove the Dust Bin. Otherwise, it will cause dust to fall from the Dust Bin.
BEFORE CALLING FOR SERVICE Check the following before you call for service. Problem Solutions (Reference page) The power supply cannot be turned on. Check that the power switch is turned on. The power supply automatically turns off. This is not a failure. Robot Cleaner has its own power saving function. If it is not used for ten minutes after the power supply is turned on, the power will automatically turn off. The Robot Cleaner will not charge. ƬƬ Check whether the main power switch is turned on.
PRODUCT SPECIFICATIONS Item/Model External Dimensions Weight Power Consumption Battery (Fully Charging) ※T his equipment is a Class B digital device that complies with 47 CFR Parts 2 and 15 of the FCC Rules. Operation is subject to the following two conditions: (1) This device may not cause harmful interference, and (2) this device must accept any interference received, including interference that may cause undesired operation. LG Robot Cleaner CR3*65** 13.4 inch x 13.4 inch x 3.
PRODUCT SPECIFICATIONS Item/Model Home Station (VR650) EPS : ADS-30FSA-17 17030EPCU External Dimensions 9.3 inch x 7.1 inch x 5.0 inch (236 mm x 181 mm x 128 mm) 3.7 inch x 1.7 inch x 1.2 inch (95 mm x 43 mm x 30.7 mm) Rating 17.1 VDC AC 100–240 V~ 50/60 Hz Output Voltage / Current 17.1 VDC / 1.7 A DC 17.1 V / 1.7 A Power Consumption 1.7 A 0.8 A Item/Model Battery(EAC62218205) Type Lithium Battery Rating DC 14.
REFERENCE ITEMS Open Source Software Notice To obtain the source code under GPL, LGPL, MPL and other open source licenses, that is contained in this product, visit http://opensource.lge.com. In addition to the source code, all referred license terms, warranty disclaimers and copyright notices are available for download. Removing / Refitting the Battery Pack 1 2 Turn off the main power switch on the back-left side of the Robot Cleaner.
PERFORMANCE TESTING (IEC 62929 Standard) Dust Removal Test - Box (Hard Floor & Carpet) 1. Put fully charged Robot Cleaner down on start point and turn on. 2. Push TURBO button on the Robot Cleaner or Turbo button on the remote and Robot Cleaner will be set to Turbo Mode. 3. Push the Repeat button on the remote and Robot Cleaner will be set to Repeat Mode. 4. Push the START/STOP button on the Robot Cleaner or button on the remote and Robot Cleaner will operate.
LG Robot Cleaner WARRANTY LG Electronics Inc. will repair or replace your product, at LG’s option, if it proves to be defective in material or workmanship under personal household use, during the warranty period set forth below, effective from the date of original consumer purchase of the product. This limited warranty is good only to the original purchaser of the product and effective only when used in U.S.A. and Canada. * Manufacturing Locations : LG Elecronics.
MEMO 65
MEMO 66
MEMO 67
Made in Korea