OWNER'S MANUAL DISHWASHER Please read this manual carefully before operating your dishwasher. Retain it for future reference. D1417W(L,M,T,B,C,D)F(B,U) D1418W(L,M,T,B,C,D)F(B,U) D1419W(L,M,T,B,C,D)F(B,U) D1417W(L,M,T,B,C,D)FB D1419W(L,M,T,B,C,D)FB P/No.
C ONTENTS SAFETY AND CAUTION 3 INSTALLATION INSTRUCTIONS 5 PARTS NAME 9 FUNCTION OF CONTROL BUTTON 10 BEFORE USING FOR THE FIRST TIME 13 HOW TO USE AND OPERATE 15 OPERATING SEQUENCE 22 PROGRAM 23 USER MAINTENANCE INSTRUCTIONS 24 TROUBLE SHOOTING GUIDE 25 SPECIFICATION 28
S AFETY AND CAUTION IMPORTANT SAFETY INSTRUCTIONS WARNING - When using your dishwasher, follow basic precautions, including the following: During use • Please read this manual carefully before using the dishwasher for the first time. • This manual contains very important notes regarding the installation, use and maintenance of your dishwasher. • The manufacturer can not be responsible for problems caused by ignoring these safety and caution instructions.
S AFETY AND CAUTION CAUTION concerning the Power Cord Most appliances recommend they be placed upon a dedicated circuit; that is, a single outlet circuit which powers only that appliance and has no additional outlets or branch circuits. Check the specification page of this owner's manual to be certain. Do not overload wall outlets. Overloaded wall outlets, loose or damaged wall outlets, extension cords, frayed power cords, or damaged or cracked wire insulation are dangerous.
I NSTALLATION INSTRUCTIONS WARNING A qualified electrician/plumber or competent person should carry out any electrical/plumbing work required to install this appliance. Step 1 : PREPARE CUPBOARD OPENING Step 2 : PREPARATION FOR ELECTICAL WIRING CAUTION 1 This dishwasher is designed to fit the size shown as below. For personal safety, remove house fuse or open circuit breaker before installation. Do not use an extension cord or adapter plug with this appliance.
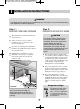
I NSTALLATION INSTRUCTIONS Step 3 : PREPARING THE DISHWASHER FOR INSTALLATION Step 4 : INSTALLING THE DISHWASHER IN CUPBOARD 1 Lay the dishwasher on its back. 1 Before sliding the dishwasher into the cupboard opening, all necessary height and balancing adjustments should be made using a spanner. 2 Adjust the legs to the required height as shown in below figure. 2 Slide the dishwasher into the cabinet opening carefully. Make sure that the drain hose inside the cabinet is not kinked or stretched.
I NSTALLATION INSTRUCTIONS Step 5 : DRAIN LINE CONNECTION When the drain hose is connected to a separate standpipe, it is essential that an airtight connection be made. Refer to Fig.B 1 If the end of drain hose does not fit to the drain line, use a rubber connector(not supplied) that is resistant to heat and detergent. 2 This should be available from a plumbing shop or DIY merchants. 3 There are two typical connections as shown in Figure A, B.
I NSTALLATION INSTRUCTIONS Step 6 : WATER SUPPLY CONNECTION Step 8 : HOW TO LEVEL THE DISHWASHER 1 Connect the water supply hose to the water tap as shown.(Some models consist of an inlet valve and hose.) This dishwasher may be fed with either hot or cold water. If the water can not be maintained below 65ºC, the dishwasher must be connected to cold water. After installing the dishwasher, you may notice a slight sticking of the door to the dishwasher, when you open or close the door.
P ARTS NAME 1. Control Panel 2. Door Handle 3. Front Cover 4. Lower Cover 5. Display Window 6. Power Button 7. Drain Hose 8. Inlet Hose 9. Power Cord 10. Adjustable Leg 11. Upper Rack 12. Cutlery Basket 13. Detergent And Rinse Aid Dispenser 14. Vapor Vent Cover 15. Upper Spray Arm 16. Lower Spray Arm 17. Filter ASM 18. Lower Rack 19. Salt Container Cap Funnel The appearance and specifications may vary without notice.
F UNCTION OF CONTROL BUTTON MODEL : D1418W(L,M,T,B,C,D)F(B,U) D1419W(L,M,T,B,C,D)F(B,U) D1419W(L,M,T,B,C,D)FB MODEL : D1417W(L,M,T,B,C,D)F(B,U) D1417W(L,M,T,B,C,D)FB 10
F UNCTION OF CONTROL BUTTON Process Indicator • Indicates current program phase. • The Wash, Rinse and Dry lamps twinkle while each phase of washing process. • The Clean lamp turns on after all procedure is ended for 4minutes. Salt & Rinse Refill Indicator • Salt : Refill with special salt when the lamp turns on. • Rinse : Refill with rinse aid when the lamp turns on. Half Load • In case of small load, use upper or lower rack only to save energy. • With each press, can select Upper or Lower rack only.
B EFORE USING FOR THE FIRST TIME Hardness setting You have to check your water hardness and set the softening system level before operating your dishwasher. < Water hardness level > Step 1. Check and find water hardness level Method 1 1) Check the water hardness of your area. (Your water utility company can help you with this.) 2) Set the softening system level of your dishwasher according to the water hardness level. Refer to the Step 2.
B EFORE USING FOR THE FIRST TIME Step 3. Salt Filling This model has a water softener to soften hard water. Please read these notes carefully for correct operation. In order to provide satisfactory rinsing results, the dishwasher requires soft water, i.e., containing little or no lime, otherwise water stains will be left behind on the dishes and interior containers. If the tap water exceeds a certain level of hardness, it must be softened, I.e.,decalcified.
H OW TO USE AND OPERATE 2. Loading the Lower Rack 1. Loading your Dishwasher The lower basket is best loaded with dinner plates, soup bowls, dishes, pots, pans, lids and even the grill tray. Plates should be positioned upright and facing the centre of the rack and pots, pans and large dishes must be turned upside down. How to use For better washing performance, always load the dishwasher according to the instructions.
H OW TO USE AND OPERATE 3. Using the Cutlery Basket Loading examples (Energy test) Cutlery should be mixed within each section of the cutlery basket to prevent nesting of similar items. Place the cutlery in the cover with the handles down. The cover can be hinged and clipped away from the basket if you choose not to use them. Place knives in the separate rack for located in the top of the dishwasher. Take care when loading and unloading sharp items.
H OW TO USE AND OPERATE 4. Loading the Upper Rack Loading examples (Energy test) It is best to load this with more delicate items such as, small plates, long cutlery, cups, glasses and dishwasher safe plastic items. Plates should be positioned upwards with the plate bottom facing the front of the rack. Cups, glasses and bowls must be positioned upside down. Extra cups or cooking utensils can be laid on the fold down cup racks, which also provides support for long stem glasses.
H OW TO USE AND OPERATE 5. Adjusting the Upper Rack D1419W(L,M,T,B,C,D)F(B,U) D1419W(L,M,T,B,C,D)FB D1417W(L,M,T,B,C,D)F(B,U) D1418W(L,M,T,B,C,D)F(B,U) D1417W(L,M,T,B,C,D)FB Your upper rack can be raised or lowered to cater for different sized crockery. Before adjusting, ensure that the rack is empty. You can change the position of the upper rack by lifting the rack upward, into the upper position, or by pulling on the two levers on either side of the rack to move it down to its lower position.
H OW TO USE AND OPERATE 6. Adding Detergent Push latch to open • Detergent must be put into the detergent chamber before starting every program. • Please follow the manufacturer’s instructions within the manual, when determining the correct amount of detergent to use. • If your dishes are moderately dirty, you may use slightly less detergent than recommended. • Chambers hold 15g and 25g. • The amount of detergent required depends on the program. Please refer to the guide table.
H OW TO USE AND OPERATE 7. Refilling For refilling Rinse Aid For refilling Salt Depending on the dosage setting and the number of washes, the chamber may need to be topped up, approximately once a month. The rinse aid level can be checked by two methods. • By the indicator window on the dispenser when the dishwasher door is fully open.
H OW TO USE AND OPERATE 8. Drying To assist drying, we recommend that the door be fully opened after the cycle. 9. Energy Test(EN50242) Appliance loaded in accordance with standard specifications. • Example of loaded dishwasher : p.15~17 • Capacity : 14 place settings • Comparability course : Eco • Rinse Aid setting : 4 • Reference cleaner : 8g of detergent onto the inside surface of the door and fill 27g into the detergent dispenser.
O PERATING SEQUENCE The corresponding indicator lights will illuminate if refilling is required. The time in the display window will start to decrease minute by minute. If the door is opened during the program a safety device ensures that the machine stops. Once the door is re-closed the program will start from where it was interrupted. Open the door and check the filters At the end of the washing program Ensure they are clean and properly positioned (See “User Maintenance Instructions”).
P ROGRAM Running time may vary according to the water temperature, water pressure and voltage. Running time doesn’t include “Cool Dry - 30min”. Program Dual Intensity Auto WASH Pre Wash Main Wash 40 RINSE Rinse 1 Rinse 2 Rinse 3 60 Heating Rinse DRY COOL DRY 70 The program sequence is optimized and adapted in accordance with how dirty the dishes are.
U SER MAINTENANCE INSTRUCTIONS To prevent trouble and poor operating, it is important to check filters and spray arms at regular intervals. Filters Lower Spray Arm • Remove the lower rack first. • Turn the mesh filter counterclockwise. • Take out the mesh filter, upper STS filter and outer filter. • Clean them if necessary. • Replace them in the reverse order. • Check that the water jet holes are not blocked. • If cleaning is required, remove the arm by pulling up.
T ROUBLE SHOOTING GUIDE If a problem occurs check below to see whether this can be solved. In the unlikely event that the problem cannot be rectified, please contact a service engineer. Problem Possible Causes Solution No lights come on when the power is turned on. • Plug is not properly inserted into the socket. • Fuses blown or circuit breaker tripped. • The electricity of the house was cut off. • Check the plug. • Check the electricity. • Call for service. The machine does not start.
T ROUBLE SHOOTING GUIDE Problem Possible Causes Solution The display shows "OE" code. (Water is not pumped away.) • The drain hose is kinked. • The filter is clogged. • Motor trouble. (Washing motor or Drain motor) • Straighten hose(s). • Clean the filter. • If you can not solve the problem, call for service. The display shows "IE" code. • Water is not supplied. • Water tap is not opened. • Water sensor has a trouble. • Check the water tap. • If you can not solve the problem, call for service.
T ROUBLE SHOOTING GUIDE ■ These are not error codes indicating a malfunction. Code Description The display shows “PF” code This indicates there was a power failure. This function protects the dishwasher in the event the power goes out or the power to the unit is disrupted. When power is returned, and a button is pushed, this will display for 10 seconds and then go away. The display shows “Cd” code "Cd" means Cool-Dry.
S PECIFICATION D1417W(L,M,T,B,C,D)FB D1419W(L,M,T,B,C,D)FB D1417W(L,M,T,B,C,D)F D1418W(L,M,T,B,C,D)F D1419W(L,M,T,B,C,D)F D1417W(L,M,T,B,C,D)B D1418W(L,M,T,B,C,D)B D1419W(L,M,T,B,C,D)B 600mm 598mm 600mm 567mm 850mm 819mm D1417W(L,M,T,B,C,D)U D1418W(L,M,T,B,C,D)U D1419W(L,M,T,B,C,D)U 598mm 567mm 819mm Capacity 14 Place settings Weight See rating label Power Supply See rating label Power Consumption See rating label Water Feed Pressure 50 ~ 800 kPa 28
M EMO Serial Number How to read Serial Number. : There is attached a Serial Number label on the right side of the inner surface of door. Example) 909KW 00001 SERIAL No. PRODUCT CODE. MANUFACTURED MONTH. MANUFACTURED YEAR(LAST DIGITAL). Critical Parts List : When you need to change frequency of dishwasher (60Hz You must change following parts list.
You may also find user manual in video version at following link www.guidelg.
ﺩﻟﻴﻞ ﺍﳌﺎﻟﻚ ﻏﺴﺎﻟﺔ ﺍﻟﺼﺤﻮﻥ ﻳﺮﺟﻰ ﻗﺮﺍﺀﺓ ﻫﺬﺍ ﺍﻟﺪﻟﻴﻞ ﺑﻌﻨﺎﻳﺔ ﻗﺒﻞ ﺗﺸﻐﻴﻞ ﻏﺴﺎﻟﺔ ﺍﻟﺼﺤﻮﻥ. ﺍﺣﺘﻔﻆ ﺑﻪ ﻛﻤﺮﺟﻊ ﻓﻲ ﺍﳌﺴﺘﻘﺒﻞ. D1417W(L,M,T,B,C,D) F(B,U)U D1418W(L,M,T,B,C,D) F(B,U)U D1419W(L,M,T,B,C,D) F(B,U)U D1417W(L,M,T,B,C,D) FB D1419W(L,M,T,B,C,D) FB P/No.
ﺍﶈﺘﻮﻳﺎﺕ ﺍﻟﺴﻼﻣﺔ ﻭﺍﳊﺬﺭ ٣ ﺗﻌﻠﻴﻤﺎﺕ ﺍﻟﺘﺮﻛﻴﺐ ٥ ﺃﺳﻤﺎﺀ ﺍﻷﺟﺰﺍﺀ ٩ ﻭﻇﺎﺋﻒ ﺃﺯﺭﺍﺭ ﺍﻟﺘﺤﻜﻢ ١٠ ﻗﺒﻞ ﺍﻻﺳﺘﺨﺪﺍﻡ ﻷﻭﻝ ﻣ ﹼﺮﺓ ١٣ ﻛﻴﻔﻴﺔ ﺍﻻﺳﺘﺨﺪﺍﻡ ﻭﺍﻟﺘﺸﻐﻴﻞ ١٥ ﺗﺴﻠﺴﻞ ﺍﻟﺘﺸﻐﻴﻞ ٢٢ ﺍﻟﺒﺮﻧﺎﻣﺞ ٢٣ ﺗﻌﻠﻴﻤﺎﺕ ﺍﻟﺼﻴﺎﻧﺔ ﻟﻠﻤﺴﺘﺨﺪﻡ ٢٤ ﺩﻟﻴﻞ ﲢﺪﻳﺪ ﺍﳌﺸﺎﻛﻞ ﻭﺣﻠﻬﺎ ٢٥ ﺍﳌﻮﺍﺻﻔﺎﺕ ٢٨ ٢ 5/18/10 10:17:18 AM MFL62077162(Arab)_100518.
ﺍﻟﺴﻼﻣﺔ ﻭﺍﳊﺬﺭ ﻫﺎﻣﺔ ﻣﻦ ﺃﺟﻞ ﺍﻟﺴﻼﻣﺔ ﺗﻌﻠﻴﻤﺎﺕ ﹼ ﲢﺬﻳﺮ - • • • • • • • • • • • • • ﻳﺮﺟﻰ ﺍﺗﺒﺎﻉ ﺇﺟﺮﺍﺀﺍﺕ ﺍﻟﺴﻼﻣﺔ ﺍﻷﺳﺎﺳﻴﺔ ﻗﺒﻞ ﺗﺸﻐﻴﻞ ﻏﺴﺎﻟﺔ ﺍﻟﺼﺤﻮﻥ ﻷﻭﻝ ﻣ ﹼﺮﺓ .ﲟﺎ ﻓﻲ ﺫﻟﻚ ﺍﻟﺘﻌﻠﻴﻤﺎﺕ ﺍﻟﺘﺎﻟﻴﺔ: ﻳﹸﺮﺟﻰ ﻗﺮﺍﺀﺓ ﻫﺬﺍ ﺍﻟﺪﻟﻴﻞ ﺑﻌﻨﺎﻳﺔ ﻗﺒﻞ ﺍﺳﺘﺨﺪﺍﻡ ﻏﺴﺎﻟﺔ ﺍﻟﺼﺤﻮﻥ ﻷﻭﻝ ﻣ ﹼﺮﺓ. ﻣﻬﻤﺔ ﺣﻮﻝ ﻛﻴﻔﻴﺔ ﻳﺤﺘﻮﻱ ﻫﺬﺍ ﺍﻟﺪﻟﻴﻞ ﻋﻠﻰ ﺗﻌﻠﻴﻤﺎﺕ ﹼ ﻏﺴﺎﻟﺔ ﺍﻟﺼﺤﻮﻥ ﻭﺗﺮﻛﻴﺒﻬﺎ ﻭﺻﻴﺎﻧﺘﻬﺎ. ﺗﺮﻛﻴﺐ ﹼ ﻳﺘﺤﻤﻞ ﺍﳌﺼﻨﻊ ﺃﻱ ﻣﺴﺆﻭﻟﻴﺔ ﻋﻦ ﺃﻱ ﻣﺸﺎﻛﻞ ﺗﻨﺘﺞ ﻻ ﹼ ﻋﻦ ﺇﻫﻤﺎﻝ ﺗﻌﻠﻴﻤﺎﺕ ﺍﻟﺴﻼﻣﺔ ﻭﺍﳊﺬﺭ ﻫﺬﻩ.
ﺍﻟﺴﻼﻣﺔ ﻭﺍﳊﺬﺭ ﲢﺬﻳﺮ ﻳﺘﻌ ﹼﻠﻖ ﺑﺴﻠﻚ ﺍﻟﺘﻴﺎﺭ ﺍﻟﻜﻬﺮﺑﺎﺋﻲ ﲢﺬﻳﺮ ﲢﺪﺩ ﺍﻟﺘﻌﻠﻴﻤﺎﺕ ﻣﻀﻤﻮﻥ ﻣﺎ ﻳﻠﻲ ﻳﺠﺐ ﻭﺿﻊ ﺍﻷﺟﻬﺰﺓ ﺍﳌﻨﺰﻟﻴﺔ ﻋﻠﻰ ﻋﻠﻰ ﺩﺍﺭﺓ ﻛﻬﺮﺑﺎﺋﻴﺔ ﻣﺨﺼﺼﺔ ﻟﻬﺎ ،ﺃﻱ ﺩﺍﺭﺓ ﻛﻬﺮﺑﺎﺋﻴﺔ ﺫﺍﺕ ﻣﻨﻔﺬ ﻭﺍﺣﺪ ﻓﻘﻂ ﲤﺪ ﺟﻬﺎﺯﺍ ﹰ ﻭﺍﺣﺪﺍ ﹰ ﻓﻘﻂ ،ﺩﻭﻥ ﻭﺟﻮﺩ ﺃﻱ ﻣﻨﺎﻓﺬ ﺃﻭ ﺩﺍﺭﺍﺕ ﻓﺮﻋﻴﺔ .ﻳﺮﺟﻰ ﻣﺮﺍﺟﻌﺔ ﺻﻔﺤﺔ ﺍﳌﻮﺍﺻﻔﺎﺕ ﻓﻲ ﺩﻟﻴﻞ ﺍﳌﺎﻟﻚ ﻟﻠﺘﺄﻛﺪ ﻣﻦ ﻫﺬﺍ ﺍﻷﻣﺮ. ﻻ ﺗﻘﻢ ﺑﺰﻳﺎﺩﺓ ﺣﻤﻞ ﻣﺂﺧﺬ ﺍﻟﺘﻴﺎﺭ ﺍﻟﻜﻬﺮﺑﺎﺋﻲ .
ﺗﻌﻠﻴﻤﺎﺕ ﺍﻟﺘﺮﻛﻴﺐ ﲢﺬﻳﺮ ﻳﺠﺐ ﺇﺟﺮﺀ ﻋﻤﻠﻴﺎﺕ ﺗﻮﺻﻴﻞ ﺍﻷﻧﺎﺑﻴﺐ ﻭﺍﻟﺘﻮﺻﻴﻼﺕ ﺍﻟﻜﻬﺮﺑﺎﺋﻴﺔ ﻣﻦ ﻗﺒﻞ ﺷﺨﺺ ﻣﺨﺘﺺ )ﻛﻬﺮﺑﺎﺋﻲ ﻭﻓﻨﻲ ﺃﻧﺎﺑﻴﺐ(. ﺍﳋﻄﻮﺓ :٢ ﺍﳋﻄﻮﺓ :١ ﲢﻀﻴﺮ ﻣﻜﺎﻥ ﻣﻨﺎﺳﺐ ﺑﲔ ﺍﳋﺰﻥ ﺍﻻﺟﺮﺍﺀﺍﺕ ﺍﻟﻼﺯﻣﺔ ﻹﺟﺮﺍﺀ ﺍﻟﺘﻤﺪﻳﺪﺍﺕ ﺍﻟﻜﻬﺮﺑﺎﺋﻴﺔ ﻏﺴﺎﻟﺔ ﺍﻟﺼﺤﻮﻥ ﻫﺬﻩ ﻣﺼﻤﻤﺔ ﻟﺘﺘﺴﻊ ﻓﻲ ﺍﳌﻜﺎﻥ ﺍﳌﺒﲔ ﻓﻲ ﺍﻟﺼﻮﺭﺓ ﺃﺩﻧﺎﻩ. ﺗﻨﺒﻴﻪ ﻳﺠﺐ ﻓﺼﻞ ﺍﻟﺪﺍﺭﺓ ﺍﻟﻜﻬﺮﺑﺎﺋﻴﺔ ﺍﳌﻨﺰﻟﻴﺔ ﺍﻟﺘﻲ ﺳﻴﺘﻢ ﻭﺻﻞ ﺍﳉﻬﺎﺯ ﻋﻠﻴﻬﺎ ﻭﺫﻟﻚ ﻛﺈﺟﺮﺍﺀ ﺍﺣﺘﺮﺍﺯﻱ ﻟﻠﺴﻼﻣﺔ. ﻻ ﺗﺴﺘﺨﺪﻡ ﺳﻠﻚ ﺗﻮﺻﻴﻞ ﺇﺿﺎﻓﻲ ﺃﻭ ﻗﺎﺑﺲ ﻣﺤﻮﻝ ﺇﺿﺎﻓﻲ ،ﻛﻤﺎ ﻳﺠﺐ ﻣﻄﺎﺑﻘﺔ ﺍﻟﺘﻮﺻﻴﻼﺕ ﺍﻟﻜﻬﺮﺑﺎﺋﻴﺔ ﻣﻊ ﺍﻟﺸﺒﻜﺔ ﺍﶈﻠﻴﺔ ﺃﻭ ﺍﻟﻮﻃﻨﻴﺔ.
ﺗﻌﻠﻴﻤﺎﺕ ﺍﻟﺘﺮﻛﻴﺐ ﺍﳋﻄﻮﺓ : ٤ ﺍﳋﻄﻮﺓ : ٣ ﺗﺮﻛﻴﺐ ﻏﺴﺎﻟﺔ ﺍﻟﺼﺤﻮﻥ ﺑﲔ ﺍﳋﺰﻥ ﲢﻀﻴﺮ ﻏﺴﺎﻟﺔ ﺍﻟﺼﺤﻮﻥ ﻟﻠﺘﺮﻛﻴﺐ ﺿﻊ ﻏﺴﺎﻟﺔ ﺍﻟﺼﺤﻮﻥ ﻋﻠﻰ ﻇﻬﺮﻫﺎ. ﻳﺠﺐ ﺿﺒﻂ ﺍﳌﺴﺎﺣﺔ ﻭﺍﻻﺭﺗﻔﺎﻉ ﺍﳋﺎﺹ ﺑﻐﺴﺎﻟﺔ ﺍﻟﺼﺤﻮﻥ ﺑﺎﺳﺘﺨﺪﺍﻡ ﻣﻔﺘﺎﺡ ﺍﻟﺼﻤﻮﻟﺔ. ﺃﺩﺧﻞ ﻏﺴﺎﻟﺔ ﺍﻟﺼﺤﻮﻥ ﻓﻲ ﻣﻜﺎﻧﻬﺎ ﺑﻌﻨﺎﻳﺔ ﻭﺗﺄﻛﺪ ﻣﻦ ﺃﻥ ﺧﺮﻃﻮﻡ ﺍﻟﺘﺠﻔﻴﻒ ﻏﻴﺮ ﻣﻠﻮﻱ ﺃﻭ ﳑﺪﻭﺩﺓ. ﺍﺿﺒﻂ ﺃﺭﺟﻞ ﺍﻟﺼﺤﻮﻥ ﻟﺘﻨﺎﺳﺐ ﺍﻻﺭﺗﻔﺎﻉ ﺍﳌﻄﻠﻮﺏ. ﺍﺿﺒﻂ ﺍﻟﺒﺮﻏﻰ ﺗﻨﺒﻴﻪ ﺇﺫﺍ ﻛﺎﻥ ﺍﺭﺗﻔﺎﻉ ﺍﳋﺰﺍﻥ ﺃﻗﻞ ﻣﻦ ٠٥٨ﻣﻠﻢ ،ﻻ ﺑﺪ ﻣﻦ ﻧﺰﻉ ﺍﻟﻠﻮﺣﺔ ﺍﻟﻌﻠﻴﺎ ﺑﺮﺧﻮ ﺑﺮﻏﻴﲔ) .
ﺗﻌﻠﻴﻤﺎﺕ ﺍﻟﺘﺮﻛﻴﺐ ﺍﳋﻄﻮﺓ : ٥ ﻋﻨﺪ ﺗﻮﺻﻴﻞ ﺧﺮﻃﻮﻡ ﺍﻟﺘﺼﺮﻳﻒ ﺍﻟﻰ ﺃﻧﺒﻮﺏ ﻗﺎﺋﻢ ﻣﺴﺘﻘﻞ ،ﻓﻤﻦ ﺍﳌﻬﻢ ﺟﺪﺍ ﺇﺟﺮﺍﺀ ﺍﻟﺘﻮﺻﻴﻞ ﺍﻟﺴﺪﻭﺩ ﻟﻠﻬﻮﺍﺀ. ﺭﺍﺟﻊ ﺍﻟﺸﻜﻞ ﺏ. ﺗﻮﺻﻴﻞ ﺧﻂ ﺍﻟﺘﺼﺮﻳﻒ ﺗﻮﺻﻴﻞ ﺳﺪﻭﺩ ﻟﻠﻬﻮﺍﺀ ٣٠٠ﻣﻠﻢ ﻋﻠﻰ ﺍﻷﺩﻧﻰ ﻫﻨﺎﻟﻚ ﻃﺮﻳﻘﺘﲔ ﳕﻮﺫﺟﻴﺘﲔ ﻹﺟﺮﺍﺀ ﺍﻟﺘﻮﺻﻴﻞ ﻛﻤﺎ ﻫﻮ ﻣﺒﲔ ﻓﻲ ﺍﻟﺸﻜﻠﲔ ﺍ ﻭ ﺏ. ﻳﺠﺐ ﺗﻌﻠﻴﻖ ﺍﳋﺮﻃﻮﻡ ﺑﻄﺮﻳﻘﺔ sﻟﻠﺤﺼﻮﻝ ﻋﻠﻰ ﺗﺼﺮﻳﻒ ﺟﻴﺪ. ﺃﻧﺒﻮﺏ ﻗﺎﺋﻢ ﺑﻘﻄﺮ ٤٠ﻣﻠﻢ ﻋﻠﻰ ﺍﻷﺩﻧﻰ ﳌﻨﻊ ﺍﻟﺜﻌﺐ ،ﻻ ﺑﺪ ﻣﻦ ﺇﺗﺒﺎﻉ ﺇﺣﺪﻯ ﺍﻟﻄﺮﻳﻘﺘﲔ ﺍﻟﺘﺎﻟﻴﺘﲔ.
ﺗﻌﻠﻴﻤﺎﺕ ﺍﻟﺘﺮﻛﻴﺐ ﺍﳋﻄﻮﺓ : ٦ ﺍﳋﻄﻮﺓ : ٨ ﺗﻮﺻﻴﻞ ﺇﻣﺪﺍﺩ ﺍﳌﺎﺀ ﻛﻴﻔﻴﺔ ﺿﺒﻂ ﻣﺴﺘﻮﻯ ﺍﺭﺗﻔﺎﻉ ﺍﻟﻐﺴﺎﻟﺔ ﻣﻮﺿﺢ ﻓﻲ ﻗﻢ ﺑﻮﺻﻞ ﺧﺮﻃﻮﻡ ﺗﺰﻭﻳﺪ ﺍﳌﺎﺀ ﻛﻤﺎ ﻫﻮ ﹼ ﺍﻟﺸﻜﻞ )ﺑﻌﺾ ﺍﳌﻮﺩﻳﻼﺕ ﺗﺘﻜ ﹼﻮﻥ ﻣﻦ ﺻﻤﺎﻡ ﺩﺧﻮﻝ ﺍﳌﺎﺀ ﻭﺍﳋﺮﻃﻮﻡ( ﳝﻜﻦ ﺇﻣﺪﺍﺩ ﺍﳌﺎﺀ ﺍﳊﺎﺭ ﻭﺍﻻﺭﺩ ﻟﻬﺬﻩ ﺍﻟﻐﺴﺎﻟﺔ ،ﺇﺫﺍ ﻟﻢ ﻳﻜﻦ ﻣﻦ ﺍﳌﻤﻜﻦ ﺗﻮﺻﻴﻞ ﺍﳌﺎﺀ ﺑﺪﺭﺟﺔ ﺣﺮﺍﺭﺓ ﺃﻗﻞ ﻣﻦ ٥٦ﺩﺭﺟﺔ ﻣﺌﻮﻳﺔ ،ﻳﺠﺐ ﺇﻳﺼﺎﻝ ﺍﳌﺎﺀ ﺍﻟﺒﺎﺭﺩ ﻟﻬﺬﻩ ﺍﻟﻐﺴﺎﻟﺔ. ﻋﻨﺪ ﺍﻟﺘﻮﺻﻴﻞ ﻻ ﺑﺪ ﻣﻦ ﻻ ﺑﺪ ﻣﻦ ﺍﺳﺘﺨﺪﺍﻡ ﺷﺮﻳﻂ ﻣﻨﻊ ﺍﻟﺘﺴﺮﻳﺐ ﺃﻭ ﻣﺎﺩﺓ ﳌﻨﻊ ﺍﻟﺘﺴﺮﻳﺐ. ﺗﺄﻛﺪ ﻣﻦ ﺃﻥ ﺍﳋﻂ ﻏﻴﺮ ﻣﻠﺘﻮﻱ ﺃﻭ ﻣﻨﺤﻨﻲ.
ﺃﺳﻤﺎﺀ ﺍﻷﺟﺰﺍﺀ .١ .٢ .٣ .٤ .٥ .٦ .٧ .٨ .٩ ﻟﻮﺣﺔ ﺍﻟﺘﺤﻜﻢ ﻣﻘﺒﺾ ﺍﻟﻴﺪ ﺍﻟﻐﻄﺎﺀ ﺍﻷﻣﺎﻣﻲ ﺍﻟﻐﻄﺎﺀ ﺍﻷﺳﻔﻞ ﺯﺟﺎﺝ ﺍﻟﻌﺮﺽ ﺯﺭ ﺍﻟﻄﺎﻗﺔ )ﺍﻟﺘﺸﻐﻴﻞ( ﺧﺮﻃﻮﻡ ﺍﻟﺘﺼﺮﻳﻒ ﺧﺮﻃﻮﻡ ﺇﻣﺪﺍﺩ ﺍﳌﺎﺀ ﺳﻠﻚ ﺍﻟﻄﺎﻗﺔ ﺍﳌﻠﺤﻘﺎﺕ .١٠ﺭﺟﻞ ﻗﺎﺑﻠﺔ ﻟﻠﺘﻌﺪﻳﻞ .١١ﺍﻟﺮﻑ ﺍﻷﻋﻠﻰ .١٢ﺭﻑ ﺃﺩﻭﺍﺕ ﺍﻷﻛﻞ ﺍﻟﺼﻐﻴﺮﺓ .١٣ﺩﺭﺝ ﺳﺎﺋﻞ ﺍﻟﻐﺴﻴﻞ ﻭﺍﳌﺎﺩﺓ ﺍﳌﺴﺎﻋﺪﺓ ﻟﻠﺸﻄﻒ .١٤ﻏﻄﺎﺀ ﻓﺘﺤﺤﺔ ﺍﻟﺒﺨﺎﺭ .١٥ﺫﺭﺍﻉ ﺍﻟﺮﺵ ﺍﻟﻌﻠﻴﺎ Accessoriesﺍﻟﺮﺵ ﺍﻟﺴﻔﻠﻰ .١٦ﺫﺭﺍﻉ .١٧ﻣﺠﻤﻮﻋﺔ ﺍﳌﺼﻔﺎﺓ .١٨ﺍﻟﺮﻑ ﺍﻷﺳﻔﻞ .
ﻭﻇﺎﺋﻒ ﺃﺯﺭﺍﺭ ﺍﻟﺘﺤﻜﻢ D1418W(L,M,T,B,C,D) F(B, U) D1419W(L,M,T,B,C,D) F(B, U) D1419W(L,M,T,B,C,D) FB : ﺍﳌﻮﺩﻳﻞ D1417W(L,M,T,B,C,D) F(B, U) D1417W(L,M,T,B,C,D) FB : ﺍﳌﻮﺩﻳﻞ U ١٠ U
١١ MFL62077162(Arab)_100518.
ﻭﻇﺎﺋﻒ ﺃﺯﺭﺍﺭ ﺍﻟﺘﺤﻜﻢ ﻣﺆﺷﺮ ﺍﳌﻌﺎﳉﺔ • ﻳﹸﺸﻴﺮ ﺇﻟﻰ ﺍﳌﺮﺣﻠﺔ ﺍﳊﺎﻟﻴﺔ ﻣﻦ ﺍﻟﺒﺮﻧﺎﻣﺞ. • ﻛﻞ ﻣﻦ »ﻏﺴﻴﻞ« ﻭ »ﺷﻄﻒ« ﻭ »ﲡﻔﻴﻒ« ﺗﻘﻮﻡ ﺑﺎﻟﻮﻣﻴﺾ ﺃﺛﻨﺎﺀ ﻛﻞ ﻣﺮﺣﻠﺔ ﻣﻦ ﻋﻤﻠﻴﺔ ﺍﻟﻐﺴﻴﻞ. • ﺗﻀﻲﺀ ﳌﺒﺔ ﺗﻨﻈﻴﻒ ﺑﻌﺪ ﺍﻧﺘﻬﺎﺀ ﻛﻞ ﺇﺟﺮﺍﺀ ﻭﳌﺪﺓ ٤ﺩﻗﺎﺋﻖ. ﻣﺆﺷﺮ ﺇﻋﺎﺩﺓ ﺗﻌﺒﺌﺔ ﺍﳌﻠﺢ ﻭﺍﻟﺸﻄﻒ • ﻣﻠﺢ :ﻗﻮﻣﻲ ﺑﺈﻋﺎﺩﺓ ﺍﻟﺘﻌﺒﺌﺔ ﲟﻠﺢ ﻣﻦ ﻧﻮﻉ ﺧﺎﺹ ﻋﻨﺪﻣﺎ ﺗﻀﻲﺀ ﺍﻟﻠﻤﺒﺔ. • ﺷﻄﻒ :ﻗﻮﻣﻲ ﺑﺈﻋﺎﺩﺓ ﺍﻟﺘﻌﺒﺌﺔ ﲟﺴﺎﻋﺪ ﺍﻟﺸﻄﻒ ﻋﻨﺪﻣﺎ ﺗﻀﻲﺀ ﺍﻟﻠﻤﺒﺔ. ﹾ ﺻﻒ ﺍﳊﻤﻞ • ﻓﻲ ﺣﺎﻟﺔ ﺍﳊﻤﻮﻟﺔ ﺍﻟﺼﻐﻴﺮﺓ ﺍﺳﺘﺨﺪﻡ ﺍﻟﺮﻑ ﺍﻷﻋﻠﻰ ﺃﻭ ﺍﻷﺳﻔﻞ ﻟﺘﻮﻓﻴﺮ ﺍﻟﻄﺎﻗﺔ.
ﻗﺒﻞ ﺍﻻﺳﺘﺨﺪﺍﻡ ﻷﻭﻝ ﻣﺮﹼﺓ ﺇﻋﺪﺍﺩ ﻋﺴﺮ ﺍﳌﺎﺀ ﻳﺠﺐ ﻋﻠﻴﻚ ﺍﻟﺘﺤﻘﻖ ﻣﻦ ﺩﺭﺟﺔ ﻋﺴﺮ ﺍﳌﺎﺀ ﻭﺿﺒﻂ ﻣﺴﺘﻮﻯ ﻧﻈﺎﻡ ﺍﻟﺘﺨﻔﻴﻒ ﻗﺒﻞ ﺗﺸﻐﻴﻞ ﻏﺴﺎﻟﺔ ﺍﻷﻃﺒﺎﻕ. ﺍﳋﻄﻮﺓ .١ﺇﻓﺤﺼﻲ ﻭﺗﻌﺮﻓﻲ ﻋﻠﻰ ﻣﺴﺘﻮﻯ ﺩﺭﺟﺔ ﻋﺴﺮ ﺍﳌﺎﺀ >ﻣﺴﺘﻮﻯ ﻋﺴﺮ ﺍﳌﺎﺀ< ﺍﻟﻄﺮﻳﻘﺔ ﺍﻷﻭﻟﻰ .(١ﲢﻘﻘﻲ ﻣﻦ ﺩﺭﺟﺔ ﻋﺴﺮ ﺍﳌﺎﺀ ﻓﻲ ﻣﻨﻄﻘﺘﻚ. )ﳝﻜﻦ ﺃﻥ ﺗﺴﺎﻋﺪﻙ ﺷﺮﻛﺔ ﻣﺮﻓﻖ ﺍﳌﻴﺎﻩ ﻓﻲ ﻫﺬﺍ ﺍﻷﻣﺮ(. .(٢ﺇﺿﺒﻄﻲ ﻣﺴﺘﻮﻯ ﻧﻈﺎﻡ ﺍﻟﺘﺨﻔﻴﻒ ﻓﻲ ﻏﺴﺎﻟﺔ ﺍﻷﻃﺒﺎﻕ ﻭﻓﻘﹰﺎ ﳌﺴﺘﻮﻯ ﻋﺴﺮ ﺍﳌﺎﺀ .ﺇﺭﺟﻌﻲ ﺇﻟﻰ ﺍﳋﻄﻮﺓ .٢ ) : * Lﻣﺴﺘﻮﻯ ﻧﻈﺎﻡ ﺍﻟﺘﺨﻔﻴﻒ ( ﺍﻟﻄﺮﻳﻘﺔ ﺍﻟﺜﺎﻧﻴﺔ .(١ﲢﻘﻘﻲ ﻣﻦ ﺩﺭﺟﺔ ﻋﺴﺮ ﺍﳌﺎﺀ ﺑﺎﺳﺘﺨﺪﺍﻡ ﺷﺮﻳﻂ ﺍﻻﺧﺘﺒﺎﺭ. .
ﻗﺒﻞ ﺍﻻﺳﺘﺨﺪﺍﻡ ﻷﻭﻝ ﻣﺮﹼﺓ ﺍﳋﻄﻮﺓ .٣ﻣﻞﺀ ﺍﳌﻠﺢ ﻣﻴﺴﺮﺓ ﻟﻠﻤﺎﺀ ﺧﺎﺻﺔ ﺑﻬﺬﺍ ﺍﻟﻄﺮﺍﺯ. ﻳﻮﺟﺪ ﻣﺎﺩﺓ ﹼ ﻳﺮﺟﻰ ﻗﺮﺍﺀﺓ ﻫﺬﻩ ﺍﻟﺘﻌﻠﻴﻤﺎﺕ ﺑﺘﻤﻌﻦ ﻟﻠﺤﺼﻮﻝ ﻋﻠﻰ ﺗﺸﻐﻴﻞ ﺻﺤﻴﺢ. ﻣﻴﺴﺮ ﻟﻠﺤﺼﻮﻝ ﻋﻠﻰ ﻧﺘﺎﺋﺞ ﺷﻄﻒ ﻣﺮﺿﻴﺔ ،ﻭﻳﺤﺐ ﺃﻥ ﻻﲢﺘﻮﻱ ﻋﻠﻰ ﺍﻟﻼﱘ ﻷﻥ ﺫﻟﻚ ﻗﺪ ﻳﺘﺮﻙ ﺑﻘﻌﺎ ﹰ ﻳﺠﺐ ﺍﳊﺼﻮﻝ ﻋﻠﻰ ﻣﺎﺀ ﹼ ﻋﻠﻰ ﺍﻷﻭﺍﻧﻲ ﻭﺍﻷﺟﺰﺍﺀ ﺍﻟﺪﺍﺧﻠﻴﺔ ﻟﻠﻐﺴﺎﻟﺔ. ﺍﳌﻴﺴﺮ ﺇﻋﺘﻤﺎﺩﺓ ﻋﻠﻰ ﻣﻴﺴﺮ ﻟﻠﻤﺎﺀ ،ﻭﻳﺘﻢ ﲢﺪﻳﺪ ﻛﻤﻴﺔ ﺍﳌﻠﺢ ﹼ ﻓﻲ ﺣﺎﻝ ﺃﻥ ﺍﳌﺎﺀ ﺍﻟﺬﻱ ﻳﺨﺮﺝ ﻣﻦ ﺍﻟﺼﻨﺒﻮﺭ ﻋﺴﻴﺮﺍ ﹰ ﻓﻴﺠﺐ ﺇﺿﺎﻓﺔ ﹼ ﺩﺭﺣﺔ ﻋﺴﺎﺭﺓ ﺍﳌﻴﺎﻩ. ﻣﻞﺀ ﺍﳌﻠﺢ ﺍﻣﻠﺌﻲ ﻭﻋﺎﺀ ﺍﳌﻠﺢ ﺍﳌﺘﺠﺪﺩ ﻗﺒﻞ ﺑﺪﺀ ﺑﺮﻧﺎﻣﺞ ﺍﻟﻐﺴﻴﻞ.
ﻛﻴﻔﻴﺔ ﺍﻻﺳﺘﺨﺪﺍﻡ ﻭﺍﻟﺘﺸﻐﻴﻞ .٢ﲢﻤﻴﻞ ﺍﻟﺮﻑ ﺍﻟﺴﻔﻠﻲ .١ﲢﻤﻴﻞ ﹼ ﻏﺴﺎﻟﺔ ﺍﻟﺼﺤﻮﻥ ﺇﺫﺍ ﺃﺭﺩﺕ ﺍﳊﺼﻮﻝ ﻋﻠﻰ ﺃﻓﻀﻞ ﺍﻟﻨﺘﺎﺋﺞ ﻗﻢ ﺑﺘﺤﻤﻴﻞ ﻏﺴﺎﻟﺔ ﺍﻟﺼﺤﻮﻥ ﻭﻓﻘﺎ ﹰ ﻟﻠﺘﻌﻠﻴﻤﺎﺕ. ﹼ ﻏﺴﺎﻟﺔ ﺍﻟﺼﺤﻮﻥ ﺑﺘﻨﻈﻴﻔﻬﺎ ﻗﻢ ﻗﺒﻞ ﻭﺿﻊ ﺍﻷﻭﺍﻧﻲ ﻓﻲ ﹼ ﻣﻦ ﺍﻟﺒﻘﺎﻳﺎ ﺍﻟﻜﺒﻴﺮﺓ ﺍﳌﺘﺮﻭﻛﺔ ﻋﻠﻴﻬﺎ ﻣﺜﻞ :ﺍﻟﻌﻈﺎﻡ ﻭﻏﻴﺮ ﺫﻟﻚ. ﻳﺮﺟﻰ ﺍﺗﺒﺎﻉ ﻣﺎﻳﻠﻲ ﻋﻨﺪ ﲢﻤﻴﻞ ﻏﺴﺎﻟﺔ ﺍﻟﺼﺤﻮﻥ: ﺍﻟﺴﻠﺔ ﺍﻟﺴﻔﻠﻰ ﻫﻲ ﺍﻷﻓﻀﻞ ﻟﺘﺤﻤﻴﻞ ﺍﻟﺼﺤﻮﻥ ،ﻭﺃﻭﻋﻴﺔ ﺍﳊﺴﺎﺀ ،ﻭﺍﻷﻃﺒﺎﻕ ،ﻭﺍﻟﻘﺪﻭﺭ ،ﻭﺍﳌﻘﻼﺓ ،ﻭﺍﻷﻏﻄﻴﺔ ،ﻭﺣﺘﻰ ﺻﻴﻨﻴﺔ ﺍﻟﺘﺸﻮﻳﻪ .ﻭﻻ ﺑﺪ ﻣﻦ ﻭﺿﻊ ﺍﻟﺼﺤﻮﻥ ﻣﺴﺘﻘﻴﻤﺔ ﻭﻫﻲ ﺗﺘﺠﻪ ﺍﻟﻰ ﻭﺳﻂ ﺍﻟﺮﻑ .
ﻛﻴﻔﻴﺔ ﺍﻻﺳﺘﺨﺪﺍﻡ ﻭﺍﻟﺘﺸﻐﻴﻞ .٣ﺍﺳﺘﻌﻤﺎﻝ ﺳﻠﺔ ﺃﺩﻭﺍﺕ ﺍﻷﻛﻞ ﺃﻣﺜﻠﺔ ﺍﳊﻤﻞ )ﻓﺤﺺ ﺍﻟﻄﺎﻗﺔ( ﻳﺠﺐ ﻭﺿﻊ ﺃﺩﻭﺍﺕ ﺍﻷﻛﻞ ﻣﻊ ﺑﻌﻀﻬﺎ ﻓﻲ ﺍﻟﺴﻠﺔ ﳌﻨﻊ ﺗﺪﺍﺧﻠﻬﺎ ﻣﻊ ﺃﺩﻭﺍﺕ ﳑﺎﺛﻠﺔ. ﺿﻊ ﺍﻷﺩﻭﺍﺕ ﺍﻟﺼﻐﻴﺮﺓ ﻋﻠﻰ ﺍﻟﻐﻄﺎﺀ ﺍﳋﺎﺹ ﺑﻬﺎ ﻭﳝﻜﻦ ﻭﺿﻊ ﺍﳌﻘﺎﺑﺾ ﻋﻠﻴﻬﺎ ﻭﺍﺑﻘﺎﺋﻬﺎ ﺑﻌﻴﺪﺍ ﹰ ﻋﻨﺪ ﻋﺪﻡ ﺍﻻﺳﺘﻌﻤﺎﻝ. ﻳﺠﺐ ﻭﺿﻊ ﺍﻟﺴﻜﺎﻛﲔ ﻓﻲ ﻣﻜﺎﻥ ﻣﻨﻔﺼﻞ. ﺍﺣﺬﺭ ﻋﻨﺪ ﲢﻤﻴﻞ ﻭﺗﻔﺮﻳﻎ ﺍﻷﺩﻭﺍﺕ ﺍﳊﺎﺩﺓ. ﻛﻴﻔﻴﺔ ﺍﻻﺳﺘﺨﺪﺍﻡ ﺍﺳﺤﺐ ﺍﻟﺴﻠﺘﲔ ﺑﺎﲡﺎﻩ ﻣﻌﺎﻛﺲ ﺛﻢ ﺍﺳﺤﺒﻬﻤﺎ ﻻﺑﻌﺎﺩﻫﻤﺎ ﻋﻦ ﺑﻌﺾ.
ﻛﻴﻔﻴﺔ ﺍﻻﺳﺘﺨﺪﺍﻡ ﻭﺍﻟﺘﺸﻐﻴﻞ .٤ﲢﻤﻴﻞ ﺍﻟﺮﻑ ﺍﻟﻌﻠﻮﻱ ﺃﻣﺜﻠﺔ ﺍﻟﺘﺤﻤﻴﻞ )ﻓﺤﺺ ﺍﻟﻄﺎﻗﺔ( ﻣﻦ ﺍﻷﻓﻀﻞ ﲢﻤﻴﻞ ﻫﺬﺍ ﺍﻟﺮﻑ ﺑﺎﻷﻭﺍﻧﻲ ﺍﳊﺴﺎﺳﺔ ﻣﺜﻞ ﺍﻟﺼﺤﻮﻥ ﺍﻟﺼﻐﻴﺮﺓ ﻭﺍﻷﺩﻭﺍﺕ ﺍﻟﻄﻮﻳﻠﺔ ﻭﺍﻟﻔﻨﺎﺟﲔ ﻭﺍﻟﻜﺆﻭﺱ ﻭﺍﻷﺩﻭﺍﺕ ﺍﻟﺒﻼﺳﺘﻴﻜﻴﺔ ﺍﻟﺘﻲ ﺗﺼﻠﺢ ﻟﻐﺴﺎﻻﺕ ﺍﻟﺼﺤﻮﻥ ،ﻳﺠﺐ ﻭﺿﻊ ﺍﻟﺼﺤﻮﻥ ﻟﻸﻋﻠﻰ ﺣﻴﺚ ﻳﻮﺍﺟﻪ ﺃﺳﻔﻞ ﺍﻟﺼﺤﻦ ﺃﻣﺎﻡ ﺍﻟﺮﻑ .ﺗﻮﺿﻊ ﺍﻟﻔﻨﺎﺟﲔ ﻭﺍﻟﻜﺆﻭﺱ ﻭﺍﻟﺰﺑﺎﺩﻱ ﻣﻘﻠﻮﺑﺔ ،ﻭﺗﻮﺿﻊ ﺍﻟﻔﻨﺎﺟﲔ ﺍﻟﺰﺍﺋﺪﺓ ﻭﺃﺩﻭﺍﺕ ﺍﻟﻄﺒﺦ ﻋﻠﻲ ﺭﻑ ﺍﻟﻔﻨﺎﺟﲔ ﺍﻟﻘﺎﺑﻞ ﻟﻠﻔﺘﺢ. ﺇﻧﺘﺒﻪ ﻣﻦ ﺇﻋﺎﻗﺔ ﺣﺮﻛﺔ ﺫﺭﺍﻉ ﺭﺷﺎﺵ ﺍﳌﻴﺎﻩ ﻓﻲ ﺍﻟﺮﻑ ﺍﻟﻌﻠﻮﻱ.
ﻛﻴﻔﻴﺔ ﺍﻻﺳﺘﺨﺪﺍﻡ ﻭﺍﻟﺘﺸﻐﻴﻞ D1417W(L,M,T,B,C,D)F(B,U) D1418W(L,M,T,B,C,D)F(B,U) D1417W(L,M,T,B,C,D)FB D1419W(L,M,T,B,C,D)F(B,U) D1419W(L,M,T,B,C,D)FB U U U U ) ١٨
ﻛﻴﻔﻴﺔ ﺍﻻﺳﺘﺨﺪﺍﻡ ﻭﺍﻟﺘﺸﻐﻴﻞ .٦ﺇﺿﺎﻓﺔ ﻣﺎﺩﺓ ﺍﻟﺘﻨﻈﻴﻒ • • • • • ﺍﺿﻐﻂ ﻋﻠﻰ ﺍﳌﺰﻻﺝ ﻟﻠﻔﺘﺢ. ﻳﺠﺐ ﺇﺿﺎﻓﺔ ﻣﻮﺍﺩ ﺍﻟﺘﻨﻈﻴﻒ ﻗﺒﻞ ﺍﻟﺒﺪﺀ ﺑﺄﻱ ﺑﺮﻧﺎﻣﺞ. ﻳﺮﺟﻰ ﺍﺗﺒﺎﻉ ﺗﻮﺻﻴﺎﺕ ﺍﳌﺼﻨﻊ ﻓﻲ ﺩﻟﻴﻞ ﺍﻻﺳﺘﺨﺪﺍﻡ ﻟﻠﺘﺄﻛﺪ ﻣﻦ ﻛﻤﻴﺔ ﻣﻮﺍﺩ ﺍﻟﺘﻨﻈﻴﻒ ﺍﳌﻄﻠﻮﺑﺔ. ﳝﻜﻦ ﺍﺳﺘﺨﺪﻡ ﻛﻤﻴﺔ ﺃﻗﻞ ﺑﺸﻜﻞ ﺑﺴﻴﻂ ﻣﻦ ﺍﻟﻜﻤﻴﺔ ﺍﻟﻌﺎﺩﻳﺔ ﺇﺫﺍ ﻛﺎﻧﺖ ﻣﺘﻮﺳﻄﺔ ﺍﻻﺗﺴﺎﺥ. ﲢﻤﻞ ﺍﳊﺎﻭﻳﺎﺕ ٥١ﺟﺮﺍﻡ ﻭ ٥٢ﺟﺮﺍﻡ. ﺗﻌﺘﻤﺪ ﻛﻤﻴﺔ ﻣﻮﺍﺩ ﺍﻟﻐﺴﻴﻞ ﻋﻠﻰ ﺍﻟﺒﺮﻧﺎﻣﺞ ﺍﳌﻄﻠﻮﺏ، ﻳﺮﺟﻰ ﻣﺮﺍﺟﻌﺔ ﺍﳉﺪﻭﻝ.
ﻛﻴﻔﻴﺔ ﺍﻻﺳﺘﺨﺪﺍﻡ ﻭﺍﻟﺘﺸﻐﻴﻞ .٧ﺇﻋﺎﺩﺓ ﺍﻟﺘﻌﺒﺌﺔ ﻹﻋﺎﺩﺓ ﻣﻞﺀ ﺍﳌﻠﺢ ﻹﻋﺎﺩﺓ ﺗﻌﺒﺌﺔ ﻣﺴﺎﻋﺪ ﺍﻟﺸﻄﻒ ﻋﻨﺪﻣﺎ ﻳﻜﻮﻥ ﻣﺨﺰﻥ ﺍﳌﻠﺢ ﻓﺎﺭﻏﺎ ﹰ ﺳﻴﻀﻲﺀ ﻣﺆﺷﺮ ﺍﳌﻠﺢ ﺗﻠﻘﺎﺋﻴﺎ ﹰ ﺧﻼﻝ ﺗﺸﻐﻴﻞ ﻏﺴﺎﻟﺔ ﺍﻟﺼﺤﻮﻥ .ﻳﺠﺐ ﻣﻞﺀ ﺍﳌﻠﺢ ﺑﻌﺪ ﺍﻻﻧﺘﻬﺎﺀ ﻣﻦ ﺩﻭﺭﺓ ﺍﻟﻐﺴﻴﻞ .ﻛﻤﺎ ﺃﻧﻨﺎ ﻧﻨﺼﺢ ﲟﻞﺀ ﺍﳌﻠﺢ ﻗﺒﻞ ﺍﻟﺒﺪﺀ ﺑﺎﻟﻐﺴﻴﻞ ﻹﺯﺍﻟﺔ ﺃﻱ ﻣﻠﺢ ﺯﺍﺋﺪ ﻣﻦ ﺍﳌﺮﺓ ﺍﻟﺴﺎﺑﻘﺔ.
ﻛﻴﻔﻴﺔ ﺍﻻﺳﺘﺨﺪﺍﻡ ﻭﺍﻟﺘﺸﻐﻴﻞ .٨ﺍﻟﺘﺠﻔﻴﻒ ﻟﻠﻤﺴﺎﻋﺪﺓ ﻋﻠﻰ ﺍﻟﺘﺠﻔﻴﻒ ﻧﻨﺼﺢ ﺑﻔﺘﺢ ﺍﻟﺒﺎﺏ ﻛﺎﻣﻼﹰ ﺑﻌﺪ ﺇﻧﺘﻬﺎﺀ ﺩﻭﺭﺓ ﺍﻟﻐﺴﻴﻞ. .٩ﻓﺤﺺ ﺍﻟﻄﺎﻗﺔ)(EN٥٠٢٤٢ ﰎ ﲢﻤﻴﻞ ﺍﳉﻬﺎﺯ ﻭﻓﻘﺎ ﹰ ﻟﻠﻤﻮﺻﻔﺎﺕ ﺍﻟﻘﻴﺎﺳﻴﺔ. ﺍﶈﻤﻠﺔ« ﺹ ١٧-١٥ • ﻣﺜﺎﻝ ﻋﻦ ﹼ ﻏﺴﺎﻟﺔ ﺍﻟﺼﺤﻮﻥ ﹼ • ﺍﻟﺴﻌﺔ :ﺿﺒﻂ ﻟـ ١٤ﻣﻜﺎﻧﺎ ﹰ • ﻧﻈﺎﻡ ﺍﳌﻘﺎﺭﻧﺔ :ﺍﻗﺘﺼﺎﺩﻱ • ﺿﺒﻂ ﻣﺴﺎﻋﺪ ﺍﻟﺸﻄﻒ٤ : • ﻣﺮﺟﻊ ﺍﳌﻨﻈﻒ ٨ :ﺟﺮﺍﻡ ﻣﻦ ﺍﳌﻨﻈﻒ ﺩﺍﺧﻞ ﺳﻄﺢ ﺍﻟﺒﺎﺏ ﻭﻣﻞﺀ ٢٧ﺟﺮﺍﻡ ﻓﻲ ﻣﺨﺰﻥ ﺍﳌﻨﻈﻒ • ﻳﺠﺐ ﺇﺩﺧﺎﻝ ﺍﻟﺮﻑ ﺍﻟﺬﻱ ﻋﻠﻰ ﺷﻜﻞ ﺣﺮﻑ Uﺍﻟﻘﺎﺑﻞ ﻟﻀﺒﻂ ﺍﻻﺭﺗﻔﺎﻉ ﻓﻲ ﺍﻟﻮﺿﻊ ﺍﻷﻋﻠﻰ.
ﺗﺴﻠﺴﻞ ﺍﻟﺘﺸﻐﻴﻞ ﺇﺿﻐﻂ ﺯﺭ »ﺗﺸﻐﻴﻞ /ﺍﻳﻘﺎﻑ )«(Power ﺗﺄﻛﺪ ﻣﻦ ﻭﺟﻮﺩ ﻣﺴﺎﻋﺪ ﻟﻠﺸﻄﻒ ﻭﻣﻠﺢ ﺳﺘﻀﻲﺀ ﻣﺆﺷﺮﺍﺕ ﺍﳌﻮﺍﺩ ﺍﻟﺘﻲ ﲢﺘﺎﺝ ﺇﻟﻰ ﺇﻋﺎﺩﺓ ﺍﻟﺘﻌﺒﺌﺔ. ﺇﻓﺘﺢ ﺍﻟﺒﺎﺏ ﻭﺗﺄﻛﺪ ﻣﻦ ﺍﻟﻔﻼﺗﺮ ﺗﺄﻛﺪ ﻣﻦ ﻧﻈﺎﻓﺘﻬﺎ ﻭﻣﺮﻛﺒﺔ ﺑﺸﻜﻞ ﺻﺤﻴﺢ )ﺗﻌﻠﻴﻤﺎﺕ ﺍﻟﺼﻴﺎﻧﺔ ﻟﻠﻤﺴﺘﺨﺪﻡ(. ﺣﻤﹼ ﻞ ﺍﻟﺼﺤﻮﻥ ﻗﻢ ﺑﺈﺯﺍﻟﺔ ﺃﻱ ﻃﻌﺎﻡ ﺯﺍﺋﺪ. ﺇﺳﺤﺐ ﹼ ﺍﻟﺮﻑ ﺍﻟﺴﻔﻠﻲ ﻭﺭﺗﹼﺐ ﺍﻟﺼﺤﻮﻥ ﻭﺍﻷﺩﻭﺍﺕ. ﺇﺳﺤﺐ ﹼ ﺍﻟﺮﻑ ﺍﻟﻌﻠﻮﻱ ﻭﺭﺗﹼﺐ ﺍﻟﻔﻨﺎﺟﲔ ﻭﺍﻟﻜﺆﻭﺱ ﻭﻏﻴﺮﻫﺎ. ﺗﻨﺒﻴﻪ ﺍﻟﺮﻑ ﺍﻟﻌﻠﻮﻱ ﻋﻨﺪﻣﺎ ﻳﻜﻮﻥ ﹼ ﲢﻤﻞ ﺃﻱ ﺷﺊ ﻓﻲ ﹼ ﺍﻟﺮﻑ ﻻ ﹼ ﺍﻟﺴﻔﻠﻲ ﻣﺴﺤﻮﺑﺎﹰ.
ﺍﻟﺒﺮﻧﺎﻣﺞ ﻗﺪ ﻳﺨﺘﻠﻒ ﺯﻣﻦ ﺍﻟﺘﺸﻐﻴﻞ ﺍﻋﺘﻤﺎﺩﺍ ﹰ ﻋﻠﻰ ﺩﺭﺟﺔ ﺣﺮﺍﺭﺓ ﺍﳌﺎﺀ ﻭﺿﻐﻂ ﺍﳌﺎﺀ ﻭﻗﻮﺓ ﺍﻟﻠﺘﻴﺎﺭ ﺍﻟﻜﻬﺮﺑﺎﺋﻲ. ﻳﺘﻀﻤﻦ "ﺍﻟﺘﺠﻔﻴﻒ ﺍﻟﺒﺎﺭﺩ ) (Cool Dryﻭﻫﻮ ٣٠ﺩﻗﻴﻘﺔ. ﺯﻣﻦ ﺍﻟﺘﺸﻐﻴﻞ ﻻ ﹼ ﺍﻟﺒﺮﻧﺎﻣﺞ Dual Intensity )ﺍﻟﻜﺜﺎﻓﺔ ﺍﳌﺰﺩﻭﺟﺔ( Auto )ﺍﺗﻮﻣﺎﺗﻴﻜﻲ /ﺃﻟﻲ( ﺍﻟﻐﺴﻞ ﻗﺒﻞ ﺍﻟﻐﺴﻞ ﺍﻟﻐﺴﻞ ٤٠ﹾ ﻡ ٦٠ﹾ ﻡ ﺍﻟﺸﻄﻒ ﺍﻟﺸﻄﻒ ١ ﺍﻟﺸﻄﻒ ٢ ﺍﻟﺸﻄﻒ ٣ ﺍﻟﺘﺠﻔﻴﻒ ﺍﻟﺘﺠﻔﻴﻒ ﺍﻟﺸﻄﻒ ﺍﳊﺎﺭ ﺍﻟﺒﺎﺭﺩ ٧٠ﹾ ﻡ ﻣﺤﺴﻦ ﻭﻓﻖ ﺍﺗﺴﺎﺥ ﺍﻷﻭﺍﻧﻲ.
ﺗﻌﻠﻴﻤﺎﺕ ﺍﻟﺼﻴﺎﻧﺔ ﻟﻠﻤﺴﺘﺨﺪﻡ ﻳﻨﺼﺢ ﺑﺘﻔﻘﺪ ﺍﻟﻔﻼﺗﺮ ﻭﺃﺫﺭﻉ ﺑﺨﺎﺧﺎﺕ ﺍﳌﺎﺀ ﺑﺸﻜﻞ ﻣﻨﺘﻈﻢ ﻟﺘﻔﺎﺩﻱ ﺣﺪﻭﺙ ﻣﺸﺎﻛﻞ ﻭﺗﺸﻐﻴﻞ ﺳﻴﺊ. ﺫﺭﺍﻉ ﺍﻟﺮﺷﺎﺵ ﺍﻟﺴﻔﻠﻲ ﺍﳌﺼﺎﻓﻲ • • • • • ﺇﺳﺤﺐ ﺍﻟﺮﻑ ﺍﻟﺴﻔﻠﻲ ﺃﻭﻻﹰ. ﺃﺩﺭ ﺍﳌﺼﻔﺎﺓ ﺍﻟﺸﺒﻜﻴﺔ ﻋﻜﺲ ﻋﻘﺎﺭﺏ ﺍﻟﺴﺎﻋﺔ. ﺇﺳﺤﺐ ﺍﳌﺼﻔﺎﺓ ﺍﻟﺸﺒﻜﻴﺔ ﻭﻣﺼﻔﺎﺓ STSﻭﺍﳌﺼﻔﺎﺓ ﺍﳋﺎﺭﺟﻴﺔ. ﻗﻢ ﻳﺘﻨﻈﻴﻔﻬﻢ ﺇﺫﺍ ﺩﻋﺖ ﺍﳊﺎﺟﺔ. ﻗﻢ ﺑﺈﻋﺪﺗﻬﻢ ﺇﻟﻰ ﻣﻜﺎﻧﻬﻢ ﺣﺴﺐ ﺍﻟﺘﺮﺗﻴﺐ. • ﺗﺄﻛﺪ ﻣﻦ ﺃﻥ ﻓﺘﺤﺎﺕ ﺑﺨﺎﺥ ﺍﳌﺎﺀ ﻏﻴﺮ ﻣﺴﺪﻭﺩﺓ. • ﻓﻲ ﺣﺎﻝ ﺍﳊﺎﺟﺔ ﻟﻠﺘﻨﻈﻴﻒ ﺇﺳﺤﺐ ﺍﻟﺬﺭﺍﻉ ﻭﺃﺧﺮﺟﻬﺎ ﻣﻦ ﻣﻜﺎﻧﻬﺎ.
ﺩﻟﻴﻞ ﲢﺪﻳﺪ ﺍﳌﺸﺎﻛﻞ ﻭﺣﻠﻬﺎ ﻓﻲ ﺣﺎﻝ ﺣﺪﻭﺙ ﻣﺸﻜﻠﺔ ﻣﺎ ﺃﻧﻈﺮ ﺇﻟﻰ ﺍﳉﺪﻭﻝ ﺃﺩﻧﺎﻩ ﻋﻦ ﻭﺟﻮﺩ ﺣﻞ ﻟﻬﺎ. ﻓﻲ ﺣﺎﻝ ﻋﺪﻡ ﺍﻟﻘﺪﺭﺓ ﻋﻠﻰ ﺣﻞ ﺍﳌﺸﻜﻠﺔ ﻳﺮﺝ ﺍﻟﺘﺼﺎﻝ ﲟﺮﻛﺰ ﺍﳋﺪﻣﺔ. ﺍﳌﺸﻜﻠﺔ ﺍﻟﺴﺒﺐ ﺍﶈﺘﻤﻞ ﺍﳊﻞ ﻻ ﺗﻀﻲﺀ ﺃﻱ ﻣﺆﺷﺮﺍﺕ ﻋﻨﺪ ﺗﺸﻐﻴﻞ ﺍﳉﻬﺎﺯ، • ﻟﻢ ﻳﺘﻢ ﺇﺩﺧﺎﻝ ﺍﻟﻘﺎﺑﺲ ﻓﻲ ﺍﳌﺄﺧﺬ ﺍﻟﻜﻬﺮﺑﺎﺋﻲ ﺑﺸﻜﻞ ﺻﺤﻴﺢ. • ﺍﺣﺘﺮﺍﻕ ﻗﺎﻃﻊ )ﻓﻴﻮﺯ( ﺃﻭ ﺍﻧﻄﻔﺎﺀﻩ. • ﰎ ﻗﻄﻊ ﺍﻟﺘﻴﺎﺭ ﺍﻟﻜﻬﺮﺑﺎﺋﻲ. • ﺗﻔﻘﺪ ﺍﻟﻘﺒﺲ ﺍﻟﻜﻬﺮﺑﺎﺋﻲ. • ﺗﻔﻘﺪ ﺍﻟﻜﻬﺮﺑﺎﺀ. • ﺍﺗﺼﻞ ﺑﺎﳋﺪﻣﺔ. ﺍﻟﻐﺴﺎﻟﺔ، ﻻ ﳝﻜﻦ ﺗﺸﻐﻴﻞ ﹼ • ﻟﻢ ﻳﺘﻢ ﺇﻏﻼﻕ ﺍﻟﺒﺎﺏ ﺑﺸﻜﻞ ﺟﻴﺪ. • ﻟﻢ ﻳﺘﻢ ﺿﻐﻂ ﺯﺭ ﺍﻟﺘﺸﻐﻴﻞ.
ﺩﻟﻴﻞ ﲢﺪﻳﺪ ﺍﳌﺸﺎﻛﻞ ﻭﺣﻠﻬﺎ ﺍﳌﺸﻜﻠﺔ ﺍﻟﺴﺒﺐ ﺍﶈﺘﻤﻞ ﺍﳊﻞ ﻳﻈﻬﺮ ﻋﻠﻰ ﺍﺍﻟﺸﺎﺷﺔ ».«OE )ﻻ ﳝﻜﻦ ﺗﺼﺮﻳﻒ ﺍﳌﻴﺎﻩ( • ﺧﺮﻃﻮﻡ ﺍﻟﺘﺠﻔﻴﻒ ﻣﺜﻨﻲ. • ﺍﳌﺼﻔﺎﺓ ﻣﺴﺪﻭﺩﺓ. • ﺍﶈ ﹼﺮﻙ ﻻ ﻳﻌﻤﻞ )ﻣﺤ ﹼﺮﻙ ﺍﻟﻐﺸﻴﻞ ﺃﻭ ﻣﺤ ﹼﺮﻙ ﺍﻟﺘﺠﻔﻴﻒ(. • ﻗﻢ ﺑﺘﺴﻮﻳﺔ ﺍﳋﺮﻃﻮﻡ. • ﹼ ﻧﻈﻒ ﺍﳌﺼﺎﻓﻲ. • ﺇﺫﺍ ﻟﻢ ﲢﻼ ﳌﺸﻜﻠﺔ ﺇﺗﺼﻞ ﲟﺮﻛﺰ ﺍﳋﺪﻣﺔ. ﻳﻈﻬﺮ ﻋﻠﻰ ﺍﻟﺸﺎﺷﺔ ﺭﻣﺰ ».«IE • ﻻ ﻳﺘﻢ ﺗﺰﻳﻮﺩ ﺍﳌﻴﺎﻩ. • ﻟﻢ ﻳﺘﻢ ﻓﺘﺢ ﺻﻨﺒﻮﺭ ﺍﳌﻴﺎﻩ. • ﻣﺆﺷﺮ ﺍﳌﺎﺀ ﻻ ﻳﻌﻤﻞ ﺟﻴﺪﺍﹰ. • ﺗﻔﻘﺪ ﺻﻨﺒﻮﺭ ﺍﳌﺎﺀ. • ﺇﺫﺍ ﻟﻢ ﲢﻼ ﳌﺸﻜﻠﺔ ﺇﺗﺼﻞ ﲟﺮﻛﺰ ﺍﳋﺪﻣﺔ. ﻳﻈﻬﺮ ﻋﻠﻰ ﺍﻟﺸﺎﺷﺔ ﺭﻣﺰ ».
ﺩﻟﻴﻞ ﲢﺪﻳﺪ ﺍﳌﺸﺎﻛﻞ ﻭﺣﻠﻬﺎ ﻫﺬﻩ ﻟﻴﺴﺖ ﺃﻛﻮﺍﺩ ﺧﻄﺄ ﺗﹸﺸﻴﺮ ﺇﻟﻰ ﻭﺟﻮﺩ ﻋﻄﻞ. ﺍﻟﻮﺻﻒ ﻟﻜﻮﺩ ﺗﻌﺮﺽ ﺍﻟﺸﺎﺷﺔ ﺍﻟﻜﻮﺩ »«PF ﻳﹸﺸﻴﺮ ﺫﻟﻚ ﺇﻟﻰ ﻭﺟﻮﺩ ﺍﻧﻘﻄﺎﻉ ﻓﻲ ﺍﻟﺘﻴﺎﺭ ﺍﻟﻜﻬﺮﺑﺎﺋﻲ. ﺗﺴﺎﻋﺪ ﻫﺬﻩ ﺍﻟﻮﻇﻴﻔﺔ ﻋﻠﻰ ﺣﻤﺎﻳﺔ ﻏﺴﺎﻟﺔ ﺍﻷﻃﺒﺎﻕ ﻓﻲ ﺣﺎﻝ ﺍﻧﻘﻄﺎﻉ ﺍﻟﺘﻴﺎﺭ ﺍﻟﻜﻬﺮﺑﺎﺋﻲ ﺃﻭ ﺍﻧﻘﻄﺎﻉ ﺍﻟﻜﻬﺮﺑﺎﺀ ﻋﻦ ﺍﻟﻮﺣﺪﺓ. ﻭﺑﻌﺪ ﻋﻮﺩﺓ ﺍﻟﺘﻴﺎﺭ ﺍﻟﻜﻬﺮﺑﺎﺋﻲ ،ﻭﻋﻨﺪ ﺍﻟﻀﻐﻂ ﻋﻠﻰ ﺃﺣﺪ ﺍﻷﺯﺭﺍﺭ ،ﺳﻮﻑ ﻳﺘﻢ ﻋﺮﺽ ﺫﻟﻚ ﳌﺪﺓ ١٠ﺛﻮﺍﻧﻲ ﺛﻢ ﻳﺨﺘﻔﻲ. ﺗﻌﺮﺽ ﺍﻟﺸﺎﺷﺔ ﺍﻟﻜﻮﺩ »«Cd » «Cdﻳﹸﻘﺼﺪ ﺑﻪ ) Cool-Dryﲡﻔﻴﻒ ﻋﻠﻰ ﺍﻟﺒﺎﺭﺩ(.
ﺍﳌﻮﺍﺻﻔﺎﺕ D1417W(L,M,T,B,C,D)FB D1419W(L,M,T,B,C,D)FB D1417W(L,M,T,B,C,D)F D1418W(L,M,T,B,C,D)F D1419W(L,M,T,B,C,D)F D1417W(L,M,T,B,C,D)B D1418W(L,M,T,B,C,D)B D1419W(L,M,T,B,C,D)B D1417W(L,M,T,B,C,D)U D1418W(L,M,T,B,C,D)U D1419W(L,M,T,B,C,D)U ﺍﻟﺴﻌﺔ ١٤ﻣﻜﺎﻥ ﻟﻠﻀﺒﻂ ﺍﻟﻮﺯﻥ ﻋﻠﻰ ﻣﻠﺼﻖ ﺍﳌﻌﺪﻝ ﻣﺰ ﹼﻭﺩ ﺍﻟﻄﺎﻗﺔ ﻋﻠﻰ ﻣﻠﺼﻖ ﺍﳌﻌﺪﻝ ﺍﺳﺘﻬﻼﻙ ﺍﻟﻄﺎﻗﺔ ﻋﻠﻰ ﻣﻠﺼﻖ ﺍﳌﻌﺪﻝ ﻇﻐﻂ ﺗﺰﻭﻳﺪ ﺍﳌﺎﺀ ٨٠٠~ ٥٠ﻛﻴﻠﻮ ﺑﺎﺭ ٢٨
ﻣﺬﻛﺮﺓ ■ ﺍﻟﺮﻗﻢ ﺍﳌﺴﻠﺴﻞ ﻛﻴﻔﻴﺔ ﻗﺮﺍﺀﺓ ﺗﺎﺭﻳﺦ ﺍﻟﺮﻗﻢ ﺍﳌﺴﻠﺴﻞ :ﺭﻗﻌﺔ ﺍﻟﺮﻗﻢ ﺍﳌﺴﻠﺴﻠﺔ ﻣﻠﺼﻘﺔ ﻋﻠﻰ ﳝﲔ ﺍﻟﺴﻄﺢ ﺍﻟﺪﺍﺧﻠﻲ ﻣﻦ ﺍﻟﺒﺎﺏ. ** ﻋﻠﻰ ﺳﺒﻴﻞ ﺍﳌﺜﺎﻝ 909KW 00001 : ﺍﻟﺮﻗﻢ ﺍﳌﺴﻠﺴﻞ ﺭﻣﺰ ﺍﻹﻧﺘﺎﺝ ﺷﻬﺮ ﺍﻹﻧﺘﺎﺝ ﺳﻨﺔ ﺍﻹﻧﺘﺎﺝ )ﺍﻟﺮﻗﻢ ﺍﻷﺧﻴﺮ( ■ ﻗﺎﺋﻤﺔ ﻗﻄﻊ ﺍﻟﻐﻴﺎﺭ ﺍﻟﺮﺋﻴﺴﻴﺔ :ﻋﻨﺪ ﺗﺒﺪﻳﻞ ﺗﺮﺩﺩ ﻏﺴﺎﻟﺔ ﺍﻟﺼﺤﻮﻥ ) ٦٠ﻫﺮﺗﺰ ﻻ ﺑﺪ ﻣﻦ ﺗﺒﺪﻳﻞ ﻗﻄﻊ ﺍﻟﻐﻴﺎﺭ ﺍﻟﺘﺎﻟﻴﺔ . ٭ ﻣﺠﻤﻮﻋﺔ ﺍﳌﻮﺗﻮﺭ ،ﺍﳌﻀﺨﺔ ٥٠ﻫﺮﺗﺰ(، ٢٩ 5/18/10 10:17:55 AM MFL62077162(Arab)_100518.
ﺃﻳﻀﺎ ﺍﳊﺼﻮﻝ ﻋﻠﻰ ﺩﻟﻴﻞ ﺍﳌﺴﺘﺨﺪﻡ ﻓﻲ ﻧﺴﺨﺔ ﻓﻴﺪﻳﻮ ﻣﻦ ﺍﻟﺮﺍﺑﻂ ﺍﻟﺘﺎﻟﻲ ﳝﻜﻨﻚ ﹰ www.guidelg.com/dishwasher 5/18/10 10:17:58 AM ٣٠ MFL62077162(Arab)_100518.