DVD HOME CINEMA SYSTEM OWNER'S MANUAL MODEL : DA-3525 (DA-3525AD, FE-3525TE, FE-3525WE) Before connecting, operating, please read this instruction booklet or adjusting this product, carefully and completely.
PAGE 2 INTRODUCTION Safety WARNING: Precautions TO REDUCE THE RISK OF FIRE OR ELECTRIC SHOCK, DO NOT EXPOSE THIS PRODUCT TO RAIN OR MOISTURE. CAUTION: THIS DVD RECEIVER EMPLOYS A LASER SYSTEM. TO ENSURE PROPER USE OF THIS PRODUCT, PLEASE READ THIS OWNER'S MANUAL CAREFULLY AND RETAIN FOR FUTURE REFERENCE, SHOULD THE UNIT REQUIRE MAINTENANCE, CONTACT AN AUTHORIZED SERVICE LOCATION-SEE SERVICE PROCEDURE.
INTRODUCTION PAGE 3 Table of Contents Introduction Radio SafetyPrecautions........................2 Presettingtheradiostations................29 TableofContents.........................3 Listeningtotheradio.....................30 Precautions.............................4 Operation of RDS Reception (Radio Data Stations 30 System) NotesonDiscs..........................5 IdentificationofControls..................6-9 Sound Operation FrontPanel/Displaywindow.....................
PAGE 4 INTRODUCTION Precautions Notes on Notes handling When shipping the DVD receiver, always use the original shipping carton and packing materials. For maximum protection, repack the unit as it was originally packed at the factory. Do not use volatile liquids, such as insect spray, near the DVD receiver. Do not leave rubber or plastic products in contact with the DVD receiver for a long time. They will leave marks on the finish.
INTRODUCTION Notes on Discs This section shows you how to On PAGE 5 handle, clean, and store discs. On Discs Handling Do not touch the playback side of the disc. Storing Discs Do not store discs in direct sunlight Do not store discs in place subject a or near heat places subject moisture and dust such near a to sources. as a to bathroom or humidifier. Store discs vertically in a case. Stacking placing objects on discs outside of their case may cause warping.
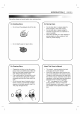
PAGE 6 INTRODUCTION Identification of Controls Front Panel PHONES connector OPEN/CLOSE POWER button and indicator Disc VOLUME controller button Tray Remote sensor RESET button FUNCTION button (located on the bottom, page 44.
INTRODUCTION Identification of Controls PAGE 7 (con'd) Rear Panel FM 75Ω Coaxial Antenna Connector AM Antenna Connector WOOFER OUT Connector VIDEO 2 Connectors (Input) VIDEO 1 (Input/Output) Connectors SPEAKER Connectors MONITOR OUT Connector S-VIDEO OUT Connector POWER CORD VIDEO SELECTOR Switch Refer to below* Connect to explanation. an AC 220-240V, 50/60Hz outlet only.
PAGE 8 INTRODUCTION Identification of Controls (con'd) REMOTE CONTROL You will find instructions for each of the remote control functions in the sections of this instruc- appropriate tion manual.
INTRODUCTION Identification of Controls Preparing (con'd) the Remote Control Insert the batteries into the remote control use it to PAGE 9 so Operating can you with the Remote Control This section shows you how to use the remote control. operate the DVD receiver. Point the remote control at the Open 1 the battery remote cover. sensor and press the buttons. Insert batteries 2 Make (AAA size).
PAGE 10 CONNECTIONS Antenna Connections Connect the supplied FM/AM antennas for listening loop antenna to the AM antenna to the radio. ? Connect the AM ? Connector the FM wire antenna to the FM 75Ω coaxial connector. connector. AM FM wire antenna loop antenna (supplied) (supplied) Notes To prevent noise pickup, keep the AM loop Be sure After antenna away from the DVD Receiver and other fully extend the FM wire antenna.
CONNECTIONS Speaker System Connect the PAGE 11 Connection speakers using the supplied speaker cords by matching the colors of the terminals and those possible surround sound, adjust the speaker parameters (distance, level, etc.). of the cords. To obtain the best If you feel lack of bass Connect an frequency active subwoofer to the WOOFER OUT connector using a Front speaker (right) monaural audio cord When you connect an active disconnect the woofer from the (not supplied).
PAGE 12 CONNECTIONS to Connecting a TV and VCR Connect the DVD receiver to your TV and VCR. Connect a TV(Monitor) to the MONITOR OUT ? or S-VIDEO OUT connector. ? Connect a VCR to the VIDEO 1 connectors. ? Connect a additional VCR to the VIDEO 2 connectors.
BASIC OPERATION Basic PAGE 13 Playback This section shows you the basics on how to play back a DVD video disc. Preparations When you want to play back DVD video discs, turn on the TV and select the video input source connected to the DVD receiver. When you want to enjoy the sound of DVD video discs or audio CDs from the audio system, turn on the audio system and select the 4 23 input source For connection Set the connected to the DVD receiver. details, pages 10 through 12.
PAGE 14 Basic BASIC OPERATION Playback (con'd) Press D/E/F/G and press ENTER, or press button(s), to select the desired 6 the numeric item. 1 2 OR 34 Play of the selected item begins. now For further information, also refer to the the disc you After 6 or case of operation When 6 jacket playing. are the unit is in use, not remove the disc and press POWER to turn off the DVD receiver. Notes Do not move damage the DVD receiver Use the OPEN/CLOSE button close the disc tray.
BASIC OPERATION PAGE 15 Special Playback Stopping Play Press STOP during playback. Resume When play STOP was Press is Play the unit records the stopped, point where pressed (RESUME function). PLAY and play will resume from this point. Notes Resume function will be cleared when the STOP is pressed on the STOP mode. Resume function will be cleared when the power is turned off STOP PLAY PAUSE/ and then on. Opening the disc tray cancels Resume function.
PAGE 16 BASIC OPERATION Special Playback (con'd) You can play back discs at various speeds. To Scan at fast forward reverse Press and hold SKIP two seconds or fast playback. button for about or during playback. [TV screen] GG X2 FF X2 The speed of advance (reverse) is relatively slow at first. pressed again, the speed becomes the button is pressed, the speed steps (DVD) or 1 step (CD).) When the button is faster.
OPERATION USING GUI MENU ICONS General Information about GUI menu This unit features GUI Menu Icons showing disc (title/chapter/track number, elapsed playing time, audio/subtitle language, angle, and sound) and DVD receiver information (repeat play, play mode, marker, etc.). Some icons only show the indicated information. Other icons allow the settings to be changed. PAGE 17 icons Common information 1 procedures Press DISPLAY Title function 2 can during playback.
PAGE 18 Detailed You can OPERATION USING GUI MENU ICONS description view information about Press DISPLAY of each GUI a disc and its operational DVD GUI icon status during playback. [TV screen] menu on the TV screen.
ADVANCED OPERATION Using title a menu Some movie discs may contain two or more titles. If the disc has a title menu recorded on it, the TITLE button can be used to select the movie title. (The depending on details of the disc operation used.) Selecting a title may not be certain DVD discs. 1 Press TITLE. A list of the titles possible ? 2 2 1 TITLE DVD Resume play to resume play from the scene pressed. not be possible on certain discs.
PAGE 20 ADVANCED OPERATION Memorizing Settings for Viewed DVD This unit stores, in memory, settings for the last DVD you have watched. Settings remain in mem- (Last Condition Memory) You memorize details for the following six settings. Position Stop (Page 15) TV Aspect (Page 39) Disc Subtitle Language (Page 21, 36) Disc Audio Language (Page 21, 36) Disc Menu Language (Page 36) Angle (Page 22) if you remove the disc from the DVD ory receiver, or switch power to OFF.
ADVANCED OPERATION Changing subtitle PAGE 21 language It is possible to change the subtitle language to a language from the one selected at the initial settings. (See page 36 for further info.) This operation works only with discs on which multiple subtitle languages are recorded. 1 different Press S-TITLE When no displayed during playback. subtitles are recorded, "OFF" will be instead of the language number.
PAGE 22 Viewing ADVANCED OPERATION from another Some DVDs may contain simultaneously from shot For these discs, the (The used.) recorded which have been number of different same scene can each of these different ton. scenes a angle angles. Press ANGLE 1 be viewed from the ANGLE but- angles using angles differ depending on the disc Number of angle being played back. 2 1 2 during playback. 3 1 Press ANGLE repeatedly desired is selected.
ADVANCED OPERATION PAGE 23 Repeat Play Repeating sections between specific points (A-B repeat) Repeating viewing (listening) Press REPEAT during playback. Each time this button is pressed, the TV screen changes as shown below and the disc will repeat chapter or title (DVD) or a track (CD). ? a 1 Press REPEAT A-B point where repeat two during play at the play is to start (A).
PAGE 24 Storing ADVANCED OPERATION markers in memory to be viewed Storing a MARKER in the marking your page in a quickly return to any point to DVD memory is similar book. It allows you to on (listened to) again Storing the disc. marker in the memory a Press MARKER 1 point during play at the starting (listened to) again. to be viewed 1/5 Indicates "1/5" is stored in the memory. to 5 markers can be stored in the memory. Up Recalling/Clearing Press SEARCH 2 marker a during playback.
ADVANCED OPERATION PAGE 25 Zoom feature The Zoom feature allows you to "ZOOM-IN" and enlarge the picture on the screen to either 4 times or 16 times (X16) Press ZOOM 1 (X4) still its normal size. ? during playback. normal playback or The square frame will be displayed in the centre of picture. If no button is pressed for more than 10 the seconds, the square frame will disappear. ? Each press of the ZOOM button in the left sequence.
PAGE 26 ADVANCED OPERATION Program play The DVD receiver the order you Note: plays specify. Program play the tracks function is on the disc in Press PROGRAM 1 during playback stop or mode. possible only The program with audio CDs. It does not work with DVD playback screen appears on the TV screen. movie discs. Program Step 1 Total Time 00:00 Clear All ? To exit the screen, press PLAY or PROGRAM. Press D/E/F/G and press the numeric to select the desired track number.
ADVANCED OPERATION Playback PAGE 27 with MP3 To 4 play Load 1 MP3 file an MP3 disc. an The MP3 menu is displayed. MP3 2,3 2,4 Program ABCD MP3-1 MP3-2 MP3-3 MP3-4 MP3-5 MP3-6 MP3-7 To play MP3 file an repeatedly If you press REPEAT button the current MP3 file will play MP3-8 during play, repeatedly. If you press REPEAT button twice during play, the directory will play repeatedly. MP3-9 once Press D/E buttons to select the 2 MP3 files that you want to then press ENTER.
PAGE 28 ADVANCED OPERATION Playback with MP3 (Cont'd) To program play MP3 file an 1 Follow steps 1 to 2 2 Select an previous page. on MP3 file to program with D/E. MP3 Program MP3-1 34 .. TRACK_1 TRACK_2 TRACK_3 TRACK_4 TRACK_5 TRACK_6 TRACK_7 2, TRACK_8 44 3 Clear All Press PROGRAM button to add the program list. MP3 an MP3 file to Program MP3-1 TRACK_2 TRACK_7 ..
RADIO OPERATION Presetting You can Before preset the radio stations 30 stations for FM and AM. that you have tuned down the volume to the minimum. tuning, PAGE 29 make 1 sure Press FUNCTION ly or FM 2 3 FM/AM on on the front AM appears in the or panel repeated- the Remote control until the window. display And then every time you press FM/AM, FM and AM changes alternately.
PAGE 30 RADIO OPERATION to the radio Listening Preset radio stations in the DVD receiver's ory first (see "Presetting previous page). radio stations" on mem- Press FM/AM until AM 1 the display FM appears in the or window. The last received station is tuned in. Press PRESET D 2 12 tunes in to select repeatedly one preset station at a time. Adjust the volume by rotating VOLUME on front panel or pressing VOLUME D or E repeatedly. 3 3 or E the preset station you want.
SOUND OPERATION Selecting a PAGE 31 Sound Mode You can enjoy surround sound simply by selecting one of the pre-programmed sound fields according to the program you want to listen to. Press SOUND MODE 1 until the repeatedly sound mode you want appears in the window. See the table below for information display each sound on mode. For your reference ? The DVD Receiver memorizes the last sound mode selected for each program source.
PAGE 32 Enjoying SOUND OPERATION the Surround Effect Constituent Elements DTS Digital Surround, Dolby Digital and Dolby Pro Logic are enjoy the 3-dimensional sound effect with video image. And you need to use the devices as the following. used to ? Use the Hi-Fi Stereo VCR to ? Use the play the program sizes TV monitor for large sources. high quality video image. ? Use the program sources marked with DTS Digital Surround ( VIDEO TAPE (e.g. LD, DVD, Surround ( ) etc.
SOUND OPERATION PAGE 33 Delay Time Setting In Dolby Digital or Dolby Pro Logic mode it is Delay Time Setting assumed that the interval from the listener to each speakers or rear er is same. left and But if the interval from the center right speakers to the listener is clos- than the interval from the listener to the front left and right speaker, the sound of center or rear left right speaker will reach first than the sound of the front speakers to the listener.
PAGE 34 Setting SOUND OPERATION the Sound Level Setting 1 2 the sound level of the desired channel Press LEVEL. The LEVEL indicator will appear in the Press F/G to select a display desired window. speaker Each time you press the F/G button, it is the following order; to set. changed as FL (Front Left) → C (Center) → FR (Front Right) → (Surround Right) → SL (Surround Left) → SW (Subwoofer) → FL (Front Left) On the 2 channel stereo mode, you can only select the SW (Subwoofer).
INITIAL SETTINGS Selection of initial PAGE 35 settings Once the initial settings have been completed, can always be operated under the same conditions (especially with DVD discs). The settings will be retained in the memory until they are changed, even if the power is switched Selection of initial settings the DVD receiver 1 Press SET-UP in the stop The SET-UP menu is or playback mode. displayed. off.
PAGE 36 Selecting INITIAL SETTINGS disc languages This is to select the audio soundtrack language, language used in title menus or DVD menus which will always be used for every disc to be played back. subtitle language and the At the setup screen, press D/E to select 1 "Disc Audio" and press G.
INITIAL SETTINGS Selecting rating This is to prohibit DVDs which are the level and playing of password specified unsuitable for children. Some DVD discs contain a which enables remove scenes or parents to Selecting rating restriction level 1 prevent playback of discs by children. DVD receivers are designed to equipped with a PAGE 37 level (DVD only) At the SET-UP screen, press D/E to select "Rating" and press G. password prevent children from changing the level.
PAGE 38 INITIAL SETTINGS Selecting rating level and password (Cont'd) Setting your password (DVD only) If you change the rating level to "7" or lower, you must enter a 4-digit "password" to prevent playback of discs with higher ratings. At the SET-UP screen, press E to select 1 "Password" and press G. Disc Audio 2,3 Disc Subtitle New ------------ Disc Menu Rating Password TV Aspect Menu Language 2,3 1 2 Input 3 Input a 4-digit password and press ENTER.
INITIAL SETTINGS Selecting Select the TV PAGE 39 Aspect appropriate screen your TV set; conventional size wide-screen (16:9). type according screen (4:3) to 1 or At the SET-UP screen, press D/E to select "TV Aspect" and press G. Disc Audio 4:3 Letterbox Disc Subtitle 4:3 Panscan Disc Menu 16:9 Wide Rating Password TV Aspect Menu 2 Language Press D/E to select the desired press ENTER.
PAGE 40 Selecting Selects on INITIAL SETTINGS Menu language the TV. Language for SET-UP menus and displays 1 At the SET-UP screen, press D/E to select "Menu Language" Disc Audio English Disc Subtitle German Disc Menu Russian Rating Polish Password Hungarian TV Aspect Menu 2 1, 22 and press G. Language Press D/E to select the desired press ENTER.
INITIAL SETTINGS Table of Enter the Language appropriate Code and Their Abbreviations code number for the initial Language PAGE 41 Code settings "Audio", Language "Subtitle" and/or "Menu" Code Language (See page 36).
PAGE 42 Disc REFERENCE Requirements/Copyright Information Discs Playable This DVD receiver can play back the following Disc mark discs. Disc size Contents 12 cm Audio+Video DVD video discs (moving pictures) 8cm 12 Audio CDs cm Maximum playback Approx. 4 hours Approx. 8 hours Approx. 80 minutes Approx.
REFERENCE Before Calling Service Personnel Symptoms Check the following guide for the possible cause of a and Correction problem before contacting service. Cause Symptom Correction No power. ? The power cord is disconnected. ? The power is on, but the DVD receiver does ? No disc is inserted. ? the power cord into the wall outlet Plug securely. Insert disc. a (Check ? The TV is not set to receive DVD signal ? output.
PAGE 44 Before REFERENCE Calling Service Personnel (Cont'd) Symptoms Cause Symptom Recording cannot be and Correction ? done. The components are Correction connected ? Connect the components correctly. incorrectly. ? The is selected in source correctly. ? Select the source ton (CD/DVD, Tuner). Radio stations cannot ? The antennas are connected poorly. with FUNCTION but- VIDEO 1, VIDEO 2 ? Connect the antenna ? Adjust or securely. be tuned in.
REFERENCE PAGE 45 Specifications Power Power [Genral] [CD/VD] [Video] [Tuner] AM F(MMW) [Amplifer] AC 220-240V, 50/60Hz supply consumption 70W Mass 10.2 lbs External dimensions (W x H x D) 360 (4.6 kg) 82 x x 388 mm (14.2 X 3.2 X 15.
P/NO: 3834RS0031L