MOSCOW_DA-W6100D_ENG-D029P DVD HOME CINEMA WIRELESS SPEAKER SYSTEM OWNER'S MANUAL MODEL : DA-SW6100 DA-W6100X, FE-6100TE, FE-6100CVE, FE-6100WE, ACC-W6100, FA-W6100SL, FA-W6100SR CD-R/RW Before connecting, operating please read this instruction booklet The working purchase. life of this product or adjusting this product, carefully and completely.
Safety Precautions CAUTION RISK OF ELECTRIC SHOCK DO NOT OPEN WARNING: TO REDUCE THE RISK OF ELECTRIC SHOCK DO NOT REMOVE COVER (OR BACK) NO USER-SERVICEABLE PARTS INSIDE REFER SERVICING TO QUALIFIED SERVICE PERSONNEL. This lightning flash equilateral triangle with arrowhead within symbol is intended to alert the user an to the presence of uninsulated dangerous voltage within the product's enclosure that may be of sufficient magnitude to constitute a risk of electric shock to persons.
Table of Contents TimeSearch........................23 Introduction Zoom..............................24 SafetyPrecautions.........................2 MarkerSearch.......................24 TableofContents..........................3 BeforeUse..............................4-5 SpecialDVDFeatures....................24 TitleMenu..........................24 PlayableDiscs...........................4 DiscMenu..........................24 Precautions.............................5 CameraAngle..................
Before Use Playable Disc-related terms Discs Title The main film content (8cm/12cmdisc) or (VCD) (8cm/12cmdisc) you to locate it Audio CD Chapter (DVD only) Sections of a picture (8cm/12cmdisc) In addition, this unit can or play CD-R a or Depending ment CD-RW that MP3 files. on discs cannot be -- The unit cannot data, no itself, recording equip- some played on the unit. play the CD-R/RW CD-R/RW enabling easily.
Before Use (Cont'd) Precautions Notes the unit Handling on Handling Discs discs When Do not touch the The Hold the disc shipping the unit original shipping carton and packing materials come in handy. For maximum protection, re-pack the unit as it was originally packed at the factory. get on playback side of the disc. edges so that fingerprints the by will not INTRODUC the surface. Do not stick paper or tape the disc.
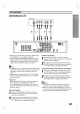
Front Panel and Display Window SKIP/SEARCH STOP (TUNING/SKIP) (MEMORY/CLEAR) buttons button PAUSE button PLAY button OPEN/CLOSE button ENTER button VOLUME controller MONO/STEREO button PHONES connector FM/AM button FUNCTION button POWER button and indicator Sound mode Repeat playback indicator mode indicators TUNED indicator SLEEP indicator PROGRAM indicator Chapter/Track number indicator STEREO indicator MUTE indicator Title number indicator PLAY/PAUSE indicator Angle Disc indicator 6
Remote Control MUTE button FM/AM button POWER button INTRODUC VIDEO 1/2 buttons CD/DVD button TEST TONE button OPEN/CLOSE button ? LEVEL button ? DELAY button BY-PASS button NUMERICAL buttons SOUND MODE button DOLBY PROLOGIC II button REPEAT button MARKER button SEARCH button SLOW SCAN(+/-) buttons on a in GUI MENU highlighting menu a selection screen, TITLE and (+/-) the on DVD video AUDIO button ZOOM button DISPLAY button button PAUSE button STOP button ? PLAY button (Q / R
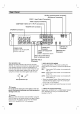
Rear Panel FM 75Ω Coaxial Antenna Connector AM Antenna Connectors VIDEO 1 (Input/Output) VIDEO 2 COMPONENT VIDEO OUT (Y Pb Connectors (Input) Pr) Connectors Connectors WOOFER OUT Connector SPEAKER Connectors Connect to an AC 50/60Hz outlet OPTICAL IN S-VIDEO OUT POWER CORD Connector Connector 220-240V, only. VIDEO OUT SELECTOR MONITOR OUT Switch Connector Refer to explanation below**. VIDEO SELECTOR Switch Refer to explanation below*.
Connections Connecting to a TV Rear of TV S-VIDEO COMPONENT VIDEO INPUT INPUT Pr Pb Y Make one of the following connections, depending capabilities of your existing equipment. When using the COMPONENT VIDEO OUT jacks, on set the VIDEO OUT SELECTOR switch to COMPO- the S-VIDEO OUT jack, Connect the S-VIDEO OUT 1 Receiver to the S-Video in optional 2 your TV and other equipment you wish are various ways you could connect on connect, there the player.
Connections Connecting to (Cont'd) Optional Equipment Connect a TV(Monitor) Connect a VCR to the VIDEO 1 connectors. to the MONITOR OUT Connect a additional VCR to the VIDEO 2 connectors. Connect an optical output of DVD or S-VIDEO OUT connector. Player (or Digital Device etc) to the OPTICAL IN connector.
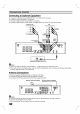
Connections the Front Assembling The front (Cont'd) speakers are Speaker detached from the speaker stands. Connect the speakers speaker cords and speaker stands to the assemble the front as How to connect the front When you do not use Connect the cords to the on speaker illustrated. speakers the Wireless Assembling To attach the wireless Speaker speaker to the stand Connect the and screw, speaker as to the stand using the screwdriver PREATION illustrated.
Connections (Cont'd) Speaker System Connection Connect the speakers to the front (right, left) or center speaker connectors. Connect the subwoofer to the woofer connector. Connect the power cord of the wireless speaker to the outlet, then press the power button on the wireless speaker. Connect the adaptor (DC 7V) to the outlet and transmitter. ground cable to the transmitter and rear (right, left) speaker connectors. distance between this unit and wireless speaker (right, left) within 10m.
Connections (Cont'd) Speaker System Connection (Cont'd) Connect the speakers using the supplied speaker cords. possible surround sound, adjust the speaker parameters (distance, level, etc.). To obtain the best Front Front Speaker (Right) Speaker (Left) FE-6100TE FE-6100TE If you feel lack of bass Connect an PREATION frequency active subwoofer to the WOOFER OUT connector using a monaural audio cord When you connect an active disconnect the woofer from the (not supplied).
Before Operation Speaker Positioning position use the 6 speakers (2 front speakers, center speaker, 2 rear speakers and subwoofer). If you want to play the excellent bass sound, DTS digital surround or Dolby Digital surround, you should connect a When subwoofer. a In the case of normal Front speakers According to your listening position set up the speakers for equal distance. And by hearing position set up the interval between speakers to 45 degree. ? Center ? height.
Before Operation (Cont'd) Sound Mode You surround sound enjoy pre-programmed can of the (Except AM) Note simply by selecting according to the one sound fields program you want to listen to.
Before Operation (Cont'd) Center Delay Time Setting In Dolby Digital Dolby or Pro Logic mode it is assumed that the distance from the listener to each of the ers is equal. center If not then or rear neously by setting speakers the delay speak- times of the the sound will be heard simulta- The interval from the speakers to the listener.
Before Operation (Cont'd) 3 Caution: Before using the remote control, press the DVD button to select the device to be General This manual or TV numbers operated. Temporary the basic instructions for operating the DVD Receiver. Some DVDs require specific operation or allow only limited operation during playback. When this occurs, the symbol appears on the TV screen, indicating that the operation is not permitted by the DVD Receiver or On-Screen Display The general playback screen.
Before Initial You Operation (Cont'd) set your can Menu Settings Select Personal Preferences own on the you receiver. Initial 1 General Settings Language see setup menu. Operation Disc Audio English Disc Subtitle German Disc Menu Russian Rating This is the menu Polish Country TV menu setup when you press SETUP. Press SETUP. The for the language a appears.
Before Operation (Cont'd) Parental Control Rating Movies DVDs may contain on 1 to scenes not suitable for Therefore, discs may contain Parental Control information that certain DVD Enter the code of DVD children. Code Country to the applies 8, and alternatively, able for selection complete the disc. These scenes on more on some suitable discs.
Operation the radio stations Presetting You can ing, make preset sure with Radio 30 stations for FM and AM. Before tun- that you have tuned down the volume to Preset radio stations in the DVD receiver's memory first radio stations" on the left side). (see "Presetting the minimum.
Operation with Radio (Cont'd) Sleep Timer Setting You a can set the DVD receiver to turn off 1 2 at source other units connected to the can use VCRs VIDEO1, VIDEO2 or connectors or Optical connector. supplied with the unit for further information on the operation. Press VIDEO1 or VIDEO2 repeatedly on the remote control to select the desired input source. Refer to the owner's manual Press SLEEP to set the desired The SLEEP indicator and play automatically time.
Operation Playing to play VCD2.0 DVD Note VCD1.1 the TV and select the AV on General Features DVD and Video CD a Getting Switch with DVD and Video CD input source con- Unless stated, all operations described remote control nected to the DVD receiver. the When you want to enjoy the sound of discs or from the audio system, turn on the audio system and using select the Moving input source connected to the DVD receiver. use.
with DVD and Video CD Operation General Features Still Picture and VCD2.0 DVD 2 You can To go into PAUSE mode. advance the picture frame by frame on a sequence in A- appears by press- the remote control. briefly VCD2.0 DVD A-B appears VCD1.1 1 Press and hold SKIP . onds The will now or > repeatedly to select required speed: mX2, mX4, mX16, mX100 (backward) or MX2, MX4, MX16, MX100 (forward). With a Video CD, the Search speed changes: mX2, mX4, mX8 (backward) or MX2, MX4, MX8 (forward).
with DVD and Video CD Operation General Features Zoom VCD2.0 DVD VCD1.1 during playback or still playback If you press ZOOM repeatedly, the increases up to six times. discs: Menus to acti- buttons to zoomed through move normal resume playback the or DVDs may contain menus that allow you to access special features. To use the disc menu, press MENU. Then, press the appropriate numerical button to select an item. Or, use the buttons selection, then press ENTER. picture.
with Audio CD and MP3 Disc Operation Playing Audio CD and MP3 disc an The DVD Receiver CD-R CD-ROM, Before recordings on onds The read the notes of MP3 recordings, page 27. CD 1 Press and hold SKIP . CD-RW discs. or MP3 playing Recordings on MP3 format play can Search or > for about two sec- during playback. player will now go into SEARCH mode. 2 Press and hold SKIP . or > to select repeatedly the Insert 1 The disc and close the tray. appears on the TV screen.
Programmed Playback Programmed Playback MP3 CD with Audio CD VCD2.0 Note Program allows you to store your favorite tracks for particular disc in the receiver memory. contain 32 tracks (Audio CD) or On a The 2 is displayed Press PROGRAM mode to enter the on E the on the TV Video CD with to menu PBC, you the use must set PBC to Off on the function. See page 18. Program 60 tracks Insert Video CD and close the tray. 1 menu The a setup Insert the disc and close the tray.
Additional Information Last Condition DVD Notes Memory VCD1.1 CD on MP3 Discs About MP3 This DVD receiver memorizes the last condition for the An MP3 file is audio data last disc you have watched. Settings remain in memory even if you remove the disc from the DVD-receiver or the audio switch off the The DVD receiver have the If you load a disc that has its setthe latest stop position is automatical- player. tings memorized, ly recalled.
Troubleshooting Check the following guide for the possible cause of a before problem Cause Symptom Correction No power. ? The power cord is disconnected. ? The power is on, but the DVD receiver does ? No disc is inserted. ? Plug the power securely. Insert disc. a cord into the wall outlet (Check ? The TV is not set to receive DVD signal ? output. Select the on the TV The video cable is not connected ? securely.
Troubleshooting (Cont'd) Cause Symptom Recording is not possi- ? ble The components are Correction connected ? Connect the components correctly. incorrectly. ? The source is selected in correctly. ? Select the source ton (CD/DVD, Tuner). Radio stations cannot ? be tuned in. The antenna is positioned or connected with FUNCTION but- VIDEO 1, VIDEO 2 ? Connect the antenna ? Adjust or REF NC securely. poorly. the antennas and connect an external antenna if necessary.
Language Code Enter the (See appropriate 18).
Country Code Enter the appropriate List code number for the initial setting "Country Code" (See page 19).
Specification Power Power [Genral] External dimensions H x x D) kg 360 x 72 350 x Laser Semiconductor Signal system Frequency response (audio) Signal-to-noise ratio (audio) Dynamic range (audio) Harmonic distortion (audio) Video input PAL output video mm 5°C to status: Horizontal 35°C, Operation 5% to 85% output Component output laser, wavelength 625/50, NTSC 525/60 650 nm 4 Hz to 20 kHz More than 75 dB (1 kHz, NOP, 20 kHz LPF/A-Filter) More than 70 dB (1 kHz, at 12W posit