DAT-150P_JA4MSLS_ENGLISH DVD Home Cinema System with STB OWNER'S MANUAL MODEL : DAT-150 (Main Unit: DAT-150P, Speakers: FE-150TE, FE-150CVE, FE-150WE) CD-R/RW Before connecting, operating please read this instruction booklet or adjusting this product, carefully and completely.
Safety Precautions CAUTION RISK OF ELECTRIC SHOCK DO NOT OPEN WARNING: TO REDUCE THE RISK OF ELECTRIC SHOCK DO NOT REMOVE COVER (OR BACK) NO USER-SERVICEABLE PARTS INSIDE REFER SERVICING TO QUALIFIED SERVICE PERSONNEL. This lightning flash equilateral triangle with arrowhead symbol is intended to alert the within user an to the presence of uninsulated dangerous voltage within the product's enclosure that may be of sufficient magnitude to constitute risk of electric a shock to persons.
Table of Contents Introduction SafetyPrecautions.........................2 TableofContents..........................3 BeforeUse..............................4-5 PlayableDiscs...........................4 Precautions.............................5 NotesonDiscs..........................5 AboutSymbols..........................5 .6 FrontPanelandDisplayWindow. . . . . . . . . . . . GeneralExplanation........................26 On-ScreenDisplay.......................26 InitialSettings...................
Before Use Disc-related terms Discs Playable Title The main film content (8cm/12cmdisc) or (VCD) (8cm/12cmdisc) you to locate it Audio CD Chapter (DVD only) Sections of a picture (8cm/12cmdisc) In addition, this unit can or play a CD-R or Depending CD-RW that MP3 files.
Before Use (Cont'd) Precautions Notes the unit Handling on Handling shipping the unit original shipping carton and packing materials come in handy. For maximum protection, re-pack the unit as it was originally packed at the factory. Discs discs When Do not touch the The Hold the disc get on by playback side of the disc. edges so that fingerprints the will not INTRODUC the surface. Do not stick paper or tape the disc.
Front Panel and Display Window SKIP (-/+) buttons STOP button PAUSE button PLAY button Display Window OPEN/CLOSE button REPEAT button VOLUME controller PROGRAMME (+) button PHONES connector PROGRAMME (-) button FUNCTION button STANDBY/ON button and indicator Sound mode indicator MUTE indicator SLEEP indicator Repeat playback mode indicators PROGRAM indicator Chapter/Track number indicator Title number indicator PLAY/PAUSE indicator Angle Disc indicator 6 icon indicator Total Delay
Remote Control POWER POWER button FUNCTION OPEN/CLOSE OPEN/CLOSE button FUNCTION button MUTE SLEEP INTRODUC DIMMER DIMMER button MUTE button SLEEP button NUMBERED buttons TV DISPLAY TV button DISPLAY button VOLUME VOLUME ( VOLUME )button PLAY SKIP ( ) PAUSE SKIP PROGRAM button ? ? LEVEL button ? DELAY button ? REPEAT SOUND MODE screen on LEVEL DELAY SOUND MODE button ? PR ENTER PR SET UP MENU ? MENU button ? ANGLE/( ) button X button TITLE/( ) S-TITLE/ ANGL
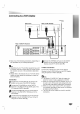
Rear Panel AERIAL Connector AUDIO MONITOR OUT OUT Connectors (L/R) (Progressive scan) PC-IN (RGB) Port Port S-VIDEO IN Connector AV3/S-VIDEO AUDIO AUDIO (L/R) (L/R), AV3 Connectors AV1 IN/OUT Connectors SPEAKER Connectors IN PC-IN(RGB) / (R) AUDIO (L/MONO) L AV3 AUDIO MONITOR OUT (PROGRESSIVE SCAN) AV1 S-VIDEO R OUT OUT L S-VIDEO (R) AUDIO (L/MONO) AV2 IN AV3 IN AUDIO IN R PC-IN (STEREO) S-VIDEO OUT Connect to an STEREO (DVD ONLY) STEREO OUT Connector POWER CORD 50/6
Connections to a PDP Connecting Display Rear of PDP Rear of PC RGB OUTPUT RGB INPUT PC STEREO OUT (SVGA) Display STEREO IN (SVGA) PREATION S-VIDEO IN T P P S R R Rear of DVD/TV Receiver IN L AV3 PC-IN(RGB) / (R)AUDIO (L/MONO) MONITOR OUT PROGRESSIVE AUDIO S-VIDEO R OUT (R) AUDIO (L/MONO) AV2 OUT S-VIDEO IN AV3 IN Make of the one capabilities following connections, depending existing equipment.
Connections (Cont'd) to Video Connecting Equipment Rear of DVD/TV Receiver IN L AV3 PC-IN(RGB) / AUDIO (L/ (R AUDIO MONITOR OUT (PROGRESSIVE SCAN) A1 ONO) S-VIDEO R OUT DIO (L/ (R O) OUT S-VIDEO IN AV3 IN AERIAL/ANT.IN R IN PC-IN (STEREO) A L AUDIO (VIDEO) V S-VI OUT (DV Y) STEREO V A Rear of DVD Rear of VCR player DIGITAL OUT (L) AUDIO OUT AUDIO OUT 5.
Connections Connecting to (Cont'd) Optional Equipment Rear of TV (L) AUDIO (R) VIDEO S-VIDEO IN INPUT IN AUDIO INPUT R L VIDEO PREATION INPUT L A V Rear of DVD/TV Receiver L AV3 IN NO) MONITOR OUT PC-IN(RGB) (PROGRESSIVE SCAN) AUDIO / AUDIO (L/M A S-VIDEO R OUT (R)AUDIO (L/MONO) OUT AV2 IN L S-VIDEO IN AV3 AUDIO AERIAL/ANT.
Connections Assembling The front and front and rear (Cont'd) and Connecting to the Speakers (FE-150TE) speakers are detached from the speaker speakers from speaker stands as illustrated. rear stands. Connect the speaker How to connect the cords and assemble the Speakers When you do not use Connect the cords to the nals on speaker the stand termi- appropriate the bottom face of each front and rear speaker.
Connections (Cont'd) Speaker System Connection (FE-150TE, FE-150CVE, FE-150WE) Connect the speakers using To obtain the best possible the supplied speaker surround sound, cords. adjust the speaker parameters (distance, level, etc.). PREATION Front Front speaker (Left) speaker (Right) Centre speaker L AV3 IN MONITOR OUT PC-IN(RGB) / (R) AUDIO (L/MONO) (PROGRESSIVE SCAN) AUDIO AV1 S-VIDEO R OUT (R) AUDIO (L/MONO) AV2 OUT L S-VIDEO IN AV3 AERIAL/ANT.
Connections (Cont'd) Speaker Positioning In the case of normal If you want to woofer. play position use the 6 ? Front speakers According to your listening position, ? Centre speaker Ideally, the centre or ? speakers (2 front speakers, centre speaker, 2 rear speakers and subwoofer).
Sound Mini Adjustments for Sound Mode Glossary Allows you to enjoy 5.1(or 6) discrete channels of high quality digital audio from DTS program sources bearing the trademark such as discs, DVD and compact discs, etc. DTS Digital Surround delivers up to 6 channels of transparent audio(which means identical to the nal masters) and results in LLC. Manufactured under The Dolby Digital play DVDs with 360 degree sound field.
Sound Adjustments (Cont'd) Sound Mode You of the ote surround sound enjoy pre-programmed can simply by selecting according to the one sound fields only displayed Each time you press SOUND MODE button, the sound changed in the following order; mode is (Present mode) → HALL1 → HALL2 → THEATER button, the sound mode of Pro following order; PLII MOVIE → sampling frequency, (sampling fre- Sound Level You 1 Each time you press Logic II is changed in the DOLBY PL → tracks with 96kHz
Sound Delay In Adjustments (Cont'd) Time Dolby Digital Setting or Pro Dolby Logic mode it is assumed that the distance from the listener to each of the ers is equal. center If not then or rear neously by the setting delay speak- times of the the sound will be heard simulta- speakers the listener.
Before Operation Sleep Timer You set the DVD/TV Receiver to turn off automati- can at cally a Setting specified time. The SLEEP indicator and time. sleep time appear in the sleep Display window. Each time you press SLEEP the in the following order. 2 setting changes can displayed in the Display Window and it will count down until the time has PAUSE AUTO: Select when DVD/TV Receiver is connected to NTSC: Select when DVD/TV Receiver is connected to PAL-TV. system TV.
Before Operation (Cont'd) Tuner Set The receiver needs to memorise all necessary stations in programme positions in order to receive TV pro- 5 Press ENTER and press D E to select Start. or grammes. You may tune up to 100 TV stations into your DVD/TV Receiver. Caution: on the Receiver and the TV (or monitor), and press FUNCTION or TV on the remote control to select the Television mode. Turn Tuning 1 in TV Stations 6 tuning process. Automatically Press MENU. The menu appears on the screen.
Before Operation (Cont'd) in TV Stations Tuning Store stations that tuning 1 were Manually not stored during Automatic 5 Press MENU. menu appears on the or E to select Channel and press G. System process. The Press D Channel V/UHF Fine Cable 40 Search screen. Name Storage 0-9 6 2 Press D or Press D or ENTER MENU E to select band and the input channel number of station that you want to tune with the numbered buttons and press ENTER.
Before 9 Operation (Cont'd) Press MENU and press D or E to select Name and press G. Press D 10 ters, 12 Input the programme position that you want to store with the numbered buttons and press ENTER. E to or cycle through PREATION the charac- then press G. Enter the remaining characters the same way (maximum of 5). After all characters, press ENTER. 13 Press MENU twice to return to normal screen.
Before Operation (Cont'd) To Edit Programme This feature allows you to Delete, from memory manually. 1 Copy, Move or Skip menu appears on the programme number (Cyan) on which is selected programme will be into cyan. Press MENU. The Skip Press D/E/F/G to select a desired programme the programme list. 2 Press Coloured button in Cyan and the colour 1 screen. changed ote The skipped using 4 2 Press D E to select or Programme edit.
Before Operation (Cont'd) Language Selection The choices language or Spanish Italian 1 English, Deutsch, French, language menu. are in the menu appears The stored programmes screen, and Press MENU. The Checking and Selecting Programmes on the can E to select Programme - - - List appears on the PREATION screen. 6S05 2C03 7C04 3 8C06 BBC 9C08 Language. 2 - - - 6S05 2C03 7C04 3 8C06 BBC 9C08 ENTER orE toselectthe 3 Programme.
Before Operation (Cont'd) TOP text Teletext Teletext (or TOP is text) an those with the teletext only therefore optional function, system receive the tele- can text broadcast. Teletext is which a free service broadcast gives up-to-the-minute most TV stations by information on topics. The teletext decoder FASTEXT of can user guide displays four fields-red, green, yellow and cyan at the bottom of the screen.
Before Operation (Cont'd) Special Teletext Functions HOLD REVEAL ? Press this button to tion, such as display solutions of riddles Press this button tion from the concealed informa- again display. to or remove puzzles. the informa- Stops occur the automatic page change which will a teletext page consists of 2 or more if sub pages. The number of sub pages and the sub page displayed is, usually, shown on the screen SIZE pressed Selects double left-hand Press this height text.
Before Operation (Cont'd) Before the remote control, press FUNCTION to select the DVD/TV. using General This manual The Temporary the basic instructions for TV screen. Some items On-screen 1 2 status be the of setting an item. be also be used for number). For some setting functions, setting.
Before Initial You Operation (Cont'd) set your can Picture Settings Personal Preferences own on the TV Aspect 4:3 Letterbox: Select when DVD/TV Receiver. nected. Initial 1 General Settings setup Displays a standard 4:3 TV is theatrical images picture. above and below the Operation 4:3 Panscan: Select when with menu Either appears.
Before Operation (Cont'd) Parental Control Rating DVD Enter the code of DVD Movies on DVDs may contain scenes not suitable for children. Therefore, discs may contain Parental Control information that applies to the complete disc or to certain Code Country the disc. These scenes on scenes are to have certain discs played Disc Audio 8 Disc Subtitle 7 Disc Menu 6 Rating Country TV Disc Menu Rating are Code Country TV Aspect Menu Language Others scenes.
with DVD and Video CD Operation Playing a Getting Switch to DVD and Video CD play VCD2.0 DVD VCD1.1 the TV and select the AV on General Features input ote source con- nected to the DVD/TV Receiver. When you want to enjoy the sound of discs or from the audio system, turn on the audio system and select the input source connected to the DVD/TV Receiver. Unless stated, all operations described are based on remote control use. Some operations can be carried out the using setup Moving menu.
Operation with DVD and Video CD General Features Still Picture and VCD2.0 DVD 1 Press PAUSE 2 You can Repeat (cont'd) To during playback. go into PAUSE mode. advance the picture frame by frame pressing PAUSE AB repeat a A- appears by sequence in briefly VCD2.0 DVD A-B appears VCD1.1 1 Press and hold SKIP . onds again 2 Press and hold SKIP . or > repeatedly to select required speed: mX2, mX4, mX16, mX100 (backward) or MX2, MX4, MX16, MX100 (forward).
with DVD and Video CD Operation General Features Zoom VCD2.0 DVD (cont'd) VCD1.1 during playback or still playback If you press ZOOM repeatedly, the increases up to six times. discs: Menus to acti- buttons to zoomed through selection, then press ENTER. the picture. 3 Press CLEAR to the move normal resume playback or DVDs may contain menus that allow you to access special features. To use the disc menu, press MENU. Then, press the appropriate numerical button to select an item.
with Audio CD and MP3 Disc Operation Playing an Audio CD and MP3 disc The DVD/TV Receiver can CD-ROM, CD-R Before playing MP3 CD-RW discs. on Recordings or play recordings, MP3 format recordings CD 1 Press and hold SKIP . onds or > for about two sec- during playback. The DVD/TV Receiver will read the notes of MP3 page 34. on Search now 2 Press and hold SKIP . go into SEARCH mode. or > to select repeatedly the Insert 1 The disc and close the a menu CD tray.
Programmed Playback Programmed Playback CD MP3 with Audio CD VCD2.0 ote Program allows you to store your favorite tracks for particular disc in the DVD/TV Receiver memory. contain 32 tracks (Audio CD) The 2 is menu displayed Press PROGRAM on E the on the TV a setup Video CD with PBC, you must set PBC to Off on the menu to use the Program function. See page 27. OPERATION 60 tracks tray. Insert Video CD and close the 2 screen. in the during playback Program Edit mode.
Additional Information Last Condition DVD CD Notes Memory VCD1.1 on MP3 Discs About MP3 This DVD/TV Receiver memorizes the last condition for An MP3 file is audio data the last disc you have watched. Settings remain in memory even if you remove the disc from the DVD/TV MPEG1, the audio layer-3 file-coding scheme. We call files that have the Receiver The DVD/TV Receiver If you load a disc that has its settings memorized, the latest stop position is automatically recalled.
Troubleshooting Check the following guide for the possible of cause problem a before Cause Symptom Correction No power. ? The power cord is disconnected. ? The power is on, but the DVD/TV Receiver ? No disc is inserted. ? Plug the power securely. Insert a disc. cord into the wall outlet (Check that the DVD or, audio CD indicator in the DVD does not work. No service. contacting display is lit.) picture. ? The Monitor (or PDP/LCD) is not set to signal output.
Troubleshooting (Cont'd) Cause Symptom Recording is not possi(External Recording) ? ble The components are Correction connected ? ? The source Connect the turn incorrectly. is selected in correctly. ? on Select the source ton AV 2, AV 3, S-AV, CD/DVD, (AV 1, RGBPC The remote control does not work ? The remote control is not remote properly. ? sensor pointed at the ? of the DVD/TV Receiver.
Language Code Enter the (See appropriate 27).
Country Code Enter the appropriate List code number for the initial setting "Country Code" (See page 28).
Specification Power Power [Genral] [CD/VD] AC 100-240V, 50/60Hz supply consumption 90W Mass External dimensions (W x H x D) [Input/O]Ter kg 360 x 82 x 350 Temperature: 5°C to 35°C, Laser Semiconductor laser, Signal system Frequency response (audio) Signal-to-noise ratio (audio) Dynamic range (audio) Harmonic distortion (audio) PAL 625/50, NTSC 525/60 Amplifer& [Input/O ] [Speakrs] [Suplied Acesori ] Designs Operation status: Horizontal 5% to 85% wavelength 650 More than 75 dB
P/N: 3834RH0024L