DVD PLAYER/ VIDEO CASSETTE RECORDER OWNER'S MANUAL MODEL : DC379 PAL BZ03 Before connecting, operating or adjusting this product, carefully and read this instruction booklet please completely. Internet Address:http://www.lg.
Precautions / Safety notes on Important CAUTION Notes on copyrights: It is forbidden by law to copy, broadcast, show, broadcast via cable, play in public, or rent copyright material without permission. This product features the copy protection function developed by Macrovision. Copy protection signals are recorded on some RISK OF ELECTRIC SHOCK DO NOT OPEN CAUTION: TO REDUCE THE RISK OF ELECTRIC SHOCK DO NOT REMOVE COVER this unit controlling (OR BACK) discs.
Contents Introduction 26-27 Operation with Audio CD and MP3/WMA Disc .26 PlayinganAudioCDandMP3/WMADisc. NotesonMP3/WMARecordings...............26 . SafetyPrecautions.........................2 2 Important notes on controlling this unit. . . . . . . . . TableofContents..........................3 BeforeUse..............................4-5 PlayableDiscs...........................4 . . . . . . . Pause.............................27 MovingtoanotherTrack...............27 RepeatTrack/All/Off...
Before Use Playable Disc-related terms Discs Title The main film content (8cm/12cmdisc) or Video CD (VCD) (8cm/12cmdisc) Audio CD (8cm/12cmdisc) In addition, this unit play can a DVD-R, DVD±RW, Kodak PICTURE CD and CD-R audio titles, MP3, WMA (DVD only) DVD or or CD-RW that contains JPEG files and SVCD also. or accompanying feature content additional feature content, or music album. Each title is assigned a title reference number enabling you to locate it easily.
Before Use (Cont'd) Precautions Storing After the unit Handling When shipping the unit original shipping carton and packing materials come in handy. For maximum protection, re-pack the unit as it was originally packed at the factory. The When the unit setting picture and sound of a nearby TV or radio may be distorted during playback. In this case, position the unit The away from the TV or radio, removing the disc.
Front Panel and Display Window PAUSE( / ) playback temporarily / frame-by-frame playback. Tape Eject Pause press repeatedly Forward Skip/Scan, for Fast-Forward Go to NEXT Press and hold for two seconds for DVD OPEN/CLOSE Opens or ( Insert a Copy Button ) STOP(A) Stops playback. Tray VCR Record disc here. Reverse Press and hold for two seconds for POWER a Switches the fast or Display Select - Channel an PLAY item in the Starts menu Remote Sensor (FGDE).
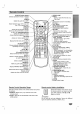
Remote Control DVD/VCR select button Selects operational OPEN/CLOSE EJECT Open or close the the disc mode of remote control. Tape Eject. - POWER Switch this unit ON or AV OFF. TV/VCR Select input into tape. OPEN/CLOSE EJECT POWER Switch between your TV's tuner and the VCR's internal tuner. TV/VCR DISPLAY CLK/CNT Access the On-Screen Display. Shows you the current time or DVD VCR source for recording DISC MENU Access menu of a DVD disc. SELECT/ENTER/OK Acknowledge menu selection.
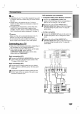
Rear Panel DVD/VCR AUDIO OUT (Left/Right) Connect to receiver an amplifier, COMPONENT VIDEO OUT Connect to a or stereo system. (Y Pb Pr) (DVD inputs. EXCLUSIVE OUT) TV with Y Pb Pr AUDIO OUT Connect to (Left/Right) (DVD EXCLUSIVE OUT) amplifier, receiver or stereo system. an EURO AV2 Connect to AERIAL this Satellite Receiver Video Connect the aerial using a Output or another video recorder. Switch Select either COMPONENT jack.
Connections DVD exclusive out connection Tips Depending your TV and other equipment you wish to connect, there are various ways you could connect the unit. Please refer to the manuals of your TV, Stereo System or other devices as necessary to make the best connections. For better sound reproduction, connect this unit's AUDIO OUT jacks to the audio in jacks of your amplifier, receiver, stereo or audio/video equipment. See "Connecting to optional equipment" on page 10. Caution -- Make to the TV.
Connections Connecting (Cont'd) Optional Equipment to Notes -- Connecting to an amplifier equipped with two channel analog stereo or Dolby Pro Logic II /Pro Logic Connect the Left and AUDIO OUT this Right jacks right in jacks on your amplifier, system, using the audio cables.
Before Tuning Operation in a - VCR part video channel on your TV Notes The output frequency of this video recorder (VCR) is set at UHF channel 36. If channel 36 is already used by another TV station, or if the picture is distorted, you can change the transmitter channel of your VCR. Stages 5 8 will show you how to change the output frequency of your VCR. ~ Your TV receives signals from the video recorder (VCR) like another TV station.
Before Setting Operation the clock - VCR part To set the colour system Manually The clock in your VCR controls time and date settings for your VCR. 1 Press i. 1 Press 1 or 2 to select TIME DATE. Press i. 2 The main 3 Press 1 or Press 3 or 4 Press OK. will appear menu on the TV screen. 2 to select the SYSTEM and press OK. 4 system used. to select according to the COLOUR HHMMDDMMYY -- :. - - -- -- -- --- .
Before How to Operation using VCR part - the main Tuning menu This VCR menus The can easily be programmed by using displayed on screen. menus are the controlled from the Remote Control Handset. 1 2 by pressing menu will appear on the TV screen. is weak your VCR may signal turn to the MANUAL TUNING section on page 14. 1 Press i button. The main If the TV broadcast Automatically not detect the necessary information and will be and to store them correctly.
Before Tuning In certain Operation VCR part - in TV Stations areas Press 2 to select STATION Manually of the country broadcast 5 your signals that you may so name TV station. Press OK. may be too weak for your VCR's automatic tuning process to find or assign TV stations correctly. You must tune in these weaker broadcast stations manually 1 in order for your VCR to store them. Press i.
Before Operation Changing - VCR part the order of TV Stations Deleting After tuning TV stations into your VCR you may wish to change the order in which they are stored without having to retune them against! The instructions given on this page will show you how you can simply move them into your desired order. 1 Press i. The main menu will appear on the TV Press 1 or 2 to select the PR SET. Press OK. TV Stations After tuning TV stations into your VCR you may wish to delete a station.
Before General This manual Operation - DVD part Temporary Explanation the basic instructions for gives operating require specific operation or allow only limited operation during playback. When this occurs, the symbol appears on the TV screen, that the indicating operation is not permitted by this unit or is not available On-Screen The TV general playback screen. 1 2 3 Press 3 or can be highlighted. the change The number buttons (e.g.
Before Initial You - DVD General Settings part Menu Settings set your own Personal Preferences on this unit. can Initial 1 Operation (Continued) Select you Language a see Operation Press SETUP. The setup for the setup language menu. This is the menu when you press SETUP. Disc Audio Russian Disc Subtitle English PREATION Disc Menu menu appears.
Before Operation (Continued) - DVD Sound Digital Others Audio Output Each DVD disc has The DRC, Vocal, PBC and Auto of audio output variety options. player's Digital Audio Output according to the Set the part a type of audio system you use. DOLBY DIGITAL/PCM: Select "DOLBY DIGITAL/PCM" Press 3/4 to select the desired item and press setting of the selected item is changed between On and Off. DTS decoder, MPEG decoder.
Before Operation (Continued) - DVD Parental Control Rating Code Country DVD Enter the code of DVD Movies on DVDs may contain scenes not suitable for children. Therefore, discs may contain Parental Control information that applies to the complete disc or to certain part the disc. These scenes on scenes are country-dependent.
with Operation Playing You will a only tape playback, Shuttle : or still picture press F or G. You can reach the following playback speeds. (-7xplay, -3xplay, -play, still, 1/19 slow, play, 2xplay, 7xplay) Slow motion tape 5 During playing back be able to load and eject video cassettes when your VCR is plugged into the mains. Your VCR may also playback recordings from NTSC To switch off the slow motion and shuttle, press the desired function. tapes (on PAL TV).
Operation with Instant Timer tape Press LP if you wish to record in Recording (ITR) Your VCR allows you to make variety of simple methods: 5 Standard Play. recordings using SP will a Recording (ITR) start recording for a set period of time or until the immediately Your VCR incorporates Long Play (LP) time record up to 180 minutes using Standard Play (SP); using LP you will be able to record up to 360 minutes.
with Operation tape recording using On Screen Display Timer 6 You may set up to seven timer record events within one month of the current date. Press the numbered buttons to enter the recording start and end times of the programme that you wish to record. Please note your VCR uses a 24 hour clock. e.g. 1pm will be displayed as 13:00.
Operation Playing with DVD and Video CD DVD and Video CD a Playback Setup Turn on DVD VCD2.0 the TV and select the video nected to the DVD General Features Note VCD1.1 input source con- player. features may also be available Audio system: Turn on the audio system and select the input source connected to the DVD 1 Moving player. Press OPEN/CLOSE to open the disc Unless stated otherwise, all operations described use the remote control.
with DVD and Video CD Operation General Features Still Picture and VCD2.0 DVD Frame-by-frame playback VCD1.1 player will picture frame-by-frame by pressing PAUSE/STEP repeatedly on the remote control. VCD2.0 DVD the TV screen. a Repeat All icon appears the TV on screen. Repeat mode, press REPEAT a third time. Repeat Off icon appears on the TV screen. 3 To exit The Note VCD1.1 On 1 Press and hold . or > for about two seconds a setup during playback.
with DVD and Video CD Operation General Features Zoom VCD2.0 DVD (continued) VCD1.1 Checking during playback or still playback to acti- vate the Zoom function. If you press ZOOM repeatedly, the increases up to six times. 2 Use the 1 2 zoomed 3 4 buttons to picture. 3 Press CLEAR to resume normal the the through playback or the contents of DVD Video DVDs may contain menus that allow you to access special features. To use the disc menu, press DISC MENU.
Operation with Audio CD and MP3/WMA Disc Playing an Audio CD and MP3/WMA Disc CD MP3 The DVD Notes MP3/WMA Insert 1 play Recordings a files that have The player can not read an MP3 file that has a file extension other than disc and close the tray. About CD; Audio CD menu appears on the TV go to step 4. MP3/WMA disc; The MP3/WMA-JPEG choice menu appears on the TV screen. Go to step 2 screen a technology.
with Audio and MP3/WMA Disc Operation CD Pause MP3 1 Press PAUSE/STEP 2 To return to WMA Repeat during playback. playback, PAUSE/STEP again. press PLAY or To repeat 1 press CD another Track MP3 WMA Press . twice track. case briefly step back to to the previous of audio CD, to go directly to any track, enter using the numbered buttons (0-9) during playback. Repeat Track/All/Off CD MP3 WMA again " appears * on the at your chosen end menu screen. point.
Operation Viewing a with JPEG Disc JPEG disc JPEG Player can play discs with JPEG files and Kodak picture CD. Before playing JPEG recordings, read the notes on JPEG Recordings on right. This DVD 1 Insert a disc and close the TV menu appears on the screen. JPEG menu appears on the TV > once 1 Press PAUSE/STEP during viewing a picture to the previous file. to or screen. JPEG player Folder2 Folder4 now Press 3/4 during showing a picture picture horizontally or a vertically.
Programmed Playback Programmed Playback CD VCD2.0 with Audio CD VCD1.1 function enables you to store your favorite tracks from any disc in the player memory. Program Program with Video CD Note On a setup Video CD with PBC, you must set PBC to Off on the menu to use the Program function. See page 18. contain 30 tracks. can Press PROGRAM 1 WMA Programmed Playback and MP3/WMA Disc The MP3 mode to enter the during playback or in Program Edit mode.
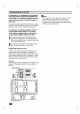
Additional On Screen Operation VCR part - Video Doctor Display You may easily display the current time or tape counter, amount of tape left, day, month, year, day of week, programme channel, tape speed and operational mode of your VCR will appear on the TV screen. If a recording is taking place these On Screen Displays will not be recorded onto the tape. (Self-Diagnosis) This feature informs you that there is a problem with error messages will appear on the TV your VCR. These screen. 1 Press i.
Additional Operation Hi-Fi Stereo Sound - VCR part System 2 playback Hi-Fi stereo sound. digital stereo sound to record and playback the stereo NICAM a 4:3 or back Wide-Screen programmes programmes as normal. and recording Normal format 16:9: another Hi-Fi VCR. digital AUTO, Wide-Screen and Normal Only playing back and recording Wide-Screen recordings (16:9). for format Your VCR's NICAM to select: as Only for playing back recordings (4:3). and two VHS Hi-Fi stereo audio tracks.
Additional Operation Last Condition DVD This CD player - DVD part Memory VCD1.1 memorizes the user settings for the last disc that you have viewed. Settings remain in memory even if you remove the disc from the player or switch off the player. If you load a disc that has its settings memorized, the latest stop position is automatically recalled. Notes -- -- Settings are stored in memory for use any time.
Special Recording Copying from DVD To VCR This unit allows you to copy the contents of VHS tape with a press of the COPY button. Recording from a DVD to a recorder protected, 1 2 to copy is copy not be able to copy the disc. you may 3 Copy a recordings from from another video camcorder. Note following description, this video recorder will be recording and will be referred to as VCR The other appliance will be used for playback and one B. used for will be referred to as VCR A.
Troubleshooting Check the following guide for the possible cause VCR do not or work properly. before problem a service. contacting Cause Symptom DVD of DVD or Correction VCR button is not switched Refer to page 2. properly. No power. The power cord is disconnected. Plug the power securely. The power is on, but the DVD player does not work. No disc is inserted. Insert a disc. (Check that the DVD or, audio CD indicator in the display window is lit.
Language Code Enter the (See appropriate 17).
Country Code Enter the appropriate List code number for the initial setting "Country Code" (See page 19).
Specification General Power requirements AC 110-240V, 50/60 Hz Power consumption 23W Dimensions Mass 430 X 85 X 293 (approx.) 4.8 (approx.
P/NO : 3834RP0104R